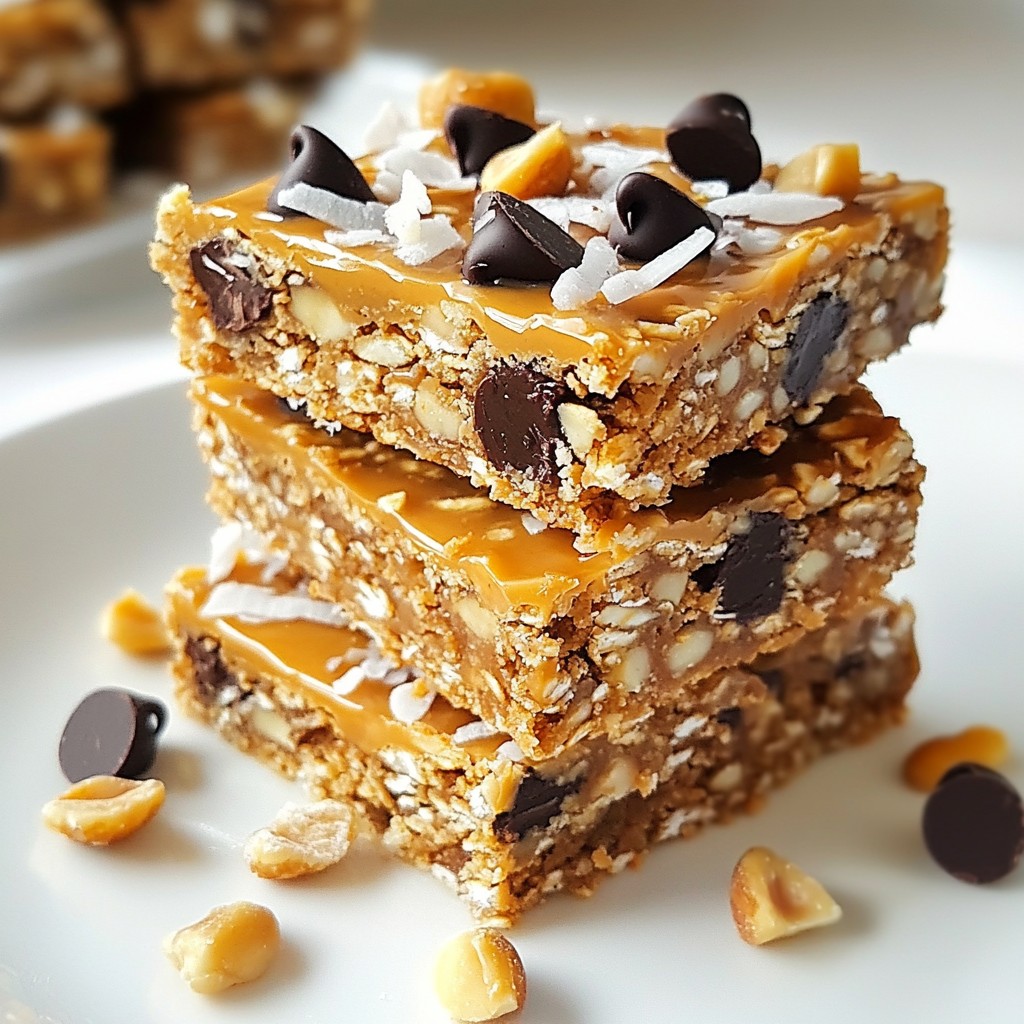
If you're craving a sweet but healthy treat, these no-bake peanut butter oat bars are for you! This simple recipe is quick to make and perfect for snacks, school lunches, or even dessert. With just a few easy ingredients, you can whip up a tasty option that satisfies your sweet tooth. Let's dive into how to make these delicious bars and customize them to fit your taste!
Why I Love This Recipe
- Quick and Easy: This recipe requires minimal time and effort, making it perfect for busy days when you want a healthy snack without the hassle.
- Nutritious Ingredients: Packed with wholesome ingredients like oats, nuts, and peanut butter, these bars offer a great balance of protein, fiber, and healthy fats.
- No-Bake Convenience: No need to turn on the oven! These bars set in the fridge, keeping your kitchen cool and your preparation simple.
- Customizable Delight: Easily modify the ingredients to suit your taste, whether you prefer different nuts, sweeteners, or mix-ins for a personal touch.
Ingredients
List of Main Ingredients
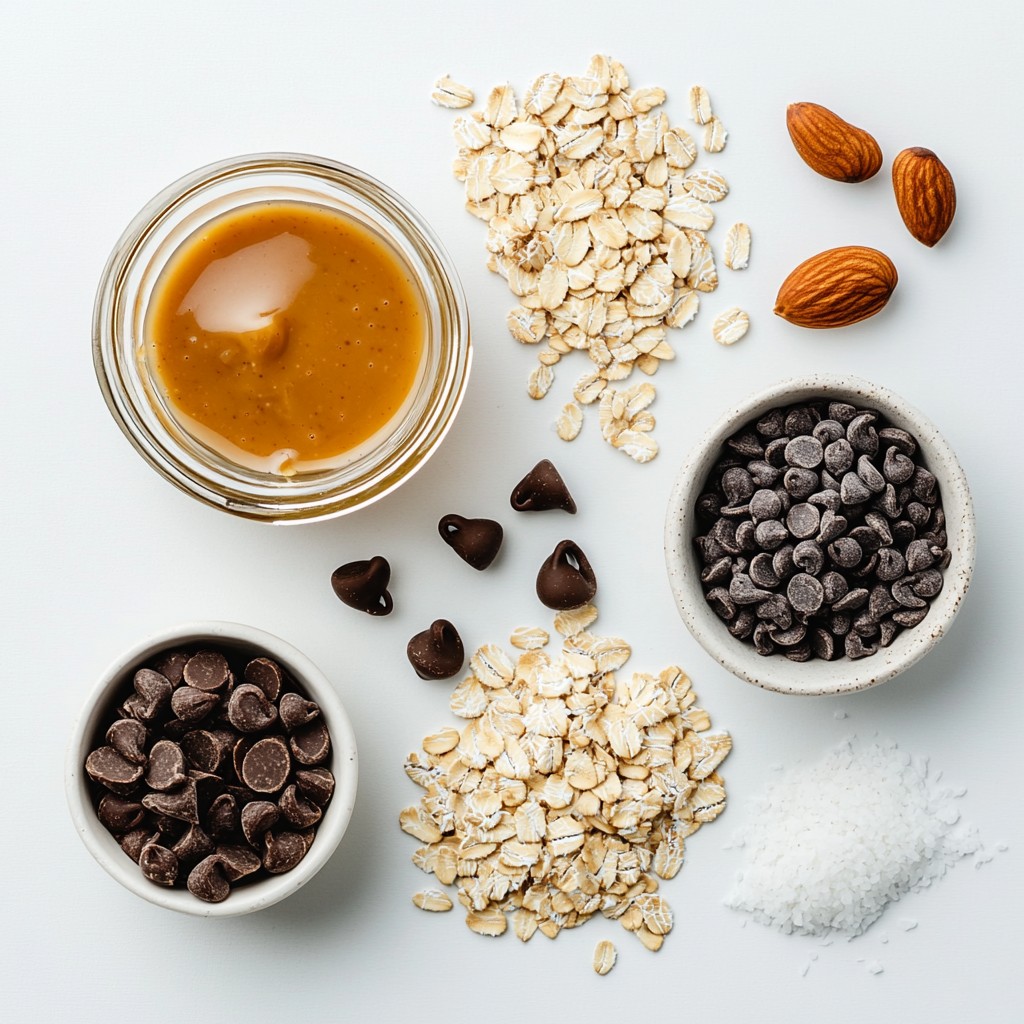
To make these no-bake peanut butter oat bars, you need:
- 1 cup rolled oats
- 1 cup creamy peanut butter
- 1/2 cup honey or maple syrup
- 1/2 cup mixed nuts, chopped (like almonds, walnuts, and cashews)
- 1/4 cup dark chocolate chips
- 1/4 cup unsweetened shredded coconut
- 1 teaspoon pure vanilla extract
- A pinch of sea salt
These ingredients work together to create a tasty and satisfying treat. The oats give structure, while the peanut butter adds creaminess. The honey or maple syrup adds sweetness, making every bite delicious. The mixed nuts give a nice crunch, and the chocolate chips add a rich flavor.
Optional Add-ins for Customization
You can easily change these bars to suit your taste. Here are some fun ideas:
- Use dried fruits like raisins or cranberries for extra sweetness.
- Swap the mixed nuts for seeds like pumpkin or sunflower seeds.
- Add protein powder for a boost of energy.
- Try different nut butters like almond or cashew for a twist.
Each of these add-ins changes the flavor and texture. Feel free to experiment and make these bars your own!
Nutritional Information Overview
These bars are not only tasty but also packed with good nutrition. Here’s a quick look at what they offer:
- Protein: The peanut butter and nuts provide a good protein source.
- Fiber: Rolled oats and nuts give you fiber, which is great for digestion.
- Healthy Fats: The nuts and peanut butter contain healthy fats for energy.
- Vitamins & Minerals: Ingredients like nuts and coconut offer vitamins and minerals.
You can enjoy these bars as a healthy snack or dessert. They are a smart choice to keep your energy up!
Step-by-Step Instructions
Preparation of Dry Ingredients
Start by gathering your dry ingredients. In a medium bowl, add 1 cup of rolled oats. Next, toss in 1/2 cup of chopped mixed nuts. I like using almonds, walnuts, and cashews for crunch. Then, add 1/4 cup of dark chocolate chips and 1/4 cup of unsweetened shredded coconut. Finally, sprinkle in a pinch of sea salt. Mix everything well to ensure an even blend.
Mixing the Wet Ingredients
Now, let’s move on to the wet ingredients. In a separate heat-safe bowl, combine 1 cup of creamy peanut butter and 1/2 cup of honey or maple syrup. You can warm this mixture in the microwave for about 20 to 30 seconds. Alternatively, use a saucepan over low heat. Stir it often until it becomes smooth. Once it’s ready, remove it from the heat and stir in 1 teaspoon of pure vanilla extract.
Combining Dry and Wet Mixtures
Take your warm peanut butter mixture and pour it over the dry ingredients. Use a spatula or wooden spoon to mix everything together. Keep stirring until the mixture is sticky and holds together nicely. This step is key for a great texture in your bars.
Setting the Bars
Line an 8x8 inch baking dish with parchment paper. Let the edges hang over the sides for easy removal later. Transfer the sticky mixture into the dish. Press it down firmly and evenly across the bottom. You can add more chocolate chips or nuts on top and gently press them in. Cover the dish with plastic wrap and place it in the fridge for at least 2 hours. Once set, lift the bars out using the parchment paper. Cut them into squares or rectangles as you like.
Tips & Tricks
How to Achieve the Perfect Texture
To get the best texture in your no-bake peanut butter oat bars, use a smooth peanut butter. Creamy peanut butter blends well with the oats, making a sticky mix. If your mixture feels too dry, add a bit more honey or maple syrup. This extra moisture helps bind the bars while keeping them chewy. Press the mixture firmly into the baking dish. A compact layer ensures the bars hold together well once set.
Common Mistakes to Avoid
One common mistake is not mixing the dry ingredients thoroughly. If you skip this step, some bites may lack flavor. Another mistake is not letting the bars chill long enough. They need at least two hours in the fridge to firm up nicely. Avoid using natural nut butter without added oils. These can lead to a crumbly texture. Lastly, don’t cut the bars too soon! Wait until they are fully set for clean cuts.
Variations for Different Flavors
You can switch up the flavors easily with a few tweaks. Try adding dried fruits like cranberries or raisins for extra sweetness. For a fun crunch, toss in some chia seeds or pumpkin seeds. Want a chocolatey twist? Use chocolate peanut butter instead of regular peanut butter. You can even mix in spices like cinnamon or nutmeg for warmth. Each variation offers a unique taste while keeping the bars delicious and nutritious.
Pro Tips
- Storage Suggestion: Keep these bars in an airtight container in the refrigerator for up to a week for optimal freshness.
- Nut Variations: Feel free to swap in your favorite nuts or seeds to customize the flavors and textures to your liking.
- Sweetness Adjustment: Adjust the sweetness by using less honey or maple syrup if you prefer a less sweet bar.
- Chocolate Options: For a healthier alternative, you can use dark chocolate or cacao nibs instead of chocolate chips.
Variations
Alternative Sweeteners to Use
You can swap honey with maple syrup for a vegan option. Agave syrup also works well. If you prefer less sugar, try using stevia or monk fruit sweetener. These options keep the bars tasty while lowering the sugar content.
Nut-Free and Vegan Options
To make these bars nut-free, use sunflower seed butter instead of peanut butter. Sunflower seed butter gives a similar flavor. You can also skip the mixed nuts. Make sure to check your chocolate chips for dairy-free labels to keep it vegan.
Flavor Boosting Ideas with Spices
Add spices to enhance the taste of your bars. Cinnamon gives a warm flavor that blends well with peanut butter. For a spicy kick, consider a pinch of cayenne pepper. You can also add a dash of sea salt to balance sweetness. Experiment with these flavors to find your favorite!
Storage Info
Best Practices for Storage
To keep your no-bake peanut butter oat bars fresh, store them in an airtight container. Place parchment paper between layers to prevent sticking. Keep the container in the fridge. This will maintain the bars' texture and flavor. If you prefer a firmer texture, you can chill them longer before serving.
Freezing Instructions for Long-Term Storage
For longer storage, you can freeze these bars. First, cut them into squares. Wrap each square tightly in plastic wrap. Then, place them in a freezer-safe bag or container. Make sure to label the bag with the date. These bars can last for up to three months in the freezer. When you want a treat, simply thaw them in the fridge overnight.
Shelf-Life and Expiry Date
When stored properly in the fridge, these bars last about one week. If you freeze them, they can last up to three months. Always check for any signs of spoilage before eating, such as an off smell or change in texture. Enjoy your tasty bars while they’re at their best!
FAQs
Can I use crunchy peanut butter instead of creamy?
Yes, you can use crunchy peanut butter. It will add more texture to your bars. The taste stays the same, but you'll enjoy little bits of nuts. Just make sure it is the same amount as creamy peanut butter.
How long do these bars last in the fridge?
These bars stay fresh for about a week in the fridge. Store them in an airtight container. If you want them to last longer, consider freezing them.
Can I substitute oats with another ingredient?
Yes, you can swap oats for other grains like quinoa or puffed rice. This may change the taste but will still give you a yummy treat. Just ensure the new ingredient can bind well with the mixture.
What is the best way to cut these bars?
The best way to cut the bars is to use a sharp knife. For cleaner cuts, you can warm the knife slightly. Cut them into squares or rectangles based on your preference. Make sure to lift them out carefully using the parchment paper.
This blog post explored key ingredients and steps for making tasty bars. We discussed customizing flavors and tips for perfect texture. Remember to avoid common mistakes, and store your bars well for freshness. Whether you opt for nut-free or try different sweeteners, there’s a perfect recipe for you. With these insights, you can enjoy making and sharing your homemade bars with ease. Try new variations and enjoy your creations!