Are you ready to whip up a delicious treat that everyone will love? Nutella Fudge Squares are the answer! This easy dessert packs rich flavors and a creamy texture, making it perfect for any occasion. In this post, I’ll guide you through each simple step, from mixing ingredients to serving the finished squares. Let’s dive into this sweet adventure and enjoy every bite of your new favorite dessert!
Why I Love This Recipe
- Decadent Flavor: The rich combination of Nutella and cocoa creates a luscious chocolate experience in every bite.
- Easy to Make: This no-bake recipe requires minimal effort and ingredients, making it perfect for beginners.
- Customizable: Add your favorite nuts or toppings to personalize the fudge to your taste.
- Perfect for Sharing: With 16 squares, it's an ideal treat for parties, gatherings, or just to enjoy with family and friends.
Ingredients
To make Nutella Fudge Squares, you need the following ingredients:
- 1 cup Nutella
- 1 cup sweetened condensed milk
- ½ cup unsweetened cocoa powder
- 1 cup graham cracker crumbs
- ½ cup chopped nuts (either walnuts or hazelnuts)
- ½ teaspoon pure vanilla extract
- 1 pinch of salt
- Optional: chocolate chips for an irresistible topping
These ingredients come together to create a rich and creamy treat. Nutella adds a smooth, chocolatey flavor, while the sweetened condensed milk gives it a sweet base. Cocoa powder enhances the chocolate taste, and graham cracker crumbs provide a nice texture. The nuts add a crunchy element. If you like, sprinkle chocolate chips on top for an extra sweet touch. This simple list makes it easy to whip up a delicious dessert that everyone will love.

Step-by-Step Instructions
Preparation of Baking Pan
To start, line an 8-inch square baking pan with parchment paper. Leave some paper hanging over the edges. This extra paper helps you lift the fudge out later. Using parchment paper is key. It keeps the fudge from sticking and makes cleanup easy.
Mixing Ingredients
Next, grab a large mixing bowl. Add 1 cup of Nutella and 1 cup of sweetened condensed milk. Mix these two until they are smooth and well blended. This creates a rich base for your fudge.
Now, sift in ½ cup of unsweetened cocoa powder. Follow this with 1 cup of graham cracker crumbs. Stir gently until everything is combined. You want a thick, chocolaty mixture.
Incorporating Additional Ingredients
Time to add some crunch! Fold in ½ cup of chopped nuts, ½ teaspoon of pure vanilla extract, and a pinch of salt. Make sure to mix well so every bite is full of flavor.
Carefully pour this mixture into your prepared baking pan. Use a spatula to spread it evenly. This ensures a consistent thickness throughout your fudge.
Chilling and Serving
Place the pan in the refrigerator. Chill the fudge for at least 2 hours. You want it to feel firm to the touch. This chill time is important for the right texture.
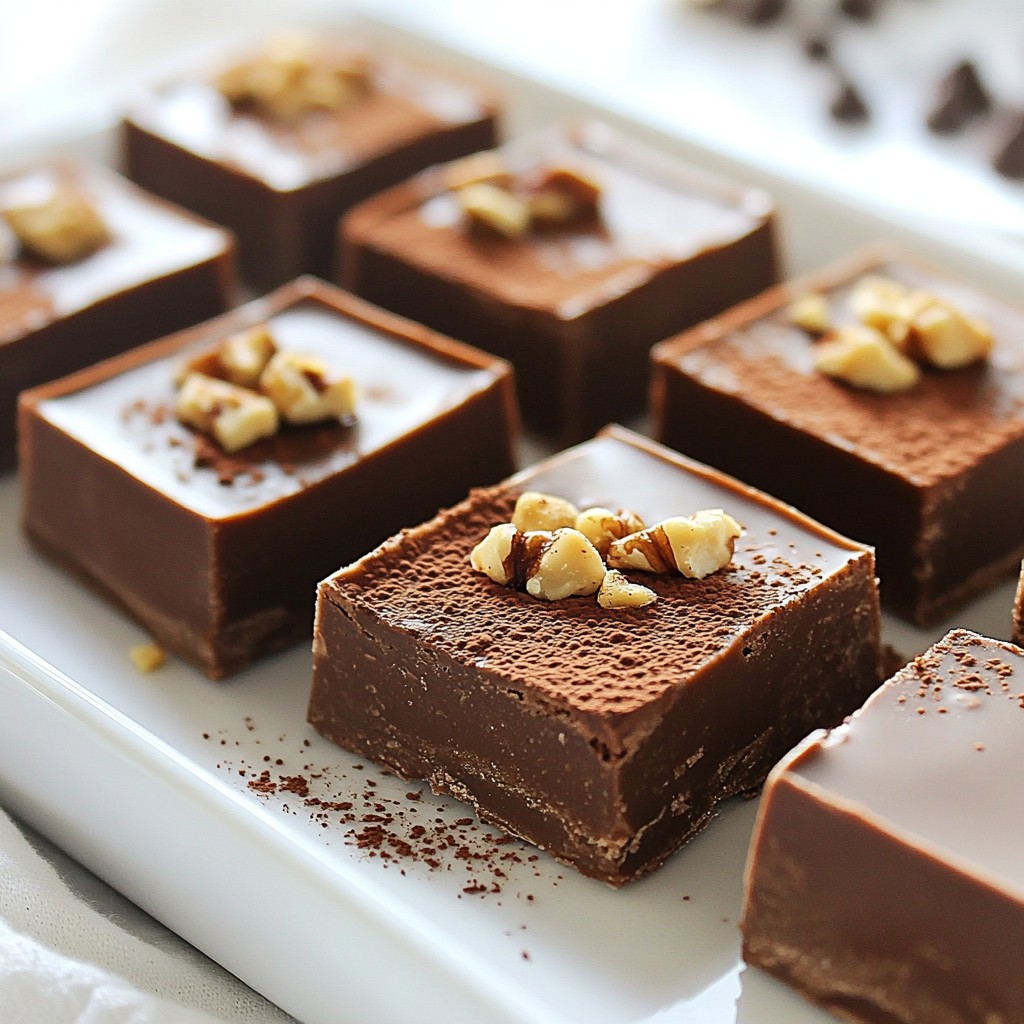
Once set, lift the fudge out using the parchment overhang. Place it on a cutting board. Use a sharp knife to cut it into 16 equal squares. For neat squares, wipe the knife clean between cuts.
Tips & Tricks
Perfecting the Texture
To get the best fudge, adjust the chill time. If you want a firmer fudge, chill it longer. Two hours is the minimum. If you like it softer, check it after one hour. Serving temperature matters too. I find that fudge is best served slightly warm. This makes it creamy and soft.
Troubleshooting Common Issues
What if your fudge is too soft? You can fix it by chilling it longer. If it’s still soft after chilling, try adding more graham cracker crumbs. This helps absorb extra moisture. If your fudge is too hard after chilling, use a warm knife to slice it. You can also let it sit at room temp for a few minutes.
Presentation Ideas
For a lovely look, dust the top with cocoa powder. You can also add chopped nuts for crunch. If you want to impress guests, use melted chocolate to drizzle over the fudge. Arrange the squares on a nice platter. This makes them stand out at any gathering.
Pro Tips
- Chill for Optimal Texture: Make sure to chill the fudge for the full 2 hours. This allows it to set properly, resulting in a firmer texture that is easier to cut.
- Customize Your Nuts: Experiment with different nuts such as almonds or pecans for a unique flavor twist. Toasting the nuts beforehand can also enhance their taste.
- Layer Your Flavors: For added depth, consider mixing in a tablespoon of espresso powder or a splash of almond extract to the fudge mixture.
- Storing Your Fudge: Keep the fudge squares in an airtight container in the refrigerator for up to a week, or freeze them for longer storage. Just make sure to separate layers with parchment paper.
Variations
Flavor Alternatives
You can make Nutella Fudge Squares even better by changing a few things. Add different nuts like pecans or almonds for more crunch. You can also mix in dried fruits, like raisins or cranberries, for a chewy twist. For a fun treat, toss in your favorite candies. This adds color and surprises in each bite.
Vegan and Dairy-Free Options
Want a vegan version? You can replace sweetened condensed milk with coconut cream or maple syrup. This keeps it creamy and sweet. For the chocolate, use dairy-free chocolate chips. These swaps make it easy to enjoy this treat while sticking to a vegan diet.
Ingredient Swaps
You can use different types of cocoa for a unique taste. Dark cocoa gives a richer flavor, while milk cocoa is milder. You can also swap graham crackers for crushed cookies or oats. For a healthier option, use whole-grain crackers or nut flour. These changes can make your fudge squares a bit healthier without losing flavor.
Storage Info
Proper Storage Techniques
To keep your Nutella fudge squares fresh, use airtight containers. Glass or plastic containers work well. Make sure they seal tightly. Avoid letting your fudge touch air. This keeps it from drying out. Also, do not store fudge near heat or moisture. A cool, dry place is best.
Shelf Life & Freezing Tips
Nutella fudge squares last about one week in the fridge. Keep them wrapped or in a container. If you want to save some for later, freeze them. Cut the squares first, then wrap each piece. Use plastic wrap or foil. Place them in a freezer bag. They can stay frozen for up to three months.
Reheating Instructions
If your fudge squares get too hard, you can soften them. The best way is to leave them out for a few minutes. You can also use a microwave. Heat them in 5-second bursts. If you prefer the oven, set it to low heat. Place the fudge on a baking sheet and warm it up. This will make it soft and easy to enjoy!
FAQs
Can I use Nutella alternatives?
Yes, you can use other spreads. Popular options include chocolate hazelnut spreads or peanut butter. Each choice brings a unique flavor. If you pick peanut butter, your fudge will taste nutty and rich. Chocolate spreads will keep the fudge sweet and creamy, but the taste will differ from Nutella.
What can I do if my fudge is too soft?
If your fudge is too soft, don’t worry! You can fix it easily. First, place the fudge back in the fridge to chill longer. This helps firm it up. If it remains soft, try adding more cocoa powder or graham cracker crumbs. This will absorb extra moisture.
How do I make Nutella Fudge Squares without nuts?
To make nut-free fudge, just skip the nuts! The fudge will still taste great. You can add a bit more cocoa powder for depth. If you want crunch, try crushed pretzels or crispy rice cereal. This will add texture without using nuts.
This guide helps you create delicious Nutella fudge squares with ease. We covered essential ingredients, step-by-step instructions, and helpful tips to perfect your fudge. Remember, you can customize flavors and textures to fit your taste. Storing your fudge properly will keep it fresh longer. Whether you enjoy it at home or share it with friends, this treat is sure to impress. Happy baking!


