Have you ever tasted the sweet delight of Old-Fashioned Martha Washington Candy? This treat has a rich history and blends smooth chocolate with creamy filling for a heavenly bite. In this post, I’ll share the origins of this beloved candy, the ingredients you need, and step-by-step instructions to make your own. Whether you love the classic version or want to try new flavors, this guide is for you! Let’s dive in!
Why I Love This Recipe
- Simple Ingredients: This recipe uses common pantry staples, making it easy and accessible for everyone to whip up a batch of these delightful candies.
- Decadent Flavor: The combination of creamy peanut butter and rich chocolate creates a mouthwatering treat that satisfies any sweet tooth.
- Customizable: You can easily modify this recipe by adding nuts, dried fruits, or even a hint of sea salt to elevate the flavor profile.
- Perfect for Sharing: These candies make an excellent gift or party treat, allowing you to share the joy of homemade sweets with friends and family.
History of Martha Washington Candy
Origins of the Candy
Martha Washington candy dates back to the 19th century. This sweet treat gained popularity in American homes. It features simple ingredients like coconut and peanut butter. These flavors blend well and make a delicious snack.
Significance of Martha Washington
Martha Washington, the first lady, represents a time of warmth and hospitality. She hosted many gatherings and shared her love of food. People often associate this candy with her legacy. It reflects her spirit of generosity and care for others.
Traditional vs. Modern Variations
Traditional Martha Washington candy uses coconut, peanut butter, and chocolate. Some people add nuts or dried fruit for extra flavor. Modern recipes sometimes use different chocolates or sweeteners. Both versions taste great, but the classic remains a favorite.
Ingredients
Complete List of Ingredients
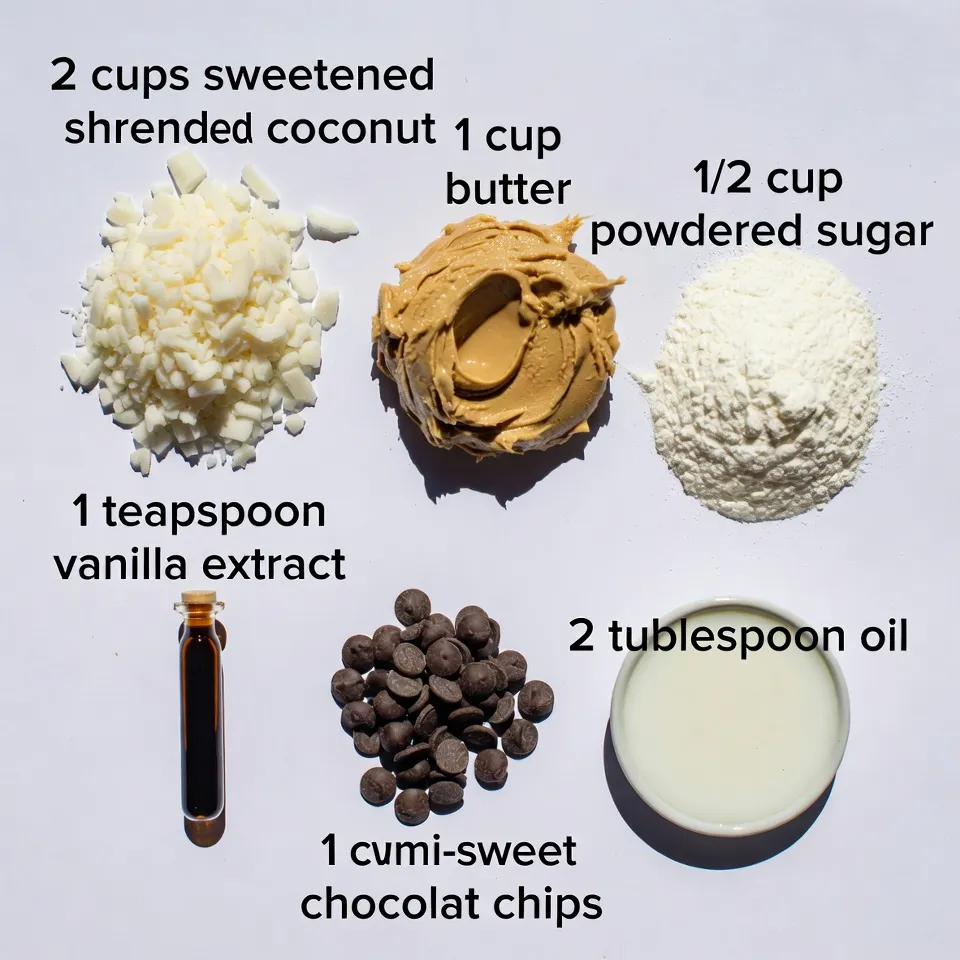
– 2 cups sweetened shredded coconut
– 1 cup smooth peanut butter
– 1/2 cup powdered sugar
– 1 teaspoon vanilla extract
– 1 cup semi-sweet chocolate chips
– 2 tablespoons coconut oil
Notes on Ingredient Quality
Using fresh, high-quality ingredients makes a big difference. Choose sweetened shredded coconut without preservatives. This keeps your candy tasty and soft. For the peanut butter, select a smooth variety. Natural is best, with no added sugar or oils. The chocolate should be semi-sweet for the right balance of sweetness. If you can, use a brand you trust.
Substitutes for Common Ingredients
If you’re short on coconut, try almond flour for a nutty twist. You can swap peanut butter with almond or cashew butter. This will change the flavor, but it will still be delicious. If you want to avoid powdered sugar, use granulated sugar and blend it until fine. This will help it mix well with the other ingredients. For a dairy-free option, use dark chocolate chips instead of semi-sweet.
Step-by-Step Instructions
Detailed Preparation Steps
First, grab a medium-sized mixing bowl. Add 2 cups of sweetened shredded coconut. Next, scoop in 1 cup of smooth peanut butter. Then, add 1/2 cup of powdered sugar and 1 teaspoon of vanilla extract. Use a sturdy spatula or a spoon to mix everything together. You want a thick and sticky dough. This is key for shaping.
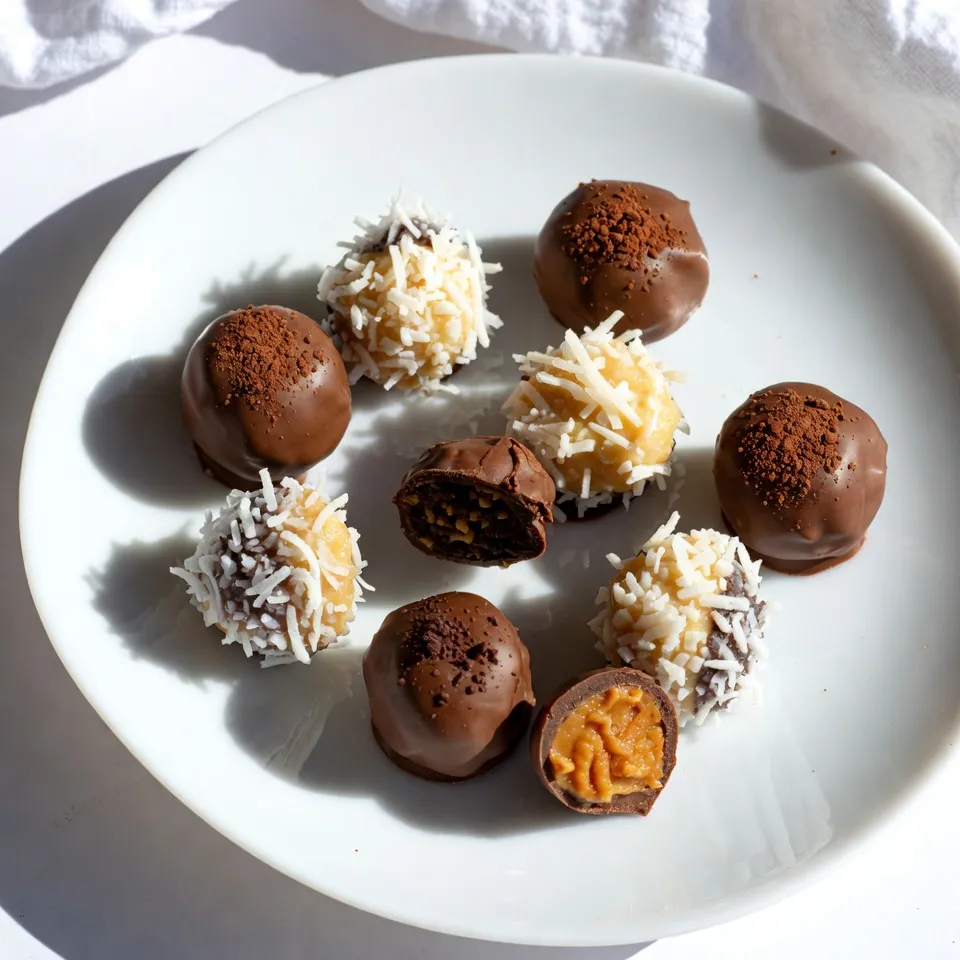
Once mixed, clean your hands. Scoop out small portions of the mixture. Roll them into bite-sized balls or pat them into squares about 1 inch wide. Lay each piece on a baking sheet lined with parchment paper. Make sure they have some space between them.
Now, place the baking sheet in the freezer. Let the candies chill for at least 30 minutes. This helps them firm up and keep their shape.
Tips for Mixing and Shaping
When mixing, ensure all ingredients blend well. If the dough feels too sticky, add a bit more powdered sugar. This will help with shaping. For rolling, wet your hands slightly. This prevents sticking and makes it easier to form the candies.
If you prefer squares, use a knife to cut them evenly. This gives a nice look and makes them easy to serve.
Melting Chocolate for Coating
While the candies chill, prepare the chocolate coating. Get a microwave-safe bowl. Add 1 cup of semi-sweet chocolate chips and 2 tablespoons of coconut oil. Heat this in the microwave in 30-second intervals. Stir after each interval until the chocolate is fully melted and smooth.
Be careful not to overheat. You want the chocolate warm but not hot. This will make coating the candies easy and keep them shiny.
Pro Tips
- Chill for Best Results: Ensure the candies are well-chilled before coating them in chocolate. This will help maintain their shape and prevent melting during the dipping process.
- Use Quality Chocolate: Opt for high-quality semi-sweet chocolate chips for a richer flavor. Consider using chocolate bars and chopping them for a smoother melt.
- Experiment with Flavors: Feel free to add a pinch of sea salt, a dash of cinnamon, or even almond extract to the coconut mixture for a unique twist on the classic recipe.
- Storage Tips: Store the finished candies in an airtight container in the refrigerator for up to two weeks. For longer storage, freeze them and enjoy them later!
Tips & Tricks
Achieving the Perfect Chocolate Coat
To get a smooth and shiny coat of chocolate, use good quality chocolate chips. Semi-sweet is best for this candy. Melt the chocolate slowly in the microwave. Stir it every 30 seconds. This keeps it from burning. If the chocolate gets too thick, add a bit more coconut oil. This will help it coat the candies better.
Preventing Candy from Sticking
After rolling your candy into balls or squares, chill them in the freezer. This makes them firm and less sticky. Use parchment paper on your baking sheet. This helps the candies not stick when you dip them in chocolate. If they do stick, gently use a spatula to lift them off.
Storing Leftovers Properly
Store any leftover candies in an airtight container. Keep them in the fridge to stay fresh. They can last for up to a week. If you want to keep them longer, freeze them. Just make sure to wrap each piece well to prevent freezer burn. When you’re ready to eat them, let them thaw in the fridge.
Variations
Flavor Variations
You can change the flavor of Martha Washington candy easily. Adding nuts is a great option. Chopped pecans or walnuts add a nice crunch. You can also mix in dried fruits, like cherries or cranberries. This adds a sweet and tangy twist. For a tropical flair, try adding crushed pineapple. This brings a fresh taste that pairs well with coconut. You can even use flavored chocolate. Dark chocolate or white chocolate can give a new spin to the classic taste.
Dietary Adjustments
If you need vegan options, you can still enjoy this candy. Swap out peanut butter for almond or cashew butter. Use a vegan chocolate brand for coating. You can find many great options in stores today. For gluten-free needs, always check labels on the chocolate and other ingredients. Ensure they are certified gluten-free to avoid any issues. These simple swaps keep the candy delicious and kind to different diets.
Presentation Ideas for Different Occasions
How you present Martha Washington candy can make it even more special. For holidays, arrange the candies on a decorative platter. Sprinkle some extra shredded coconut on top for a snowy look. If you’re hosting a party, use small cupcake liners to hold each piece. This adds a fun touch. For gifts, place the candies in a cute box or jar. Tie it with a ribbon for a personal touch. You can customize the box for birthdays or holidays, making it a delightful treat for anyone.
FAQs
Can I make these candies ahead of time?
Yes, you can make Martha Washington candies ahead of time. They hold well in the fridge. I often prepare them a few days before events. This way, I have less stress on the day of the gathering. Just follow the recipe and store them properly.
How do I store Martha Washington Candy?
Store these candies in an airtight container. You can keep them in the fridge for up to two weeks. This helps to keep the chocolate and coconut fresh. If you want to keep them longer, you can freeze them. Just place them in a freezer-safe bag or container.
What is the best way to reheat leftover chocolate?
To reheat leftover chocolate, use a microwave-safe bowl. Heat it in short bursts of 15 to 20 seconds. Stir in between to avoid burning the chocolate. This method keeps the chocolate smooth and shiny. You can also use a double boiler for a gentle heat option.
Martha Washington Candy has a rich history, blending old traditions with modern twists. We explored its origins and the essential ingredients that make it special. The detailed steps provided guide you through the making process, ensuring a perfect treat. With tips for coating and storing, you can enjoy these candies anytime. Lastly, the variations cater to all tastes and diets. Now you can make Martha Washington Candy with confidence and creativity. Enjoy sharing this delightful treat with friends and famil


