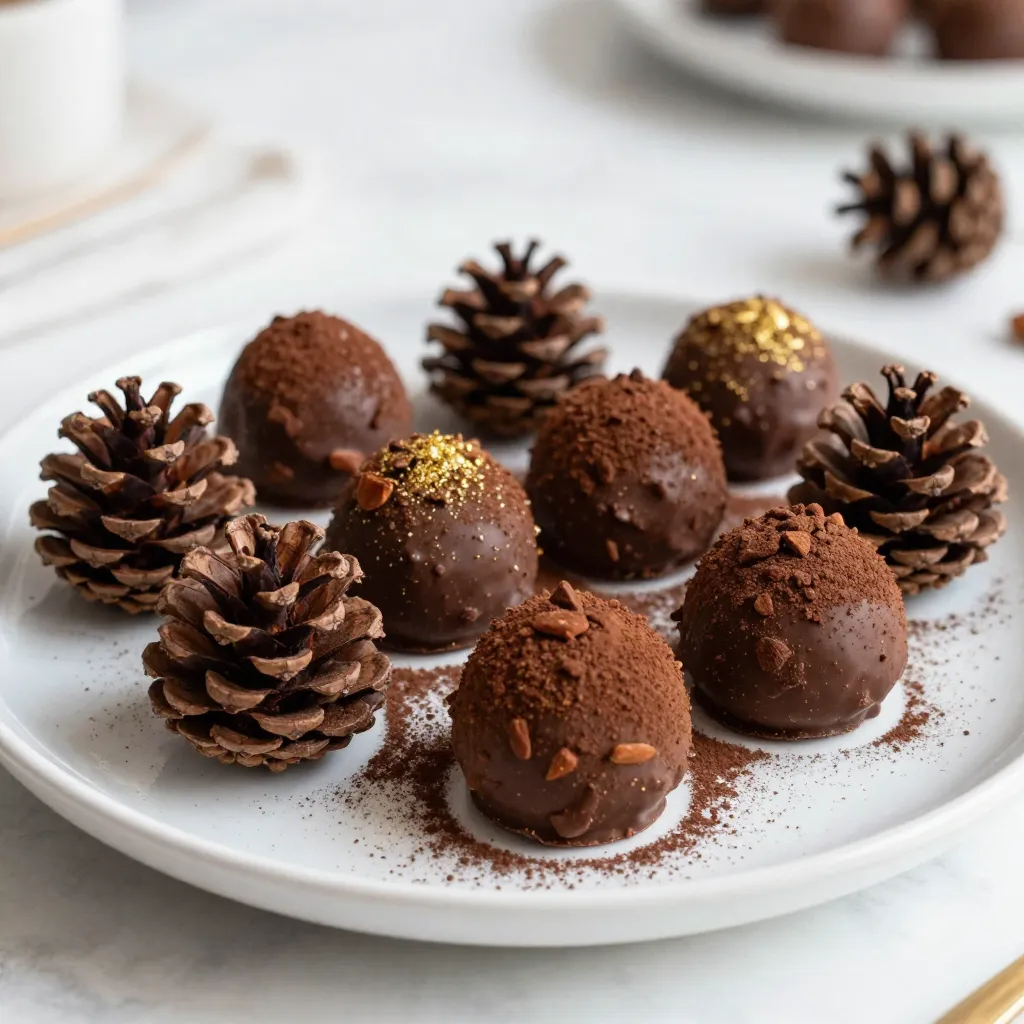
Looking for a fun and tasty treat? Let me introduce you to Pine Cone Chocolate Truffles! This easy recipe combines rich dark chocolate with creamy goodness, making a delightful snack or gift. With simple ingredients and clear steps, you’ll impress family and friends, even if you’re a beginner. Ready to get started? Let’s dive into this sweet adventure and make these charming truffles together!
Why I Love This Recipe
- Festive Presentation: These truffles resemble pine cones, making them a perfect treat for holiday gatherings and celebrations.
- Decadent Flavor: The rich dark chocolate combined with the creamy texture offers a delightful and indulgent experience.
- Customizable Touch: With the optional edible gold or silver dust, you can easily elevate their appearance for special occasions.
- Simple Process: The recipe is straightforward, allowing both novice and experienced bakers to create these delicious treats with ease.
Ingredients
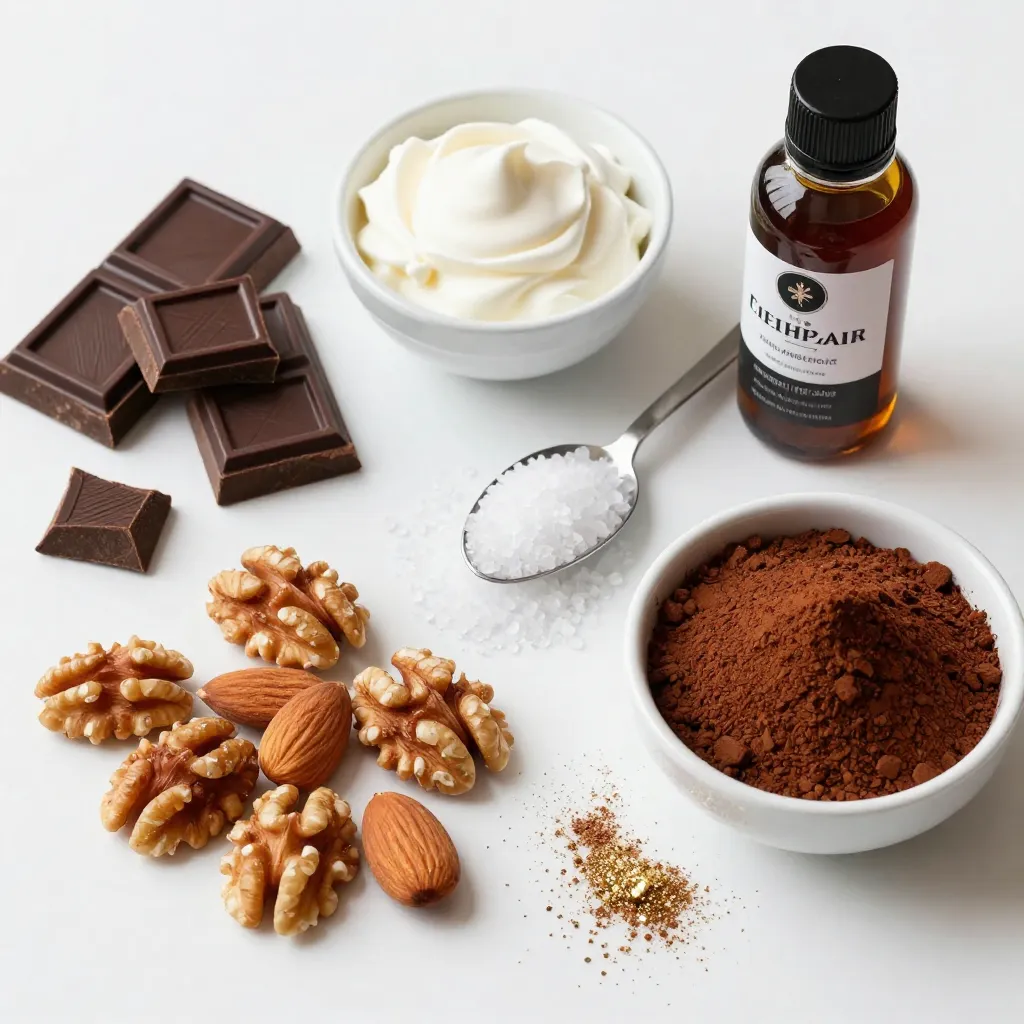
To make Pine Cone Chocolate Truffles, you need a few simple ingredients. Here’s what you’ll need:
– 8 ounces dark chocolate (70% cocoa), chopped into small pieces
– 1/2 cup heavy cream
– 1 teaspoon pure vanilla extract
– 1/4 teaspoon flaky sea salt
– 1/2 cup finely crushed almonds or walnuts (to create the pine cone texture)
– 1/4 cup unsweetened cocoa powder (for dusting)
– Edible gold or silver dust (optional, for an elegant decoration)
These ingredients come together to create rich and flavorful truffles. Dark chocolate gives a deep taste. Heavy cream adds smoothness, while vanilla and sea salt enhance the flavors. The crushed nuts help create a fun pine cone look, making your truffles both tasty and beautiful. The cocoa powder adds a nice finish, rounding out the flavor. If you want to impress, sprinkle edible dust on top for a sparkling touch.
Step-by-Step Instructions
Melting the Chocolate
To melt the chocolate, use a double boiler. Place a heatproof bowl over a saucepan with simmering water. Make sure the bowl does not touch the water. Add 8 ounces of chopped dark chocolate and 1/2 cup of heavy cream to the bowl. Stir often until the chocolate melts and the mixture is smooth. This method helps prevent burning.
Enhancing the Flavor
Once the chocolate melts, take it off the heat. Stir in 1 teaspoon of pure vanilla extract and 1/4 teaspoon of flaky sea salt. Mixing these ingredients well is key. You want every bite to have that rich flavor.
Cooling and Chilling
Let the chocolate mixture cool at room temperature. This step helps it thicken. After it cools, cover the bowl with plastic wrap. Refrigerate it for about 2 hours. This makes the mixture firm enough to scoop.
Shaping the Truffles
When ready to shape the truffles, use a small ice cream scoop or your hands. Take about a tablespoon of the chilled mixture. Roll it into a rough ball. Aim for a shape that looks like a pine cone. This adds a fun touch!
Coating the Truffles
Next, roll each chocolate ball in finely crushed nuts. Use 1/2 cup of almonds or walnuts for the best texture. Make sure each truffle is well-coated. This gives it a great pine cone appearance.
Dusting and Decorating
Now, dust each truffle with unsweetened cocoa powder. Use a fine sieve for even application. This step boosts the flavor and makes them look nice. If you want a fancy touch, you can use edible gold or silver dust.
Final Chill for Firmness
Place the finished truffles on a tray lined with parchment paper. Refrigerate them for another 30 minutes. This final chill helps them firm up nicely. Once chilled, they are ready to enjoy!
Tips & Tricks
Shaping Tips
– Achieving the Perfect Texture
Roll the chocolate mixture into rough balls. This gives them a rustic look. Aim for shapes that mimic pine cones. If the mix feels too soft, chill it longer before shaping.
– Tools to Use
Use your hands for a personal touch or a small ice cream scoop for uniformity. Both methods work well. Just remember, hands can give you that natural, textured shape.
Flavor Enhancements
– Adding Spices or Extracts
Want to spice things up? Try adding a pinch of cinnamon or nutmeg. You can also use almond or orange extract for unique flavors. Just a little goes a long way.
– Nut Alternatives
If you have nut allergies, consider crushed seeds instead. Pumpkin or sunflower seeds work beautifully. They add crunch and keep the pine cone look.
Presentation Ideas
– Creative Serving Suggestions
Arrange the truffles in a pine cone shape on a flat plate. This makes for a stunning display. You can also place them in small paper cups for easy serving.
– Garnishing Techniques
Add a sprinkle of powdered sugar for a snowy effect. Fresh pine needles can give a festive touch too. If you want, use edible gold or silver dust for a glamorous finish.
Pro Tips
- Use High-Quality Chocolate: Opt for a good quality dark chocolate with at least 70% cocoa content for a rich flavor and smooth texture in your truffles.
- Cool Before Shaping: Ensure the chocolate mixture is sufficiently chilled before rolling it into balls; this makes the shaping process easier and less messy.
- Experiment with Nuts: Try different types of nuts like pecans or hazelnuts for a unique flavor twist and to create varied textures for your truffles.
- Presentation Matters: Arrange the truffles in a creative way, such as in a pine cone shape, and add decorative touches to elevate their visual appeal.
Variations
Different Chocolate Choices
You can use different types of chocolate for your truffles. Dark chocolate gives a rich flavor. It has a deep taste that many love. Milk chocolate is sweeter and creamier. It can make your truffles more appealing to kids. You can also mix chocolates for a unique taste. Try half dark and half milk for a balanced flavor.
You might want to explore white chocolate too. White chocolate adds a sweet, buttery flavor. It pairs nicely with nuts and fruits. You can create a fun twist by using white chocolate instead of dark. Just remember to adjust the sweetness in your recipe.
Nut-Free Alternatives
If you want nut-free options, seeds work well. Pumpkin seeds and sunflower seeds add crunch. They give a nice texture to your truffles, just like nuts. You can crush them finely or leave them a bit chunky for variety.
Other texturing options include crushed cookies or granola. These can add fun flavors and make your truffles unique. Experiment with what you have at home. You might find a new favorite!
Holiday Themed Variations
For holidays, you can make your truffles more festive. Use fun toppings like colored sprinkles or edible glitter. You can also add flavors inspired by the season. Think cinnamon for winter or fresh mint for spring.
You can shape your truffles into holiday symbols too. Create small stars or hearts for special occasions. These little touches make your treats stand out. They also add joy to gatherings. Enjoy crafting your holiday-themed pine cone chocolate truffles!
Storage Info
Best Storage Practices
To keep your Pine Cone Chocolate Truffles fresh, refrigerate them. Place them in an airtight container. This helps prevent them from absorbing other smells in the fridge. You can also line the container with parchment paper for extra protection.
Shelf Life
How long do truffles last in the fridge? They stay good for about 1 week. If you want to keep them longer, freezing is a great option. Just place the truffles in a freezer-safe container. They can last up to 3 months in the freezer. When you want to enjoy them again, let them thaw in the fridge overnight. This keeps their texture nice and smooth.
FAQs
How can I make Pine Cone Chocolate Truffles vegan?
To make these truffles vegan, swap heavy cream for coconut cream. Use dairy-free dark chocolate. Check the label to ensure it has no milk products.
What is the best chocolate to use for truffles?
I recommend using dark chocolate with 70% cocoa. This chocolate gives great flavor and smooth texture. It balances sweetness and richness well.
Can I make these truffles ahead of time?
Yes, you can make these truffles one or two days in advance. Store them in the fridge in an airtight container. This helps the flavors to blend.
Are Pine Cone Chocolate Truffles suitable for gifting?
Absolutely! They look lovely on a tray. Use a nice box or tin for packaging. Add a ribbon for a delightful touch.
You now have all the steps to create delicious Pine Cone Chocolate Truffles. From choosing quality dark chocolate to shaping truffles and adding unique flavors, every part matters. Remember to store them well for the best taste. Whether for gifts or a special treat, these truffles impress. Have fun experimenting with variations and presentation. Enjoy every bite of your creative treat