Pumpkin Patch Dirt Cups Delightful and Fun Treat

WANT TO SAVE THIS RECIPE?

Get ready to bring the fun of fall straight to your kitchen with Pumpkin Patch Dirt Cups! These delightful treats combine creamy pumpkin, rich chocolate cookies, and festive garnishes for an easy yet impressive dessert. Perfect for Halloween parties or cozy family gatherings, these cups are a simple way to wow your guests. Join me as I guide you step-by-step to make this delicious dessert that’s sure to be a hit!

Why I Love This Recipe

  1. Fun Presentation: These Pumpkin Patch Dirt Cups are visually appealing and perfect for Halloween parties or fall gatherings, making them a festive treat.
  2. Delicious Flavor Combination: The creamy pumpkin mixture paired with the crunch of chocolate cookies creates a delightful contrast that is hard to resist.
  3. Easy to Assemble: This recipe requires no baking, making it quick and simple to prepare, even for novice cooks.
  4. Customizable Toppings: You can easily personalize these cups with different candies or decorations, allowing for creativity in presentation.
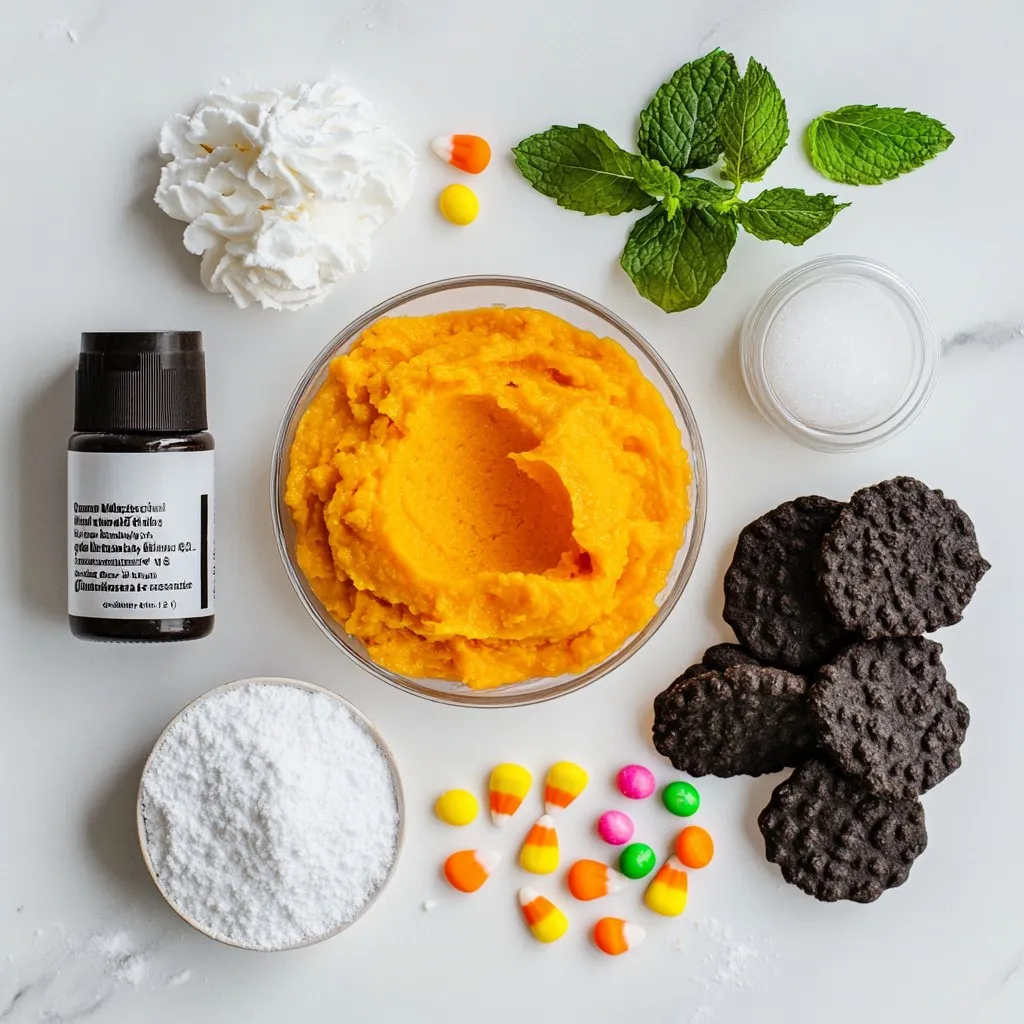
Ingredients

Complete list of ingredients for Pumpkin Patch Dirt Cups

– 1 cup pumpkin puree

– 1 cup cream cheese, softened to room temperature

– 1 cup powdered sugar

– 1 teaspoon vanilla extract

– 1 cup heavy whipping cream

– 1 package (14 oz) chocolate sandwich cookies, finely crushed

– 1 cup gummy worms

– 1 cup candy corn (optional)

– Fresh mint leaves for garnish (optional)

Importance of fresh versus canned pumpkin puree

Using fresh pumpkin puree gives your dessert a rich taste. It also has a vibrant color that makes your cups look great. Fresh pumpkin has more nutrition than canned. However, canned pumpkin is a good choice for convenience. Look for 100% pumpkin, not pumpkin pie filling. It saves time without losing too much flavor.

Recommended brands for chocolate sandwich cookies

For the best flavor, I recommend using Oreos. They have a classic taste that kids and adults love. Other good options include Trader Joe’s Joe-Joe’s or Hydrox cookies. These brands work well for crushing and layering. The crunchiness adds a nice texture to your dirt cups.

Step-by-Step Instructions

Mixing the pumpkin and cream cheese base

Start by getting a large mixing bowl. Add 1 cup of pumpkin puree. Next, add 1 cup of softened cream cheese. Then, mix in 1 cup of powdered sugar and 1 teaspoon of vanilla extract. Use an electric mixer to beat this mixture on medium speed. Keep mixing until it is smooth and fluffy, which takes about 2-3 minutes. This base gives your cups that rich pumpkin flavor.

Whipping the cream to stiff peaks

In a separate bowl, pour in 1 cup of heavy whipping cream. Use a whisk or an electric mixer to whip the cream. You want to whip it until you see stiff peaks. This should take about 3-5 minutes. Stiff peaks mean the cream stands up and doesn’t fall. This step is key for a light texture in your dessert.

Layering the cups for best results

Start layering your cups or small jars. Add a generous layer of crushed chocolate cookies at the bottom. This layer acts as the dirt foundation. Next, spread a layer of the creamy pumpkin mixture over the cookies. Make sure you cover them completely. This step gives a great mix of flavors.

Repeat the layers. Add another layer of crushed cookies, followed by another layer of pumpkin mixture. For the final touch, top the last layer with more crushed cookies. This makes it look like dirt.

For fun, take gummy worms and place them on top. Arrange them as if they are crawling out of the dirt. If you want, add candy corn on top for color and sweetness. Finally, garnish with fresh mint leaves. This adds a nice green touch and makes it look pretty.

Enjoy making these cups! They are fun, tasty, and perfect for any occasion.

Tips & Tricks

How to achieve the perfect texture

To get the right texture, mix the pumpkin and cream cheese well. Use an electric mixer on medium speed. This makes it smooth and fluffy. When you whip the heavy cream, beat it until stiff peaks form. This takes about 3-5 minutes. Fold the whipped cream gently into the pumpkin mix. This keeps it light and airy. Avoid over-mixing, as this can lead to a dense texture.

Serving suggestions for Halloween parties

These cups are perfect for Halloween! Serve them in clear cups for a fun look. Place them on a spooky tray with decorations. You could add little plastic spiders for fun. Kids love to dig in and find the gummy worms. Consider adding themed napkins or plates to match the vibe. This makes your party more festive and exciting.

Creative garnishing ideas to enhance presentation

Garnishing adds a special touch to your cups. Use fresh mint leaves for a pop of green on top. You can also sprinkle extra crushed cookies for that dirt effect. For added fun, let gummy worms hang over the edges. If you want more color, add candy corn on top. These little touches make your treats look amazing and tasty!

Pro Tips

  1. Use Fresh Pumpkin Puree: For the best flavor, use homemade pumpkin puree instead of canned. Simply roast and blend fresh pumpkins for a rich taste.
  2. Chill Before Serving: Allow the dirt cups to chill in the refrigerator for at least an hour before serving. This helps the flavors meld together and enhances the overall taste.
  3. Experiment with Layers: Get creative with the layering! You can alternate between layers of different candies or even add a layer of whipped cream for extra texture.
  4. Presentation Matters: Use clear cups or jars to showcase the beautiful layers of the dessert. It makes for a visually appealing treat that’s perfect for any gathering.

Variations

Ingredient substitutions for dietary needs

If you have dietary needs, you can still enjoy Pumpkin Patch Dirt Cups. For a gluten-free version, use gluten-free chocolate sandwich cookies. They give you the same crunch without the gluten. If dairy is a concern, swap cream cheese with a dairy-free option like cashew cream. Use coconut cream instead of heavy whipping cream for a dairy-free whip. You can also try maple syrup instead of powdered sugar for a natural sweetener. This way, everyone can join in the fun.

Alternative toppings for a unique twist

To switch things up, play with your toppings. Instead of gummy worms, use chocolate spiders or candy bats for a spooky touch. Swap out candy corn for mini marshmallows or crushed nuts for extra crunch. You can even add crushed pretzels for a salty twist. If you want a fruity flavor, top with fresh berries. Each option adds a new layer of fun and flavor to your cups.

Seasonal variations for year-round enjoyment

Pumpkin Patch Dirt Cups don’t have to be just for fall. In spring, try a berry version using strawberry or raspberry puree. For summer, make a refreshing lemon cream base with lemon zest and juice. In winter, use peppermint extract in the cream for a minty delight. Each season brings new flavors to explore, making these cups a treat for any time of year. You can easily adapt them to fit the season and your taste.

Storage Info

Best practices for storing leftovers

To keep your Pumpkin Patch Dirt Cups fresh, cover them tightly. Use plastic wrap or a lid. Store them in the fridge. This protects the layers and keeps them tasty. Avoid storing them near strong-smelling foods. Those scents can soak into your dessert.

How long do Pumpkin Patch Dirt Cups last?

When stored properly in the fridge, these cups last about 3-4 days. After that, the texture and taste may change. If you notice any off smells or changes in texture, it’s best to toss them. Always use your senses to check for freshness.

Freezing tips for longer storage

You can freeze Pumpkin Patch Dirt Cups for up to 2 months. Use airtight containers or freezer bags. Layer the cups carefully, leaving space for expansion. When you are ready to eat them, thaw them overnight in the fridge. Avoid refreezing once thawed. Enjoy the creamy goodness!

FAQs

Can I make Pumpkin Patch Dirt Cups ahead of time?

Yes, you can make Pumpkin Patch Dirt Cups ahead of time. Just prepare them a day before your event. Store them in the fridge to keep them fresh. This gives the flavors time to blend, making them taste even better. Just remember to add the gummy worms right before serving to keep them looking fresh and fun.

What can I use instead of heavy whipping cream?

If you want to skip heavy whipping cream, use coconut cream. It gives a nice texture and flavor. You can also try whipped topping, which is a good substitute. These options will keep your Pumpkin Patch Dirt Cups creamy and delicious.

How to make a vegan version of this recipe?

Making a vegan version is easy! Replace cream cheese with vegan cream cheese. Use coconut cream instead of heavy cream. For the powdered sugar, check if it’s vegan-friendly. The rest of the ingredients, like pumpkin puree and cookies, are usually vegan. Enjoy your tasty, plant-based treat!

You now have a clear guide to making Pumpkin Patch Dirt Cups. Remember to use fresh pumpkin for the best flavor. Each step, from mixing to layering, helps create a fun treat. Don’t forget to add your personal twist with creative toppings. Store leftovers properly to enjoy later. With these tips, you can impress at any Halloween gathering. Experiment and make this dessert your own throughout the year. Enjoy your delicious creation

- 1 cup pumpkin puree - 1 cup cream cheese, softened to room temperature - 1 cup powdered sugar - 1 teaspoon vanilla extract - 1 cup heavy whipping cream - 1 package (14 oz) chocolate sandwich cookies, finely crushed - 1 cup gummy worms - 1 cup candy corn (optional) - Fresh mint leaves for garnish (optional) Using fresh pumpkin puree gives your dessert a rich taste. It also has a vibrant color that makes your cups look great. Fresh pumpkin has more nutrition than canned. However, canned pumpkin is a good choice for convenience. Look for 100% pumpkin, not pumpkin pie filling. It saves time without losing too much flavor. For the best flavor, I recommend using Oreos. They have a classic taste that kids and adults love. Other good options include Trader Joe’s Joe-Joe’s or Hydrox cookies. These brands work well for crushing and layering. The crunchiness adds a nice texture to your dirt cups. {{ingredient_image_2}} Start by getting a large mixing bowl. Add 1 cup of pumpkin puree. Next, add 1 cup of softened cream cheese. Then, mix in 1 cup of powdered sugar and 1 teaspoon of vanilla extract. Use an electric mixer to beat this mixture on medium speed. Keep mixing until it is smooth and fluffy, which takes about 2-3 minutes. This base gives your cups that rich pumpkin flavor. In a separate bowl, pour in 1 cup of heavy whipping cream. Use a whisk or an electric mixer to whip the cream. You want to whip it until you see stiff peaks. This should take about 3-5 minutes. Stiff peaks mean the cream stands up and doesn’t fall. This step is key for a light texture in your dessert. Start layering your cups or small jars. Add a generous layer of crushed chocolate cookies at the bottom. This layer acts as the dirt foundation. Next, spread a layer of the creamy pumpkin mixture over the cookies. Make sure you cover them completely. This step gives a great mix of flavors. Repeat the layers. Add another layer of crushed cookies, followed by another layer of pumpkin mixture. For the final touch, top the last layer with more crushed cookies. This makes it look like dirt. For fun, take gummy worms and place them on top. Arrange them as if they are crawling out of the dirt. If you want, add candy corn on top for color and sweetness. Finally, garnish with fresh mint leaves. This adds a nice green touch and makes it look pretty. Enjoy making these cups! They are fun, tasty, and perfect for any occasion. To get the right texture, mix the pumpkin and cream cheese well. Use an electric mixer on medium speed. This makes it smooth and fluffy. When you whip the heavy cream, beat it until stiff peaks form. This takes about 3-5 minutes. Fold the whipped cream gently into the pumpkin mix. This keeps it light and airy. Avoid over-mixing, as this can lead to a dense texture. These cups are perfect for Halloween! Serve them in clear cups for a fun look. Place them on a spooky tray with decorations. You could add little plastic spiders for fun. Kids love to dig in and find the gummy worms. Consider adding themed napkins or plates to match the vibe. This makes your party more festive and exciting. Garnishing adds a special touch to your cups. Use fresh mint leaves for a pop of green on top. You can also sprinkle extra crushed cookies for that dirt effect. For added fun, let gummy worms hang over the edges. If you want more color, add candy corn on top. These little touches make your treats look amazing and tasty! Pro Tips Use Fresh Pumpkin Puree: For the best flavor, use homemade pumpkin puree instead of canned. Simply roast and blend fresh pumpkins for a rich taste. Chill Before Serving: Allow the dirt cups to chill in the refrigerator for at least an hour before serving. This helps the flavors meld together and enhances the overall taste. Experiment with Layers: Get creative with the layering! You can alternate between layers of different candies or even add a layer of whipped cream for extra texture. Presentation Matters: Use clear cups or jars to showcase the beautiful layers of the dessert. It makes for a visually appealing treat that’s perfect for any gathering. {{image_4}} If you have dietary needs, you can still enjoy Pumpkin Patch Dirt Cups. For a gluten-free version, use gluten-free chocolate sandwich cookies. They give you the same crunch without the gluten. If dairy is a concern, swap cream cheese with a dairy-free option like cashew cream. Use coconut cream instead of heavy whipping cream for a dairy-free whip. You can also try maple syrup instead of powdered sugar for a natural sweetener. This way, everyone can join in the fun. To switch things up, play with your toppings. Instead of gummy worms, use chocolate spiders or candy bats for a spooky touch. Swap out candy corn for mini marshmallows or crushed nuts for extra crunch. You can even add crushed pretzels for a salty twist. If you want a fruity flavor, top with fresh berries. Each option adds a new layer of fun and flavor to your cups. Pumpkin Patch Dirt Cups don't have to be just for fall. In spring, try a berry version using strawberry or raspberry puree. For summer, make a refreshing lemon cream base with lemon zest and juice. In winter, use peppermint extract in the cream for a minty delight. Each season brings new flavors to explore, making these cups a treat for any time of year. You can easily adapt them to fit the season and your taste. To keep your Pumpkin Patch Dirt Cups fresh, cover them tightly. Use plastic wrap or a lid. Store them in the fridge. This protects the layers and keeps them tasty. Avoid storing them near strong-smelling foods. Those scents can soak into your dessert. When stored properly in the fridge, these cups last about 3-4 days. After that, the texture and taste may change. If you notice any off smells or changes in texture, it's best to toss them. Always use your senses to check for freshness. You can freeze Pumpkin Patch Dirt Cups for up to 2 months. Use airtight containers or freezer bags. Layer the cups carefully, leaving space for expansion. When you are ready to eat them, thaw them overnight in the fridge. Avoid refreezing once thawed. Enjoy the creamy goodness! Yes, you can make Pumpkin Patch Dirt Cups ahead of time. Just prepare them a day before your event. Store them in the fridge to keep them fresh. This gives the flavors time to blend, making them taste even better. Just remember to add the gummy worms right before serving to keep them looking fresh and fun. If you want to skip heavy whipping cream, use coconut cream. It gives a nice texture and flavor. You can also try whipped topping, which is a good substitute. These options will keep your Pumpkin Patch Dirt Cups creamy and delicious. Making a vegan version is easy! Replace cream cheese with vegan cream cheese. Use coconut cream instead of heavy cream. For the powdered sugar, check if it's vegan-friendly. The rest of the ingredients, like pumpkin puree and cookies, are usually vegan. Enjoy your tasty, plant-based treat! You now have a clear guide to making Pumpkin Patch Dirt Cups. Remember to use fresh pumpkin for the best flavor. Each step, from mixing to layering, helps create a fun treat. Don't forget to add your personal twist with creative toppings. Store leftovers properly to enjoy later. With these tips, you can impress at any Halloween gathering. Experiment and make this dessert your own throughout the year. Enjoy your delicious creations!

Pumpkin Patch Dirt Cups

A fun and festive dessert featuring layers of pumpkin cream and crushed cookies, topped with gummy worms and candy corn.
Prep Time 20 minutes
Total Time 20 minutes
Course Dessert
Cuisine American
Servings 6

Ingredients
  

  • 1 cup pumpkin puree
  • 1 cup cream cheese, softened to room temperature
  • 1 cup powdered sugar
  • 1 teaspoon vanilla extract
  • 1 cup heavy whipping cream
  • 1 package (14 oz) chocolate sandwich cookies, finely crushed
  • 1 cup gummy worms
  • 1 cup candy corn (optional)
  • to taste fresh mint leaves for garnish (optional)

Instructions
 

  • In a large mixing bowl, combine the pumpkin puree, softened cream cheese, powdered sugar, and vanilla extract. Using an electric mixer, beat the mixture on medium speed until it becomes smooth and fluffy, approximately 2-3 minutes.
  • In a separate bowl, pour the heavy cream and use a whisk or an electric mixer to whip it until stiff peaks form. This should take about 3-5 minutes.
  • Gradually fold the whipped cream into the pumpkin mixture using a spatula, being careful to maintain the light and airy texture until fully combined.
  • Begin layering your cups or small jars by adding a generous layer of crushed chocolate cookies at the bottom. This will represent the dirt foundation of your cups.
  • Next, evenly spread a layer of the creamy pumpkin mixture over the crushed cookies, ensuring it covers them completely for even flavor distribution.
  • Repeat the layering process: add another layer of crushed cookies, followed by a second layer of the pumpkin mixture.
  • For the final touch, top the last layer with a generous sprinkle of crushed cookies to achieve a dirt-like appearance.
  • Take the gummy worms and creatively place them on top so they look like they are crawling out from the dirt.
  • If desired, add a colorful sprinkle of candy corn on top for a sweet treat and visual appeal.
  • To finish, garnish with fresh mint leaves for a vibrant pop of green that enhances the presentation.

Notes

Optional candy corn and mint leaves can enhance presentation.
Keyword dessert, gummy worms, Halloween, pumpkin

WANT TO SAVE THIS RECIPE?

Leave a Comment

Recipe Rating