Skip to content
DisclaimerTerms Of UseGDPR PolicyCookie Policy

recipesstation

  • Home
  • Drinks
  • Appetizers
  • Dinner
  • Dessert
  • About
  • Contact
  • Privacy Policy
DisclaimerTerms Of UseGDPR PolicyCookie Policy

NO-ING-IMG

- 4 boneless, skinless chicken thighs - 1.5 lbs baby potatoes, halved - 1 cup heavy cream - 1 cup grated Parmesan cheese - 4 cloves garlic, minced - 1 teaspoon Italian seasoning - 1 teaspoon smoked paprika - 2 tablespoons olive oil - Salt and pepper to taste - Fresh parsley, chopped (for garnish) The key to a great dish starts with good ingredients. Using boneless, skinless chicken thighs helps keep the meal juicy. They cook well and soak up flavors. Baby potatoes are perfect because they hold their shape and add a nice texture. Heavy cream is what makes the sauce creamy and rich. Grated Parmesan cheese adds a savory kick. Don't forget the garlic! It gives the dish depth and aroma. Seasonings play a big role in flavor. Italian seasoning brings warmth. Smoked paprika adds a hint of smokiness. Olive oil is essential for searing the chicken and helps the spices stick. Salt and pepper are must-haves. They enhance all the flavors and balance the dish. Finally, fresh parsley not only looks good but also brightens the overall taste. Gather these ingredients, and you're ready to make a delicious meal! {{ingredient_image_2}} Seasoning the chicken thighs First, take your chicken thighs and season them well. Use salt, pepper, smoked paprika, and Italian seasoning. Rub the spices into the meat. Cover every side for the best taste. This step is key to making the chicken flavorful. Searing the chicken Next, heat olive oil in a skillet over medium heat. When the oil is hot, add the seasoned chicken. Sear each thigh for about 3 to 4 minutes. Look for a golden-brown crust. This adds depth to the flavor. Once done, remove the chicken and set it aside. Preparing the baby potatoes Now, take your halved baby potatoes and place them in the slow cooker. Season them with salt and pepper. Use a spoon to mix them well. This coats the potatoes and enhances their taste. Mixing the creamy sauce In a bowl, combine heavy cream, grated Parmesan cheese, and minced garlic. Stir until it's smooth and creamy. This sauce will make the dish rich. Pour it over the seasoned potatoes in the slow cooker. Make sure the potatoes are fully covered. Layering the ingredients After that, take the browned chicken thighs and nestle them on top of the potatoes. Ensure they sit in the creamy sauce. This helps cook the chicken evenly and keeps it moist. Cooking times and settings Secure the lid on your slow cooker. Set it to low for 6-7 hours or high for 3-4 hours. The chicken should be fully cooked and tender. The potatoes need to be soft enough to pierce with a fork. Once cooked, stir the mixture to blend flavors. Serve hot and enjoy your meal! To get the best flavor in your Crockpot Garlic Parmesan Chicken & Potatoes, follow these steps: - Sear the Chicken: This adds depth. Heat olive oil in a skillet. Season the thighs with salt, pepper, smoked paprika, and Italian seasoning. Sear each thigh for 3-4 minutes. You want a golden-brown crust. This step locks in moisture and flavor. - Creamy Sauce Mix: In a bowl, blend heavy cream, grated Parmesan, and minced garlic. This mixture is the heart of your dish. Pour it over the potatoes to ensure they soak up all the flavors. When it comes to serving, think about adding sides that balance the meal: - Ideal Side Dishes: A fresh green salad or steamed vegetables pair well. They add crunch and lightness to your plate. - Presentation Tips: For a stunning look, serve in shallow bowls. Ladle the chicken and potatoes, then drizzle the creamy sauce over them. Top with fresh parsley for color. It makes the dish pop and looks inviting. Pro Tips Perfectly Sear the Chicken: Make sure your skillet is hot enough before adding the chicken. A good sear locks in moisture and flavor, giving your dish a delicious depth. Choosing the Right Potatoes: Baby potatoes are ideal for this recipe due to their creamy texture when cooked. You can substitute with Yukon Gold or red potatoes for a similar result. Make it Extra Creamy: For an even richer sauce, consider adding a splash of white wine to the cream mixture before pouring it over the potatoes. Garnish for Freshness: Don't skip the fresh parsley! It adds a pop of color and a fresh flavor that balances the richness of the dish. {{image_4}} You can make this dish your own with easy swaps. - Alternative protein options: Try using chicken breasts instead of thighs. You can also use turkey or pork. For a vegetarian option, use hearty mushrooms or tofu. - Different types of cheese: If you want a twist, swap Parmesan for mozzarella or cheddar. Feta can add a tangy flavor that pairs well too. - Vegetable additions: Add veggies like carrots or broccoli for extra color and nutrients. You can also toss in bell peppers for a sweet crunch. Want to mix it up? Here are some cooking method options. - Instant Pot variation: Use the Instant Pot for a quick meal. Sauté the chicken and garlic first. Next, add the rest of the ingredients and cook on high pressure for 10 minutes. - Oven-baking option: Preheat your oven to 375°F. Place the chicken and potatoes in a baking dish. Pour the creamy sauce over and bake for 40-45 minutes. Check that the chicken is cooked through before serving. These variations give you freedom to explore. Enjoy experimenting! After enjoying this dish, you may have some leftovers. To keep your food fresh: - Let the chicken and potatoes cool to room temperature. - Place them in an airtight container. - Store in the fridge for up to three days. If you want to freeze it: - Use freezer-safe containers or bags. - Make sure to remove as much air as possible. - Label the container with the date. - You can store it in the freezer for up to three months. When it’s time to enjoy the leftovers, you want to keep them tasty. Here are some ways to reheat: - Use the microwave for quick reheating. Place food in a bowl and cover it. - For the best flavor, use the oven. Preheat it to 350°F. Place the food in an oven-safe dish, cover it with foil, and heat for 15-20 minutes. To keep the flavor and texture: - Add a splash of cream or broth before reheating. - Stir the mixture gently to combine flavors. - Check that the chicken is heated through, reaching at least 165°F. How long does it take to cook? Cooking this dish takes about 6-7 hours on low or 3-4 hours on high. It’s great for busy days. Just set it and forget it! Can I use frozen chicken? Yes, you can use frozen chicken. However, it may take longer to cook. Ensure the chicken reaches a safe temperature of 165°F. Is it possible to make this dish dairy-free? You can make it dairy-free. Use coconut cream and a dairy-free cheese. This keeps the creamy texture without the dairy. What to do if it’s too dry? If the dish turns out dry, add more cream or broth. Stir it in gently to add moisture. This will help restore the creamy goodness. Adjusting seasoning levels Taste the dish before serving. If it needs more flavor, add salt, pepper, or more garlic. Mix well to ensure even seasoning throughout. This recipe brings tasty chicken and creamy sauce together in one dish. We covered the ingredients, prepping steps, and cooking methods. You can also try it in an Instant Pot or oven, with tips for serving and storing leftovers. For best results, season well and try different veggies. With this guide, your meal will shine, no matter how you choose to make it. Enjoy your cooking adventure and savor every bite!

Crockpot Garlic Parmesan Chicken & Potatoes Delight

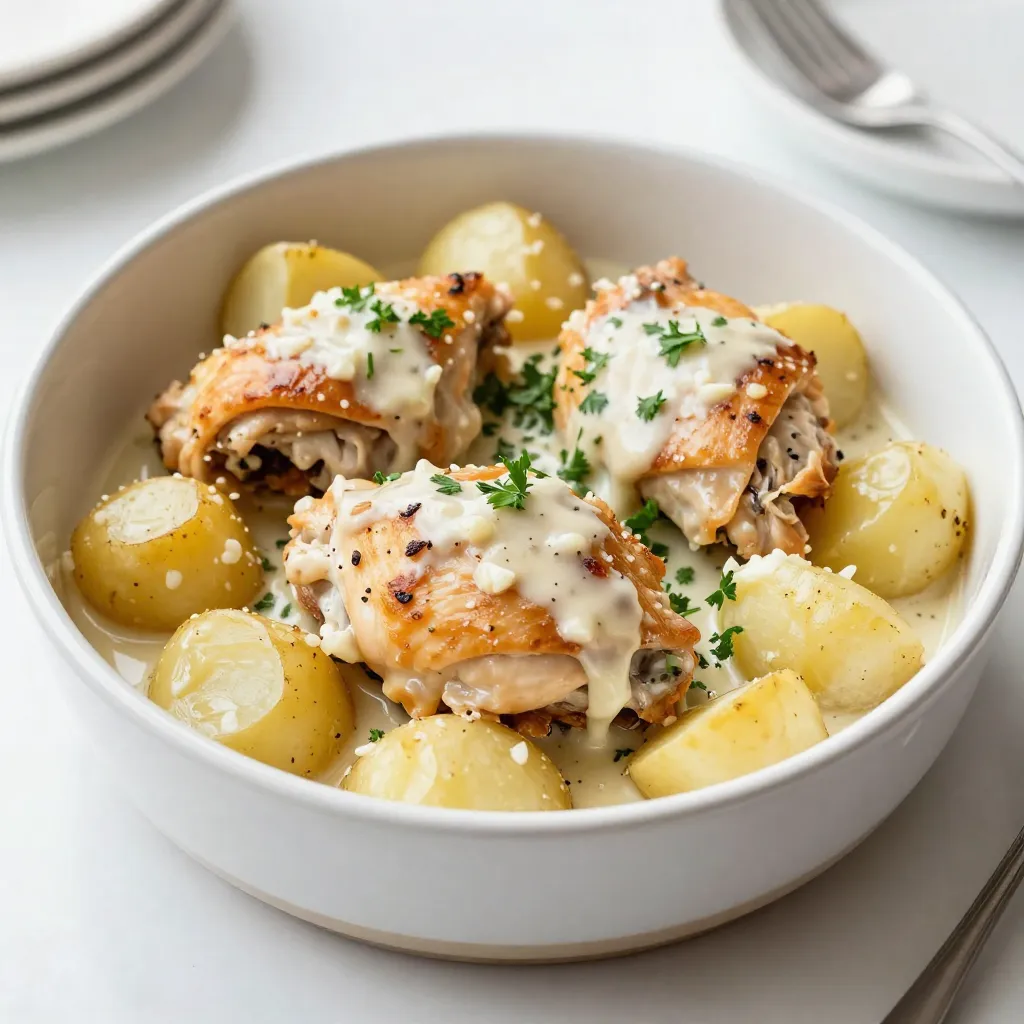
Are you craving a warm, hearty meal that’s easy to make? Look no further than my Crockpot Garlic Parmesan Chicken

- Butterscotch chips: These rich, sweet chips make the base of our cookies. They melt down to create a smooth, creamy mixture that binds everything together. - Creamy peanut butter: This adds a nice texture and flavor. It helps to make the cookies chewy and satisfying. Choose a good quality brand for the best taste. - Chinese chow mein noodles: These are the star of the show. They add crunch and structure. When you mix them with the melted butterscotch, they help form the haystack shape. - Mini marshmallows: These soft, sweet bites add a fun texture. They melt slightly but keep their shape, giving a nice chew to each cookie. - Shredded coconut (optional): Coconut gives a tropical twist and extra chewiness. You can add it for more texture or skip it if you prefer a simpler cookie. - ½ teaspoon vanilla extract: This little bit of flavor enhances the sweetness. It makes each bite taste even better. - A pinch of salt: This balances the sweetness of the butterscotch and peanut butter. It brings out the flavors nicely. For this recipe, you will need: - 2 cups butterscotch chips - 1 cup creamy peanut butter - 3 cups Chinese chow mein noodles - 1 cup mini marshmallows - 1 cup shredded coconut (optional) - ½ teaspoon vanilla extract - A pinch of salt Feel free to adjust these amounts based on your taste. You can also consider different add-ins or toppings to make these cookies your own! {{ingredient_image_2}} 1. Microwave melting technique for the butterscotch and peanut butter Start by placing the butterscotch chips and creamy peanut butter into a microwave-safe bowl. Heat this mixture in the microwave for 30 seconds. After 30 seconds, take it out and stir. Repeat this in 15-30 second bursts until the mix is smooth and fully melted. This takes about 1 to 1.5 minutes in total. 2. Mixing and combining all ingredients Once your butterscotch and peanut butter are melted, add in the vanilla extract and a pinch of salt. Stir well to combine. Next, in a large bowl, mix the Chinese chow mein noodles, mini marshmallows, and shredded coconut if you’re using it. Be gentle while mixing. You want to keep the marshmallows whole. 3. Forming and dropping the cookie mixture Carefully pour the warm butterscotch mix over your noodle mixture. Use a spatula or your hands to gently fold everything together. Make sure all the dry ingredients are coated well. Then, take a spoon or a cookie scoop and drop spoonfuls of the mixture onto a baking sheet lined with parchment paper. Leave some space between them since they may spread a little while setting. Let the haystacks cool at room temperature until they firm up, or refrigerate them for about 30 minutes for faster results. Once firm, your cookies are ready to enjoy! To make no-bake butterscotch haystack cookies, you need to avoid a few common mistakes. First, when melting butterscotch chips, heat them slowly. If you use too much heat, they can seize up. Start with 30 seconds in the microwave, then stir. Continue in 15-30 second bursts until smooth. Next, ensure the mixture has the right texture. It should be creamy and thick enough to coat the other ingredients without being runny. If it is too thick, add a tiny bit of warm peanut butter. This helps blend everything smoothly. When folding in the chow mein noodles and marshmallows, be gentle. You want to keep the marshmallows whole for that lovely chewy texture. Use a spatula or your hands, but don’t crush them. This will keep your cookies light and airy. For a fun presentation, try drizzling melted chocolate over the cooled cookies. It adds a nice touch and makes them look fancy. Serving them in colorful cupcake liners also gives a festive vibe. Pair these cookies with a cold glass of milk or a warm cup of cocoa. They also go well with vanilla ice cream. Enjoy the mix of flavors and textures with your favorite drink or dessert! Pro Tips Melting Method: To avoid burning the butterscotch chips, melt them in short intervals and stir frequently. This ensures a smooth, creamy consistency. Texture Variation: Feel free to experiment with add-ins such as nuts or dried fruits for a unique twist on the classic recipe! Cooling Tips: If you're short on time, refrigerate the cookies to help them set faster. Just be sure to check occasionally to avoid over-chilling. Presentation Perks: Enhance the visual appeal by drizzling melted chocolate over the cooled haystacks or placing them in colorful cupcake liners. {{image_4}} You can change the flavor of these cookies by using different ingredients. Swap butterscotch chips for dark or milk chocolate chips. Each type adds a new twist. If you prefer, use almond or cashew butter instead of peanut butter. This change adds a unique taste for nut lovers. Adding extra ingredients can make these cookies even better. Consider mixing in chopped nuts like pecans or almonds for a crunch. Dried fruits like raisins or cranberries can add sweetness. These mix-ins create fun flavor profiles and textures. You can easily boost the flavor of these cookies with spices or extracts. Try adding a pinch of cinnamon or nutmeg for warmth. A splash of almond or coconut extract adds a lovely touch, too. Experiment to find your favorite combination. For holidays or special events, give these cookies a theme. Use red and green sprinkles for Christmas. In fall, add pumpkin spice to the mix. You can even shape the cookies into nests for Easter. These small changes can make your treats stand out! You can store these cookies in different ways. If you want to keep them at room temperature, place them in an airtight container. This keeps them fresh and chewy. If you prefer a firmer texture, try refrigerating them. Just remember to use a container that seals well to avoid moisture. - Room temperature: Ideal for a softer cookie. - Refrigeration: Provides a firmer bite. - Storage container: Use airtight ones for best results. These cookies can last quite a while. When stored properly, they stay fresh for up to one week at room temperature. If you keep them in the fridge, they may last up to two weeks. Watch for signs of spoilage. If they start to look dry or hard, it's time to toss them. Also, if you notice an off smell, that means they are no longer good to eat. - Room temperature: Lasts about one week. - Refrigeration: Lasts about two weeks. - Spoilage signs: Dryness, hard texture, or bad smell. Can I use sugar-free butterscotch chips? Yes, you can use sugar-free butterscotch chips. They work well in this recipe. The flavor will still be sweet, but with less sugar. Keep in mind that the texture might change slightly, but they will still taste great. What other toppings can I add? You can add many fun toppings. Try using chopped nuts for crunch. You can also add dried fruit for a chewy texture. Chocolate drizzle is a tasty option! Get creative and mix in what you love. Can I freeze butterscotch haystack cookies? Yes, you can freeze these cookies. Place them in an airtight container. They will stay fresh for up to three months. To enjoy, let them thaw at room temperature. This keeps them chewy and tasty. How do you soften hard cookies? To soften hard cookies, place a slice of bread in the container. Seal it tightly and wait a few hours. The bread adds moisture back to the cookies. This method works well for keeping them soft and fresh. In this post, we explored how to make delicious butterscotch haystack cookies. We discussed the key ingredients like butterscotch chips and creamy peanut butter. You learned the step-by-step process for perfect cookies and tips to avoid mistakes. We also covered fun variations and storage tips to keep cookies fresh. Remember, these cookies are fun to make and easy to share. Get creative with flavors and enjoy the process. Happy baking!

No-Bake Butterscotch Haystack Cookies Delightful Treat

Do you crave something sweet and easy to make? Let me introduce you to No-Bake Butterscotch Haystack Cookies! These delightful

- 2 medium zucchini, sliced into fry-shaped sticks - 1 cup panko breadcrumbs - 1/2 cup finely grated Parmesan cheese - 1 teaspoon garlic powder - 1 teaspoon onion powder - 1 teaspoon dried oregano - Salt and black pepper to taste - 2 large eggs, well beaten - Cooking spray or a drizzle of olive oil for crisping These ingredients come together to make crunchy and cheesy zucchini fries. The zucchini gives a fresh taste, while the panko breadcrumbs add crunch. Parmesan cheese enhances the flavor, making these fries hard to resist. The spices, like garlic powder and dried oregano, bring out the best in each bite. Eggs help the breading stick well, ensuring a perfect coating. Using cooking spray or olive oil helps achieve that golden crispiness. This mix of ingredients makes a delicious snack or side dish that you and your family will love. {{ingredient_image_2}} Start by preheating your air fryer to 400°F (200°C). Let it heat for about 5 minutes. This step is crucial. It helps the fries cook evenly and get crispy. In a bowl, mix together the panko breadcrumbs, Parmesan cheese, garlic powder, onion powder, dried oregano, salt, and black pepper. Stir well to blend all the flavors. This coating gives the fries a tasty crunch. Set up your breading station with two bowls. One bowl should have the beaten eggs, and the other should hold the breadcrumb mix. Take one zucchini fry and dip it into the eggs. Let any extra egg drip off. Then, coat it with the breadcrumb mix. Press lightly so the crumbs stick well. Place the coated zucchini fries in a single layer in the air fryer basket. If you have many fries, do them in batches. Overcrowding can lead to uneven cooking. Lightly mist the fries with cooking spray or drizzle them with olive oil to help them crisp up. Air fry for 10-12 minutes. Shake the basket halfway through to ensure they brown evenly. After cooking, lift the fries from the air fryer and let them cool slightly on a wire rack. This keeps them crunchy. Serve your crispy zucchini fries on a colorful platter. A side of marinara sauce or ranch dressing makes a great dip. Add a sprinkle of chopped parsley for a fresh touch! To get the best crispiness, preheat your air fryer to 400°F (200°C). This step helps the fries cook evenly. Next, use panko breadcrumbs for that extra crunch. They are light and airy, which makes all the difference. When you coat the zucchini, mist it lightly with cooking spray or drizzle some olive oil on top. This will help the fries crisp up nicely. Remember to shake the basket halfway through cooking. This ensures every side turns golden brown. Avoid soggy fries by not overcrowding the air fryer basket. If you add too many at once, they will steam rather than crisp. Give them space to breathe. Another tip is to let the fries cool slightly on a wire rack after cooking. This prevents steam from building up and keeps them crisp. These zucchini fries taste great with dips. I love serving them with marinara sauce or ranch dressing. They add flavor and make for a fun experience. You can also try spicy sriracha mayo for an extra kick. Just mix sriracha with mayo for a quick and tasty sauce. Enjoy experimenting with different dips! Pro Tips Choose the Right Zucchini: Opt for medium-sized zucchini that are firm and free of blemishes for the best texture and flavor. Don’t Skip the Preheat: Preheating your air fryer is crucial for achieving that perfect crispiness on your zucchini fries. Experiment with Seasonings: Feel free to mix up the spices in your breadcrumb mixture; adding cayenne pepper can give your fries a nice kick! Use a Wire Rack: After air frying, let the fries cool on a wire rack to prevent them from steaming and losing their crunch. {{image_4}} To give your zucchini fries a kick, add some heat. Mix in 1 teaspoon of cayenne pepper or chili powder with your breadcrumb coating. This adds a nice spicy layer to the fries. You can also serve them with a spicy dipping sauce. Try mixing hot sauce with ranch or mayo for a tasty dip. If you need a gluten-free choice, swap the panko breadcrumbs for gluten-free breadcrumbs. You can also use ground almonds or crushed rice crackers as a crunchy coating. This way, everyone can enjoy crispy zucchini fries without worry. You can play with different cheeses to change the flavor. Try using shredded mozzarella or cheddar cheese instead of Parmesan. Mix up the cheeses for a fun twist. A blend of cheeses will make your fries extra cheesy and delicious. To keep your zucchini fries fresh, place them in an airtight container. Make sure they cool down first. Store them in the fridge for up to three days. If you want them crispy later, avoid stacking them. Layer them with parchment paper to absorb moisture. To reheat your fries, use the air fryer again for best results. Set it to 350°F (175°C). Cook for about 5-7 minutes. This method keeps them crispy. You can also use an oven. Preheat to 375°F (190°C) and bake for 8-10 minutes. Avoid the microwave, as it makes fries soggy. If you want to freeze your zucchini fries, flash freeze them first. Arrange the fries in a single layer on a baking sheet. Freeze for about 1-2 hours until solid. Then, transfer them to a freezer bag. They can last up to three months. When ready to eat, cook from frozen, adding a few extra minutes to the air fryer time. Yes, you can use regular breadcrumbs. However, panko gives a lighter, crunchier texture. Regular breadcrumbs may not crisp up as well. If you choose to use them, the taste will still be nice but the texture will change. The fries are done when they turn golden brown and feel crispy. You can check them at 10 minutes. Shake the basket halfway through cooking for even browning. If they need more time, air fry for 1-2 more minutes. These zucchini fries go great with marinara sauce or ranch dressing. You can also try serving them with garlic aioli or a spicy dip for extra flavor. They make a fun starter or snack for any meal. Yes, these fries can be a healthy snack! Zucchini is low in calories and high in vitamins. The air fryer uses less oil than frying. However, remember that the cheese and breadcrumbs add some calories. Enjoy them in moderation! To wrap up, we explored delicious Parmesan zucchini fries. You learned the easy ingredients and steps to make them crispy in an air fryer. We covered cooking tips, fun variations, and smart storage ideas. Remember, you can switch up flavors or opt for gluten-free. Make these tasty fries your new favorite snack or side dish! Enjoy the crispy goodness and share them with friends and family.

Air Fryer Parmesan Zucchini Fries Crispy and Tasty

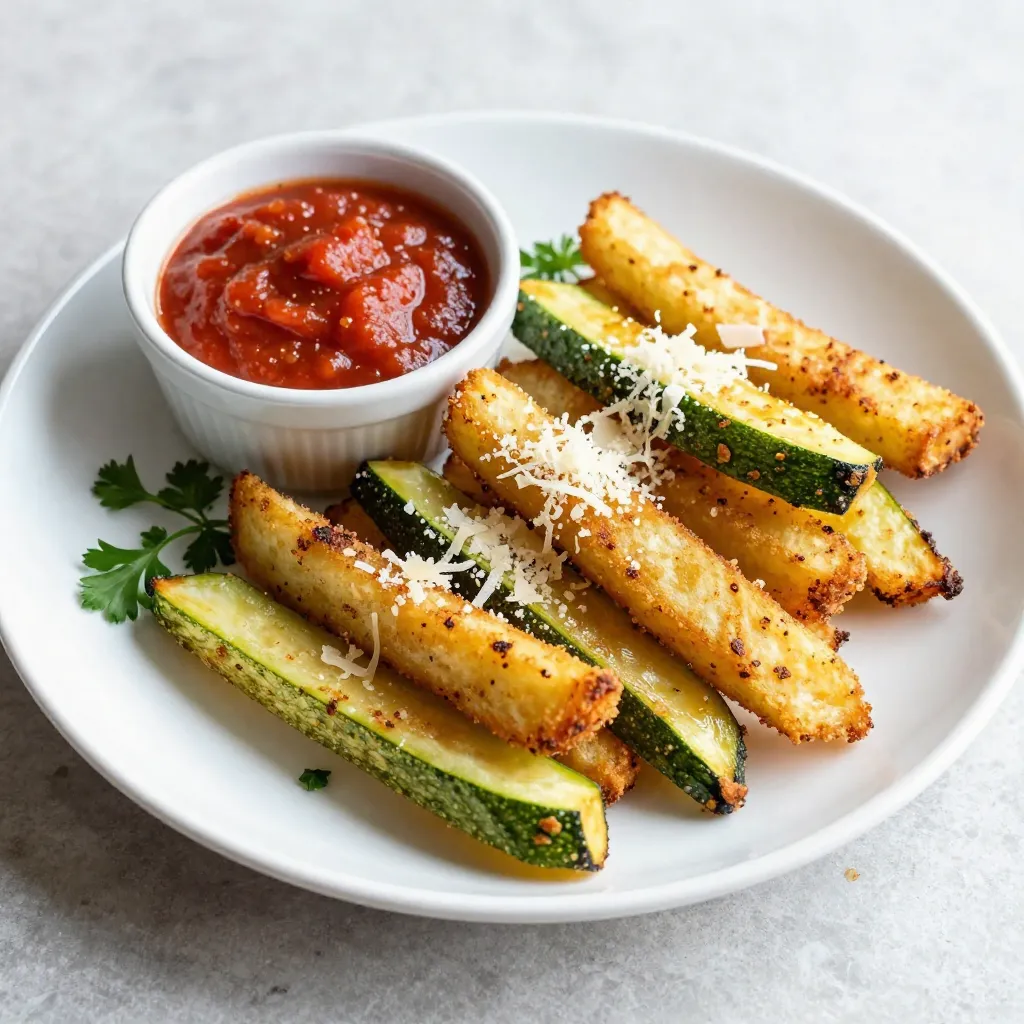
Are you ready to impress your taste buds? These Air Fryer Parmesan Zucchini Fries are crispy, tasty, and simple to

- 1 ¾ cups graham cracker crumbs - ½ cup unsalted butter, melted - 2 tablespoons granulated sugar - 16 oz cream cheese, softened to room temperature - 1 cup granulated sugar - 1 teaspoon vanilla extract - 3 large eggs, at room temperature - 1 teaspoon ground cinnamon - 2 cups diced apples (preferably Granny Smith for tartness) - 1 cup granulated sugar - 6 tablespoons unsalted butter, cut into pieces - ½ cup heavy cream, at room temperature - Pinch of salt When making this caramel apple cheesecake, gather all your ingredients first. Having everything ready makes cooking easier and more fun. For the crust, I use graham cracker crumbs. They give a sweet and crunchy base. Melted unsalted butter helps bind the crumbs. The granulated sugar adds just the right amount of sweetness. For the cheesecake filling, cream cheese is key. It gives that smooth, rich texture. I mix it with sugar and vanilla extract. The eggs help hold everything together. Ground cinnamon adds warmth, while diced apples give a nice tartness. I prefer Granny Smith apples for their crispness. Finally, the caramel sauce needs granulated sugar. This will turn golden brown when heated. Unsalted butter adds richness, and heavy cream creates a smooth finish. A pinch of salt balances the sweetness perfectly. Make sure to prepare each ingredient ahead of time, as this helps ensure a smooth cooking process. This dessert will impress everyone! {{ingredient_image_2}} 1. Preheat the oven: Set your oven to 325°F (160°C). 2. Mixing crust ingredients: In a bowl, combine 1 ¾ cups graham cracker crumbs, ½ cup melted butter, and 2 tablespoons granulated sugar. Stir until the crumbs are moist. 3. Baking the crust: Press the mixture into a greased 9-inch springform pan. Bake for 10 minutes. Remove it and let it cool while you make the filling. 1. Beating cream cheese: In a large bowl, beat 16 oz softened cream cheese until smooth. 2. Incorporating sugar and vanilla: Gradually add 1 cup granulated sugar and 1 teaspoon vanilla extract. Mix until blended. 3. Adding eggs and spices: Add 3 eggs one at a time. Mix on low after each. Then add 1 teaspoon ground cinnamon. Fold in 2 cups diced apples gently. 1. Combining filling with crust: Pour the cheesecake filling over the cooled crust. Smooth the top evenly. 2. Baking the cheesecake: Bake for 50-60 minutes. The center should jiggle slightly when done. 3. Cooling in the oven: Turn off the oven and crack the door. Let the cheesecake cool inside for 1 hour. 1. Making caramel sugar: In a saucepan, heat 1 cup granulated sugar over medium heat. Stir until it melts and turns amber. 2. Mixing in butter and cream: Add 6 tablespoons of butter. Whisk until smooth. Carefully pour in ½ cup heavy cream and a pinch of salt. Whisk until silky. 3. Cooling the caramel: Set the caramel aside to cool slightly before using. 1. Chilling the cheesecake: Move the cheesecake to the fridge. Chill for at least 4 hours or overnight. 2. Serving suggestions: Drizzle the cooled caramel over each slice. Garnish with apple slices for a lovely touch. Enjoy! - Use room temperature cream cheese. This helps it blend smoothly. - To avoid cracks, don't overmix once you add the eggs. - Bake at a low temperature for even cooking and a creamy texture. - For perfect caramel, watch it closely as it cooks. Remove from heat when it turns amber. - Store leftover caramel in a jar in the fridge. Warm it up before using. - Try honey or maple syrup for a different flavor in your caramel. - Garnish each slice with thin apple slices. This adds color and a fresh touch. - Serve on a nice plate. A clean edge makes it look great. - Drizzle extra caramel on top for an eye-catching finish. Pro Tips Choose the Right Apples: For the best flavor, opt for tart apples like Granny Smith. They provide a perfect balance against the sweetness of the cheesecake and caramel. Room Temperature Ingredients: Ensure that your cream cheese and eggs are at room temperature before mixing. This helps achieve a smoother, creamier cheesecake filling without lumps. Cool Slowly: Allowing the cheesecake to cool gradually in the oven prevents cracking. A sudden temperature change can cause the surface to split. Chill Overnight: For the best texture and flavor, refrigerate the cheesecake overnight. This allows the flavors to meld beautifully and ensures it’s set perfectly. {{image_4}} You can make this cheesecake even more fun! Try adding spices to kick up the taste. A sprinkle of nutmeg or allspice can bring warmth. You can also mix in other fruits. Pears work well with apples, or you can toss in berries for a burst of color. Need a gluten-free option? Use almond flour or gluten-free cookies for the crust. For a vegan cheesecake, swap cream cheese for cashew cream. Use flax eggs instead of regular eggs. These changes make the dessert fit many diets. Celebrate the seasons with your cheesecake! For fall, try making a pumpkin caramel cheesecake. It adds a festive touch. In winter, a chocolate caramel cheesecake can warm you up. Each version brings new flavors and fun to your table. Store your caramel apple cheesecake in the refrigerator. It stays fresh for about five days. Make sure to cover it tightly with plastic wrap. You can also freeze it for up to three months. Wrap it well in plastic wrap and then in aluminum foil. Thaw in the fridge overnight before serving. Keep any leftover caramel sauce in an airtight container. It lasts about two weeks in the fridge. For longer storage, you can freeze it. Pour it into ice cube trays for easy use later. Just pop out a cube whenever you need some. To reheat caramel, place it in a small saucepan. Use low heat and stir often. This method helps retain the smooth texture. For cheesecake, let it sit at room temperature for about 30 minutes before serving. This will help bring back its creamy texture. How do you know when cheesecake is done? You know cheesecake is done when the center is set but slightly jiggles. A toothpick should come out clean from the edges. Can I make this cheesecake ahead of time? Yes, you can make this cheesecake one to two days ahead. Just chill it in the fridge. What apples are best for caramel apple cheesecake? Granny Smith apples work best. Their tartness balances the sweetness of the caramel. How do you fix grainy caramel? To fix grainy caramel, add a bit of water and heat gently. Stir until smooth again. Can I use store-bought caramel? Yes, you can use store-bought caramel. It saves time and still tastes great. Best sides to serve with cheesecake Serve the cheesecake with whipped cream or vanilla ice cream. Fresh apple slices also add a nice touch. Ideal beverages to accompany the dessert Pair this cheesecake with coffee, tea, or apple cider. These drinks enhance the flavors of the dessert. This blog post covered every step to make a delicious caramel apple cheesecake. We explored ingredients, from the crust to the caramel sauce. I shared tips for the best results and variations for different tastes. Remember, using room temperature ingredients helps avoid cracks in your cheesecake. With practice, your cheesecake can impress anyone. Enjoy making and sharing this tasty dessert with friends and family. Happy baking!

Caramel Apple Cheesecake Delightful and Rich Dessert

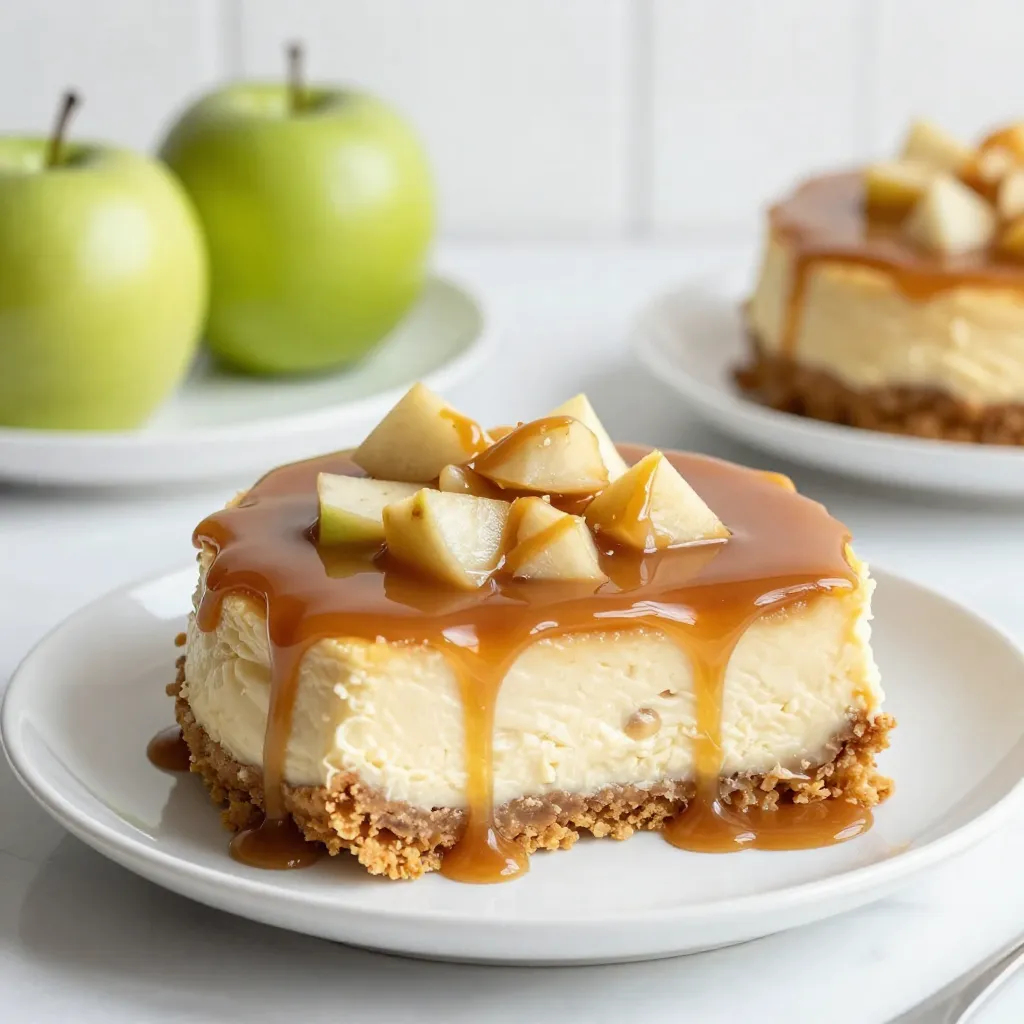
Are you ready to indulge in a dessert that combines the sweetness of caramel with the crispness of apples? My

- 2 cups all-purpose flour - 1 teaspoon baking soda - 1 tablespoon ground ginger - 1 tablespoon ground cinnamon - 1/2 teaspoon ground nutmeg - 1/2 teaspoon salt - 1/2 cup unsalted butter, softened - 1 cup brown sugar, packed - 2 large eggs, at room temperature - 3/4 cup molasses - 1/2 cup buttermilk, at room temperature - 1 teaspoon vanilla extract - Zest of 1 lemon - 1 cup powdered sugar - 2 tablespoons freshly squeezed lemon juice - 1 tablespoon lemon zest The ingredients for these muffins mix sweet and spicy flavors. The all-purpose flour gives the muffins their base. The baking soda helps them rise. Ground ginger, cinnamon, and nutmeg add warmth and depth. Salt balances the sweetness. Butter and brown sugar create a rich, moist texture. Eggs add structure and help bind the mix. Molasses gives a deep, sweet flavor, while buttermilk adds moisture and tang. Vanilla extract rounds out the taste, and lemon zest brightens it all. For the lemon glaze, powdered sugar provides sweetness. Fresh lemon juice adds tartness, and zest enhances the lemon flavor. This glaze is smooth and bright. It complements the muffins perfectly. {{ingredient_image_2}} This blog post covered how to make delicious muffins from scratch. You learned about the key ingredients, step-by-step baking instructions, and tips for perfect results. Don't forget the lemon glaze to finish your muffins beautifully. Try different flavors and seasonal adds to make each batch unique. Store leftovers properly so they stay fresh, or freeze them for later. Now, it’s time to get baking and enjoy every bite of your homemade treats. Happy baking!

Soft Gingerbread Muffins with Lemon Glaze Delight

Welcome to a delightful bake that’s sure to warm your heart: Soft Gingerbread Muffins with Lemon Glaze! These muffins blend

- 1 ½ cups all-purpose flour - 1 teaspoon baking powder - ½ teaspoon baking soda - 1 teaspoon ground cinnamon - ½ teaspoon ground nutmeg - ¼ teaspoon ground ginger - ¼ teaspoon salt - ½ cup unsalted butter, softened - 1 cup granulated sugar - 2 large eggs, at room temperature - 1 cup pumpkin puree - ½ cup brewed coffee, cooled - 1 teaspoon pure vanilla extract - 1 cup powdered sugar - 4 ounces cream cheese, softened - 1 teaspoon pure vanilla extract - Whipped cream and ground cinnamon for garnish When I create these Pumpkin Spice Latte Cupcakes, I gather all my ingredients first. Having everything ready helps me stay focused. I use high-quality pumpkin puree. It gives the cupcakes a rich flavor. I also choose fresh spices for the best taste. The dry ingredients mix together first. I whisk flour, baking powder, baking soda, and spices in a bowl. This step is key. It ensures even flavor throughout. Next, I prepare the wet ingredients. Softened butter and sugar mix until fluffy. Eggs go in one at a time. I blend in the pumpkin, coffee, and vanilla. This mix brings the cozy fall flavors to life. For the frosting, I whip cream cheese and powdered sugar. I add vanilla for extra taste. The frosting should be creamy and smooth. I like to top each cupcake with whipped cream and cinnamon. It makes them look extra special. These ingredients come together to create a delightful treat. They capture the warmth of autumn in every bite. {{ingredient_image_2}} - Preheat oven to 350°F (175°C) - Line muffin tin with cupcake liners Start by preheating your oven. This helps the cupcakes rise well. Lining the tin with cupcake liners keeps them from sticking. It makes cleanup easier, too. - Whisk dry ingredients in a medium bowl - Set aside for later use Next, take a medium bowl. Whisk together the flour, baking powder, baking soda, cinnamon, nutmeg, ginger, and salt. Mixing them well ensures even flavor. Set this bowl aside for later. - Beat softened butter and granulated sugar until fluffy - Add eggs, mixing one at a time In a large bowl, beat the softened butter and granulated sugar. Use an electric mixer to make it fluffy. This takes about 3 to 4 minutes. Then, add the eggs one at a time. Make sure to mix well after each egg. - Blend in pumpkin puree, brewed coffee, and vanilla Now, blend in the pumpkin puree, cooled brewed coffee, and vanilla. Mix until all the wet ingredients look smooth. This adds moisture and flavor to your cupcakes. - Gradually add dry ingredients to wet mixture - Stir gently until just combined Gradually mix the dry ingredients into the wet. Stir gently to combine them. Be careful not to overmix. This helps keep your cupcakes light and fluffy. - Fill liners and bake for 18-20 minutes - Cool on wire rack Fill the cupcake liners about two-thirds full with batter. Bake in the preheated oven for 18 to 20 minutes. Check for doneness with a toothpick. Once baked, let them cool in the pan for 5 minutes. Then, move them to a wire rack to cool completely. - Beat cream cheese, powdered sugar, and vanilla until smooth - Frost cooled cupcakes and add toppings While the cupcakes cool, make the frosting. Beat the cream cheese, powdered sugar, and vanilla until smooth. Once your cupcakes are cool, frost them generously. For a lovely finish, add a dollop of whipped cream and a sprinkle of cinnamon on top. - Avoid overmixing for best texture. Mixing too much can make the cupcakes tough. - Test for doneness with a toothpick. If it comes out clean, your cupcakes are ready. - Use a piping bag for decorative swirls. This makes your cupcakes look special and fun. - Chill the frosting for easier spreading. A cold frosting stays put and is less messy. - Serve on a decorative platter. A pretty dish makes your treats shine. - Add seasonal decorations for visual appeal. Small pumpkins or leaves can bring a festive feel. Pro Tips Use Room Temperature Ingredients: Allow your eggs and butter to come to room temperature before mixing. This helps create a smoother batter and results in fluffier cupcakes. Don’t Overmix: When combining the dry and wet ingredients, mix just until you no longer see dry flour. Overmixing can lead to dense cupcakes. Cool Completely Before Frosting: Ensure your cupcakes are completely cool before adding the cream cheese frosting. This prevents the frosting from melting and losing its shape. Experiment with Spices: Feel free to adjust the spices according to your taste. Adding a pinch of allspice or cloves can give your cupcakes a unique twist! {{image_4}} You can make these cupcakes even better! Here are two fun ideas: - Add chocolate chips for a mocha twist. The chocolate gives a deep, rich taste. It pairs so well with pumpkin and coffee. - Incorporate nuts like pecans or walnuts. Chopped nuts add crunch and flavor. They also give a nice texture contrast. Do you need a different option? Try these swaps: - Use gluten-free flour for a gluten-free version. This way, everyone can enjoy them. Just make sure you check the flour's label for the best results. - Substitute coconut cream for vegan frosting. It’s a tasty choice. It also makes the frosting creamy without dairy. Want something smaller? Mini cupcakes are a great idea! Here’s how to do it: - Adjust baking time for mini cupcakes. Bake them for about 10-12 minutes. Check with a toothpick to see if they’re done. - Perfect for bite-sized treats. These mini versions are great for parties or snacking. Plus, they’re easy to share! You can keep these cupcakes at room temperature. Store them in an airtight container for up to 3 days. This keeps them fresh and soft. If you have frosted cupcakes, you can refrigerate them. They will stay good for up to 1 week. Just make sure to keep them in an airtight container to avoid drying out. Want to save some for later? Freeze the un-frosted cupcakes. They can last up to 3 months in the freezer. Just wrap them well to protect against freezer burn. When you're ready, let them thaw before frosting. To keep your cupcakes moist, use these tips: - Use room temperature ingredients. - Don't overmix your batter. - Add a bit of sour cream or yogurt. - Bake just until done. The right baking time is key. Overbaking makes them dry. Always check with a toothpick. It should come out clean but moist. Yes, you can use pumpkin pie filling. However, it has spices and sugar. You may need to reduce sugar in your recipe. Check the flavor balance before mixing. Pumpkin puree has a pure pumpkin taste. It's less sweet and allows more control. Use whichever suits your taste best. For a different frosting option, try these: - Mascarpone cheese for a rich taste. - Greek yogurt for a lighter option. - Coconut cream for a dairy-free choice. Each option changes the flavor a bit. Mascarpone is smooth, while yogurt adds tang. Choose based on your needs and taste. Yes, espresso can boost the flavor. Just be careful with the amount. Start with a tablespoon of brewed espresso. Mix it into the batter. Espresso deepens the coffee notes in the cupcakes. It adds richness without making them too strong. Enjoy your flavorful creation! In this blog post, I covered how to make delicious pumpkin cupcakes. We discussed the ingredients, including dry and wet components, as well as frosting. I also shared step-by-step instructions to guide you through the baking process. Remember to mix gently and check for doneness. You can try variations for fun flavors or dietary needs. With these tips, your cupcakes will turn out perfect every time. Enjoy baking and sharing these tasty treats!

Pumpkin Spice Latte Cupcakes Delightful Fall Treat

Fall is here, and that means it’s time for pumpkin spice everything! If you’re craving a sweet treat that brings

- 2 cups milk (choose your favorite type or a milk alternative) - 1 cup strong brewed coffee or espresso - 2 tablespoons pumpkin puree - 1 tablespoon sugar (feel free to adjust based on your sweetness preference) - 1/2 teaspoon pumpkin pie spice (plus additional for garnishing) - 1/4 teaspoon pure vanilla extract - Whipped cream (for a delightful topping) To make a great pumpkin spice latte, start with your milk. You can use dairy milk or a plant-based option like almond or oat milk. Each type adds its own flavor. Next, brew your coffee or espresso. Strong coffee works best for a rich taste. Pumpkin puree is key. It gives the drink its lovely color and flavor. Use real pumpkin puree, not pumpkin pie filling. The latter has added sugar and spices that can change the taste. - Sweeteners and alternatives - Types of spices and their roles - Flavor enhancers like vanilla extract You can customize your latte with sweeteners. Use sugar, honey, or maple syrup to add sweetness. Adjust the amount to fit your taste. Spices are important too. Pumpkin pie spice includes cinnamon, nutmeg, and ginger. Each spice brings warmth and depth to your drink. You can also add a dash of cayenne for a little heat! Don't forget about flavor enhancers. A splash of vanilla extract enriches the latte’s taste. It adds a sweet note that pairs well with pumpkin. These simple ingredients make your homemade pumpkin spice latte a creamy seasonal delight! {{ingredient_image_2}} To start, heat 2 cups of milk in a medium saucepan. Keep the heat at medium. Stir it gently. You want the milk to steam but not boil. If it boils, it can curdle. After the milk is heated, add 2 tablespoons of pumpkin puree. Next, add 1 tablespoon of sugar, 1/2 teaspoon of pumpkin pie spice, and 1/4 teaspoon of pure vanilla extract. Whisk it well until everything is smooth and mixed. To blend the milk mixture, you can use an immersion blender. It gives a nice frothy texture. If you don't have one, a regular whisk works too. Just whisk it hard and fast until it becomes frothy. This step is key to a great latte. You want that light, airy feel to your drink. Now, it’s time to put it all together. Brew 1 cup of strong coffee or espresso. Pour this into a large mug. The coffee should be hot enough to mix well with the milk. Carefully pour the warm pumpkin milk over the coffee. Stir gently to combine the flavors. Crown your latte with whipped cream on top. Sprinkle extra pumpkin pie spice for a pretty finish. Enjoy the warmth and cozy flavors of your homemade pumpkin spice latte! You can change the sugar to fit your taste. Start with one tablespoon of sugar. If you love it sweeter, add more. You can also try natural sweeteners. Honey or maple syrup can work well too. These give unique flavors alongside the pumpkin. For a great froth, use an immersion blender or a milk frother. Both make your drink creamy and light. If you don’t have these, just use a whisk. Beat the milk mixture fast until it gets frothy. It takes a bit of work, but the taste is worth it! Top your latte with whipped cream for a special treat. A sprinkle of pumpkin pie spice adds a nice touch. You can also try adding nutmeg or cinnamon. They bring out the fall flavors in your drink. Experiment with different spices to find your favorite mix! Pro Tips Choose Your Milk Wisely: Different types of milk will create varying textures and flavors. Whole milk for creaminess, almond milk for a nutty flavor, or oat milk for a smooth finish can elevate your latte experience. Adjust the Sweetness: Don’t hesitate to modify the amount of sugar based on your taste. You can also substitute with honey or maple syrup for a different sweetness profile. Froth Like a Pro: For the best frothy texture, use an immersion blender or milk frother. If you don’t have one, whisk vigorously by hand until you achieve a light and airy foam. Garnish for Flair: A simple sprinkle of extra pumpkin pie spice or a drizzle of caramel sauce on top of the whipped cream can add not only visual appeal but also an extra layer of flavor. {{image_4}} You can easily make this latte dairy-free. Here are a few ideas: - Use almond milk for a nutty taste. - Try oat milk for a creamy texture. - Coconut milk gives a tropical twist. - Soy milk is a great option too. For whipped cream, choose these vegan options: - Coconut whipped cream for a light touch. - Soy whipped cream offers a smooth texture. - Aquafaba can also serve as a nice topper. Changing the spice profile can give your latte a fresh feel. Try these ideas: - Add more pumpkin pie spice for a stronger flavor. - Use cinnamon or nutmeg to switch things up. - A pinch of ginger can add warmth and depth. You can also add flavored syrups or extra ingredients: - Vanilla syrup adds sweetness and aroma. - Caramel syrup gives a rich flavor. - A splash of maple syrup adds a fall twist. Pair your latte with snacks or treats for a cozy vibe: - Enjoy with pumpkin bread for a seasonal snack. - Pair with cookies for a sweet treat. - A slice of apple pie complements the flavors well. Best times to enjoy your latte include: - Morning for a warm start to your day. - Afternoon for a cozy pick-me-up. - Evening while relaxing or reading a book. To store leftover latte mixture, pour it into an airtight container. Keep it in the fridge for up to three days. Use a glass or plastic container with a tight lid. This helps keep the flavors fresh. Homemade ingredients like pumpkin puree last about one week in the fridge. Make sure to check for any signs of spoilage before using. When reheating your latte, do it gently. Heat it on low in a saucepan. This way, you won't lose the creamy texture. Avoid boiling, as it can change the taste. To maintain froth, use a whisk or milk frother while heating. If you don’t have those, shake the latte in a jar to add air. This will help you keep that lovely frothy layer. Yes, you can make a larger batch of pumpkin spice latte. Just scale up the ingredients. For each additional serving, add: - 1 cup milk - 1/2 cup strong brewed coffee or espresso - 1 tablespoon pumpkin puree - 1/2 tablespoon sugar - 1/4 teaspoon pumpkin pie spice - 1/8 teaspoon vanilla extract Mix these ingredients in the same way. You can easily double or triple the recipe. Just keep an eye on the heating process. To make a great latte, use strong coffee or espresso. Espresso gives a rich flavor. If you prefer brewed coffee, choose a dark roast. Dark roasts have bold flavors. Medium roasts work too, but they may taste lighter. The key is to ensure your coffee stands up to the creamy pumpkin flavor. You can make your pumpkin spice latte healthier with a few simple swaps. Here are some ideas: - Use low-fat or almond milk instead of whole milk. - Replace sugar with honey or maple syrup for natural sweetness. - Cut back on sugar to taste. - Add less whipped cream or skip it altogether. These changes will help reduce calories and sugar while keeping your latte tasty! This guide covered the key steps to making a pumpkin spice latte. You learned about essential ingredients like milk, coffee, and pumpkin puree. We also explored optional add-ins, blending techniques, and ways to customize your drink. In summary, you can craft the perfect latte tailored to your taste. Experiment with different spices and milk options to create your unique version. With these tips, you can enjoy this cozy drink anytime!

Homemade Pumpkin Spice Latte Creamy Seasonal Delight

Fall is here, and it’s time to enjoy a cozy cup of Homemade Pumpkin Spice Latte! With just a few

- 1 cup all-purpose flour - 1/2 teaspoon baking soda - 1/4 teaspoon fine sea salt - 1/2 cup unsalted butter, softened to room temperature - 1/4 cup cream cheese, softened to room temperature - 1/2 cup brown sugar, packed tightly - 1/4 cup granulated sugar - 1 teaspoon pure vanilla extract - 1 large egg, at room temperature - 1 cup semi-sweet chocolate chips - 1/2 cup chopped walnuts (optional, but recommended for crunch) The main ingredients create a soft and rich cookie. The butter and cream cheese add moisture. Brown sugar gives a deep, sweet flavor. The chocolate chips provide a delightful burst of sweetness in every bite. Adding chopped walnuts offers a nice crunch. They balance the soft texture of the cookie. You can also try adding a pinch of cinnamon for warmth. A sprinkle of flaky sea salt on top makes a tasty contrast. If you don’t have cream cheese, use more butter. This will change the texture but still keep it soft. For a dairy-free option, use vegan butter and a non-dairy cream cheese. If you’re out of brown sugar, granulated sugar works too, though it will be less rich. {{ingredient_image_2}} 1. Preheat your oven to 350°F (175°C). This helps the cookies bake evenly. 2. Line your baking sheet with parchment paper. This prevents sticking and makes cleanup easy. 3. In a small bowl, mix together 1 cup of all-purpose flour, 1/2 teaspoon of baking soda, and 1/4 teaspoon of fine sea salt. Whisk until there are no lumps and set aside. 4. In a larger bowl, use an electric mixer to beat together 1/2 cup of softened unsalted butter and 1/4 cup of softened cream cheese. Mix on medium speed for 2-3 minutes. Your mixture should be smooth and creamy. 5. Gradually add 1/2 cup of packed brown sugar and 1/4 cup of granulated sugar. Keep mixing until it's light and fluffy. 6. Pour in 1 teaspoon of pure vanilla extract. Crack in 1 large egg. Mix until everything is well combined and smooth again. 7. Slowly add the flour mixture to your wet ingredients in batches. Mix just until combined. Don’t overwork the dough, or your cookies may turn tough. 8. Gently fold in 1 cup of semi-sweet chocolate chips and, if desired, 1/2 cup of chopped walnuts. Make sure they are evenly spread throughout the dough. 9. Use a cookie scoop or a tablespoon to drop dough onto your prepared baking sheet. Leave space between each mound, as the cookies will spread while baking. 10. Bake for 10-12 minutes. Look for golden edges and soft centers. This creates that perfect soft-batch texture. 11. After baking, let the cookies cool on the sheet for 5 minutes. This helps them set before moving to a wire rack to cool completely. To get soft and chewy cookies, use room temperature butter and cream cheese. This helps blend them well and traps air. Mixing them on medium speed for 2-3 minutes ensures a fluffy mix. Also, avoid overmixing the flour mixture. Mix just until you see no dry flour. This keeps your cookies tender. One common mistake is using cold butter. Cold butter won’t mix well, leading to dense cookies. Another mistake is overbaking. Check your cookies at 10 minutes. They should look soft and slightly underbaked in the middle. Let them cool on the sheet for a few minutes; they will continue to firm up. Use a good electric mixer for the best results. A cookie scoop helps shape even cookies. Parchment paper on your baking sheet prevents sticking. For cooling, a wire rack is best. This allows air to circulate and keeps the cookies from getting soggy. Pro Tips Chill the Dough: For even softer cookies, consider chilling the dough for 30 minutes before baking. This helps enhance the flavors and keeps the cookies from spreading too much. Use Quality Ingredients: Opt for high-quality chocolate chips and butter. The better the ingredients, the richer your cookies will taste! Don’t Overbake: Keep a close eye on the cookies as they bake. They should be golden around the edges but still soft in the center for that perfect chewy texture. Experiment with Mix-ins: Feel free to get creative! Try adding dried fruits, different nuts, or even a swirl of peanut butter for a unique twist on the classic cookie. {{image_4}} You can mix things up with these cookies. Try adding spices like cinnamon or nutmeg for warmth. You can also add zest from an orange or lemon for a fresh kick. Want to get bold? Use a teaspoon of espresso powder for a coffee twist. Each change gives a new flavor, making your cookies exciting and fun. A gluten-free version is easy to make! Just swap the all-purpose flour for a gluten-free blend. Look for one that includes xanthan gum, as it helps with texture. Follow the same steps, and you’ll have cookies that everyone can enjoy. They’ll still be soft and delicious. You can use various chocolate chips to change the taste. Dark chocolate chips add a rich flavor, while milk chocolate brings sweetness. White chocolate gives a creamy touch. You can even mix them! Try adding peanut butter chips or butterscotch chips for a unique twist. Each option creates a fun cookie experience. To keep your cookies soft, store them in an airtight container. Line the bottom with parchment paper. Add a slice of bread to help retain moisture. This trick works wonders! Keep the container at room temperature, away from sunlight. Enjoy the cookies within a week for the best taste. You can freeze the cookie dough for later use. Scoop the dough into balls and place them on a baking sheet. Freeze until solid, then transfer the balls to a freezer bag. Label the bag with the date. The dough can stay fresh for up to three months. When ready, bake them straight from the freezer. Just add a minute or two to the baking time. If you have leftover cookies, reheating can restore their softness. Preheat your oven to 300°F (150°C). Place the cookies on a baking sheet and cover them lightly with foil. Heat for about 5-10 minutes. This method brings back the gooey delight of the chocolate chips. Enjoy them warm with a glass of milk! Yes, you can use low-fat cream cheese. This change will make the cookies a bit less rich. However, they might not be as soft and creamy. The texture may be slightly different. I recommend using full-fat cream cheese for the best result. To stop your cookies from spreading, chill the dough before baking. You can refrigerate it for 30 minutes. This helps the butter firm up. Also, make sure you use enough flour. If the dough is too wet, add a little more flour. Lastly, do not overmix the dough. This keeps your cookies thick and soft. These cookies pair well with many drinks. A glass of cold milk is a classic choice. You can also serve them with a warm cup of coffee or tea. For a fun twist, try them with ice cream. A scoop of vanilla ice cream on top makes a great dessert! You now know how to make soft batch cream cheese chocolate chip cookies. We covered key ingredients, preparation steps, and helpful tips. Don't forget to try different flavors and variations for fun. Storing your cookies properly keeps them fresh, and you can freeze dough for later. Following these steps will help you avoid common mistakes and reach the perfect chewy texture. Enjoy every bite, whether fresh or warmed up later! Happy baking!

Soft Batch Cream Cheese Chocolate Chip Cookies Delight

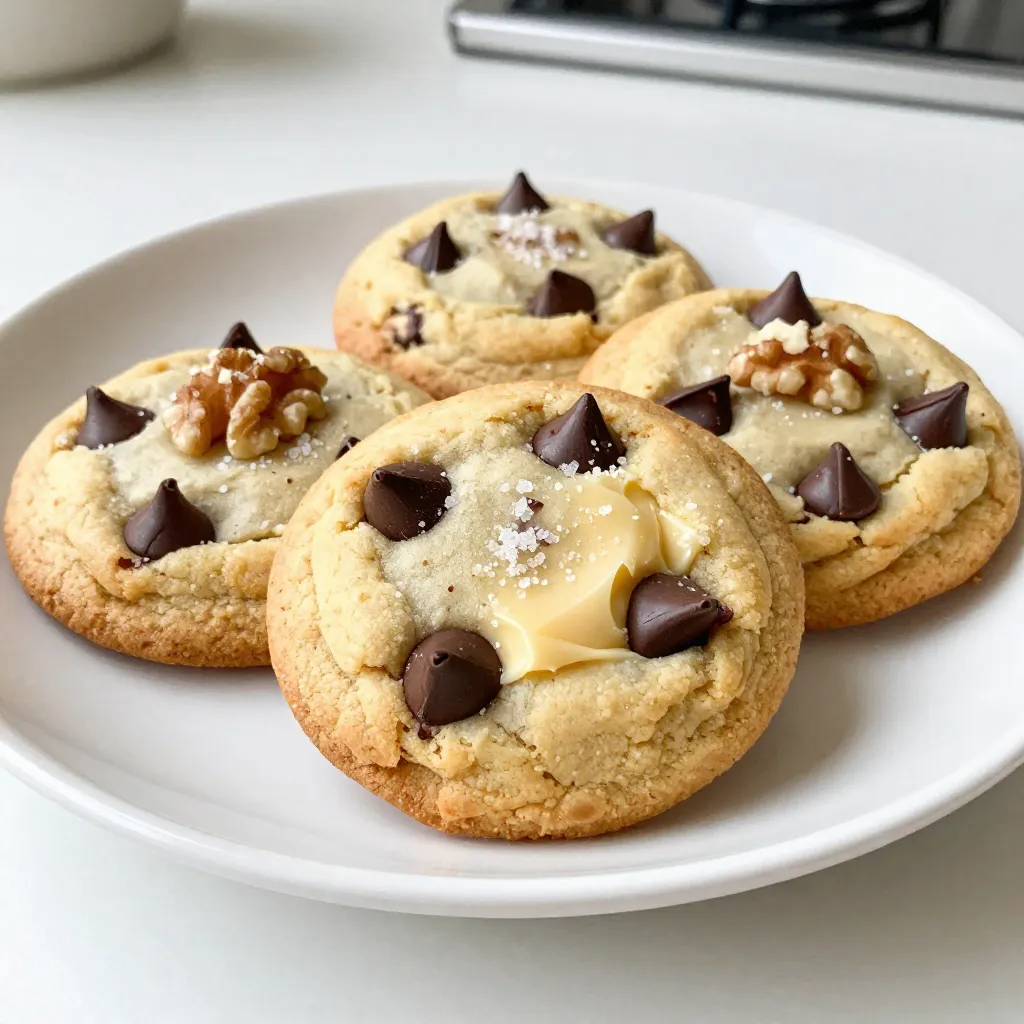
Get ready to bake the softest, chewiest cookies you’ve ever tried! My Soft Batch Cream Cheese Chocolate Chip Cookies are

To make Christmas Crack Saltine Toffee, you need these simple items: - 40 Saltine crackers - 1 cup unsalted butter - 1 cup packed brown sugar - 2 cups semi-sweet chocolate chips - 1 cup chopped pecans or walnuts (optional) - Sea salt for a final sprinkle Each of these ingredients plays a key role in creating this sweet treat. The Saltine crackers provide a crunchy base. The unsalted butter and brown sugar create a rich toffee layer. Semi-sweet chocolate chips add a smooth, sweet finish. If you like, add nuts for extra crunch. Finally, a sprinkle of sea salt balances the sweetness. Gather these items before you start. This will make your cooking process smoother and more enjoyable. You’ll find that each ingredient blends to create a holiday favorite. {{ingredient_image_2}} Start by preheating your oven to 350°F (175°C). This step is key. A hot oven helps the toffee bubble up nicely. Next, grab a large baking sheet. Line it with parchment paper. Make sure the paper hangs over the sides. This way, you can easily lift out your treats later. In a medium saucepan, melt 1 cup of unsalted butter over medium heat. Once the butter is melted, add 1 cup of packed brown sugar. Stir the mixture until it boils gently. Let it boil without stirring for 2-3 minutes. This creates the toffee. Carefully pour the hot toffee mixture over the Saltine crackers. Use a spatula to spread it evenly. Make sure every cracker gets covered in that sweet goodness. Now, pop the baking sheet into the oven. Bake for 5-6 minutes. You want the toffee bubbly and golden. Keep an eye on it to avoid burning. Once baked, take the sheet out of the oven. Scatter 2 cups of semi-sweet chocolate chips over the hot toffee. Let them sit for a few minutes to melt. After that, use your spatula to spread the melted chocolate evenly. If you like, sprinkle some chopped nuts and a pinch of sea salt on top. Let the toffee cool at room temperature until firm. For a quicker option, place it in the fridge for about 30 minutes. Once cool, break it into pieces. Enjoy it right away or store it in an airtight container for later! To start, lay the Saltine crackers flat. Make sure they touch each other. This will help create a solid base for your toffee. Use a large baking sheet, so you have room for all 40 crackers. You want an even layer to ensure great taste and texture. When making the toffee, avoid stirring too much after it boils. Let it bubble for 2-3 minutes. This helps create a smooth and creamy texture. If you stir too often, it can become grainy. Also, pour the mixture evenly over the crackers. This helps keep the toffee intact. After baking, let the chocolate chips sit for a few minutes. This step helps them melt perfectly. Use a spatula to spread the chocolate evenly. Start from the center and move outwards. If you want more crunch, sprinkle your nuts on top before the chocolate sets. Pro Tips Use Fresh Ingredients: Ensure your butter and chocolate chips are fresh for the best flavor and texture in your toffee. Watch the Baking Time: Keep an eye on the toffee while it bakes to prevent burning; it should be bubbly and golden. Cool Completely: Allow the toffee to cool completely before breaking it into pieces; this ensures a clean break. Experiment with Toppings: Feel free to customize your Christmas Crack with different nuts or a sprinkle of sea salt for added flavor. {{image_4}} You can easily make a nut-free version of Christmas Crack. Simply leave out the chopped nuts. Your toffee will still be tasty and crunchy. Instead of nuts, you can use extra chocolate chips. This gives a rich flavor without the nuts. Want to add some fun? Try adding flavorings! A splash of vanilla extract makes the toffee richer. For a holiday twist, you can mix in peppermint extract. Just a few drops can make your treat extra special. You can switch up the chocolate too! Instead of semi-sweet chocolate chips, use milk chocolate. This will give you a creamier taste. Dark chocolate is another option for a richer flavor. Each type of chocolate brings its own charm to your Christmas Crack. Store your Christmas Crack in an airtight container. This keeps it fresh and crisp. You can use a glass jar or a plastic container. Make sure the lid is tight. If you stack the pieces, place parchment paper between layers. This prevents sticking and makes it easy to grab a piece. When stored properly, your Christmas Crack lasts about one week. It may lose some crunch after a few days. For the best taste, eat it within the first few days. If you want to keep it longer, consider freezing it. Yes, you can freeze Christmas Crack! To freeze, wrap the pieces tightly in plastic wrap. Then, place them in a freezer bag. Make sure to remove as much air as possible. This method helps keep the flavor and texture. You can freeze it for up to three months. When you are ready to eat, let it thaw at room temperature. Enjoy your sweet treat! Yes, you can use other crackers. I have tried it with buttery Ritz crackers. They add a nice taste. You can also use plain graham crackers for a sweeter touch. Yes, you can make this vegan. Use vegan butter instead of regular butter. For the chocolate, choose dairy-free chocolate chips. These swaps keep it tasty and cruelty-free. You can get creative with toppings. Try crushed candy canes for a minty flavor. You can also use toffee bits or dried fruit for added sweetness. The sky's the limit! Watch for bubbles in the toffee. It should boil gently for 2-3 minutes. When it turns golden, it’s done. This gives the perfect crunch and flavor. This blog post covered how to make delicious Christmas Crack with simple ingredients. We explored each step, starting from preheating the oven to cooling and breaking the toffee. I shared tips for perfect layers and variations to try, like nut-free options and different chocolates. Remember to store your treats well for lasting freshness. Enjoy creating this treat, and don’t be afraid to experiment with flavors. Christmas Crack is fun to make and share!

Christmas Crack Saltine Toffee Simple and Sweet Treat

Get ready for a festive treat that’s as easy to make as it is delicious! Christmas Crack Saltine Toffee is

- 1 cup cream cheese, softened - 1 cup powdered sugar - 1 ½ cups crushed vanilla wafers - 1 cup melted white chocolate chips - ½ teaspoon vanilla extract - Mini chocolate chips for decoration - Orange candy or fondant for noses - Colorful sprinkles for hats - Coconut flakes for the snowy finish When making No-Bake Snowman Truffles, gather these ingredients first. Cream cheese gives the truffles their rich and creamy texture. Softened cream cheese mixes well with powdered sugar, making a smooth base. The powdered sugar adds sweetness and helps bind the mixture. Crushed vanilla wafers give a nice crunch. They also act as the main ingredient, making the truffles easy to shape. Melted white chocolate chips add sweetness and a silky finish. The vanilla extract enhances the flavor. You can use mini chocolate chips to add fun details like eyes and buttons. For the noses, orange candy or fondant works perfectly. Colorful sprinkles make fun hats for your snowmen. Finally, coconut flakes create a snowy effect around each truffle. This mix of ingredients makes these treats festive and fun to eat. {{ingredient_image_2}} To start, grab a large mixing bowl. Beat 1 cup of softened cream cheese with 1 cup of powdered sugar. Mix until smooth and creamy. You want it lump-free! Next, add 1 ½ cups of crushed vanilla wafers. Pour in 1 cup of melted white chocolate and ½ teaspoon of vanilla extract. Stir gently until everything is well mixed. This creamy blend will be the base of your truffles. Now comes the fun part! With clean hands, take small portions of the cream cheese mixture. Roll them into 1-inch balls. Make sure they are round and smooth. After rolling, place each ball on a baking sheet lined with parchment paper. This step keeps them from sticking and makes cleanup easy. Once all the balls are formed, it’s time to chill them. Pop the baking sheet into the refrigerator. Let them chill for about 30 minutes. This helps the truffles hold their shape when we stack them later. After chilling, take the truffles out of the fridge. Stack two truffles on top of each other to form a snowman. Make sure they are stable! Now, it’s time to decorate. Use mini chocolate chips for the eyes and buttons. Shape small pieces of orange candy or fondant into noses. Stick them on just below the eyes. For a snowy effect, sprinkle coconut flakes around the base. Finish off with colorful sprinkles for fun hats. Your snowman truffles will be a festive delight! To make great truffles, start with softened cream cheese. Soft cream cheese mixes easily. It helps to avoid lumps in your mixture. Use an electric mixer for best results. Mix the cream cheese and powdered sugar well. When adding the crushed vanilla wafers, do it slowly. This way, you keep the mixture smooth. After forming your truffles, stacking them can be tricky. For a stable snowman, choose two truffles of similar size. This helps them balance better. Use melted chocolate to stick them together. A little melted chocolate acts as glue. It keeps them from falling apart. Get creative with decorations! Use mini chocolate chips for eyes and buttons. They add charm to your snowmen. For hats, colorful sprinkles work great. You can also use different candies to personalize them. Small candies can make your snowman unique. Try different shapes and colors for fun results! Pro Tips Chill the Mixture: Ensure your cream cheese is softened to room temperature for easier mixing, and chill the truffles thoroughly to maintain their shape. Use Quality Chocolate: Opt for high-quality white chocolate chips for a smoother and more decadent flavor in your truffles. Customize Your Toppings: Feel free to get creative with your toppings! Use different colored sprinkles or various candies to personalize each snowman. Storage Tips: Keep the truffles refrigerated in an airtight container to maintain freshness and prevent them from becoming too soft. {{image_4}} You can change the flavor of your Snowman Truffles easily. Try adding extracts like almond or peppermint. Just a few drops can make a big difference. Almond adds a warm, nutty taste. Peppermint gives a cool, fresh twist. You can also switch up the chocolate you use. While white chocolate is popular, dark or milk chocolate can work too. Each type offers a new taste. Use what you love best! If you need gluten-free options, use gluten-free vanilla wafers. They can replace regular wafers without losing taste. Check the label to make sure they fit your needs. For vegan-friendly truffles, swap cream cheese with a vegan cream cheese. You can use vegan white chocolate chips too. These changes keep the same fun flavors while making it suitable for everyone. Get creative with your decorations! You can make Santa hats by using red sprinkles or chocolate. Simply shape your truffles to fit the theme. You can also adapt the truffles for other winter celebrations. Use blue and silver sprinkles for a winter wonderland look. Or, use different colored candies to match your event's theme. The options are endless, and you can make these treats special for any occasion! To keep your snowman truffles fresh, place them in airtight containers. This method prevents moisture loss and keeps them tasty. If you plan to enjoy them later, you can freeze truffles too. Just layer them with parchment paper in a freezer-safe container. This helps avoid sticking. These truffles will last about one week in the fridge. Check for signs of spoilage such as a change in smell or texture. If they feel slimy or have a sour smell, it's best to toss them. When serving at a party, arrange the truffles on a festive platter. Add some colorful sprinkles around them for a pop of color. Pair these treats with hot cocoa or coffee for a cozy feel. They also go great with other holiday sweets like cookies or candies. Yes, you can make these snowman truffles in advance. You should prepare the truffles and chill them. After chilling, stack them and decorate. Store your truffles in an airtight container. Keep them in the fridge for up to a week. This way, you save time for your holiday fun! If you need a cream cheese substitute, try using dairy-free cream cheese. You can also use blended silken tofu for a vegan option. Both choices work well in this recipe. They maintain the smooth texture and flavor. To add extra festivity, use colorful sprinkles or edible glitter. You can also shape hats from fondant or use mini candies. For a winter touch, add coconut flakes to look like snow. Get creative with your designs to make each snowman unique! You can use dark chocolate, but it changes the flavor. Dark chocolate gives a richer taste. It might be less sweet than white chocolate. This twist can be fun if you love dark chocolate. Just make sure to melt it carefully! You can make delightful snowman truffles using simple ingredients. Start by mixing softened cream cheese and powdered sugar, then form truffles and chill them. Get creative with decorations, and remember to try different flavors and dietary options. As you prepare these fun treats, the key is to have fun and enjoy the process. They not only taste great but also look festive. Whether for holiday parties or winter gatherings, these snowman truffles will impress and delight all your guests.

No-Bake Snowman Truffles Fun and Easy Holiday Treat

Get ready to bring holiday cheer to your kitchen with my No-Bake Snowman Truffles! These fun and easy treats are

Older posts
Page1 Page2 … Page86 Next →

dsad

© 2026 recipesstation • Built with GeneratePress

Our Policies

  • Copyright Policy
  • Cookie Policy
  • GDPR Policy
  • Privacy Policy
  • Disclaimer
  • Terms Of Use

More Information

  • Home
  • About
  • Contact
  • Appetizers
  • Dessert
  • Dinner
  • Drinks
©2026, recipesstation About Back To Top