Skip to content
DisclaimerTerms Of UseGDPR PolicyCookie Policy

recipesstation

  • Home
  • Drinks
  • Appetizers
  • Dinner
  • Dessert
  • About
  • Contact
  • Privacy Policy
DisclaimerTerms Of UseGDPR PolicyCookie Policy

NO-ING-IMG

- 1 French baguette, sliced into 1/2 inch rounds - 1 cup cherry tomatoes, halved - 1/2 cup fresh mozzarella balls, halved - 1/4 cup fresh basil leaves, finely chopped - 1/4 cup sun-dried tomatoes, finely chopped - 1 clove garlic, minced - 3 tablespoons extra virgin olive oil, plus more for drizzling - Salt and freshly cracked pepper to taste - 1/2 teaspoon balsamic glaze (for drizzling) - Fresh parsley leaves for garnish (optional) You can add many fun flavors to make this wreath special. Here are some ideas: - Add diced bell peppers for crunch. - Use goat cheese instead of mozzarella for a tangy twist. - Mix in olives for a salty bite. - Consider roasted red peppers for extra color. - Try different herbs like oregano or thyme for a new taste. When picking your ingredients, choose fresh options for the best taste: - Look for ripe cherry tomatoes that are firm and bright. - Select mozzarella balls that are soft and creamy. - Fresh basil should smell fragrant and look vibrant. - For the baguette, pick one with a crisp crust. - Use high-quality extra virgin olive oil for rich flavor. These choices will help make your Christmas bruschetta wreath festive and delicious! {{ingredient_image_2}} Start by preheating your oven to 400°F (200°C). This step is key for crisp bread. Line a baking sheet with parchment paper. This will help the bread not stick. Slice your French baguette into 1/2-inch rounds. Arrange each slice on the baking sheet in a single layer. With a brush, coat one side of each slice with olive oil. This adds flavor and helps them crisp up. Bake the baguette slices for 5-7 minutes. Look for a golden brown color. Remove them from the oven and let them cool for a few minutes. Grab a medium mixing bowl and add halved cherry tomatoes. Next, add halved mozzarella balls and chopped basil. Toss in chopped sun-dried tomatoes and minced garlic. Drizzle in 2 tablespoons of olive oil. This will bring all the flavors together. Add salt and freshly cracked pepper to taste. Gently toss everything to coat well. Make sure each piece is covered with the tasty mix. Take each toasted baguette slice. Spoon the tomato and mozzarella mixture generously onto the oiled side. Make sure to cover them well. Now, it’s time to make the wreath shape. Carefully arrange the bruschetta slices on a large round serving platter. Overlap the slices slightly for a festive look. Drizzle balsamic glaze over the top for a sweet touch. If you like, add more olive oil for richness. For a bright finish, garnish with fresh parsley leaves around the edge. Serve immediately while warm and crispy. Enjoy this festive treat! Toasting the baguette is key for perfect crunch. Start by cutting the baguette into 1/2 inch rounds. This thickness gives a nice bite. Preheat your oven to 400°F (200°C). Line a baking sheet with parchment paper. This helps to prevent sticking. Brush one side of each slice with extra virgin olive oil. This adds flavor and keeps the bread crisp. Bake for 5-7 minutes, watching closely. You want them to turn golden brown. Let them cool for a few minutes before topping. The topping is where the magic happens. Start with fresh ingredients for the best taste. Use sweet cherry tomatoes and creamy mozzarella balls. Mix these with sun-dried tomatoes for a punch. Add chopped basil for freshness and minced garlic for depth. Drizzle in olive oil to bind the flavors. Season with salt and cracked pepper. Toss gently to coat everything evenly. This helps each bite burst with flavor. Presentation makes your bruschetta wreath a showstopper. Arrange the toasted slices in a circle on a large platter. Overlap them slightly to create a wreath shape. Drizzle balsamic glaze over the top for a sweet touch. For added richness, drizzle more olive oil. Garnish the outer edge with fresh parsley leaves. This adds a pop of color and makes it festive. Serve immediately while the bread is warm and crispy. Guests will love the look and taste! Pro Tips Use Day-Old Bread: Using slightly stale baguette slices enhances the crispiness when baked, making them perfect for holding toppings. Add a Kick: For a spicy twist, consider adding a pinch of red pepper flakes to the tomato and mozzarella mixture. Experiment with Toppings: Feel free to mix in other ingredients like olives or artichokes for a unique flavor profile. Make Ahead: Prepare the topping mixture in advance and assemble just before serving to keep the bread crisp. {{image_4}} For a great vegetarian option, try using roasted bell peppers or grilled zucchini. Both add nice color and flavor. You can also add sliced olives for a briny kick. For those who love spice, consider sprinkling on some red pepper flakes. These toppings will keep your bruschetta fresh and vibrant. If you need a gluten-free option, use gluten-free bread instead of a baguette. Look for gluten-free baguettes or use rice cakes. Even crisped polenta rounds can work well. Just make sure to toast them until they are crispy. This will give you a sturdy base for the toppings. Herbs and spices can really change the taste of your bruschetta. Fresh herbs like thyme or oregano complement the tomatoes nicely. You can also try a sprinkle of smoked paprika for a warm flavor. For a herbal twist, add a touch of pesto to the topping mix. Each of these options brings a new layer of flavor to your dish. To keep your leftover bruschetta fresh, place it in an airtight container. You can store it in the fridge for up to two days. If you leave it out, the bread will become soft. To prevent sogginess, store the toppings separately. This way, you can enjoy crispy bread later. When you reheat bruschetta, you want to keep it crispy. Preheat your oven to 350°F (175°C). Place the bruschetta on a baking sheet. Heat it for about 5-7 minutes. If you have toppings in the fridge, add them after reheating. This keeps the flavors fresh and vibrant. You can freeze the components of your bruschetta wreath. For the bread, slice it and wrap it tightly in plastic wrap. Place it in a freezer bag. It can last up to three months. For the toppings, mix them and put them in a freezer-safe container. Defrost them in the fridge when you are ready to use them. Yes, you can prepare the topping mixture a day ahead. Store it in the fridge. Just toast the baguette slices right before serving. This keeps them crisp and fresh. If you need a change, use feta or goat cheese. Both add a nice tang. Fresh ricotta is also a great choice for creaminess. To add holiday flair, use red and green toppings. Consider adding diced bell peppers or pomegranate seeds. You could also use festive herbs like rosemary or thyme for extra flavor. Yes! Use vegan cheese or skip cheese entirely. Add more veggies like avocado or olives. You can still have a tasty and colorful dish without dairy. This blog post covered making a bruschetta wreath. We explored a full list of ingredients, tips for choosing them, and ways to customize your recipe. I shared easy step-by-step instructions for prepping, assembling, and toasting. We also looked at fun variations, storage tips, and common questions about the dish. In the end, you can create a unique and festive appetizer that everyone will love. Enjoy making this dish for your next gathering!

Christmas Bruschetta Wreath Festive and Tasty Delight

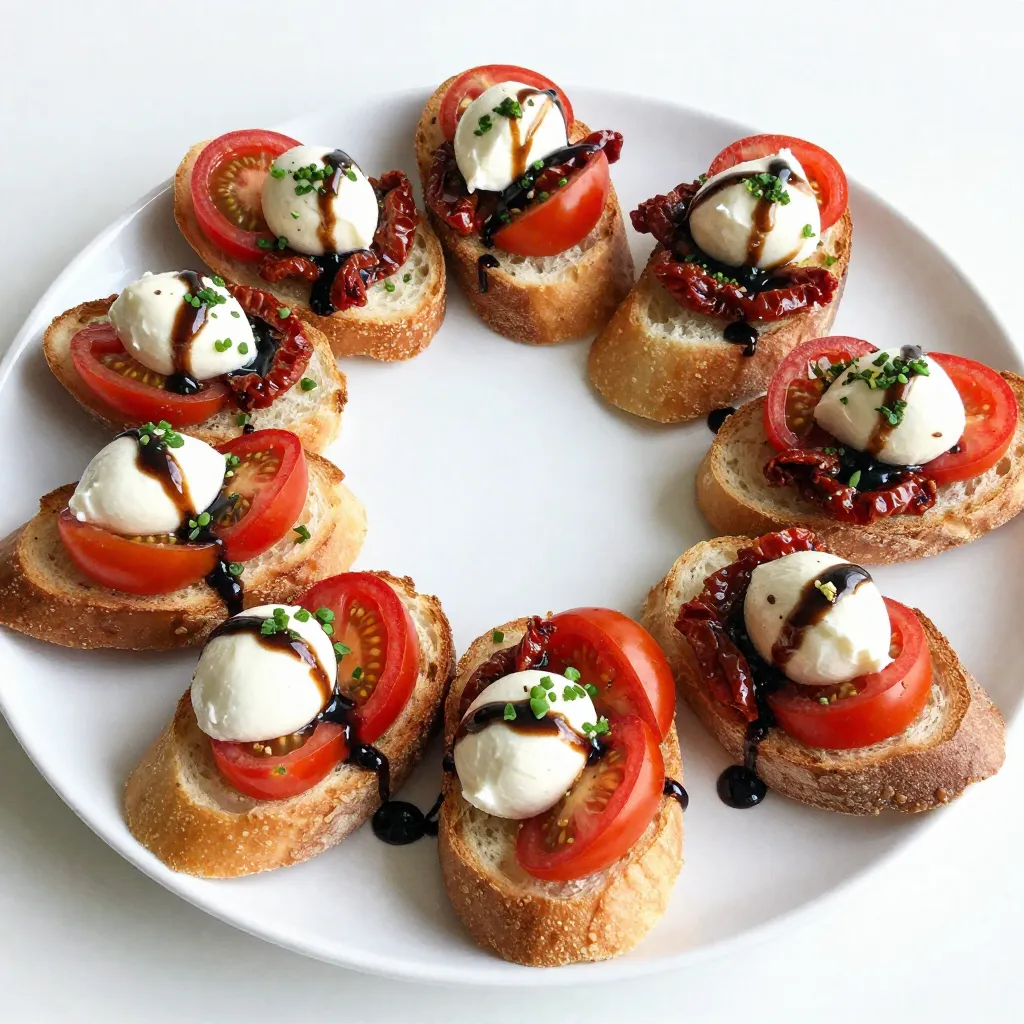
Get ready to impress your guests with a stunning Christmas Bruschetta Wreath! This festive dish is not only visually appealing,

- 2 cans (8 oz each) refrigerated cinnamon rolls - 6 large eggs - 1 cup milk (whole, almond, etc.) - 1/2 cup heavy cream - 1 teaspoon vanilla extract - 1 teaspoon ground cinnamon - 1/4 teaspoon freshly grated nutmeg - 1/4 cup pure maple syrup - 1/2 cup chopped pecans (optional) - Powdered sugar for garnishing Gathering these simple ingredients is the first step to making a delicious Cinnamon Roll French Toast Casserole. The star of this dish is the cinnamon rolls. They add a sweet, soft base. You can choose any milk you like, whether it’s whole or almond. Heavy cream adds richness to the egg mixture. The eggs are key for binding the casserole and making it fluffy. Vanilla extract brings a warm flavor that pairs well with cinnamon. The ground cinnamon and nutmeg enhance the spice profile, making each bite flavorful. If you want some crunch, pecans work perfectly, but they are optional. Finally, powdered sugar is perfect for a sweet finish. This simple list makes it easy for anyone to create a delightful dish that brings joy to breakfast or brunch. {{ingredient_image_2}} - Preheat the oven to 350°F (175°C). - Grease a 9x13 inch baking dish. - Cut each cinnamon roll into quarters. - Layer the cinnamon roll pieces in the baking dish. - Whisk together eggs, milk, cream, and spices. - Pour the mixture over cinnamon rolls. - Cover with aluminum foil and bake for 25 minutes. - Remove foil and bake for an additional 15-20 minutes. - Cool for 5 minutes before serving. - Drizzle with icing and sprinkle powdered sugar. This casserole is fun to make. Each step builds a tasty dish. Follow these steps closely for the best results. Enjoy your time in the kitchen! To ensure even soaking of the cinnamon rolls, cut each roll into quarters. Spread the pieces evenly in your baking dish. This helps each piece absorb the egg mixture. You should also press down gently with a spatula. This step ensures that the mixture soaks into every bite. For a golden brown texture, cover the casserole with foil for the first half of baking. This traps steam and keeps it moist. After 25 minutes, remove the foil. Bake until the top is golden and firm. Check for doneness by gently shaking the dish. If it wobbles, it needs more time. You can substitute milk with different options. Whole milk is rich, but almond or oat milk works well too. Each choice gives a different flavor. You can also add fun twists to the egg mixture. Try mixing in some orange zest for a fresh taste. A splash of almond extract will add a nice touch too. For a stunning finish, garnish with chopped pecans and a drizzle of maple syrup. This adds crunch and sweetness. You can also serve slices with fresh fruit, like berries or banana slices. A dollop of whipped cream on the side makes it feel extra special. Enjoy serving this tasty dish warm for the best experience. Pro Tips Use Day-Old Cinnamon Rolls: If you have leftover cinnamon rolls, they work perfectly for this casserole, adding extra flavor and texture. Customize Your Mix: Feel free to add your favorite spices or extracts, such as almond or orange zest, to elevate the flavor profile. Soak Longer for Extra Moisture: For an even richer texture, let the cinnamon roll pieces soak in the egg mixture for 30 minutes before baking. Make Ahead: Prepare the casserole the night before, cover it, and store it in the fridge. Just pop it in the oven in the morning for a hassle-free breakfast! {{image_4}} To make this casserole nut-free, just skip the pecans. You can still add a nice crunch by using granola or seeds. Granola adds a sweet and crunchy layer on top. Seeds like sunflower or pumpkin can also work. They give a nice texture without nuts. Want to boost the flavor? Try adding fresh fruits like blueberries or sliced bananas. These fruits bring a burst of sweetness and color. You can also mix in chocolate chips for a sweeter treat. This makes each bite even more fun! For a healthier twist, use whole wheat cinnamon rolls instead of regular ones. This simple swap adds fiber to your meal. You can also cut down on sugar. Try using natural sweeteners like honey or maple syrup. This makes your dish tasty and a bit better for you! To store leftovers of your cinnamon roll French toast casserole, let it cool first. Once cooled, cover it tightly with plastic wrap or aluminum foil. You can also place it in an airtight container. This way, it stays fresh in the refrigerator for up to three days. When you want to reheat, preheat your oven to 350°F (175°C). Place the casserole in the oven for about 15-20 minutes. You can also use a microwave. Heat it in short bursts of 30 seconds until warm. Cover it with a damp paper towel to keep it moist. If you want to save it for later, you can freeze the casserole. Cut it into portions first. Wrap each piece in plastic wrap, then place them in a freezer-safe bag. This method helps to keep them fresh for up to three months. To thaw, move the casserole from the freezer to the fridge. Let it sit overnight. If you're in a hurry, you can use the microwave on the defrost setting. After thawing, reheat in the oven at 350°F (175°C) for about 20-25 minutes. This keeps the texture nice and fluffy. Yes, you can prepare this casserole the night before. This saves time in the morning. To do this, follow these steps: - Assemble the casserole as usual. - Cover it tightly with plastic wrap or foil. - Store it in the fridge overnight. - In the morning, remove it from the fridge and let it sit at room temperature for about 30 minutes. - Bake as directed, adding a few extra minutes if needed. You will know the casserole is done when it looks golden brown on top. The center should feel firm when pressed lightly. Here are some signs to look for: - The surface is set and not jiggly. - A toothpick inserted in the center comes out clean. - The edges pull away slightly from the sides of the dish. Yes, you can make this recipe gluten-free. Here are some tips: - Use gluten-free refrigerated cinnamon rolls. Many brands offer these. - Check labels for hidden gluten in other ingredients, like vanilla extract. - Adjust the baking time if necessary, as gluten-free products can vary. With these changes, you can enjoy this delicious dish without gluten! This blog covered how to make a tasty Cinnamon Roll French Toast Casserole. We looked at the key ingredients, step-by-step instructions, and helpful tips to perfect it. You learned about variations to suit your taste and how to store leftovers. Try this recipe for a fun breakfast that everyone will love. Enjoy your cooking and sharing this delightful dish!

Cinnamon Roll French Toast Casserole Easy and Tasty

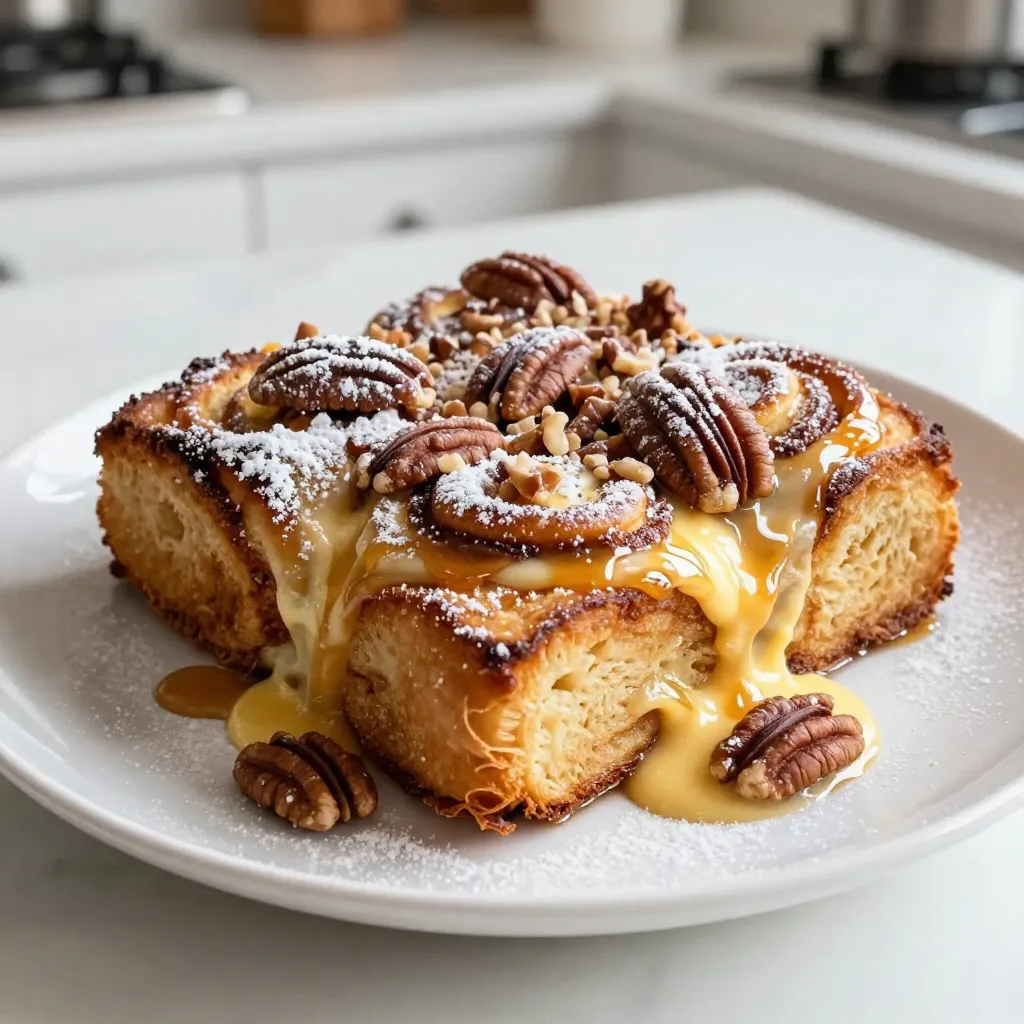
Looking for a quick and tasty breakfast that will wow your family? You’re in the right place! My Cinnamon Roll

- 2 cups shredded cooked chicken - 1/2 cup buffalo sauce (adjust according to your preferred level of heat) - 1/4 cup ranch dressing - 1/2 cup shredded cheddar cheese - 12 slider buns I love using shredded cooked chicken for these sliders. It gives a great texture. You can use leftover chicken or rotisserie chicken for ease. Buffalo sauce is key here. You can adjust the heat to match your taste. I find that ranch dressing adds a nice coolness to the spicy chicken. Shredded cheddar cheese melts well and adds rich flavor. Slider buns are perfect for these bite-sized treats. They hold everything together nicely. - 1 cup shredded lettuce - 1/2 cup diced tomatoes - 1/4 cup sliced pickles - Optional garnishes: sliced green onions Fresh toppings make these sliders even more fun. Shredded lettuce adds a nice crunch. Diced tomatoes bring freshness and color. Sliced pickles offer a tangy bite that contrasts well with the spicy chicken. You can also add green onions for a bit of extra flavor. They make the sliders look great too! - Olive oil for brushing the buns - Salt and pepper to taste Brushing the buns with olive oil helps them brown nicely. It adds flavor and makes them crispy. A pinch of salt and pepper enhances the taste of the sliders. You can adjust these seasonings to your liking. It’s all about making the flavors pop! {{ingredient_image_2}} In a large bowl, combine the shredded cooked chicken with the buffalo sauce. You can adjust the buffalo sauce to make it spicier or milder, based on your taste. Add the ranch dressing next, mixing well. Then, stir in the shredded cheddar cheese until everything is well coated. This creamy and spicy mixture will be the heart of your sliders. Start by carefully slicing each slider bun in half. You should have a top and bottom for each slider. Place the bottom halves on a large baking sheet. Now, take your chicken mixture and spoon it generously onto each bottom bun. Make sure every slider gets a good amount of that tasty filling. Next, place the top halves of the buns over the chicken mixture to create little sandwiches. Preheat your oven to 350°F (175°C). To keep the buns from getting too brown, cover the assembled sliders loosely with aluminum foil. Bake them in the oven for about 15 minutes. After that time, take off the foil and let them bake for another 5 minutes. This will make the tops turn golden brown and crispy. While they bake, you can prepare your fresh toppings to add later. To get the perfect buffalo chicken sliders, keep these tips in mind: - Prevent browning: Cover the sliders loosely with aluminum foil when baking. This stops the tops from getting too dark too fast. - Crispy tops: Brush the tops of the buns with olive oil. This gives them a nice golden crust. Bake until they are just right. Want to spice things up? You can easily add more flavor: - Try mixing in extra hot sauce for more heat. - Add a dash of garlic powder for a savory kick. - Consider using a different ranch or blue cheese dressing for a new twist. Serving buffalo chicken sliders is all about presentation and flavor: - Place the sliders on a big platter. Garnish with parsley or sliced green onions for color. - Offer toothpicks to make them easy to grab. - Serve with extra ranch dressing on the side for dipping. Enjoy every bite! Pro Tips Adjust the Heat: If you prefer a milder flavor, reduce the amount of buffalo sauce or use a milder variety. You can also mix in some honey to balance the heat. Make Ahead: Prepare the buffalo chicken mixture in advance and store it in the refrigerator. Assemble the sliders just before baking for a quick and easy meal. Cheese Variations: Experiment with different types of cheese, like blue cheese or pepper jack, to customize the flavor profile of your sliders. Serving Suggestions: Serve with a variety of dipping sauces, such as extra ranch, blue cheese dressing, or even a spicy aioli for your guests to enjoy. {{image_4}} You can switch up the flavor by using different sauces. Try BBQ sauce for a sweet twist. Blue cheese adds a rich taste, while sriracha brings a spicy kick. Each sauce gives your sliders a unique flair. Don’t be afraid to mix and match. You might find a new favorite! If you want to change the protein, use shredded turkey instead of chicken. It’s just as tasty! For a plant-based option, try shredded tofu. The texture soaks up the sauce well. Both options keep the sliders light and delicious. Get creative with your toppings! Jalapeños add heat and crunch. Sliced avocado brings creaminess to each bite. You can also add crispy bacon for extra flavor. The right toppings can make your sliders stand out and impress your guests. Experiment with different combinations to discover what you love! To store leftover sliders in the fridge, place them in an airtight container. You can stack the sliders, but keep a piece of parchment paper between layers. This helps prevent them from sticking together. Leftover buffalo chicken sliders last for up to three days in the fridge. Always check for any changes in smell or appearance before eating. To freeze prepared sliders, wrap each slider tightly in plastic wrap. Then, place the wrapped sliders in a freezer-safe bag or container. This helps keep them fresh. You can freeze them for up to three months. When ready to eat, thaw the sliders in the fridge overnight before reheating. The best way to reheat buffalo chicken sliders is in the oven. Preheat the oven to 350°F (175°C). Place the sliders on a baking sheet and cover them with foil. This keeps them moist. Bake for about 10-15 minutes, or until heated through. You can also use a microwave, but this may make the buns soggy. If you choose the microwave, heat in short bursts, checking often. Buffalo chicken sliders last about 3 to 4 days in the fridge. To store them safely, place the sliders in an airtight container. You can also wrap them tightly in plastic wrap or aluminum foil. This helps keep them fresh and tasty. Yes, you can make these sliders in advance! Prepare the chicken mixture and store it in the fridge for up to 2 days. You can also assemble the sliders ahead of time. Just cover them well and store them in the fridge. Bake them just before serving. Great side dishes for buffalo chicken sliders include: - Celery sticks with blue cheese dressing - Carrot sticks - Potato chips - Coleslaw - French fries These sides add crunch and balance to the spicy sliders. You learned how to make buffalo chicken sliders step by step. We covered the key ingredients and tasty variations. I shared tips for baking and serving your sliders perfectly. Don't forget to experiment with different toppings and sauces. Store any leftovers properly for future enjoyment. Whether you’re hosting a party or enjoying a quiet night, these sliders are a hit. Try your hand at this easy recipe, and you'll impress everyone at the table. Enjoy your cooking adventure!

Buffalo Chicken Sliders Tasty and Easy Recipe

Are you ready to spice up your game day or party? Buffalo Chicken Sliders are a hit! This easy recipe

- 1 cup quinoa - 1 medium sweet potato - 1 cup Brussels sprouts - 1 cup kale - 1/2 cup dried cranberries - 1/4 cup pecans Quinoa is your base. It cooks fluffy and fills you up. Sweet potatoes add creaminess and sweetness. Brussels sprouts bring a crunchy bite, while kale adds color and nutrients. Dried cranberries add a sweet pop, and pecans give a nice crunch. - 1 tablespoon extra virgin olive oil - 1 tablespoon pure maple syrup - 1 teaspoon ground cinnamon - Salt and freshly ground black pepper Extra virgin olive oil adds richness. Maple syrup enhances sweetness without being too much. Ground cinnamon gives warmth and depth. Salt and pepper balance all the flavors perfectly. - Crumbled feta cheese - Additional seasonings Feta cheese can add creaminess and tang. You can also use other seasonings to make it your own. Try chili flakes for heat or herbs for freshness. {{ingredient_image_2}} To start, rinse your quinoa. This step removes any bitter coating. Use a fine mesh strainer and run it under cold water for about a minute. Next, cook the quinoa. In a medium saucepan, mix the rinsed quinoa with two cups of vegetable broth or water. Bring this mixture to a boil over medium-high heat. Once it boils, reduce the heat to low. Cover the pot with a lid and let it simmer for about 15 minutes. Your quinoa is ready when it absorbs all the liquid and becomes fluffy. Now, it’s time to prep the sweet potato and Brussels sprouts. Peel the sweet potato and cut it into bite-sized cubes. Trim and halve the Brussels sprouts. In a large bowl, combine the sweet potato and Brussels sprouts. Drizzle one tablespoon of extra virgin olive oil and one tablespoon of pure maple syrup over them. Add one teaspoon of ground cinnamon, along with salt and pepper to taste. Toss everything well so that all the pieces are coated evenly. Preheat your oven to 425°F (220°C). Spread the vegetable mixture on a lined baking sheet. Roast them for 25 to 30 minutes. Flip the veggies halfway through to ensure even cooking. About five minutes before they're done, add one cup of chopped kale to the baking sheet. This will let the kale wilt nicely. When your quinoa is cooked, fluff it with a fork. This separates the grains and makes it light. Divide the quinoa into serving bowls. Top each bowl with the roasted sweet potatoes, Brussels sprouts, and kale. For a touch of sweetness, sprinkle half a cup of dried cranberries on top. Add a quarter cup of roughly chopped pecans for crunch. If you like, finish each bowl with a sprinkle of crumbled feta cheese. This adds a creamy, tangy flavor that enhances the dish beautifully. Enjoy your warm winter harvest bowl! To ensure your quinoa is fluffy, rinse it well before cooking. This step removes bitter saponins. Use a fine mesh strainer for best results. When you cook quinoa, the ratio is key: one part quinoa to two parts liquid. Bring it to a boil, then cover and simmer on low. This method traps steam, making grains fluffy. For perfect vegetable roasting, choose uniform sizes for even cooking. Toss sweet potatoes and Brussels sprouts in olive oil, maple syrup, and cinnamon. This adds flavor and helps them caramelize. Spread them out on a baking sheet. Crowding will steam them instead of roasting. Flip halfway through for even browning. For a beautiful presentation, use deep bowls. Layer the quinoa first, then add the roasted veggies. Top with cranberries and pecans for color and crunch. A drizzle of olive oil or balsamic reduction can elevate the dish. Consider adding proteins like grilled chicken or tofu for a heartier meal. Dressings, like a lemon vinaigrette, can also bring brightness. To store leftovers, let the bowl cool first. Then transfer it to an airtight container. This helps keep it fresh. The winter harvest bowl will last about three days in the fridge. When reheating, use the microwave or a stovetop. Add a splash of water to prevent dryness. Heat until warm, stirring occasionally. Enjoy your meal prep by making extra quinoa and veggies to use throughout the week. This way, you can create quick, healthy meals on busy days. Pro Tips Rinse Your Quinoa: Always rinse quinoa thoroughly before cooking to remove its natural coating, called saponin, which can make it taste bitter. Roast at High Heat: Roasting vegetables at a high temperature helps to caramelize their natural sugars, enhancing their flavor and texture. Mix and Match Greens: Feel free to substitute kale with other greens like spinach or Swiss chard for a different flavor profile and nutrient boost. Add Texture: For added crunch, consider topping your bowl with seeds like pumpkin or sunflower seeds in addition to the pecans. {{image_4}} You can change the grains in your bowl. Try farro or brown rice instead of quinoa. Both grains add a nice texture. You can also swap vegetables based on what you have. Carrots, butternut squash, or parsnips work well. Use what’s fresh and in season. To make this recipe vegan, skip the feta cheese. You can still enjoy great flavor. For gluten-free needs, quinoa is already a safe choice. Add toppings like avocado or sunflower seeds for extra taste. These swaps keep the dish exciting and satisfying. Want to spice things up? Add cumin or smoked paprika for a warm kick. Fresh herbs like parsley or thyme can brighten the dish. You can also mix in different nuts or seeds. Try walnuts, almonds, or pumpkin seeds for crunch. Each variation adds a new layer of flavor to your bowl. Each serving of this warm winter harvest bowl has about: - Calories: 450 - Fat: 20 grams - Protein: 12 grams - Carbohydrates: 60 grams This bowl packs a punch of nutrients. The quinoa gives you protein and fiber. The sweet potato adds vitamins and healthy carbs. The pecans offer healthy fats. The ingredients in this bowl provide many health benefits. Quinoa is a complete protein, which means it has all the essential amino acids. It helps build strong muscles. Sweet potatoes are high in vitamin A, good for your eyes and skin. Brussels sprouts are rich in fiber and antioxidants, which help fight off illness. Kale boosts your immune system with vitamin C. Eating this bowl in winter can help keep you healthy. The warm, hearty ingredients help you feel full and satisfied. They also give you energy during the cold months. This recipe is mostly allergen-friendly. It is gluten-free, as quinoa is a great substitute for grains. However, if you have nut allergies, skip the pecans. If dairy is a concern, leave out the feta cheese. You can adapt this bowl to fit your needs. If you need a vegan option, just skip the cheese. This bowl is easy to customize based on what you like or what you have at home. What can I substitute for quinoa? You can use farro, brown rice, or even barley. Each grain has a unique taste and texture. Pick one that you enjoy to keep the dish flavorful. How long will the winter harvest bowl keep in the fridge? The winter harvest bowl lasts about 3 to 5 days in the fridge. Store it in an airtight container to keep it fresh and tasty. Can I roast the vegetables in advance? Yes, you can roast the vegetables ahead of time. Just store them in the fridge until you are ready to eat. Reheat them in the oven or a microwave. How do I reheat the winter harvest bowl? To reheat, place the bowl in the microwave for 1-2 minutes. Stir it halfway for even warming. You can also heat it in a pan over low heat. Is it necessary to use vegetable broth? Using vegetable broth gives the quinoa a rich flavor. However, you can use water if you prefer a lighter taste. Can I use frozen vegetables for this recipe? Yes, you can use frozen vegetables. Just make sure to thaw and drain them before roasting for best results. They will still taste great! This blog post covered how to make a healthy winter harvest bowl. We explored ingredients like quinoa, vegetables, and tasty toppings. You learned step-by-step instructions from preparing quinoa to roasting veggies. I shared tips for serving and storing, plus some fun variations to try. Keep the nutrition benefits in mind as you enjoy this bowl. Embrace creativity in your cooking. This dish nourishes both your body and your taste buds, making it a great choice for winter meals.

Winter Harvest Bowl Nourishing and Flavorful Recipe

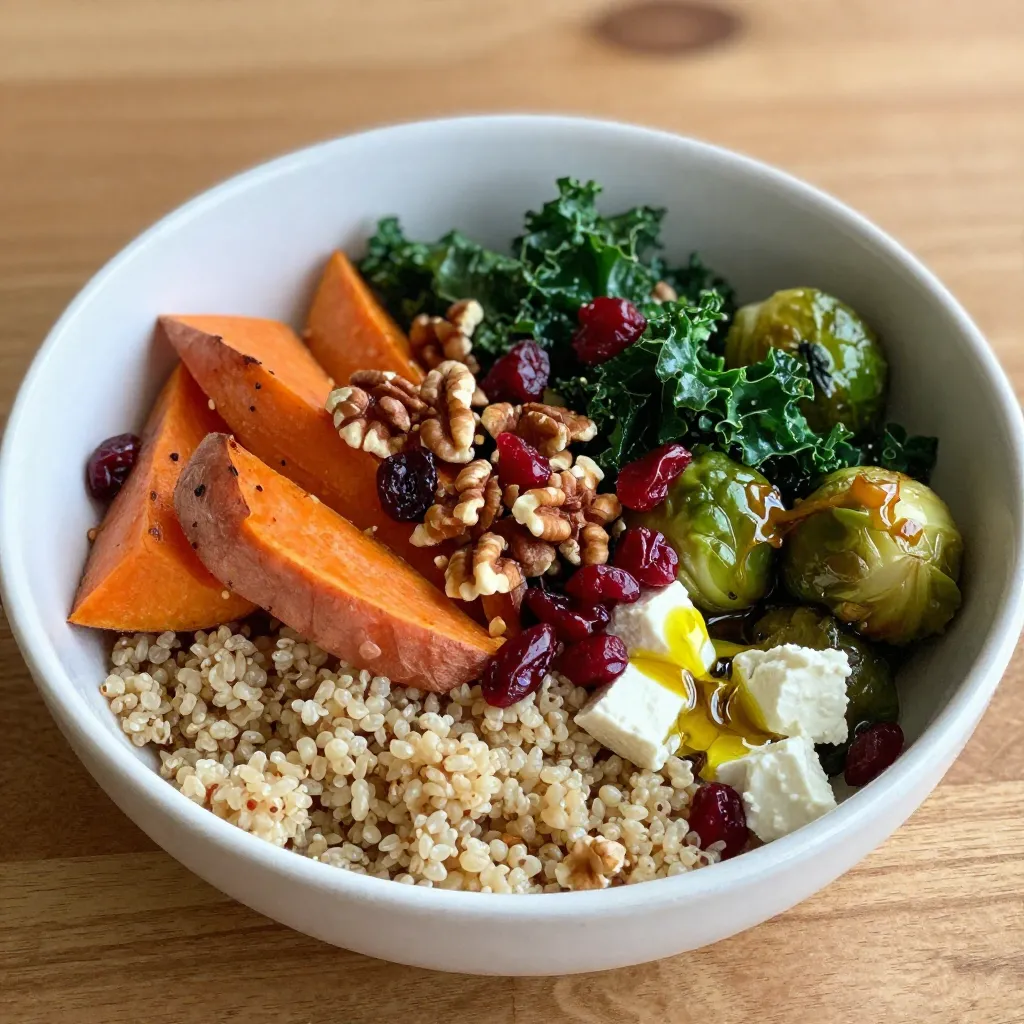
Warm, hearty, and packed with nutrients, the Winter Harvest Bowl is your perfect winter meal. This nourishing dish combines fluffy

- 2 cups cooked and shredded chicken - 2 cups corn (grilled or canned) - 1 red bell pepper, diced - 1 jalapeño, finely chopped - 1/4 cup red onion, finely chopped - 1/2 cup mayonnaise - 1/2 cup Greek yogurt - 1 teaspoon chili powder - 1 teaspoon smoked paprika - 1 tablespoon fresh lime juice - Salt and pepper - 1/2 cup crumbled feta cheese - Fresh cilantro, chopped - Tortilla chips for serving For this Street Corn Chicken Bowl, I use simple yet fresh ingredients. First, I pick chicken that is already cooked. Shredded rotisserie chicken is my go-to. It adds great flavor and saves time. Next, corn is key. I love using grilled corn for that smoky taste. If I’m short on time, canned corn works too. Just drain it well. I add a diced red bell pepper for crunch and color. A finely chopped jalapeño gives it a nice kick. If you want less heat, remove the seeds. I also toss in some red onion for a bit of sharpness. Now, for the dressing, I mix mayonnaise and Greek yogurt for creaminess. The yogurt adds a nice tang. I then stir in chili powder and smoked paprika. These spices boost the flavor. A squeeze of fresh lime juice brightens the whole dish. I season with salt and pepper to taste. For the final touch, I sprinkle crumbled feta cheese on top. It adds a nice salty contrast. Fresh cilantro is my favorite herb to garnish the bowl. I often serve it with tortilla chips for crunch. All these elements come together to create a vibrant and tasty meal. You can personalize this bowl with your favorite toppings too! {{ingredient_image_2}} To get started, grill your corn. If you have fresh corn, place the ears on a hot grill. Grill them for about 8-10 minutes. Turn them until they are charred on all sides. This adds great flavor. Once done, let the corn cool for a few minutes. Then, use a sharp knife to cut the kernels off the cob. Make sure to get as many kernels as you can for that sweet corn taste. If you use canned corn, just drain and rinse it well under cold water. This helps remove extra sodium. Next, let's make the dressing. In a medium-sized bowl, mix the mayonnaise and Greek yogurt. This makes the dressing creamy. Now, add chili powder, smoked paprika, lime juice, and a pinch of salt and pepper. Whisk all the ingredients together until smooth. This dressing brings the flavors together beautifully. In a large bowl, add the shredded chicken, grilled corn, diced red bell pepper, chopped jalapeño, and red onion. This mix looks colorful and tasty. Drizzle the dressing over the top. Use a spatula or large spoon to gently toss everything together. Make sure every ingredient is coated in the dressing. The flavors will blend nicely. Now it's time to serve! Divide the mixture into bowls. This recipe makes enough for four servings. Top each bowl with crumbled feta cheese. This adds a nice salty kick. Finally, sprinkle fresh chopped cilantro on top for color and flavor. For a fun crunch, serve with tortilla chips on the side. You can dip them or enjoy them as a side. This dish is both easy and delicious! For this dish, you can use any cooked chicken. If you want quick prep, rotisserie chicken is your best friend. It saves time and adds flavor. Plus, it’s juicy and tender. Just shred it up and mix it in. Grilling corn adds a nice smoky taste. Grill fresh corn over medium-high heat for about 8-10 minutes. Turn it often until it's charred. Once it cools, cut the kernels off the cob. If you can't grill, use canned corn. Just drain and rinse it well. This way, you still get great taste and texture. The dressing is key for flavor. Mix mayonnaise and Greek yogurt for creaminess. Add chili powder, smoked paprika, and lime juice for zest. If you want it thicker, add more mayo. For a lighter option, use plain yogurt. Adjust salt and pepper to your taste. Pro Tips Fresh Corn is Best: Using fresh grilled corn adds a smoky flavor and delightful texture to the dish. If fresh corn is unavailable, choose high-quality canned corn, but ensure it's well-drained. Adjust Spice Level: If you prefer a milder flavor, remove all the seeds and membranes from the jalapeño. Alternatively, add more jalapeños or a dash of hot sauce for an extra kick. Make it Ahead: This chicken bowl can be prepared ahead of time and stored in the refrigerator for up to 2 days. Just add the feta and cilantro right before serving for freshness. Serve with Variations: Feel free to customize your bowl by adding other toppings like avocado, black beans, or salsa to cater to your taste preferences. {{image_4}} To make this dish vegetarian, you can use plant-based proteins. Options like tofu or tempeh work well. You can also use black beans for added fiber and protein. They mix nicely with the corn and veggies. For dressings, swap mayonnaise and yogurt with vegan versions. Look for plant-based mayo and coconut yogurt. This keeps the creaminess while making it vegan-friendly. If you love heat, adjust the jalapeño and spices in your bowl. Use more jalapeños or keep the seeds for extra spice. You can also add cayenne pepper or red pepper flakes for a kick. Don’t forget the hot sauce! A drizzle of your favorite brand adds flavor and heat. Try Sriracha or a smoky chipotle sauce to spice things up. Switching vegetables can bring new life to your bowl. In summer, add fresh zucchini or cherry tomatoes. In fall, roasted butternut squash or sweet potatoes work great. They add color and flavor. Think about seasonal swaps, too. Use asparagus in spring or bell peppers in summer. This keeps your dish fresh and exciting all year long. To keep your Street Corn Chicken Bowl fresh, use airtight containers. Glass or plastic containers work well. Seal them tightly to avoid air exposure. This method helps to maintain flavor and texture. When reheating, use low heat to avoid drying out the chicken and corn. The microwave is great for this. Add a splash of water or broth to keep it moist. You can also cover the bowl with a damp paper towel. For added flavor, sprinkle fresh cilantro or extra feta on top when serving again. You can store this dish in the fridge for up to three days. Always check for signs of spoilage. Look for off smells or a change in texture. If the chicken feels slimy or the corn looks dull, it’s best to toss it out. Yes, you can use frozen corn. Frozen corn is convenient and easy to find. It also saves time. Pros of frozen corn: - No need to cook or grill. - It’s picked at peak ripeness. - Often less expensive than fresh corn. Cons of frozen corn: - It may lack some crunch. - The texture can be softer than fresh. If you choose frozen corn, just thaw and drain it before use. Yes, this recipe is gluten-free. Most ingredients do not contain gluten. Key ingredients: - Chicken - Corn - Vegetables However, check the labels. Some sauces or dressings may have gluten. If you use gluten-free mayo and yogurt, you are all set! You can make this bowl healthier in a few ways. - Use less mayonnaise and yogurt. This cuts down on calories. - Skip the feta cheese or use a lower-fat version. - Add more veggies like tomatoes or spinach for nutrients. These changes will help you enjoy a lighter meal without losing flavor. Yes, you can prepare this dish ahead of time. It’s great for meal prep! Tips for meal prepping: - Cook the chicken and corn a day before. - Mix the dressing and store it separately. - Combine everything right before serving. This keeps it fresh. You can store it in airtight containers in the fridge for up to three days. This blog post outlined the key ingredients, preparation steps, and storage tips for a delicious chicken bowl. You learned how to combine chicken, corn, and fresh veggies with a tasty dressing. I shared ideas to make this dish fit your taste, whether you're vegan or like it spicy. For best results, store leftovers properly and reheat carefully. Enjoy creating this easy, flavorful meal anytime!

Street Corn Chicken Bowl Flavorful and Easy Meal

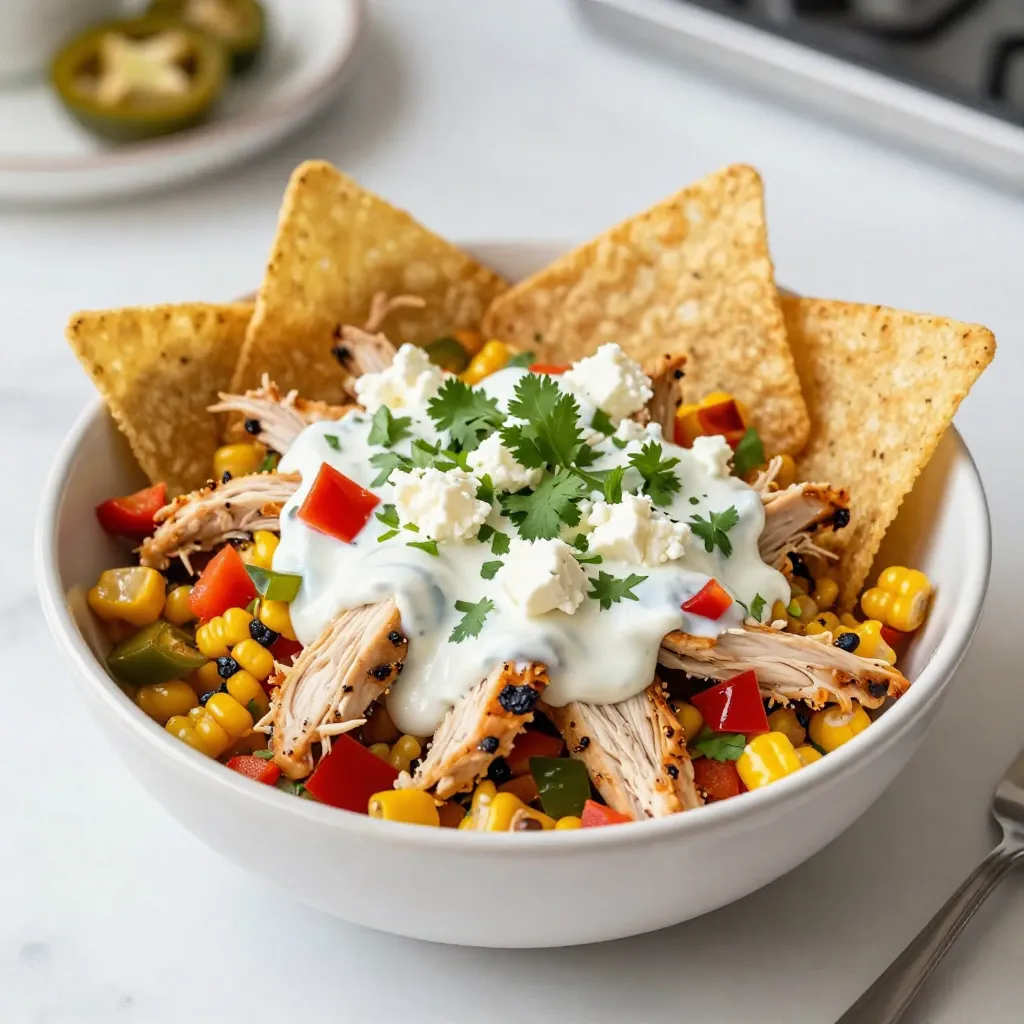
Craving a colorful and tasty meal? The Street Corn Chicken Bowl is the answer! This dish blends juicy chicken, sweet

To make Cajun Chicken Alfredo Orzo, you need a few key items. Here’s what you should gather: - 1 pound boneless, skinless chicken breasts - 2 tablespoons Cajun seasoning - 1 tablespoon olive oil - 1 cup orzo pasta - 2 cups chicken broth (low-sodium recommended) - 1 cup heavy cream - 1 cup grated Parmesan cheese (plus more for garnish) - 2 cloves garlic, minced - 1 cup fresh spinach, roughly chopped - Salt and freshly ground black pepper, to taste - Fresh parsley, finely chopped, for garnish These ingredients work together to create a rich and flavorful dish. Each one adds its own touch to the meal. To elevate your dish, consider adding these garnishes or extras: - Extra Parmesan cheese for topping - Sliced green onions for a fresh taste - Squeeze of lemon juice for brightness - Chopped tomatoes for a pop of color - Red pepper flakes for extra spice These options give you room to play with flavors and textures, making your orzo even more delightful. When choosing fresh produce, keep these tips in mind: - Look for bright green spinach with no wilted leaves. - Choose firm garlic bulbs. Avoid soft or sprouted ones. - Select chicken breasts that are pink and moist, not discolored. Fresh ingredients make a big difference in flavor. Always pick the best to ensure your dish shines! {{ingredient_image_2}} To start, take 1 pound of boneless, skinless chicken breasts. Coat them well with 2 tablespoons of Cajun seasoning. Make sure every side gets enough seasoning. This step adds lots of flavor. Set the chicken aside for a moment. Now, heat 1 tablespoon of olive oil in a large skillet. Use medium-high heat until the oil shimmers. Carefully add the seasoned chicken breasts. Cook each side for about 5 to 7 minutes. Look for a nice golden-brown color. Check the internal temperature; it should reach 165°F. Once done, take the chicken out and let it rest for 5 minutes. Then, slice it into thin strips. In the same skillet, add 2 cloves of minced garlic. Sauté for 1 minute. Keep stirring until it smells great but does not brown. Next, pour in 2 cups of low-sodium chicken broth. Bring it to a gentle simmer. Add 1 cup of orzo pasta and cook for about 8 to 10 minutes. Stir often to avoid sticking. You want the orzo to be al dente, which means firm but tender. Now it’s time to make the sauce. Lower the heat to medium-low. Stir in 1 cup of heavy cream and 1 cup of grated Parmesan cheese. Mix until the cheese melts and the sauce turns creamy. If it’s too thick, add a splash of chicken broth. Gently fold in the chopped spinach and sliced chicken. Stir everything together until well mixed. Season with salt and freshly ground black pepper to taste. Cook for another 2 to 3 minutes until the spinach wilts. The dish is ready to serve! To ensure your chicken stays tender, start with boneless, skinless breasts. Coat the chicken with Cajun seasoning, covering all sides. This adds flavor and helps lock in moisture. Sear the chicken for about 5-7 minutes on each side. Use medium-high heat so it cooks evenly. After cooking, let it rest for 5 minutes before slicing. This keeps juices inside and gives you moist chicken. To make your sauce extra creamy, use full-fat heavy cream. When you add the cream, lower the heat to medium-low. This prevents the cream from boiling and curdling. Stir in the grated Parmesan cheese slowly. This helps it melt smoothly into the sauce. If your sauce feels too thick, add a splash of chicken broth. This keeps it silky and rich. One common mistake is not seasoning enough. Always taste your dish and adjust the salt and pepper. Another mistake is rushing the cooking time for the orzo. Cook it until it's al dente, stirring often. Lastly, don’t skip resting the chicken. Allowing it to rest is key for juicy pieces. These small steps make a big difference in your dish! Pro Tips Marinate for More Flavor: If you have time, let the chicken marinate in the Cajun seasoning for at least 30 minutes (or up to overnight) before cooking. This will enhance the flavor and tenderness of the chicken. Use Fresh Herbs: Fresh parsley not only adds a pop of color but also a fresh flavor. Consider adding other herbs like thyme or basil for an extra layer of complexity. Adjust Spice Levels: If you prefer a milder dish, reduce the amount of Cajun seasoning on the chicken or serve with a dollop of sour cream to tone down the heat. Perfectly Creamy Sauce: For an ultra-creamy sauce, make sure to slowly whisk in the Parmesan cheese until fully melted. If the sauce gets too thick, add a little more chicken broth or cream to reach your desired consistency. {{image_4}} You can easily make this dish vegetarian. Replace the chicken with mushrooms or zucchini. Use vegetable broth instead of chicken broth. This keeps the flavor rich and satisfying. Add more spinach or even kale for extra nutrients. The creamy sauce pairs well with these veggies, giving you a tasty meal. If you love spice, add more Cajun seasoning. You can also mix in some diced jalapeños or red pepper flakes. This gives your dish a fiery kick. For a smoky flavor, try adding chipotle peppers in adobo sauce. This twist makes the meal bold and exciting. While Parmesan cheese is classic, you can switch it up. Try using Gouda or fontina for a different taste. They melt well and add a nice creaminess. You can also use a sharp cheddar for a bolder flavor. Mixing different cheeses can create a unique and tasty dish. To keep your Cajun Chicken Alfredo Orzo fresh, store it in an airtight container. Make sure the dish cools before sealing it. Refrigerate the leftovers within two hours of cooking. Properly stored, it should last up to three days in the fridge. Label your container with the date to avoid confusion later. When you're ready to enjoy your leftovers, use a microwave or the stovetop. If using a microwave, place the orzo in a bowl and cover it. Heat it in short bursts, stirring in between. If you prefer the stovetop, add a splash of chicken broth in a pan. Warm it over low heat, stirring gently until heated through. Freezing Cajun Chicken Alfredo Orzo is a great way to save time. Allow the dish to cool completely before freezing. Portion it into freezer-safe bags or containers. Be sure to remove excess air to prevent freezer burn. It can last up to three months in the freezer. When ready to eat, thaw it overnight in the fridge, then reheat as mentioned above. Yes, you can! If orzo isn't available, try using penne or fusilli. These shapes hold sauce well and give a nice texture. Cook them according to the package instructions. Make sure to adjust the cooking time if needed, as different pastas have varying cooking durations. If you want a lighter option, use half-and-half or whole milk. For a dairy-free choice, try coconut milk or almond milk. These will change the flavor, so pick one that matches your taste. Just remember to stir well to keep the sauce creamy. To make Cajun Chicken Alfredo Orzo gluten-free, replace orzo with gluten-free pasta. Many brands offer options that taste great. Always check the package for cooking times and instructions. This way, you can enjoy the dish without the gluten! This dish is filling, but pairing it with a fresh salad works well. A simple green salad with vinaigrette adds a nice crunch. Garlic bread also complements the creamy sauce nicely. If you want something warm, try roasted vegetables for a healthy side! Cajun Chicken Alfredo Orzo is a tasty dish with rich flavors. We explored key ingredients, easy steps, and helpful tips. I shared ways to make it creamy and avoid common mistakes. You learned how to store leftovers and even variations to try. This dish is simple and fun for any cook. Now, it’s your turn to try it! Enjoy creating a meal that everyone will remember.

Cajun Chicken Alfredo Orzo Flavorful Dinner Delight

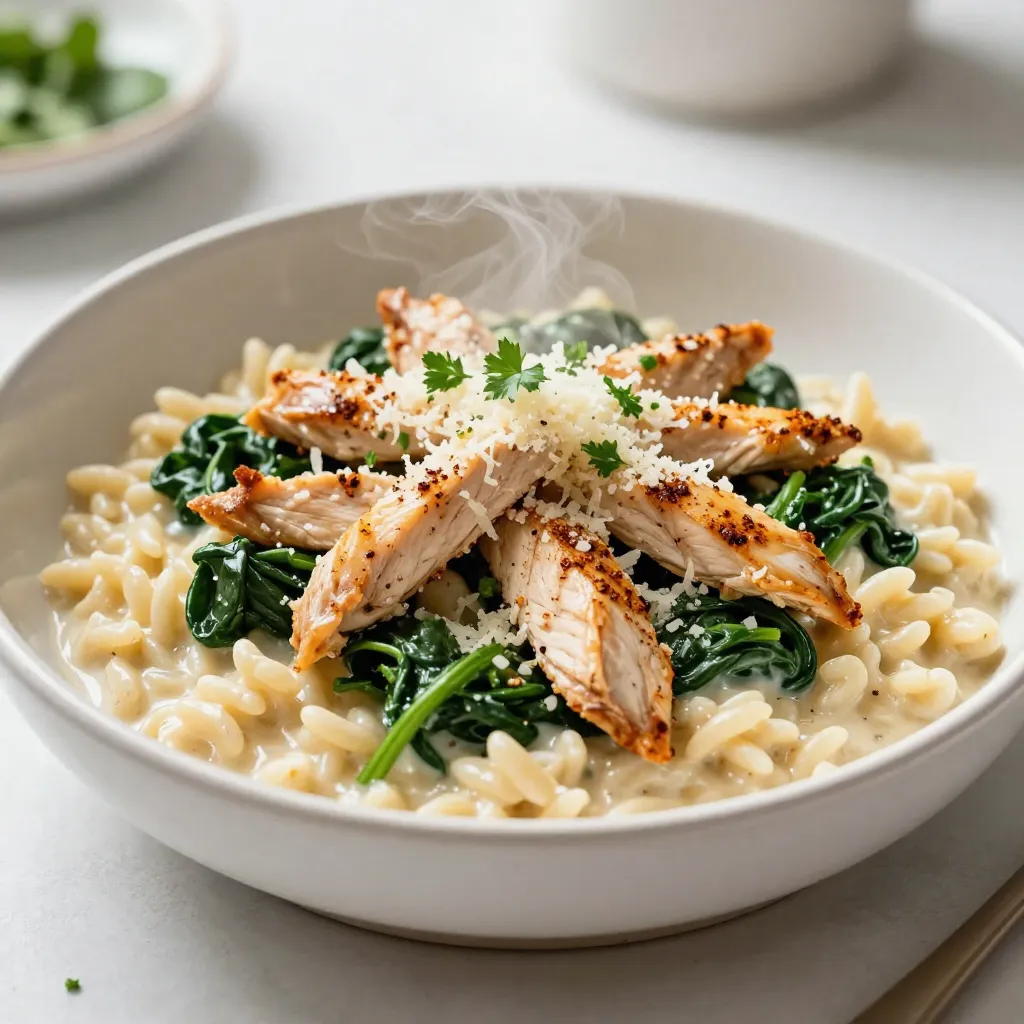
If you’re hungry for a dinner that’s rich in flavor and quick to make, I’ve got just the dish for

- 2 cups shredded cooked chicken - 1 cup black beans, rinsed and drained - 1 cup corn kernels (fresh or frozen) - 1 cup diced bell peppers (mix of red and green for color) - 1 small onion, finely chopped - 2 cloves garlic, minced The main ingredients create a tasty filling for the enchiladas. I love using shredded chicken because it’s easy to mix and adds protein. Black beans give a nice texture and extra fiber. Corn kernels bring sweetness, making the dish more balanced. Diced bell peppers add color and crunch, while onion and garlic boost the flavor. - 1 teaspoon ground cumin - 1 teaspoon chili powder - Salt and pepper Key seasonings are essential for flavor. Ground cumin gives a warm, earthy taste. Chili powder adds a bit of heat and depth. Don't forget salt and pepper to enhance all the flavors. - 1 tablespoon olive oil - 1 cup sour cream - 1 cup shredded cheese (cheddar or a flavorful blend) - 8 large flour tortillas - 2 cups enchilada sauce (store-bought or homemade) - Fresh cilantro, for garnish Additional ingredients complete the dish. Olive oil is great for sautéing the veggies. Sour cream adds creaminess to the filling. Shredded cheese gives that melty goodness on top. Flour tortillas hold everything together and make it easy to eat. Enchilada sauce keeps the dish moist and adds rich flavor. Fresh cilantro at the end brightens the whole meal with a burst of freshness. {{ingredient_image_2}} - Preheat oven to 375°F (190°C). - In a large skillet, heat 1 tablespoon of olive oil over medium heat. - Add chopped onion and diced bell peppers. Sauté for about 5 minutes. - Stir in minced garlic, ground cumin, and chili powder. Cook for 1 more minute. - In a mixing bowl, combine shredded chicken, black beans, and corn. - Add the sautéed veggies and half of the shredded cheese. - Mix in sour cream and season with salt and pepper. Stir well. - Lay a tortilla flat on a clean surface. - Spoon in about 1/4 cup of the chicken filling in the center. - Roll the tortilla tightly, tucking in the sides. Place seam side down in a greased baking dish. - Repeat with the remaining tortillas and filling until all are in the dish. - Pour enchilada sauce evenly over the rolled tortillas. - Top with the remaining shredded cheese for a gooey finish. - Cover the dish with aluminum foil. Bake for 20 minutes. - Remove foil and bake for another 10 minutes until cheese is bubbly and golden. - Remove the enchiladas from the oven. Let them cool for a few minutes. - Just before serving, sprinkle with fresh cilantro for a vibrant touch. To avoid tearing, warm the tortillas first. Heat them briefly in a dry skillet or wrap them in a damp towel and microwave for about 30 seconds. This softens the tortillas and makes them easier to roll. For rolling enchiladas, lay a tortilla flat. Spoon about 1/4 cup of filling in the center. Start at one end and roll it up tightly. Tuck in the sides as you go. This keeps the filling inside and helps with neatness. For a homemade enchilada sauce, mix canned tomatoes, chili powder, and garlic. Simmer it for about 15 minutes to deepen the flavor. You can also add a pinch of cinnamon for a unique twist. Using smoked cheese adds a new layer of taste. Try mixing in spices like smoked paprika, cayenne, or even some fresh herbs to elevate the dish. Presentation matters! Serve the enchiladas on a warm platter. Top them with a dollop of sour cream and a sprinkle of fresh cilantro. This adds color and a burst of flavor. For sides, crispy tortilla chips and zesty salsa pair perfectly. The crunch of the chips balances the softness of the enchiladas. Pro Tips Use Rotisserie Chicken: For a quicker option, use store-bought rotisserie chicken to save time on cooking and shredding. Cheese Variations: Experiment with different types of cheese such as pepper jack or queso fresco for added flavor. Homemade Enchilada Sauce: Consider making your own enchilada sauce for a fresher taste. There are many quick recipes available online. Make Ahead: You can assemble the enchiladas ahead of time and store them in the fridge or freezer. Just add extra baking time if cooking from frozen. {{image_4}} You can swap ingredients for a unique twist. For protein, use shredded jackfruit or tofu for a vegetarian option. This gives you a tasty meat-free meal. You can also mix in different beans. Try pinto or kidney beans for a fun change. Want more veggies? Add spinach, zucchini, or mushrooms to your filling. Each choice adds a new flavor and texture. Enchilada sauce is key to flavor. Red enchilada sauce is rich and spicy. It pairs well with chicken and adds a classic taste. Green enchilada sauce is tangy and bright. It’s made from tomatillos and green chilies. Both are great, so pick your favorite! If you want something creamy, try a white sauce. This sauce uses sour cream and cheese for a rich, smooth topping. If you're gluten-free, use corn tortillas instead of flour. They hold up well and add a nice crunch. For dairy-free needs, look for vegan cheese and plant-based sour cream. These swaps help you enjoy enchiladas without missing out. Always check labels to ensure they meet your dietary needs. To store leftover enchiladas, let them cool first. Place them in an airtight container. You can keep them in the fridge for about 3 to 4 days. To keep them fresh, try to cover them well. This helps prevent them from drying out or picking up other odors. You can freeze enchiladas both before and after baking. If you freeze them before, wrap each enchilada tightly. Place them in a freezer-safe dish and cover it well. They can last up to 2 months. If you bake them first, let them cool completely. Then, cover and freeze. To thaw, move them to the fridge overnight before reheating. To reheat enchiladas, use an oven for best results. Preheat your oven to 350°F (175°C). Place the enchiladas in a baking dish, cover with foil, and heat for 20 minutes. If they are frozen, it can take longer. You can also use a microwave. Just heat them in short bursts, checking often to avoid drying out. Enjoy your tasty meal! Can I make enchiladas ahead of time? Yes, you can make enchiladas ahead. Prepare the filled tortillas and place them in the baking dish. Cover with foil and store in the fridge for up to 24 hours. When ready, bake as directed, adding a few extra minutes to the cooking time. What to serve with chicken enchiladas? I love serving chicken enchiladas with crispy tortilla chips and zesty salsa. A fresh salad or guacamole pairs well too. You might also try Mexican rice or refried beans for a complete meal. Can I use cooked rotisserie chicken? Absolutely! Rotisserie chicken is a great shortcut. Just shred the chicken and use it in the filling. It adds flavor and saves time, making your meal prep quick and easy. How can I make enchiladas spicier? To spice up your enchiladas, add diced jalapeños to the filling. You can also use a spicier enchilada sauce. For an extra kick, sprinkle some cayenne pepper into the filling mix. What's the best way to reheat leftovers? Reheat leftovers in the oven. Preheat it to 350°F (175°C). Cover the enchiladas with foil and bake for about 15-20 minutes. This keeps them moist and prevents the tortillas from getting hard. How to keep enchiladas from getting soggy? To prevent soggy enchiladas, ensure you don’t over-saturate them with sauce. Use just enough sauce to coat but not drown. Bake covered for part of the time, then uncover to crisp up the cheese. In this guide, we covered how to make ultimate chicken enchiladas. We explored the key ingredients, seasonings, and step-by-step instructions. Tips for perfecting your enchiladas and tasty variations were also highlighted. Remember to store any leftovers properly for the best flavor. Enjoy experimenting with different ingredients and sauces to make this dish your own. With these insights, you can create a meal that delights every time you serve it. Dive in and enjoy your culinary adventure!

Ultimate Chicken Enchiladas Flavorful Dinner Recipe

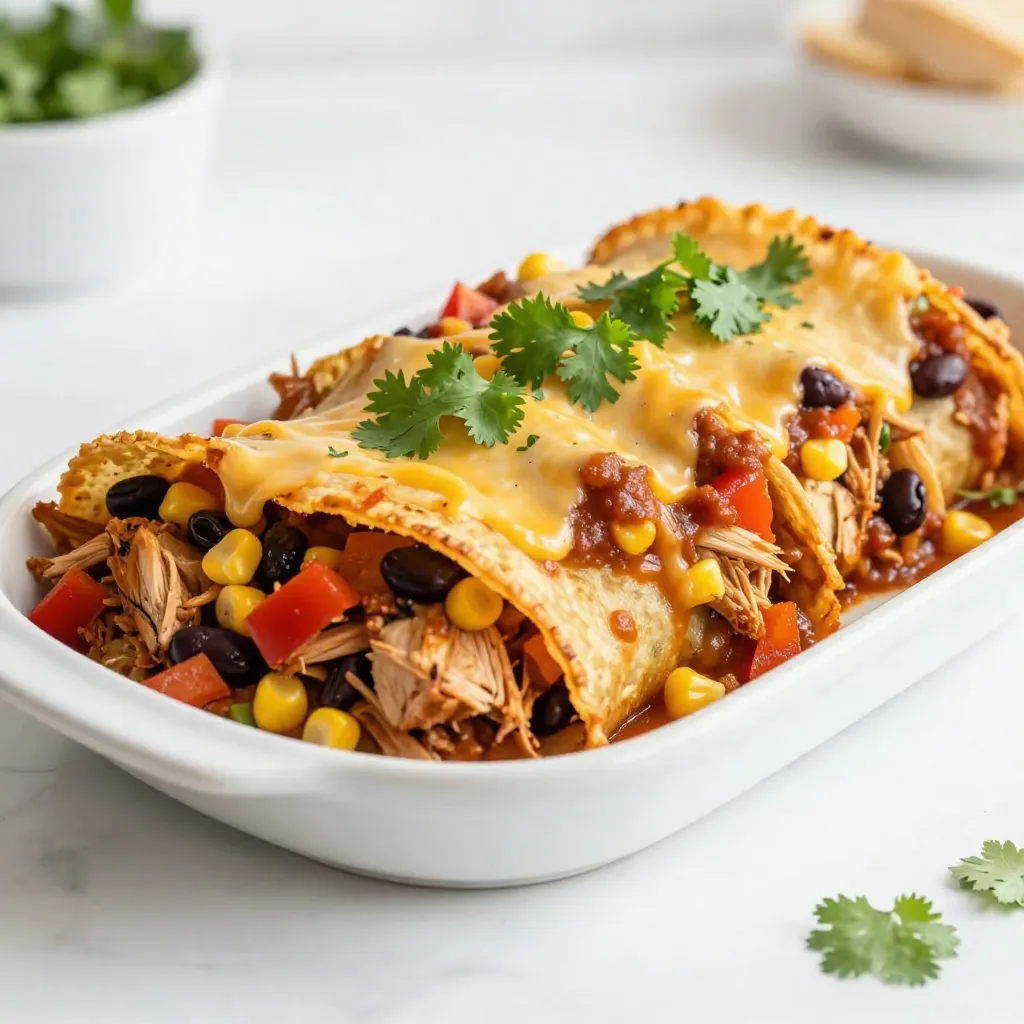
Looking for a new dinner idea that’s both easy and delicious? My Ultimate Chicken Enchiladas recipe is your answer! Packed

- 1 lb flank steak, thinly sliced - ½ cup soy sauce - 2 tablespoons brown sugar - 3 cloves garlic, minced - 1 tablespoon fresh ginger, minced - 2 cups cooked jasmine rice - 1 cup broccoli florets - 1 carrot, julienned - ½ cucumber, thinly sliced - 2 green onions, finely chopped - Sesame seeds - Sriracha sauce (optional) The main ingredients in this dish are simple yet packed with flavor. The flank steak is tender and absorbs the marinade well. The soy sauce adds depth, while the brown sugar balances the saltiness. Garlic and ginger give a nice kick to the marinade, making it aromatic and tasty. For the rice, I love using jasmine rice. It has a lovely aroma and a slightly sticky texture that holds up well under the steak and veggies. Broccoli and carrots add crunch, while cucumber provides a refreshing bite. Finally, don’t forget the garnishes! Green onions add a fresh taste, and sesame seeds give a nice crunch. If you like heat, a drizzle of Sriracha sauce does the trick! {{ingredient_image_2}} - Mixing the marinade ingredients: Start by mixing ½ cup of soy sauce, 2 tablespoons of brown sugar, 3 minced garlic cloves, 1 tablespoon of minced ginger, 2 tablespoons of sesame oil, and 1 teaspoon of black pepper in a bowl. Whisk until the sugar dissolves. - Coating the flank steak: Add 1 lb of thinly sliced flank steak to the bowl. Make sure every piece is covered in the marinade. - Recommended marination time: Cover the bowl and let it sit in the fridge for at least 30 minutes. For a deeper flavor, marinate it for up to 2 hours. - Preheating the grill pan or skillet: Heat your grill pan or skillet over medium-high heat until it’s hot. - Searing the steak slices: Take the steak out of the marinade. Let the extra liquid drip off. Cook the slices in batches for about 2-3 minutes on each side. Look for a nice char. - Cooking tips for perfect doneness: Use a meat thermometer. Aim for 130°F for medium-rare. Adjust time if you like it more cooked. - Preparing the rice base: Start with 2 cups of cooked jasmine rice. Spoon a generous amount into each bowl. - Layering the steak and vegetables: Place the grilled steak on top of the rice. Add steamed broccoli, julienned carrot, and cucumber slices for color and crunch. - Final garnishing touches: Top with chopped green onions and sesame seeds. Drizzle with Sriracha if you want some heat! Marinating is key for great flavor. Time matters a lot. You should marinate your steak for at least 30 minutes. If you can wait, try 2 hours. This will help the flavors sink in well. Choose the right cut of meat. Flank steak is great for this dish. It has a good balance of fat and flavor. You can also use skirt steak for a similar taste. To achieve the perfect sear on your steak, heat your grill pan well. A hot surface gives you that nice char. Cook the steak for about 2-3 minutes on each side. This will lock in the juices and flavors. If you don’t have a grill pan, you can also pan-sear. Both methods work well. Just remember, don’t overcrowd the pan. Cook in batches if needed. Make your bowls look great! Use colorful ingredients to catch the eye. Bright green broccoli and orange carrots look amazing together. Try serving the rice bowls in fun, colorful dishes. You can also add edible flowers or microgreens for a fancy touch. This makes the meal feel special and inviting. Pro Tips Marinade Time: For the best flavor, let the steak marinate for at least 1 hour, or up to 2 hours for a deeper taste profile. High Heat Cooking: Make sure your grill pan or skillet is preheated properly to achieve that perfect sear on the steak. Layering Flavors: Don’t hesitate to add more vegetables or toppings like avocado or pickled radish for added texture and flavor. Serving Suggestions: Serve with extra sauce on the side for those who enjoy a saucier bowl, enhancing the overall experience. {{image_4}} You can switch up the flank steak for other cuts. Sirloin or ribeye will work well. If you want a non-beef option, try chicken or tofu. Both will soak up the marinade nicely. For veggies, feel free to mix and match. Use bell peppers for sweetness or snap peas for crunch. You can also add spinach or kale for a boost of nutrients. Want more flavor? Try adding spices like paprika or cumin to the marinade. Fresh herbs like cilantro or basil can brighten the dish. If you love heat, add more Sriracha or a touch of gochujang, a Korean chili paste. This will give your rice bowls a spicy twist that many will enjoy. For meal prep, pack the rice and steak separately. This keeps the rice fluffy and the steak juicy. You can use small containers for each side. Pair these rice bowls with a simple salad or kimchi. A fresh cucumber salad works great too. It adds a cool crunch that balances the rich flavors of the beef. Store any leftover Korean BBQ steak rice bowls in the fridge. Use airtight containers for best results. This keeps the flavors fresh and prevents spills. Let the dish cool down first before sealing it. I recommend using glass containers for easy reheating. They also help you see what's inside. To reheat, take the rice and steak out. This keeps each part tasty. Heat the steak in a skillet over medium heat. This way, it stays juicy. For the rice, add a splash of water. Cover it with a lid and warm it for a few minutes. Stir often to heat evenly. Yes, you can freeze this dish! Just make sure the steak and rice are cool. Store them in freezer-safe bags or containers. Squeeze out all the air before sealing. This helps avoid freezer burn. When ready to eat, thaw in the fridge overnight. Reheat as mentioned above for best taste. You should marinate the steak for at least 30 minutes. This gives it good flavor. For even better taste, try to marinate it for 1 to 2 hours. The longer you marinate, the more flavor it absorbs. Keep it in the fridge while marinating to keep it fresh. Yes, you can use other rice types. Jasmine rice is best for its soft texture. You can also try brown rice for a nutty flavor. Sushi rice works well too, giving a sticky texture. Just make sure to cook it properly for the best taste. Several side dishes pair nicely with these rice bowls. Here are some ideas: - Kimchi: This spicy fermented cabbage adds zing. - Pickled vegetables: They give a nice crunch and contrast. - Edamame: These young soybeans are healthy and tasty. - Miso soup: A warm soup adds comfort to your meal. These sides enhance the flavors and make it a complete meal. Yes, you can make them ahead. Prepare the steak and rice in advance. Store them in the fridge in separate containers. You can also chop the veggies early. When you're ready to eat, just heat the steak and rice. This saves time on busy days and makes meals easy. This blog post guides you in making Korean BBQ Steak Rice Bowls. You learned what ingredients to use and how to prepare them with step-by-step instructions. We explored tips for marinating, cooking, and presenting your dish. Remember, personalizing this recipe with your favorite veggies can elevate your meal. Enjoying the flavors comes easy when you follow these simple steps. Now, you can impress anyone with your delicious rice bowls!

Korean BBQ Steak Rice Bowls Flavorful and Easy Recipe

Are you ready to spice up your dinner routine? Korean BBQ Steak Rice Bowls offer a tasty, easy meal that

- 2 boneless, skinless chicken breasts - 2 cups broccoli florets - 1 cup cooked quinoa - 2 tablespoons olive oil - 2 tablespoons soy sauce - 1 tablespoon honey - 1 teaspoon garlic powder - 1 teaspoon ginger powder - Salt and pepper to taste - 1 tablespoon sesame seeds - Chopped green onions for garnish Gather all these ingredients before you start cooking. Fresh chicken and broccoli make the best flavors. You can use any type of quinoa you like. The marinade is key for tasty chicken. It adds depth and sweetness. Don't skip the honey! It helps balance the saltiness of soy sauce. For the optional garnishes, sesame seeds add a nice crunch. Chopped green onions bring fresh flavor and color. You can mix and match these ingredients. Feel free to adjust the amounts to suit your taste. This is your bowl, so make it how you like it! To start, you need to make the marinade. In a small bowl, mix 2 tablespoons of olive oil, 2 tablespoons of soy sauce, 1 tablespoon of honey, 1 teaspoon of garlic powder, 1 teaspoon of ginger powder, and a pinch of salt and pepper. Whisk this mixture well. Next, place your two chicken breasts in a resealable bag or a shallow dish. Pour the marinade over the chicken. Seal the bag or cover the dish tightly. You should let it marinate in the fridge for at least 30 minutes. For the best flavor, aim for 2 hours. Rinsing the quinoa is essential. Place it in a fine mesh strainer and rinse under cold water. This step removes any bitterness. Now, cook the quinoa. Follow the package instructions on the quinoa. Usually, you will combine 1 cup of rinsed quinoa with 2 cups of water in a pot. Bring it to a boil, then reduce heat to low. Cover and simmer for about 15 minutes until water absorbs. Fluff the quinoa with a fork and set it aside. Preheat your grill or grill pan over medium-high heat. Remove the chicken from the marinade and let the excess drip off. Place the chicken on the grill. Cook for about 6-7 minutes on one side. Flip it over and cook for another 6-7 minutes. The internal temperature should reach 165°F (75°C). Once done, transfer the chicken to a cutting board. Let it rest for a few minutes before slicing into strips. While the chicken grills, prepare your broccoli. You can steam it by placing the florets in a steamer basket. Steam for about 4-5 minutes until bright green and tender-crisp. Alternatively, you can blanch the broccoli. Boil water in a pot, then add the florets for 2 minutes. After that, plunge them into ice water immediately. This stops the cooking and keeps them crisp. To build your bowls, start with a scoop of cooked quinoa as the base. Next, layer the sliced grilled chicken and the steamed broccoli on top. If you want extra flavor, sprinkle sesame seeds on top. This adds a nice crunch and look to your meal. To get great flavor in your chicken, marinate it well. Use the marinade mix of olive oil, soy sauce, honey, garlic, and ginger. Let it soak for at least 30 minutes. If you have time, two hours is best. This helps the chicken absorb all the tasty flavors. When grilling, preheat your grill to medium-high heat. Place the chicken on the grill and cook for 6-7 minutes per side. Check the internal temperature; it should reach 165°F (75°C). This way, your chicken will be juicy and cooked through. Cooking quinoa might seem easy, but small mistakes can happen. Always rinse the quinoa first to wash away any bitter taste. Cook it according to the package's instructions. After cooking, fluff the quinoa with a fork. This keeps it light and fluffy. If you skip this step, your quinoa might clump together. To steam broccoli, use a steamer basket. Steam the florets for about 4-5 minutes. They should be bright green and tender-crisp. You can also blanch the broccoli. Boil it for 2 minutes, then put it in ice water. This stops the cooking and keeps the color. Perfectly cooked broccoli should be bright and firm, not mushy. {{image_4}} If you want to switch up the protein in your bowls, here are some great options. - Substitutes for chicken: You can use turkey breast, pork tenderloin, or even shrimp. Each option brings a unique taste. - Vegetarian options: Try grilled tofu or tempeh. Both soak up flavors well. You can also use chickpeas or black beans for a hearty protein boost. Don't feel stuck with quinoa! There are many tasty grains you can use. - Quinoa substitute ideas: Brown rice is a great choice. It has a nutty flavor and chewy texture. You could also use farro for a more rustic feel. - Other base options: Consider using barley or bulgur wheat. They offer different textures and flavors that work well with the other ingredients. Let's take your bowls to the next level with some exciting flavors. - Sauces to pair with the bowl: Try a spicy sriracha sauce or a tangy sesame dressing. These can add a kick to your meal. - Additional spices and herbs: Sprinkle some red pepper flakes for heat or add fresh cilantro for a burst of freshness. A squeeze of lime juice can brighten up the dish too. To keep your grilled chicken and broccoli bowls fresh, store them right. Use airtight containers. Glass or BPA-free plastic containers work best. Make sure the chicken and broccoli cool down before sealing. This helps prevent moisture buildup. Label the containers with the date. Use within three days for the best taste. To reheat, use the microwave or stovetop. For the microwave, place a bowl in and cover it with a damp paper towel. This keeps food moist. Heat in short bursts, checking often. For stovetop reheating, place the bowl in a pan over low heat. Stir gently until warm. To keep the chicken juicy, avoid high heat. Enjoy your meal like it was just made! To make these bowls ahead of time, you can prep each component. Start with the chicken. Marinate it and grill it. Once cooked, let it cool, then slice it. Next, cook the quinoa and steam the broccoli. Store all items in separate containers in the fridge. This way, you can quickly assemble bowls when ready to eat. Yes, you can use frozen broccoli. It saves time and still tastes good. Just steam it until it’s hot. Follow the package instructions for best results. This makes meal prep easier and keeps your bowls healthy. To reheat quinoa, use a microwave or stovetop. For the microwave, place the quinoa in a bowl and add a splash of water. Cover it and heat for one minute. Stir and check if it's warm. On the stovetop, add quinoa to a pan with a little water. Heat over low heat until warm. You can boost flavor by using fresh herbs. Basil, cilantro, or parsley work well. You can also add spices like red pepper flakes for heat. Drizzling a bit of lime juice or sesame oil on top adds a nice touch, too. Feel free to experiment with flavorings you enjoy. Absolutely! For a gluten-free option, use tamari instead of soy sauce. If you want a vegetarian dish, swap chicken for tofu or chickpeas. You can also use brown rice or cauliflower rice instead of quinoa. These swaps allow everyone to enjoy the meal. This blog post covered how to make grilled chicken and broccoli bowls. We discussed the main ingredients, marinade components, and optional garnishes. I shared step-by-step instructions for marinating chicken, cooking quinoa, grilling, and preparing broccoli. Tips helped you perfect the flavors and textures. We also explored variations for proteins and grains, plus storage and reheating advice. Now, you can enjoy tasty, nutritious bowls anytime. Get creative and make this recipe your own!

Grilled Chicken and Broccoli Bowls Tasty Meal Prep

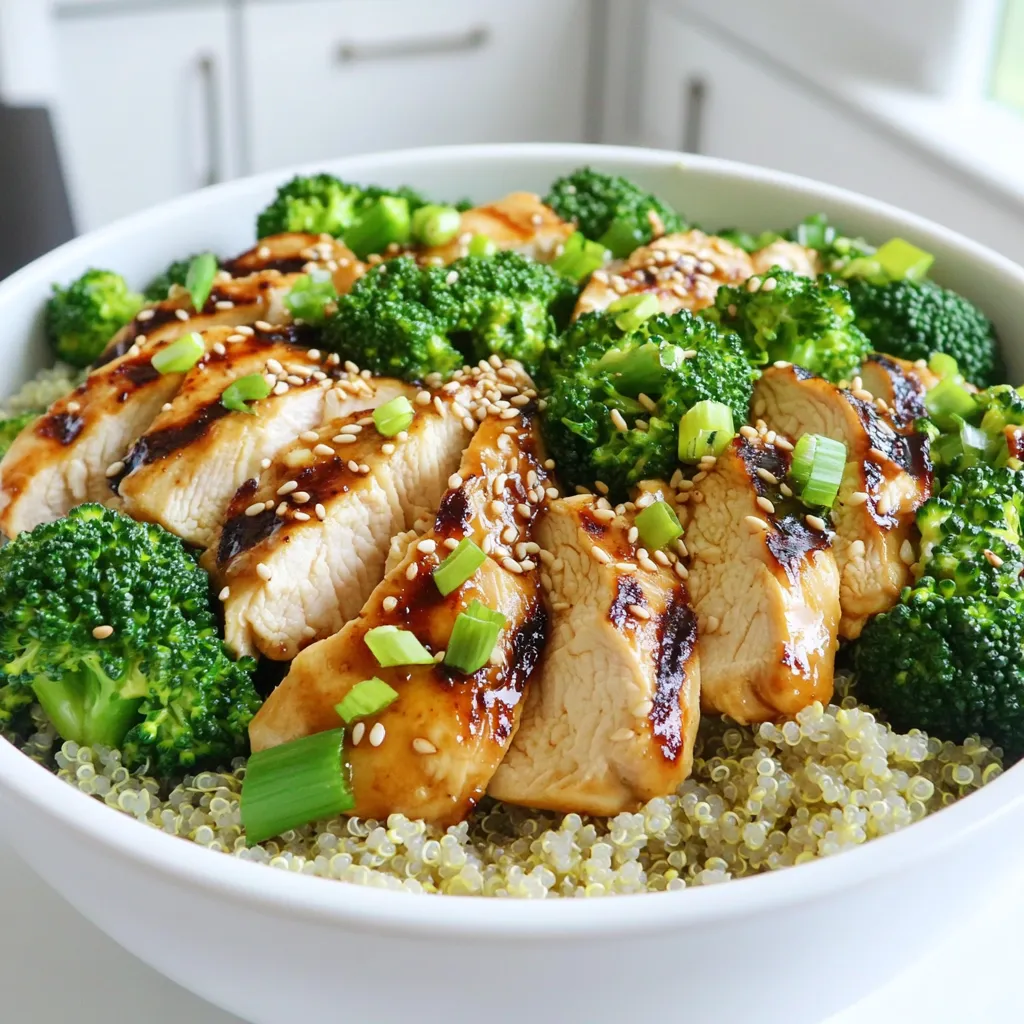
Looking for a quick, tasty meal prep idea? Grilled Chicken and Broccoli Bowls are simple and delicious! With juicy chicken,

- 1 lb flank steak - 2 large sweet potatoes, peeled and diced into 1-inch cubes - 1 tablespoon olive oil - 1 tablespoon chipotle chili powder - 1 teaspoon garlic powder - 1 teaspoon ground cumin - Salt and freshly cracked pepper, to taste The main ingredients in this meal are flank steak and sweet potatoes. Flank steak gives a rich flavor. It’s best to cut it against the grain for tenderness. Sweet potatoes add a sweet touch and healthy carbs. The spices make all the difference. Chipotle chili powder gives a smoky kick. Garlic powder and cumin add depth to the taste. Always season generously with salt and pepper. - 1 cup black beans, rinsed and drained - 1 cup corn kernels (fresh, canned, or frozen) - 1 cup cherry tomatoes, halved - 1 ripe avocado, sliced - Fresh cilantro, chopped for garnish - Lime wedges, for serving The additional components add great texture and flavor. Black beans are high in protein and fiber. Corn kernels bring sweetness and crunch. Cherry tomatoes add freshness. Sliced avocado gives creaminess. Cilantro brightens up the dish. The lime wedges add a zesty touch when you serve. This balance of flavors makes your meal fun and delicious. 1. First, preheat your oven to 425°F (220°C). This heat is perfect for roasting. 2. In a large bowl, mix the diced sweet potatoes with 1 tablespoon of olive oil. 3. Add 1 tablespoon of chipotle chili powder, 1 teaspoon of garlic powder, 1 teaspoon of cumin, salt, and pepper to taste. 4. Toss the sweet potatoes well. Make sure every piece is coated in the spice mix. 5. Spread the sweet potatoes in a single layer on a lined baking sheet. 6. Roast them for 25-30 minutes. Stir them halfway through for even cooking. They should be tender and a bit caramelized when done. 1. While the sweet potatoes roast, season the flank steak well with salt, pepper, and a sprinkle of chipotle chili powder. 2. Heat a grill or pan to medium-high. Cook the steak for 4-5 minutes on each side. 3. Check for your desired doneness. 4. Once cooked, let the steak rest for 5 minutes. This helps keep it juicy. 5. Slice the steak thinly against the grain. This will ensure each bite is tender. 1. Grab your meal prep containers and start portioning. 2. Evenly distribute the roasted sweet potatoes, sliced flank steak, 1 cup of black beans, 1 cup of corn, and halved cherry tomatoes. 3. For a fresh touch, top each bowl with avocado slices and chopped cilantro. 4. Add a lime wedge on the side for a zesty kick. 5. Let the bowls cool before sealing them with lids. 6. Store them in the fridge. They will stay fresh for up to 5 days. - Ensuring even cooking: Cut your sweet potatoes into 1-inch cubes. This size helps them cook evenly. Stir them halfway through roasting. This keeps them from sticking and helps them caramelize nicely. - Alternative seasoning ideas: If you want to mix it up, try adding cinnamon or paprika. These spices add a nice twist. You can also use fresh herbs like rosemary for a fragrant touch. - Checking for doneness: Use a meat thermometer to check the steak’s temperature. Aim for 130°F for medium-rare. This ensures you get juicy and tender meat. If you prefer it more done, aim for 145°F. - Best cooking methods for tenderness: Grilling is my favorite method. It gives a great char. Pan-searing also works well. Just make sure to keep the heat at medium-high. This helps achieve a nice crust while keeping the inside tender. - Cooling down before sealing: Let your meal prep bowls cool for about 20 minutes. This helps prevent moisture buildup in the container. Moisture can lead to soggy food. - Best practices for reheating meal prep: When reheating, use the microwave or oven. If using the microwave, cover the bowl with a damp paper towel. This keeps the food from drying out. If you're using the oven, reheat at 350°F for about 10-15 minutes. {{image_4}} You can change the protein in this meal. If you want a lighter option, try chicken or turkey. They cook quickly and soak up the spices well. For a tasty twist, marinate the chicken in chipotle sauce before cooking. This adds great flavor. If you prefer plant-based meals, consider using tofu or tempeh. Both options soak in flavors nicely. Marinate them in the same spices as the steak. Then grill or sauté until golden brown. You’ll have a filling, tasty meal. Switching up spices can elevate your dish. Instead of chipotle chili powder, try smoked paprika for a different kick. Cumin is also a great choice; it adds warmth and depth. Fresh herbs like oregano or thyme can give your meal a fragrant touch. You can mix in different beans and veggies too. Instead of black beans, use pinto or kidney beans for variety. Peppers, zucchini, or spinach can add color and nutrition. Let your creativity shine with every bowl! Accompany your meal prep bowls with tasty sauces. A dollop of sour cream or Greek yogurt can add creaminess. If you like heat, drizzle some hot sauce on top. For a fresh touch, squeeze lime juice over your bowl. Don’t forget about toppings! Crumbled queso or feta cheese adds a salty bite. Chopped green onions or jalapeños can provide a nice crunch. Explore different combos to keep your meals exciting! - Refrigeration guidelines: Always let your meal prep cool down before sealing. This keeps moisture out and helps prevent spoilage. Store in airtight containers. Your meal prep can last in the fridge for up to 5 days. - Vacuum sealing for longevity: For extra freshness, use a vacuum sealer. This method removes air and extends shelf life. It’s perfect if you want to keep your meal prep for longer. - Container choices for freezing: Use freezer-safe containers or heavy-duty bags. Make sure to leave some space for expansion. This helps avoid freezer burn. - Defrosting tips: Always defrost your meal prep in the fridge for best results. If you're in a hurry, use the microwave. Just remember to reheat it until hot all the way through. - Duration in the fridge: Your Chipotle Steak and Potatoes will stay fresh for 5 days in the fridge. This makes meal planning easy and stress-free. - Signs of spoilage: Check for any off smells or changes in texture or color. If you see any mold, it's best to toss it. Always trust your senses when it comes to food safety. Chipotle Steak and Potatoes last up to 5 days in the fridge. Store them in airtight containers to keep them fresh. Make sure the meal prep bowls cool down before sealing. This helps to avoid moisture build-up, which can spoil your meal. Check for any signs of spoilage, like off smells or mold, before eating. Yes, you can meal prep Chipotle Steak ahead of time. Cook the steak and sweet potatoes first. Let them cool before packing them into containers. This helps save time during busy weeks. You can also chop the veggies and prepare the toppings in advance. Just assemble everything on the day you plan to eat. You can use several options instead of flank steak. Sirloin steak works well and is often tender. Chicken breast is a great choice for a leaner meal. If you prefer plants, try using marinated tofu or tempeh. Both options absorb flavors nicely and add protein to your meal. Yes, this recipe is gluten-free! The ingredients used, like flank steak, sweet potatoes, and spices, do not contain gluten. Just be cautious with any packaged items, like canned beans or corn. Always check labels to ensure they are gluten-free. This makes it safe for those with gluten sensitivities. In this post, we explored a tasty dish featuring flank steak and sweet potatoes. You learned how to prepare each ingredient and assemble meal prep bowls. We also shared tips for perfecting your flavors and storage options to keep your food fresh. Think about customizing the recipe with various proteins and spices. Meal prep can save time and bring joy to your cooking. Try out these ideas and make this dish your own!

Chipotle Steak and Potatoes Meal Prep Made Easy

If you’re craving a delicious and filling meal that’s easy to prep, you’ve come to the right place! The Chipotle

Older posts
Newer posts
← Previous Page1 Page2 Page3 … Page86 Next →

dsad

© 2026 recipesstation • Built with GeneratePress

Our Policies

  • Copyright Policy
  • Cookie Policy
  • GDPR Policy
  • Privacy Policy
  • Disclaimer
  • Terms Of Use

More Information

  • Home
  • About
  • Contact
  • Appetizers
  • Dessert
  • Dinner
  • Drinks
©2026, recipesstation About Back To Top