Skip to content
DisclaimerTerms Of UseGDPR PolicyCookie Policy

recipesstation

  • Home
  • Drinks
  • Appetizers
  • Dinner
  • Dessert
  • About
  • Contact
  • Privacy Policy
DisclaimerTerms Of UseGDPR PolicyCookie Policy

NO-ING-IMG

- 1 cup graham cracker crumbs - ½ cup unsweetened cocoa powder - ½ cup granulated sugar - ½ cup unsalted butter, melted - 1 cup mini marshmallows - 1 cup milk chocolate chips - ½ cup crushed graham crackers (for topping) - ¼ cup mini chocolate chips (for garnish) To create these no bake s’mores fudge bars, you need simple and tasty ingredients. Each one plays a key role in making your bars delicious. First, the graham cracker crumbs give the base a nice crunch. They add a sweet and buttery taste. Next, the unsweetened cocoa powder brings rich chocolate flavor. The granulated sugar sweetens the mix just right. Melted unsalted butter helps bind everything together. It makes the crust smooth and moist. The mini marshmallows are a must. They add that classic s'mores taste and a fun chewy texture. Milk chocolate chips melt to create a creamy layer. Their sweetness balances the cocoa. For the topping, crushed graham crackers add extra crunch and flavor. The mini chocolate chips on top give a nice finish and extra sweetness. With these ingredients, you can make a treat that everyone loves. It’s easy, fun, and oh-so-delicious! - Combining Dry Ingredients In a medium bowl, mix the graham cracker crumbs, cocoa powder, and sugar. Whisk them until they look uniform. This step is key for a smooth crust. - Adding Melted Butter Now, pour in the melted butter. Stir well until the mixture feels like wet sand. This will help it stick together when pressed. - Pressing the Mixture into the Baking Dish Take an 8x8 inch baking dish. Firmly press the mixture into the bottom. Use your fingers or a measuring cup to flatten it down. Make sure it’s even and compact for the best base. - Melting the Chocolate Chips Grab a microwave-safe bowl. Add the milk chocolate chips and half of the mini marshmallows. Microwave in 30-second bursts, stirring in between, until smooth and melted. - Incorporating Mini Marshmallows Once the chocolate is melted, gently fold in the rest of the mini marshmallows. This adds a fun, chewy texture to the chocolate layer. - Spreading the Chocolate Mixture Pour the chocolate mixture over the crust. Use a spatula to spread it evenly. Make sure to cover all corners for a neat look. - Adding Toppings and Chilling Sprinkle the crushed graham crackers on top. Press down lightly to help the toppings stick. Place the dish in the fridge to chill for at least 2 hours. This helps the fudge bars set nicely. - Ensuring Even Layer Distribution: To achieve a great texture, spread your crust evenly. Use your hands or a measuring cup to press it down well. This makes each bite full of flavor. Make sure the chocolate layer covers all the crust. This way, every piece has the same taste. - Pressing Toppings Firmly: After adding marshmallows and crushed graham crackers, press them down lightly. This helps them stick to the chocolate layer. A firm press keeps everything together when you cut the bars. It also makes the bars look nice when served. - What to Do if Chocolate Doesn't Melt Smoothly: If your chocolate is clumpy, try microwaving it in shorter bursts. Stir after each 30 seconds. This helps to evenly melt the chocolate. If it still looks thick, add a tiny bit of oil. This can help make it smooth and shiny. - Fixing Crust Consistency Problems: If your crust is too crumbly, it may need more butter. Add a little melted butter and mix. If it’s too sticky, add a bit more graham cracker crumbs. Adjusting these will help you get the perfect texture. - Presentation Tips for Serving: For a great look, serve the bars on a wooden platter. You can also use a fancy dessert stand. To make them even prettier, add a mini marshmallow on top of each bar. A drizzle of melted chocolate adds a nice touch too. - Pairing Ideas with Other Desserts: These fudge bars pair well with vanilla ice cream. The cold ice cream balances the rich fudge. You can also serve them with fresh fruit like strawberries. The fruit adds a burst of flavor that goes well with the chocolate. {{image_4}} Peanut Butter Integration You can add peanut butter to the fudge layer. Just mix in ½ cup of smooth peanut butter when you melt the chocolate. This twist adds a nutty flavor that pairs well with the sweetness of the marshmallows. Using Dark Chocolate Instead For a richer taste, use dark chocolate chips instead of milk chocolate. The deep flavor of dark chocolate gives a nice balance to the sweetness of the bars. Melt it just like the milk chocolate, and spread it over the crust. Gluten-Free Options To make these bars gluten-free, use gluten-free graham crackers. Many brands offer tasty options that work well in this recipe. Just swap them out for regular ones, and you’re good to go! Dairy-Free Substitutions You can make these fudge bars dairy-free too. Use coconut oil instead of butter and dairy-free chocolate chips. This way, everyone can enjoy a slice without worry. Introducing Fresh Fruit Top your fudge bars with fresh fruit for a fun twist. Sliced strawberries or bananas add a burst of flavor and color. Just sprinkle them on top before you chill the bars. Experimenting with Nuts and Other Candies Try adding nuts like chopped almonds or walnuts for crunch. You can also sprinkle on mini candy pieces for extra sweetness. Mix and match to find your favorite combo! - Refrigerating Fudge Bars: Store the fudge bars in an airtight container. They can stay fresh in the fridge for up to one week. Keeping them chilled helps maintain their shape and texture. - Freezing for Long-Term Storage: For longer storage, wrap the fudge bars tightly in plastic wrap. Place them in a freezer-safe bag or container. They can last up to three months in the freezer. When you're ready to enjoy them, just take them out and let them thaw in the fridge overnight. - Recommended Methods for Softening: If the bars feel too hard, you can microwave them for about 10 seconds. Check if they are warm but not melted. This will help soften them without losing the structure. - Tips for Retaining Texture: To keep the fudge bars nice and firm, avoid leaving them out at room temperature for too long. Serve them chilled for the best taste and texture. Using a warm knife technique works best. First, heat a sharp knife under hot water. Wipe it dry. Then, slice the bars smoothly. This helps prevent any crumbling. For neat edges, clean the knife between cuts. It makes your fudge bars look nice and tidy. Yes, you can make these fudge bars ahead of time. I recommend preparing them one to two days before you need them. Just keep them in the fridge. This way, they will stay fresh and tasty. Planning ahead saves time on busy days. These fudge bars can last about a week in the fridge. Store them in an airtight container. This helps keep them fresh and prevents them from drying out. If you notice any changes in smell or texture, it’s best to toss them. Absolutely! You can use dark chocolate or white chocolate for a twist. Each type brings a different flavor to the fudge bars. Dark chocolate has a rich taste, while white chocolate is sweeter. Feel free to mix and match to find your favorite combination. In this post, I covered how to make delicious no-bake fudge bars. We discussed the key ingredients, from graham cracker crumbs to chocolate chips. I walked you through easy steps for the crust and layers. You learned tips for even layers and how to fix common issues. I also shared ways to add flavor twists, like peanut butter. Remember to store them properly for the best taste. Now, it’s your turn to enjoy these fun treats. Happy baking!

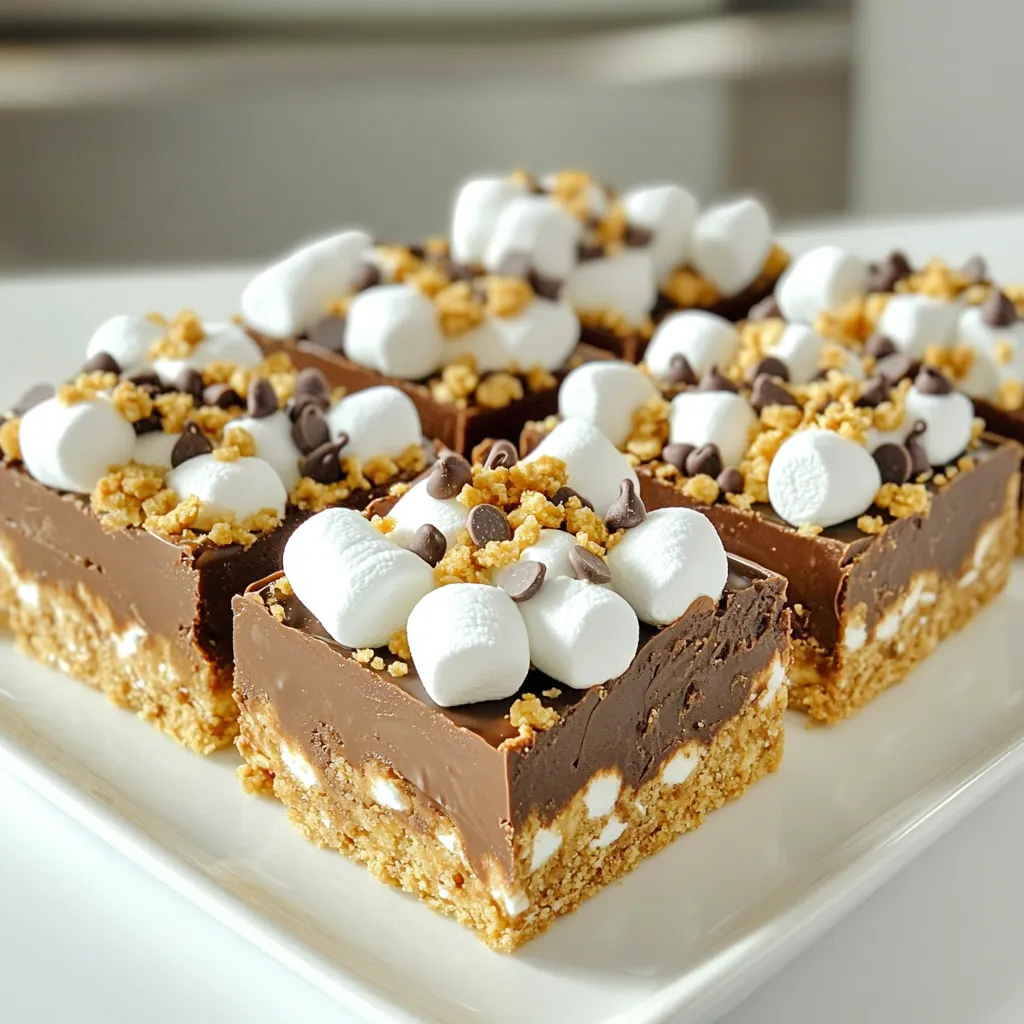
No Bake S’mores Fudge Bars Simple and Delicious Recipe

Craving a sweet treat that’s quick and easy? Look no further! My No Bake S’mores Fudge Bars are the perfect

- 2 cups all-purpose flour - 1 teaspoon baking soda - 1 teaspoon baking powder - 1 teaspoon ground cinnamon - 1 teaspoon ground ginger - 1/2 teaspoon ground cardamom - 1/4 teaspoon ground nutmeg - 1/4 teaspoon salt - 1/2 cup unsalted butter, softened - 1 cup brown sugar, packed - 2 large eggs - 1 teaspoon pure vanilla extract - 1 cup brewed chai tea, cooled - 1/2 cup whole milk - 1/2 cup chopped pecans (optional) - 1/2 cup streusel topping - 1/2 cup all-purpose flour - 1/4 cup brown sugar - 1 teaspoon ground cinnamon - 2 tablespoons unsalted butter, melted Gather these ingredients before starting. Each one adds unique flavors and textures to the chai latte coffee cake muffins. The spices like cinnamon, ginger, and cardamom create a warm, cozy taste. Softened butter and brown sugar mix well for a sweet base. The brewed chai tea gives these muffins their signature flavor. You can also add pecans for a nice crunch. The streusel topping adds a delightful crunch on top. It's easy to make and takes just a few minutes. Start by preheating your oven to 350°F (175°C). This step ensures even baking. Prepare your muffin tin by lining it with paper liners. If you don't have liners, grease the cups with butter to stop sticking. In a small bowl, mix 1/2 cup of all-purpose flour, 1/4 cup of brown sugar, and 1 teaspoon of ground cinnamon. Add melted butter. Stir until the mix looks crumbly. Set this aside for later. In a medium bowl, whisk together the remaining 2 cups of flour, 1 teaspoon of baking soda, and 1 teaspoon of baking powder. Add the spices: 1 teaspoon of ground cinnamon, 1 teaspoon of ground ginger, 1/2 teaspoon of ground cardamom, 1/4 teaspoon of ground nutmeg, and 1/4 teaspoon of salt. This mix will make your muffins flavorful. In a large bowl, combine 1/2 cup of softened unsalted butter and 1 cup of packed brown sugar. Use an electric mixer on medium speed. Cream these together for about 3 to 5 minutes. You want a light and fluffy texture. Add the 2 large eggs one at a time. Mix well after each egg. Then, add 1 teaspoon of pure vanilla extract. This adds depth to your muffins. Gradually mix the dry ingredients into the butter-sugar mix. Do this while adding 1 cup of cooled brewed chai tea and 1/2 cup of whole milk. Start and end with the dry mix. Stir gently to combine. Avoid overmixing, or your muffins may turn out dense. If you're using pecans, gently fold in 1/2 cup of chopped nuts. This step adds a nice crunch and flavor. Spoon the muffin batter into the prepared muffin tin. Fill each cup about three-quarters full. This allows space for the muffins to rise without overflowing. Sprinkle about a tablespoon of the streusel topping over each muffin. This will give your muffins a crunchy and sweet layer. Place the muffin tin in your preheated oven. Bake for about 18 to 20 minutes. Check for doneness by inserting a toothpick into the center. The toothpick should come out clean when ready. After baking, let the muffins cool in the pan for about 5 minutes. Then, transfer them to a wire rack to cool completely. This step helps keep the muffins soft and tasty. To avoid dense muffins, follow a few simple steps. First, measure your flour correctly. Use the spoon and level method to avoid too much flour. Overmixing can also lead to tough muffins. Mix the batter just until combined. The batter should be lumpy, not smooth. Finally, use room temperature ingredients. This helps the batter mix evenly, giving you that fluffy texture you want. If you want to change the flavor a bit, try adding more spices. You can increase the cinnamon or ginger for a bolder taste. Adding a pinch of black pepper can give a nice kick as well. For a fun twist, consider mixing in chocolate chips or dried fruit. Chopped apples or cranberries add moisture and sweetness too. Each little change can make your muffins unique and exciting. To make your muffins look fancy, serve them warm on a pretty plate. A light dusting of powdered sugar adds a touch of charm. Pair them with a cup of hot chai or coffee for a cozy treat. You can even add a dollop of whipped cream on top for extra fun. Enjoying these muffins during a brunch with friends makes for a delightful experience. {{image_4}} You can easily swap out the milk and butter in this recipe. For milk, use almond or oat milk. These options work well and keep the muffins moist. Instead of butter, try coconut oil or a vegan butter substitute. Both will give great flavor and texture. If you need gluten-free muffins, use a gluten-free flour blend. Look for one that works cup-for-cup like regular flour. This will help keep the texture light and fluffy. You can also use almond flour for a nutty taste. Feel free to get creative with your muffins! You can add chopped walnuts, pecans, or even shredded coconut for extra flavor. Dried fruits like raisins or cranberries work well too. For a sweet crunch, consider a drizzle of honey or maple syrup on top. The options are endless! To keep your muffins fresh longer, store them in an airtight container. This helps lock in moisture. You can place a paper towel at the bottom of the container. It absorbs extra moisture and keeps the muffins soft. Keep the container in a cool, dry place, away from direct sunlight. If you live in a humid area, refrigeration can be helpful. However, it may change the texture slightly. Freezing muffins is easy. First, let the muffins cool completely. Wrap each muffin in plastic wrap. Then, place them in a freezer-safe bag. Remove as much air as you can before sealing. You can freeze them for up to three months. To reheat, take a muffin out and let it thaw at room temperature. You can also warm it in the microwave for about 20 seconds. This makes them taste freshly baked! These chai latte coffee cake muffins last about a week at room temperature. If stored properly in an airtight container, they stay fresh. If you freeze them, they can keep for about three months. Just remember to check for any signs of freezer burn before you enjoy them! Yes, you can use chai tea bags. Just steep two bags in one cup of hot water for about five minutes. This creates a strong flavor that works well in the muffins. Make sure to let the tea cool before using it. You can swap some ingredients for healthier options. Use whole wheat flour instead of all-purpose flour. You can also use coconut oil or applesauce for butter. Reduce the sugar to make them less sweet. Adding more nuts or fruits can boost nutrition too. If you have extra streusel topping, you can use it on other baked goods. Sprinkle it on oatmeal or yogurt for added crunch. You can also make a small batch of fruit crisp using the streusel as a topping. It's so versatile! Yes, these muffins are great for breakfast! They are sweet but still have spices that add warmth. You can easily pair them with a cup of chai or coffee. They make a delightful morning treat or a great snack any time of day. You can make delicious chai tea muffins with the right ingredients and process. We covered key ingredients, step-by-step instructions, and useful tips to ensure your muffins shine. Whether you prefer dairy-free or gluten-free options, this recipe adapts to your needs. Remember to store them properly to keep them fresh. Enjoy baking and sharing these muffins for breakfast or any time. Happy muffin-making!

Chai Latte Coffee Cake Muffins Delightful and Simple

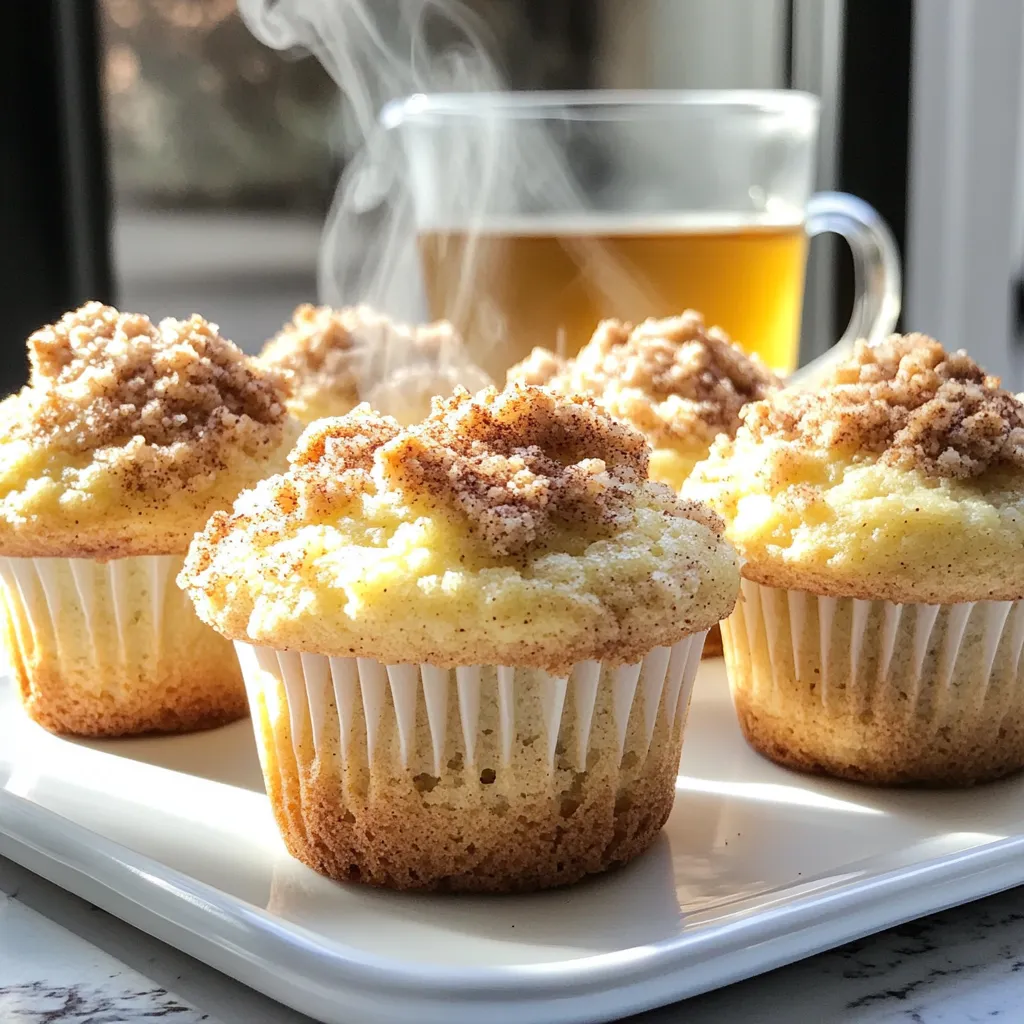
If you crave a cozy treat that combines sweet and spicy flavors, you’re in for a delight! My Chai Latte

- 1 can (15 oz) pure pumpkin puree - 1 cup cream cheese, softened to room temperature - 1 cup powdered sugar - 2 cups whipped cream, divided - 1 teaspoon pure vanilla extract - 1 teaspoon pumpkin pie spice - 1 ½ cups graham cracker crumbs - ½ cup unsalted butter, melted - ½ cup chopped pecans (optional) - Additional whipped cream for serving - Ground cinnamon for dusting Each ingredient plays a key role in this dessert. The pumpkin puree brings a rich, sweet flavor. Cream cheese adds a smooth texture and tang. Powdered sugar sweetens the mix without graininess. Whipped cream creates a light, fluffy topping that makes each bite melt in your mouth. The crust is simple yet important. Graham cracker crumbs give a sweet crunch. Melted butter holds the crumbs together, while optional pecans add a nutty twist. You can skip the nuts if you prefer a smooth texture. Toppings are the final touch. More whipped cream on top makes it look inviting. A sprinkle of ground cinnamon adds warmth and a festive feel. This combination of ingredients creates a layered dessert that is both easy to make and delightful to eat. {{ingredient_image_2}} To make the crust, start by blending graham cracker crumbs and melted butter in a bowl. Mix them until they hold together when pressed. This will give your crust a nice, firm base. Next, press this mixture evenly into the bottom of a 9x13 inch baking dish. Make sure to press down firmly. A well-packed crust will support the layers above. In a mixing bowl, beat the softened cream cheese, powdered sugar, and vanilla extract together. Use an electric mixer for the best results. Mix until the mixture is creamy and smooth, with no lumps. Then, gently spread this creamy mix over the prepared graham cracker crust. Smooth it out for an even layer. For the pumpkin layer, combine the pumpkin puree, pumpkin pie spice, and a pinch of salt in a separate bowl. Stir these ingredients until well mixed. Next, fold in 1 ½ cups of whipped cream. This step is key; it makes the pumpkin layer light and fluffy. Once combined, spoon the pumpkin mixture evenly over the cream cheese layer. Make sure to smooth out the top. Now, it’s time to add the finishing touches. Spread the remaining whipped cream over the pumpkin layer. This creates a lovely, fluffy topping. If you want, sprinkle chopped pecans on top for extra crunch and flavor. Cover the baking dish with plastic wrap and refrigerate for at least 4 hours, or overnight if you can wait. This chilling time allows the layers to set and the flavors to meld together. To make a smooth cream cheese mixture, start with softened cream cheese. Cold cream cheese creates lumps. Mix until it feels fluffy and free of bumps. Use an electric mixer for the best results. Mix in powdered sugar and vanilla until creamy. Folding whipped cream into the pumpkin layer is key. First, take a big scoop of whipped cream. Add it to the pumpkin mix. Use a spatula to gently fold it in. This keeps the mix light and airy. Repeat until fully combined. For garnishes, consider a dollop of extra whipped cream. A sprinkle of ground cinnamon adds a warm touch. Serve the dessert chilled for the best taste. It tastes even better after resting in the fridge. Cut it into squares to make serving easy. Place each square on dessert plates. This makes it look neat and inviting. To balance sweetness, taste the layers before serving. If it's too sweet, add a pinch of salt. It helps to mellow the flavors. You can also substitute pumpkin pie spice. Use cinnamon, nutmeg, and ginger if you want. This gives a different twist to your dessert. Adjusting spices can create a new favorite. Pro Tips Use Fresh Pumpkin: For an even richer flavor, consider using fresh pumpkin instead of canned puree. Roast and puree your own pumpkin for the best results. Chill for Best Results: Allow the dessert to chill overnight if possible. This not only enhances the flavors but also helps the layers set perfectly. Experiment with Spices: Feel free to adjust the amount of pumpkin pie spice to your taste. You can also add a pinch of nutmeg or cloves for an extra depth of flavor. Presentation Matters: For an elegant presentation, use a serrated knife to cut clean squares and wipe the knife between cuts. Garnish with fresh mint leaves for a pop of color. {{image_4}} You can easily make this dessert fit your needs. For a gluten-free crust, use gluten-free graham cracker crumbs. Brands like Kinnikinnick offer great options. To make it dairy-free, swap the cream cheese for a dairy-free cream cheese. Brands like Tofutti or Kite Hill work well. Also, use coconut whipped cream instead of regular whipped cream. This keeps the dessert creamy and delicious. Want to mix things up? Try adding layers of chocolate or caramel. You can drizzle chocolate sauce between the layers or mix caramel into the pumpkin layer. This adds a rich twist. You can also use different nuts for topping. Walnuts, pecans, or almonds all add a nice crunch. Each nut brings its own flavor, making your dessert unique. Embrace the fall vibe by adding other seasonal flavors. Consider mixing in maple syrup or apple pie spice for an extra layer of taste. For holidays like Thanksgiving, consider adding a layer of cranberry sauce. This gives a tart contrast to the sweet pumpkin. You can also use festive toppings like chopped candy corn or edible glitter for a fun look! To keep your Pumpkin Delight Layered Dessert fresh, store it in the refrigerator. Use a tight lid or plastic wrap to cover the dish. This helps prevent air from drying it out. Keeping it chilled also helps the flavors blend better. If you want to freeze your dessert, first slice it into squares. Wrap each piece in plastic wrap, then place them in a freezer bag. This method keeps the dessert from getting freezer burn. To thaw, take a piece out and place it in the fridge overnight. This way, it retains its creamy texture. You can store the dessert in the fridge for up to five days. After five days, it may lose its taste and texture. Look for signs like separation or an off smell. If you see these signs, it's best to toss it out. Enjoy it while it's fresh for the best taste! You can easily make this dessert ahead. I recommend chilling it for at least 4 hours. If you have time, let it chill overnight. This extra time helps the flavors mix well. It also makes the layers hold together better when you cut it. Yes, you can use fresh pumpkin. It gives a nice flavor. But it takes more work. You need to cook and mash the pumpkin. Canned puree is smooth and easy. It saves time and has a consistent taste. So, think about your time and taste when choosing. If you want a vegan option, try using cashew cream. Blend soaked cashews with lemon juice and a bit of salt. You can also use store-bought vegan cream cheese. These options give a similar texture and taste without dairy. Yes, this dessert is great for kids! It has sweet flavors and a fun texture. To make it even more kid-friendly, you can reduce the sugar a bit. You can also add colorful sprinkles on top. Kids love to help with the layers too! In this blog post, we explored how to make a delicious Pumpkin Delight Layered Dessert. We covered the key ingredients like pumpkin puree, cream cheese, and graham cracker crust. You learned step-by-step instructions, helpful tips, and variations for dietary needs. My final thoughts: This dessert is not only easy to make but also perfect for any occasion. Enjoy sharing this treat with friends and family. Your homemade Pumpkin Delight will surely impress!

Pumpkin Delight Layered Dessert Easy and Delightful Treat

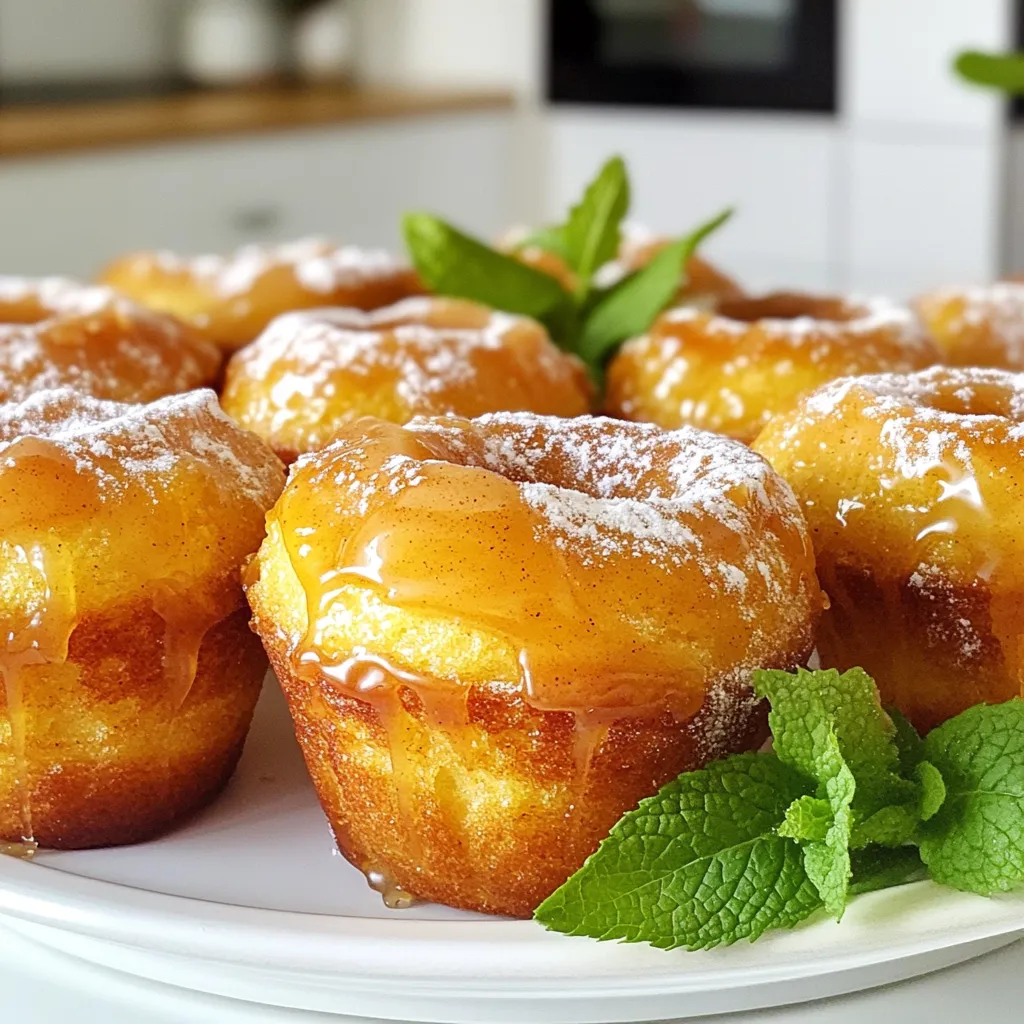
Are you ready to dive into a delicious fall treat? This Pumpkin Delight Layered Dessert is easy to make and

- 2 large carrots - 2 parsnips - 1 medium sweet potato - 1 medium beetroot - Extra virgin olive oil - Pure maple syrup - Ground cinnamon - Sea salt - Freshly cracked black pepper - Fresh thyme leaves These ingredients come together to create a colorful and tasty dish. Each root veggie brings a unique flavor. Carrots add sweetness, while parsnips give a nutty taste. Sweet potatoes offer creaminess, and beets add earthiness. The olive oil helps everything roast well. Maple syrup brings a lovely glaze and sweetness. Cinnamon enhances the flavors, making them warm and cozy. Sea salt and black pepper balance it all. Fresh thyme leaves add a nice hint of herbs at the end. - Preheat the oven to 400°F (200°C). This step makes sure the veggies roast well. - Peel and cut the root vegetables. I use large carrots, parsnips, sweet potatoes, and beetroot. Slice them thick for a hearty bite. - Combine vegetables in a mixing bowl. Mix them well so every piece gets coated. - Add olive oil and maple syrup. I drizzle two tablespoons of olive oil and three tablespoons of syrup. Toss everything together until the veggies shine. - Spread on a baking sheet and season. I line my sheet with parchment to prevent sticking. - Roast for 30-35 minutes, stirring halfway. This helps them cook evenly. You’ll know they’re done when they turn golden brown and smell amazing. Preheating your oven is key. Set it to 400°F (200°C) and let it heat up. This helps the veggies cook evenly and brown nicely. Make sure to coat the veggies well with oil and syrup. This step is important. It adds flavor and helps them caramelize. Use a spatula or your hands to mix. Ensure every piece gets a good amount of oil and syrup. Stir the veggies halfway through roasting. This helps them cook evenly and get a nice color. Give them a gentle toss to ensure they don’t stick. Avoid overcrowding on the baking sheet. Spread the veggies in a single layer. If they are too close, they will steam instead of roast. This can affect their texture and taste. Use fresh thyme leaves for garnish. They add a lovely touch and enhance the flavor. Just sprinkle them on top before serving. Drizzle any remaining maple syrup over the veggies. This adds a glossy finish and extra sweetness. It makes the dish look and taste even better. {{image_4}} For a vegan version, skip any animal products. Use maple syrup for sweetness. The recipe is already vegan-friendly. If you need a gluten-free option, this dish works great. All the ingredients are gluten-free. Just double-check that your maple syrup is pure and gluten-free. You can mix in other root veggies. Turnips add a nice peppery flavor. Garlic gives a savory touch. Try using seasonal vegetables for variety. Beets, carrots, and squash are great choices. To boost flavor, add fresh herbs like rosemary or sage. They pair well with root vegetables. You can also try spices like nutmeg or paprika for a different twist. If you want to change the sweetener, use honey or agave syrup. These will change the flavor but still taste great. To store leftover maple roasted root veggies, let them cool first. Place them in an airtight container. This keeps them fresh for up to three days. If you want to save space, use a flat container. Layer the veggies with parchment paper to avoid sticking. When reheating, I recommend using the oven. Preheat it to 350°F (175°C). Spread the veggies on a baking sheet. Heat for about 10-15 minutes, stirring once. This method keeps them crispy and tasty. If you're short on time, use the microwave. Place in a microwave-safe bowl and cover it. Heat for about two minutes, stirring halfway. This method is quicker but may soften the veggies a bit. Roasting root veggies takes about 30 to 35 minutes at 400°F (200°C). This time allows the veggies to soften and develop a nice caramelized outer layer. I recommend stirring them halfway through cooking. This helps them cook evenly and get that delicious golden brown color. Yes, you can use frozen root veggies. They are convenient and save time. However, frozen vegetables may not get as crispy. They can also release more moisture while cooking. If you use frozen veggies, roast them for a little longer. This helps achieve better texture. These maple roasted root veggies pair well with many dishes. Serve them as a side to roasted chicken or beef. They also work great with grains like quinoa or rice. For a vegetarian option, try them with a hearty salad or as part of a grain bowl. Drizzle extra maple syrup on top for added sweetness. This blog post shared how to make delicious Maple Roasted Root Veggies. You learned the importance of fresh ingredients, proper roasting techniques, and clever variations. These tips ensure your dish is perfect every time. I hope you enjoy experimenting with these flavors and additions. Remember, cooking should be fun! Use the ideas here to create a dish that delights your family. Enjoy your time in the kitchen!

Maple Roasted Root Veggies Flavorful and Healthy Dish

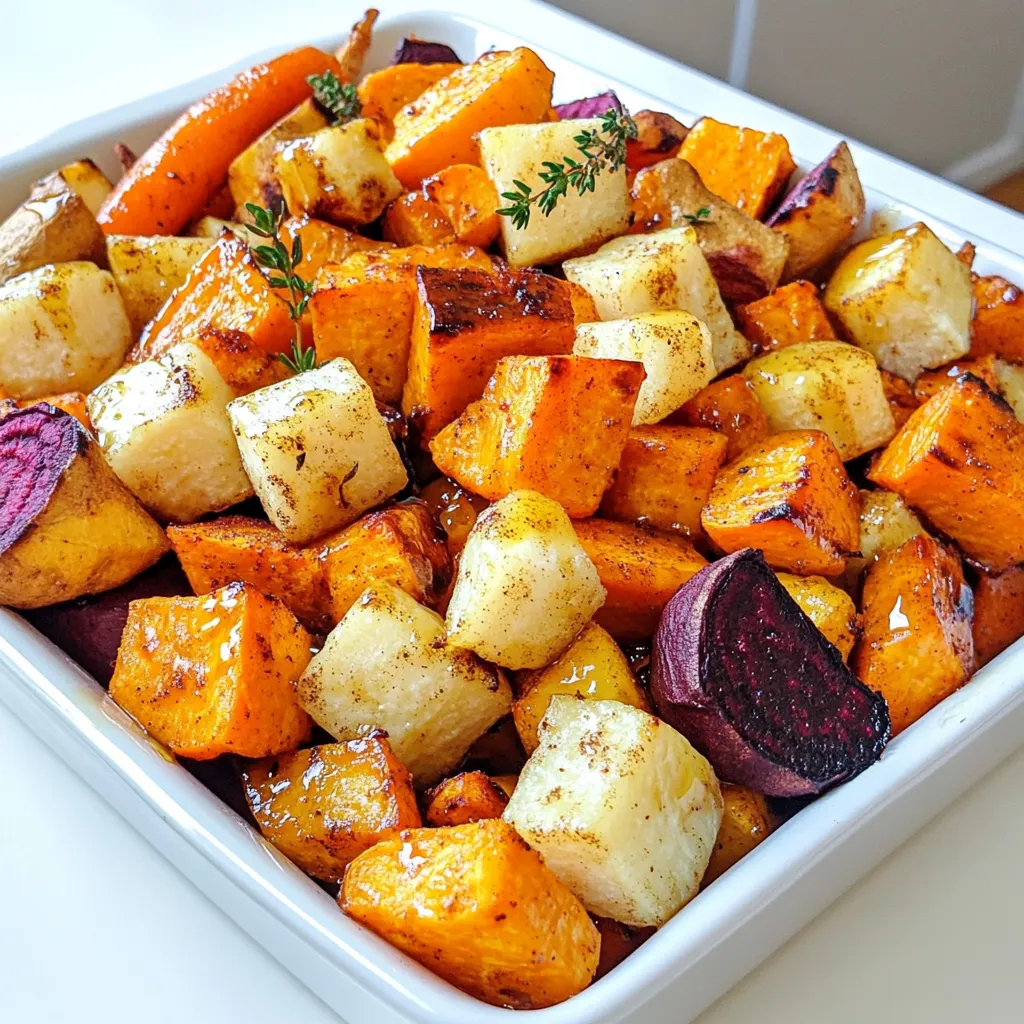
Looking for a dish that’s both tasty and healthy? Look no further! Maple roasted root veggies are here to impress.

To make your No Bake Pumpkin Spice Truffles, gather the following ingredients: - 1 cup pumpkin puree - 1 cup almond flour - 1/2 cup pure maple syrup - 1 teaspoon pumpkin spice blend - 1/4 teaspoon sea salt - 1/2 teaspoon pure vanilla extract - 1/2 cup dark chocolate chips (choose dairy-free if needed) - 1/4 cup finely chopped pecans (for coating) - 1/4 cup unsweetened shredded coconut (for coating) Each ingredient plays a key role. The pumpkin puree gives a rich flavor and texture. Almond flour adds a nutty taste and helps bind the truffles. Maple syrup sweetens and brings moisture. Pumpkin spice blend offers warmth, while sea salt enhances all flavors. Vanilla extract adds depth. Dark chocolate chips provide a delicious coating, and the pecans or coconut add crunch and extra flavor. Make sure to use high-quality ingredients for the best taste. Organic pumpkin puree and pure maple syrup can elevate your truffles. Enjoy the process of combining these simple items into a delightful treat. To start, grab a medium mixing bowl. Combine these ingredients: - 1 cup pumpkin puree - 1 cup almond flour - 1/2 cup pure maple syrup - 1 teaspoon pumpkin spice blend - 1/4 teaspoon sea salt - 1/2 teaspoon pure vanilla extract Mix them well until they form a smooth dough. Make sure each ingredient blends in nicely. This base will give your truffles a rich flavor. Once your base is mixed, cover the bowl with plastic wrap. Place it in the fridge for 30 minutes. Chilling helps firm up the dough. This step makes it much easier to roll the mixture into truffles. After the mixture is chilled, take it out of the fridge. Use a small cookie scoop or your hands to portion the dough. Roll the mixture into small balls, about 1 inch in size. Place these balls on a plate or tray. This will be the fun part where you see your truffles take shape! Now, let’s make the chocolate coating. In a microwave-safe bowl, add 1/2 cup dark chocolate chips. Melt the chocolate in intervals of 30 seconds. Stir after each interval until it's completely smooth. This will give your truffles a delicious outer layer. Next, take each pumpkin truffle ball and dip it into the melted chocolate. Ensure each one is fully coated. Use a fork to lift them out and let any extra chocolate drip back into the bowl. For a tasty touch, roll the coated truffles in either finely chopped pecans or shredded coconut right after dipping. This step adds texture and flavor! Finally, place the coated truffles on a baking sheet lined with parchment paper. This helps prevent sticking. After all the truffles are coated, put them back in the fridge. Wait for about 15 to 20 minutes for the chocolate to set fully. Once set, your no-bake pumpkin spice truffles will be ready to enjoy! - Keep hands damp for easier rolling. This helps prevent sticking. - Use a cookie scoop for uniform size. This makes each truffle look nice and neat. - Use the microwave in intervals. Heat for 30 seconds, then stir. - Avoid overheating chocolate. This can make it clump and lose its smoothness. - Arrange on a festive platter. This makes your truffles stand out. - Add cinnamon dusting for extra flair. A little sprinkle elevates the look and taste. {{image_4}} You can change the way your truffles look and taste by using different coatings. Here are two fun options: - Use crushed graham crackers for a sweet crunch. - Try crushed almonds for a nutty flavor. - If you want to be fancy, dip the truffles in white chocolate. This adds a creamy touch. You can also play with the flavors in your truffles. Here are some ideas to try: - Experiment with flavored extracts, like orange. This adds a bright twist. - Incorporate different spices, such as nutmeg or ginger, for more depth. If you need to change the recipe for dietary reasons, there are easy swaps: - Use coconut flour instead of almond flour for a gluten-free option. - Substitute maple syrup with agave nectar for a different sweetness. These variations keep your no-bake pumpkin spice truffles fun and fresh! To keep your truffles fresh, store them in an airtight container. This will help prevent them from drying out or absorbing other smells from your fridge. Make sure the container is not too big; a snug fit is best. Refrigerate your truffles to keep them cool and tasty. The cool air helps maintain their shape and flavor. These truffles can last up to two weeks in the fridge. After that, they may start to lose their flavor and texture. Watch for signs of spoilage, like a change in color or an off smell. If they look or smell funny, it's best to toss them out. You can freeze these truffles to enjoy later. First, place them on a baking sheet in a single layer. Freeze them for about an hour until they are solid. Then, transfer them to a freezer-safe bag or container. They can last up to three months in the freezer. When you want to eat them, take them out and let them thaw in the fridge. This way, they will stay soft and delicious. Yes, you can use canned pumpkin. Canned pumpkin saves time and works well. Just make sure it is pure pumpkin puree, not pumpkin pie filling. The flavor and texture will still be great. These truffles take about 15 to 20 minutes to set in the fridge. This time allows the chocolate to harden properly. You can check them after 15 minutes to see if they are ready. If you need a substitute for almond flour, try using oat flour or coconut flour. Both will work in this recipe. Just remember, coconut flour absorbs more moisture, so you may need less of it. Yes, these truffles are vegan-friendly. Use dairy-free chocolate chips, and they will be perfect. All the other ingredients are naturally vegan, too. Yes, you can skip the chocolate coating. Roll the truffles in chopped nuts or coconut instead. This will still give you a tasty treat without the chocolate. These pumpkin spice truffles are easy and fun to make. You mix simple ingredients like pumpkin puree, almond flour, and dark chocolate. After chilling, shape them, coat them, and let them set. Remember, different toppings and flavors can make each batch special. Store them properly to keep them fresh, and enjoy! These truffles are great for sharing or treating yourself. By trying variations, you can find your favorite twist. Have fun making these tasty treats!

No Bake Pumpkin Spice Truffles Easy and Delicious Treat

Craving a sweet and simple fall treat? I’ve got just the recipe for you: No Bake Pumpkin Spice Truffles! With

For this recipe, I use: - 2 cups cottage cheese, blended until smooth - 1/2 cup Greek yogurt Cottage cheese adds a creamy texture. Greek yogurt makes the dessert extra rich and tangy. You will need: - 1/2 cup honey or maple syrup - 1 teaspoon vanilla extract - 1 tablespoon freshly squeezed lemon juice - 1 teaspoon cornstarch - 1/4 teaspoon salt Honey or maple syrup gives sweetness. Vanilla and lemon juice add nice flavors. For the crust, gather: - 1 cup graham cracker crumbs - 4 tablespoons unsalted butter, melted The graham cracker crumbs create a crunchy base. The melted butter holds it all together. For garnish, consider: - Fresh berries (such as strawberries, blueberries, and raspberries) - Fresh mint leaves for garnish (optional) Berries add color and taste. Mint leaves give a fresh touch to your dessert. Start by blending two cups of cottage cheese until smooth. Add half a cup of Greek yogurt, half a cup of honey or maple syrup, one teaspoon of vanilla extract, one tablespoon of fresh lemon juice, one teaspoon of cornstarch, and a pinch of salt. Blend this mixture on high until it is creamy and lump-free. Set it aside for later. In a medium bowl, mix one cup of graham cracker crumbs with four tablespoons of melted unsalted butter. Use a fork or your fingers to combine them well. The mixture should feel like wet sand. This will form a tasty crust for your cups. Take your clear dessert cups or small glasses. Spoon about two tablespoons of the graham cracker mixture into each cup. Press down lightly with a spoon to make a firm crust layer. Make sure it is even across the bottom. Now, carefully spoon the creamy cottage cheese mixture on top of the crust in each cup. Fill them about two-thirds full. Gently tap the cups on the counter to remove any air bubbles. This ensures a nice, smooth finish. Place the cups in the refrigerator. Let them chill for at least two hours. This helps the mixture set properly, making each bite delightful. Once chilled, take the cups out of the fridge. Top each cheesecake cup with fresh berries like strawberries or blueberries. You can also add a mint leaf for a fun touch. Serve right away and enjoy your yummy dessert! To make your cottage cheese cheesecake cups smooth, blend the cottage cheese well. I recommend using a high-speed blender. It breaks down lumps quickly. Combine it with Greek yogurt for extra creaminess. The mixture should feel velvety. If it’s too thick, add a splash of milk or water. You can swap honey for maple syrup if you prefer. For a lighter option, use low-fat cottage cheese. If you want a dairy-free treat, try a plant-based yogurt. You can also use sugar instead of honey or syrup. Just adjust the amount to taste. Use clear dessert cups to show off the layers. Start with a neat layer of graham cracker crust. Then, spoon the creamy filling carefully on top. After chilling, garnish with fresh berries for color. A mint leaf adds a nice touch. Arrange them on a pretty platter for serving. {{image_4}} You can change up the flavors in your cheesecake cups. Here are some fun ideas: - Chocolate: Add cocoa powder to the cottage cheese mixture for a rich chocolate taste. - Fruit-infused: Blend in pureed fruits like strawberries or blueberries. This adds natural sweetness and color. - Citrus: Try adding orange or lime zest for a bright twist. It makes the dessert refreshing. - Spices: Add a pinch of cinnamon or nutmeg for warmth. These spices complement the creaminess perfectly. Experiment with these flavors to find your favorite! You can use different crusts for your cheesecake cups. Here are some choices: - Gluten-free: Use almond flour or gluten-free cookies instead of graham crackers. - Oreo crust: Crush Oreos for a chocolatey twist. This adds a fun flavor. - Nut crust: Mix ground nuts like pecans or walnuts with butter. This gives a crunchy texture. - Coconut crust: Combine shredded coconut with melted butter for a tropical flavor. Switching the crust can make each cup unique! Making individual servings can be fun. Here are some ideas to make your dessert special: - Layering: Alternate layers of cheesecake mixture with fruit or sauce in the cups. This looks great and tastes amazing. - Mini cups: Use smaller cups for bite-sized treats. Perfect for parties or snacks. - Themed toppings: Use seasonal fruits or colored sprinkles for holidays. This adds a festive touch. - Serving with sauce: Drizzle chocolate or caramel sauce over the top for extra sweetness. These tips help you create a dessert that everyone will love! Store any leftover cheesecake cups in the fridge. Use an airtight container to keep them fresh. They will stay good for up to three days. If you skip the lid, the cups may dry out or absorb smells from the fridge. You can freeze these cheesecake cups if you want to save them for later. Cover each cup tightly with plastic wrap. Then, place them in a freezer-safe container. They can last for up to two months in the freezer. To eat, move them to the fridge overnight to thaw. These cheesecake cups are best eaten fresh. However, they can last: - In the fridge: 3 days - In the freezer: 2 months Check for any signs of spoilage before eating. If they smell off or look strange, it is best to throw them away. Yes, you can use low-fat cottage cheese. It still gives a creamy texture. The flavor stays nice too. Some people prefer low-fat options for health reasons. Just blend it well to keep it smooth. The cheesecake cups need to chill for at least 2 hours. This time helps them set properly. Chilling makes the cups firmer and tastier. You can chill them longer if you want. Absolutely! You can make these cups a day before. Just store them in the fridge. This helps the flavors blend well. Plus, it saves time for parties or gatherings. If you don’t have graham crackers, try crushed cookies. Vanilla wafers work well too. You can also use gluten-free cookies for a gluten-free option. Just make sure to mix them with melted butter. Yes, these cheesecake cups can fit various diets. Use low-fat cottage cheese for a lighter option. You can also choose maple syrup for a vegan sweetener. Adjust the crust for gluten-free needs. These options make them more inclusive for everyone. Making cheesecake cups is easy and fun. First, gather ingredients like cottage cheese, sweeteners, and crust options. Mix, assemble, and chill your cups for the best texture. Don’t forget to try different flavors and garnishes. Finally, store extras correctly to enjoy later. With these tips and tricks, you can create tasty desserts that impress. Enjoy your delicious cheesecake cups with friends and family!

Cottage Cheese Cheesecake Cups Creamy Dessert Delight

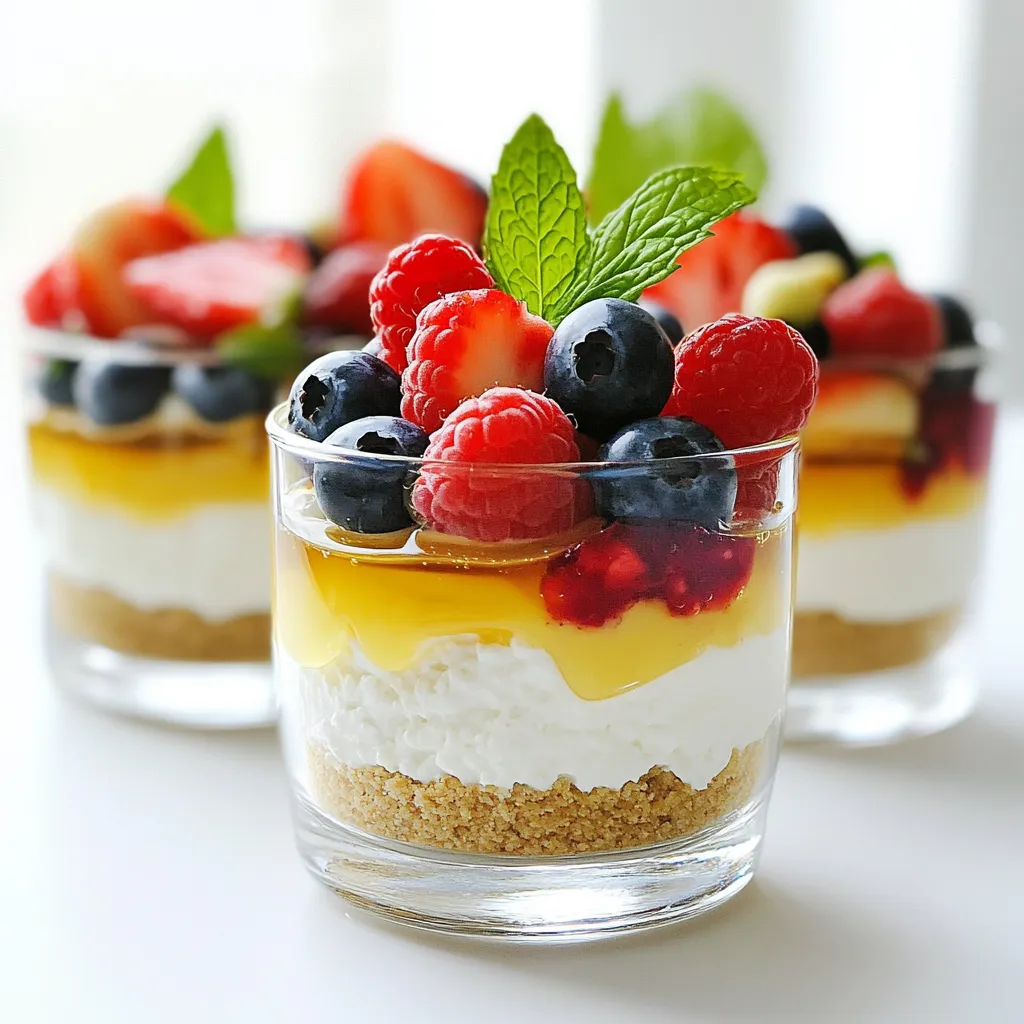
Looking for a creamy dessert that’s easy to make and delightful to eat? Try my Cottage Cheese Cheesecake Cups! These

- 2 cans (15 oz each) chickpeas, well-drained and rinsed - 1 medium onion, finely chopped - 2 cloves garlic, minced - 1 medium sweet potato, peeled and diced into small cubes - 1 bell pepper, chopped - 1 medium zucchini, chopped into bite-sized pieces - 1 can (14 oz) diced tomatoes with their juices - 2 cups vegetable broth, preferably low-sodium - 1 tablespoon olive oil - 2 teaspoons ground cumin - 1 teaspoon ground coriander - 1 teaspoon smoked paprika - 1/2 teaspoon ground cinnamon - 1/2 teaspoon turmeric - Sea salt and freshly ground black pepper to taste - Fresh cilantro or parsley, chopped, for garnish - Juice of 1 fresh lemon Gathering the right ingredients is the first step to making this stew. Chickpeas offer protein and fiber. They add heartiness. The vegetables like sweet potato, bell pepper, and zucchini bring color and nutrition. You can choose any bell pepper color you like! The spices are key. They give the stew a warm, rich flavor. Cumin, coriander, and smoked paprika add depth. Cinnamon and turmeric offer warmth and earthiness. The broth adds moisture and helps blend all the flavors. Finally, fresh herbs like cilantro or parsley brighten the dish. A splash of lemon juice at the end adds a fresh twist. Enjoy gathering these fresh and healthy ingredients! 1. Sautéing aromatics Start by adding olive oil to the slow cooker. If it has a sauté feature, add the chopped onion and minced garlic. Cook for about 2-3 minutes. The onion should look clear. If your slow cooker does not sauté, just layer the onion and garlic first. 2. Layering vegetables Next, add the diced sweet potato, bell pepper, and zucchini. Spread them evenly across the bottom. This step builds a strong base for the stew. 3. Adding chickpeas and tomatoes Open two cans of chickpeas. Rinse and drain them well. Add the chickpeas on top of the veggies. Then, pour in the canned diced tomatoes with their juices. This adds a rich flavor to the stew. 4. Mixing spices and seasoning In a bowl, combine ground cumin, ground coriander, smoked paprika, ground cinnamon, turmeric, salt, and pepper. Mix them well. Sprinkle this spice mixture over the top of the veggies and chickpeas. 5. Cooking settings: Low vs. High Use a large spoon to mix everything gently. This helps the spices coat all the ingredients. Cover the slow cooker with its lid. Set it to cook on low for 6-8 hours or on high for 3-4 hours. Choose the setting that fits your schedule. 6. Finishing touches When cooking is done, stir in the juice of one fresh lemon. This adds brightness to the stew. Taste and adjust the seasoning if needed. Serve the stew hot, garnished with fresh cilantro or parsley. Enjoy the warm, comforting flavors of your slow cooker Moroccan chickpea stew! - Choosing the best chickpeas You can use canned chickpeas for ease. Look for low-sodium options to control salt. Rinse them well to remove extra salt and foam. If you prefer dried chickpeas, soak them overnight. This helps them cook faster and taste better. - Adjusting flavors to taste Taste your stew before serving. If it needs more flavor, add more spices or salt. A squeeze of lemon juice brightens up the dish. You can also add a pinch of cayenne pepper for heat. Adjusting flavors helps make it your own. - Enhancing texture with additional ingredients Want a heartier stew? Add more veggies like carrots or kale. You can also toss in some cooked quinoa for extra protein and texture. If you like it creamy, stir in a bit of coconut milk just before serving. Each addition can change the dish in fun ways. {{image_4}} You can easily change the veggies in this stew. Try adding carrots or green beans. You can also use butternut squash for a sweet twist. If you want to switch up the protein, lentils work great too. They add a nice texture. For grains, consider quinoa or farro. Both will add extra nutrients. This recipe suits everyone, vegan or not. Replace vegetable broth with chicken broth for a non-vegan option. You can also add chicken or sausage for more protein. They will add a hearty flavor to the stew. To spice things up, add some heat! A pinch of cayenne or a dash of hot sauce works well. If you love herbs, mix in fresh thyme or basil. They will bring a new depth to the dish. For a zesty twist, experiment with citrus. A splash of orange juice can brighten the flavors. You can also use lime juice instead of lemon for a different taste. Each of these additions brings its own charm to the stew. Don't be afraid to get creative! - Refrigeration tips: Once your stew cools, place it in an airtight container. It will stay fresh in the fridge for about 3 to 4 days. Make sure to label the container with the date. This helps you keep track of freshness. - Freezing guidelines: If you want to save it longer, freeze your stew. Use freezer-safe containers or bags. It can last for about 3 months in the freezer. When ready to eat, let it thaw in the fridge overnight before reheating. - Best methods for reheating: To warm your stew, use the stove or microwave. On the stove, heat it in a pot over medium heat. Stir it often until hot. In the microwave, place the stew in a safe dish. Heat it in 1-minute intervals, stirring between each, until hot. - Maintaining flavor and texture: When reheating, add a splash of broth or water. This keeps the stew from getting too thick. Stirring helps keep the flavors mixed well. Enjoy your tasty stew just as you made it! Can I use dried chickpeas? Yes, you can use dried chickpeas. Just soak them overnight. Cook them first until tender before adding to the stew. This ensures they cook evenly. How do I make this recipe spicier? To spice it up, add red pepper flakes or diced jalapeños. Adjust to your taste. You can also add a bit of cayenne pepper for heat. What to serve with Moroccan chickpea stew? This stew goes well with warm bread or fluffy couscous. Rice is also a good choice. Fresh salad can brighten the meal. How long does the stew last in the fridge? The stew lasts about 3-4 days in the fridge. Store it in an airtight container for best results. Always check for freshness before eating. Is this stew gluten-free? Yes, this stew is gluten-free. All the ingredients are safe for a gluten-free diet. Enjoy it without worry! This blog post covered how to make a hearty Moroccan chickpea stew. We explored key ingredients, step-by-step instructions, and essential tips. You learned how to substitute ingredients and enhance flavors. Proper storage and reheating methods help keep leftovers tasty. In cooking, don’t be afraid to experiment with spices and veggies. Enjoy the process and make the stew your own. Each bite will warm you up, body and soul.

Slow Cooker Moroccan Chickpea Stew Healthy and Easy

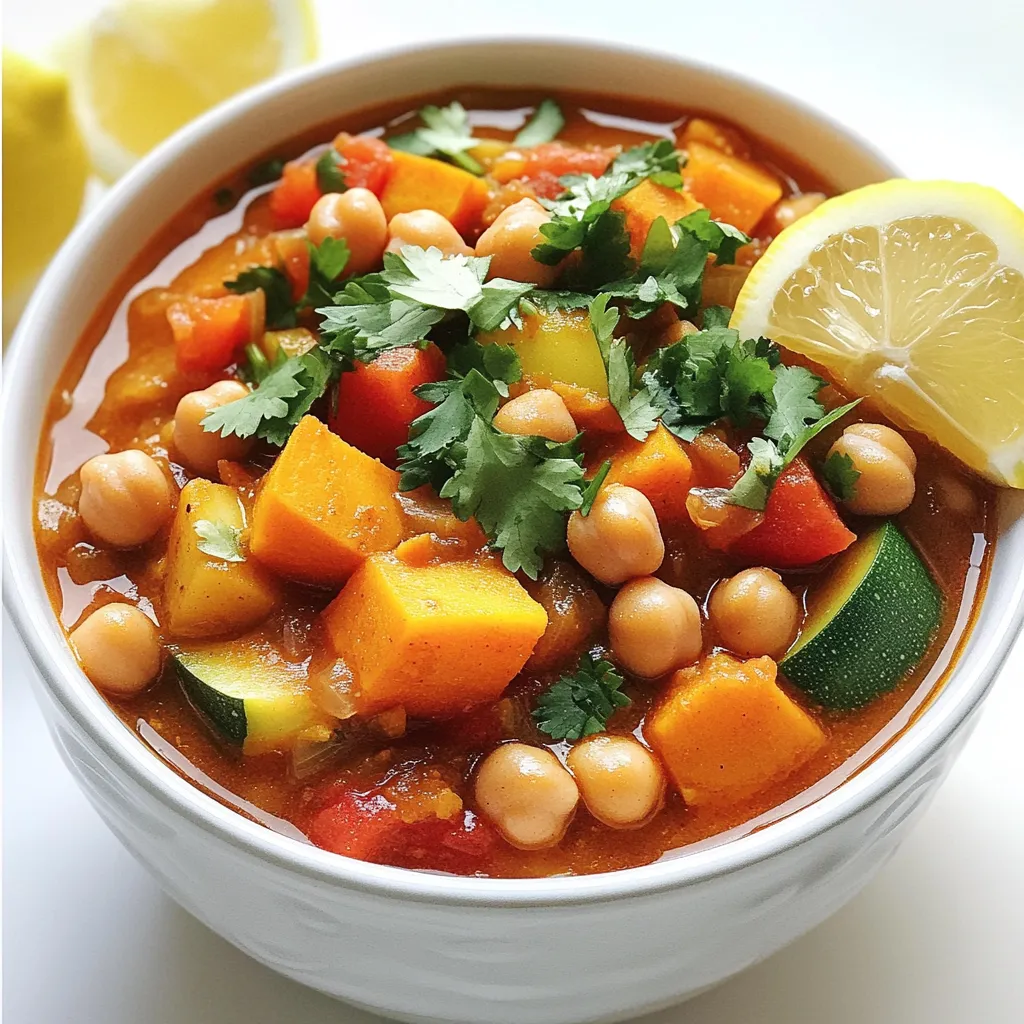
Are you ready to savor a delicious dish that’s both healthy and easy to make? This Slow Cooker Moroccan Chickpea

To make Pumpkin Pie Energy Bites, you need these simple ingredients: - 1 cup rolled oats - 1/2 cup pumpkin puree - 1/4 cup almond butter (or peanut butter) - 1/4 cup honey or maple syrup - 1 teaspoon pumpkin pie spice - 1/2 teaspoon pure vanilla extract - 1/4 cup mini chocolate chips (optional) - 1/4 cup chopped nuts (optional) - A pinch of salt These ingredients blend together to create a tasty treat. The oats provide fiber, while pumpkin puree gives moisture and flavor. Almond butter or peanut butter adds healthy fats and protein. Honey or maple syrup sweetens the bites. The pumpkin pie spice brings the warm flavors of fall, making each bite feel cozy. If you want something sweet, add mini chocolate chips. For crunch, toss in chopped nuts like walnuts or pecans. The pinch of salt enhances all the flavors. Gather these ingredients, and you are ready to create a snack that is both fun and healthy! First, grab a large mixing bowl. In it, combine 1 cup of rolled oats with 1/2 cup of pumpkin puree. This mix forms a hearty base. Next, add 1/4 cup of almond butter. If you prefer, you can use peanut butter instead. Then, pour in 1/4 cup of honey or maple syrup for sweetness. Use a spatula or wooden spoon to mix everything until it feels smooth and well combined. Now it’s time to add flavor! Sprinkle in 1 teaspoon of pumpkin pie spice and 1/2 teaspoon of pure vanilla extract. These spices will give the bites their warm, cozy taste. Don’t forget to add a pinch of salt; it really enhances the flavor. If you want a little extra fun, you can mix in optional ingredients like mini chocolate chips or chopped nuts. With clean hands, scoop out about 1 tablespoon of the mixture. Roll it into a ball shape. Place each ball onto a parchment-lined baking sheet. Make sure to leave space between the balls. This helps them keep their shape while chilling. Once all the bites are formed, it’s time to chill. Pop the baking sheet in the fridge for at least 30 minutes. This step helps firm up the energy bites. After chilling, they are ready to eat or can be stored in an airtight container. To make your Pumpkin Pie Energy Bites stick well, mix the ingredients thoroughly. This helps bind everything together. If the mixture feels too dry, add a bit more pumpkin puree or almond butter. These tweaks ensure that every bite holds its shape and taste. Feel free to get creative with your bites! If you prefer a different nut, swap almond butter for peanut butter or sunflower seed butter. You can also change the nuts you add in. Try walnuts, pecans, or even cashews. Each nut brings its own flavor and texture, making the bites unique. You can serve these bites in fun ways. Arrange them on a colorful plate for a festive look. For a special touch, sprinkle extra pumpkin pie spice on top. These bites also pair well with a side of yogurt or fresh fruit, adding to the fun and flavor. Enjoy exploring different ways to serve and share! {{image_4}} You can easily swap almond butter for peanut butter. Both give great flavor. If you want a nut-free option, try sunflower seed butter. For sweeteners, honey is delicious, but maple syrup works too. You can even use agave syrup if you prefer. Each choice adds its own twist to the bites. To add more taste, mix in shredded coconut or chopped dried fruit. Dried cranberries or cherries add a nice chewiness. You can also try adding a tablespoon of cocoa powder for a chocolatey flavor. These changes keep the bites fun and exciting every time you make them. For a gluten-free version, use certified gluten-free oats. Be careful with cross-contamination. If you need these bites to be nut-free, swap nut butter with sunflower seed butter. Always read labels to ensure no hidden allergens. Making these changes lets everyone enjoy them without worry! To keep your pumpkin pie energy bites fresh, use an airtight container. This type of container helps keep air out. You can store them in the fridge or at room temperature for a short time. If you store them in the fridge, they will stay tastier and last longer. These energy bites stay fresh for about one week in the fridge. If you leave them out, they might only last a few days. Always check for any changes in smell or texture. If they look or smell off, it’s best to toss them. Freezing is a great option if you want to save some bites for later. To freeze, place the energy bites in a single layer on a baking sheet. Freeze them for about an hour. After that, transfer them to an airtight container or a freezer bag. They can last up to three months in the freezer. When ready to eat, just let them thaw in the fridge or at room temperature. Enjoy them any time! These bites stay fresh for about a week in the fridge. Store them in an airtight container. This keeps them tasty and prevents them from drying out. If you want to keep them longer, you can freeze them for up to three months. Just let them thaw in the fridge before you eat them. Yes, you can use fresh pumpkin! First, cook and mash the pumpkin. Steam or roast it until it's soft. This will help make it smooth. Then, mash it well to get a similar texture to the puree. Use about the same amount as the recipe calls for. Yes, these bites are a healthy snack! They are packed with nutrients. Pumpkin is high in fiber and vitamins. Oats provide whole grains for energy. Almond butter gives you healthy fats and protein. If you add nuts, you get even more nutrients. They are a great energy boost without added sugar. Absolutely! To make these bites vegan, swap honey for maple syrup. Almond butter is usually vegan, but check the label. You can also use any nut butter or seed butter. This keeps the bites tasty and suitable for a vegan diet. Enjoy making these yummy treats! You can create tasty pumpkin pie energy bites easily with these steps. We covered the key ingredients, mixing, and forming the bites. I shared tips on customizing flavors and storing them well. These bites are not just fun to make; they are also healthy. Enjoy them as a snack or a treat. Try different swaps to suit your tastes. Get started making these energy bites today!

Pumpkin Pie Energy Bites Tasty and Easy Recipe

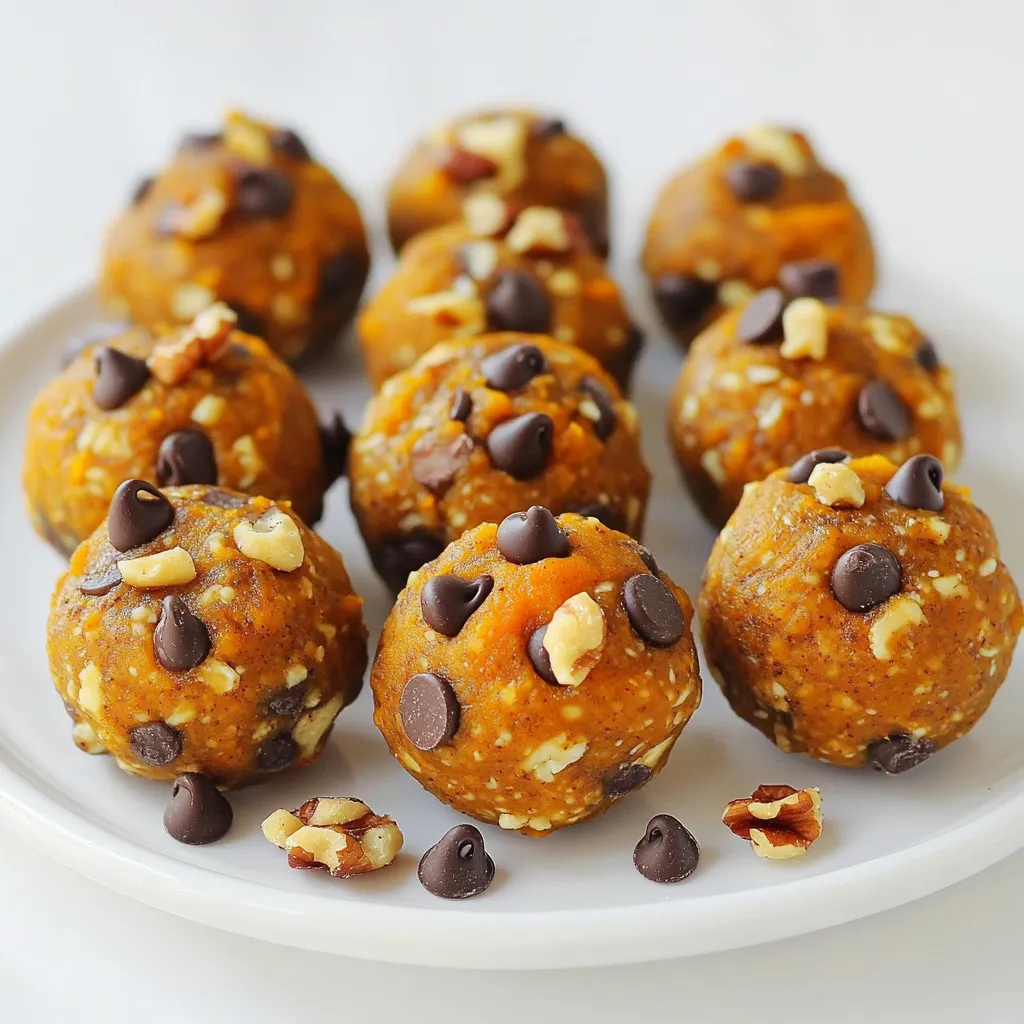
Craving a tasty snack that fuels your energy without loads of sugar? You’ll love these Pumpkin Pie Energy Bites! They

- 1 ½ cups all-purpose flour - 1 teaspoon baking powder - ½ teaspoon baking soda - ½ teaspoon salt - ½ teaspoon ground cinnamon - ¾ cup granulated sugar - ½ cup buttermilk - ¼ cup vegetable oil - 2 large eggs - 1 teaspoon pure vanilla extract - ½ cup maple syrup (for the glaze) - ¼ cup powdered sugar (for the glaze) When measuring flour, spoon it into your measuring cup. Then level it off with a knife. This method helps avoid too much flour, which can make the muffins dry. For liquids, use a clear measuring cup. Check the measurement at eye level for accuracy. If you don’t have buttermilk, mix ½ cup of milk with 1 teaspoon of lemon juice or vinegar. Let it sit for 5 minutes. This will create a similar tangy flavor. For vegetable oil, you can use melted coconut oil or melted butter. Both will work well in this recipe. If you want a dairy-free version, try almond milk instead of buttermilk. Start by preheating your oven to 350°F (175°C). This step is key to getting an even bake. Next, take a standard muffin tin and grease it lightly. You can also use paper liners for easy removal. In a large bowl, mix together the dry ingredients. Combine 1 ½ cups of all-purpose flour, 1 teaspoon baking powder, ½ teaspoon baking soda, ½ teaspoon salt, and ½ teaspoon ground cinnamon. Whisk well to blend these dry ingredients. In another bowl, mix the wet ingredients. Combine ¾ cup granulated sugar, ½ cup buttermilk, ¼ cup vegetable oil, 2 large eggs, and 1 teaspoon pure vanilla extract. Stir until the mixture is smooth. It's okay if there are a few lumps. Now, slowly mix the wet ingredients into the dry ones. Gently fold them together with a spatula until just combined. Distribute the batter evenly into the muffin cups. Fill each cup about two-thirds full to allow for rising. Place the muffin tin in the oven and bake for 18-20 minutes. Check for doneness by inserting a toothpick into the center of a muffin. It should come out clean or with a few moist crumbs. Once baked, let the muffins cool in the tin for about 5 minutes. After cooling, transfer them to a wire rack. This helps them cool evenly. While the muffins cool, prepare the maple glaze. In a small bowl, whisk together ½ cup maple syrup and ¼ cup powdered sugar. Mix until smooth. Once the muffins are warm, dip their tops into the glaze. Make sure to let the excess glaze drip off. Place the glazed muffins back on the wire rack. Allow the glaze to set for about 10 minutes before serving. Now, you have a batch of warm, delightful maple glazed donut muffins ready to enjoy! To make the best maple glazed donut muffins, follow these simple tips. First, measure your flour correctly. Use a spoon to scoop flour into the measuring cup, then level it off with a knife. Too much flour can make your muffins dry. Second, don’t overmix the batter. Stir until just combined. Small lumps are okay! They help keep your muffins light and fluffy. Third, fill each muffin cup two-thirds full. This allows them to rise perfectly without spilling over. One common mistake is using cold eggs. Make sure your eggs are at room temperature. This helps them mix better into the batter. Another mistake is skipping the cooling time. Letting the muffins cool before glazing is key. If you glaze them too soon, the glaze will run off. Lastly, be careful with the baking time. Every oven is different. Check your muffins at 18 minutes. They should be golden brown and a toothpick should come out clean. These muffins shine when served warm. Pair them with a hot cup of coffee or tea for a cozy treat. For a fun twist, add a scoop of ice cream on top for dessert. You can also serve them with fresh fruit or a dollop of whipped cream. For extra flair, sprinkle a bit of cinnamon on top of the glaze. This adds a nice touch and enhances the flavor. Enjoy experimenting with different combinations! {{image_4}} You can make these muffins even tastier with fun add-ins. Try adding chocolate chips or nuts. You can also mix in dried fruit like cranberries or raisins. For a pop of flavor, add a teaspoon of orange zest. Each of these will give your muffins a new twist. If you need gluten-free muffins, swap the all-purpose flour. Use a gluten-free flour blend instead. Just check that the blend has a good binding agent, like xanthan gum. Your muffins will still be fluffy and delicious! You can change these muffins with the seasons. In fall, add pumpkin puree and spices like nutmeg. In spring, try fresh berries for a burst of color and taste. For summer, peach or apricot chunks can brighten up your muffins. Each season brings a chance for new flavors! To keep your maple glazed donut muffins fresh, store them in an airtight container. This method helps retain moisture. Place a paper towel at the bottom of the container to absorb extra moisture. You can store them at room temperature for up to three days. If you want to keep them longer, refrigerate them for up to a week. Just remember, refrigeration can dry them out a bit. Freezing is a great way to save muffins for later. To freeze, let them cool completely first. Then, wrap each muffin tightly in plastic wrap. Next, place the wrapped muffins in a freezer-safe bag or container. They can last up to three months in the freezer. When you're ready to enjoy them, just take out the desired number and let them thaw at room temperature. To reheat your muffins, you have a few options. For a soft and warm muffin, microwave one for about 10-15 seconds. If you prefer a slightly crispy top, place it in a toaster oven at 350°F (175°C) for about 5 minutes. This will bring back some of that fresh-baked taste. Enjoy your muffins warm with a fresh glaze if you like! These muffins stay fresh for about three days at room temperature. To keep them longer, store them in an airtight container. You can also refrigerate them for up to a week. Just remember, they may lose some of their softness. Yes, you can! If you don't have buttermilk, mix one tablespoon of vinegar or lemon juice with milk. Let it sit for five minutes to thicken. This will mimic buttermilk's tangy flavor and texture, making your muffins just as tasty. You have several options! You can use melted coconut oil or melted butter instead of vegetable oil. Both will add a nice flavor. Applesauce is another great choice for a lower-fat option. It keeps the muffins moist and adds a hint of sweetness. We explored how to make delicious maple glazed donut muffins, starting with key ingredients. You learned about measurements and substitutions to make the recipe flexible. I shared step-by-step instructions, from preparation to glazing. Tips and tricks helped you avoid common mistakes and perfect your muffins. You can also try various flavor add-ins and gluten-free options to personalize your baked goods. Finally, I provided storage tips to keep muffins fresh. Enjoy making these muffins and share them with friends and family!

Maple Glazed Donut Muffins Irresistible and Easy Recipe

Craving a sweet treat that’s both easy to make and oh-so-delicious? Look no further! In this post, I’m sharing my

- 1 lb Brussels sprouts, trimmed and halved - 3 tablespoons olive oil - 2 tablespoons pure maple syrup - 1 tablespoon Dijon mustard - 2 cloves garlic, minced - Salt and pepper to taste These main ingredients create a wonderful mix of flavors. The Brussels sprouts are the star, bringing a nice crunch. Olive oil adds richness, while maple syrup offers sweetness. Dijon mustard gives a tangy kick, and garlic adds depth. Salt and pepper round out the taste. - 1/2 teaspoon red pepper flakes (optional for some heat) - 1/4 cup walnuts, chopped - 1/4 cup dried cranberries Adding red pepper flakes gives a spicy touch. Walnuts add crunch and healthy fats. Dried cranberries introduce a sweet and chewy element. These optional ingredients make the dish more exciting and textured. - Olive oil can be replaced with avocado oil. - Maple syrup can be swapped for honey for a different sweetness. - Dijon mustard can be changed to yellow mustard if needed. These substitutions allow you to adjust the recipe based on what you have. Each swap can change the flavor slightly but still keep the dish delicious. Feel free to experiment and make it your own! Start by gathering all your ingredients. You need Brussels sprouts, olive oil, maple syrup, mustard, garlic, salt, pepper, walnuts, and cranberries. Preheat your oven to 425°F (220°C). Lining your baking sheet with parchment paper helps with easy cleanup. 1. In a mixing bowl, blend olive oil, maple syrup, mustard, and minced garlic. 2. Season this mixture with salt and pepper. If you like heat, add red pepper flakes. Whisk until smooth. 3. Add the halved Brussels sprouts. Toss them until they are well-coated with the maple mustard mix. 4. Spread the Brussels sprouts on your baking sheet. Make sure they are in a single layer. 5. Roast them in the oven for 20 minutes. Stir halfway for even cooking. 6. In the last 5 minutes, sprinkle walnuts and cranberries on top. This adds crunch and sweetness. 7. When the sprouts are tender and caramelized, take them out of the oven. Let them cool slightly before serving. To get the best flavor, make sure the sprouts are dry before mixing. This helps them roast well. Space the sprouts out on the pan. If they are too close, they will steam instead of roast. Stir halfway through to keep them from burning. Always check for tenderness; they should be soft and golden. Enjoy the lovely mix of flavors and textures! To cook Brussels sprouts well, always select fresh ones. Look for firm sprouts with bright green color. Trim the ends and cut them in half for even cooking. Make sure to roast them in a single layer. This helps them brown nicely and get a crispy texture. Stir them halfway through cooking for even heat. A smooth glaze makes the dish shine. Combine olive oil, maple syrup, and Dijon mustard for the best flavor. Whisk them together until blended. If the glaze is too thick, add a bit more olive oil. If it’s too thin, add more mustard or syrup. The right glaze should coat the sprouts well but not drench them. Presentation adds joy to your meal. Use a large, colorful platter for serving. After roasting, drizzle any leftover glaze on top. This adds shine and flavor. For extra flair, sprinkle more cranberries and walnuts on top. The mix of colors makes the dish look inviting and tasty. Enjoy your meal with friends or family for an even better experience! {{image_4}} You can change the taste of your Maple Mustard Brussels Sprouts. Here are some fun ideas: - Bacon or Pancetta: Add crispy bits for a smoky flavor. - Cheese: Sprinkle feta or goat cheese for a creamy touch. - Lemon Zest: A hint of zest brightens the overall taste. - Herbs: Fresh thyme or rosemary can add an earthy note. Mix and match these to find your favorite combo! You can adapt this dish to fit the seasons. Here are some ideas: - Fall: Add roasted squash or apples for warmth. - Winter: Include root veggies like carrots or parsnips for heartiness. - Spring: Toss in fresh peas or asparagus for a bright flavor. - Summer: Add cherry tomatoes or zucchini for a fresh twist. Seasonal changes keep the dish exciting and fresh! You can easily make this dish vegetarian or vegan. Here’s how: - Maple Syrup: Ensure it’s pure and vegan-friendly. - Butter: Use vegan butter instead of regular if you want a richer flavor. - Nuts: Substitute walnuts for pecans or almonds for a different crunch. These small changes give you tasty options while keeping it plant-based! To keep your Maple Mustard Brussels Sprouts fresh, let them cool first. After they cool, place them in an airtight container. Store them in the fridge for up to three days. If you want to keep them longer, consider freezing. To reheat, preheat your oven to 350°F (175°C). Spread the sprouts on a baking sheet. Heat them for about 10 minutes or until warm. This keeps them crispy. You can also use a microwave, but the texture may be softer. Yes, you can freeze Brussels sprouts. First, blanch them in boiling water for three minutes. Then, cool them quickly in ice water. Drain and pack them in freezer bags. They can last for up to six months. When ready to use, thaw and roast as needed. You can use frozen Brussels sprouts. However, fresh sprouts work best. Frozen sprouts may lose some crunch. Thaw and drain them first to avoid excess water. This helps keep your dish crispy and tasty. To thicken the glaze, you can simmer it. Heat the maple syrup and mustard mix in a small pot. Cook it on low heat until it reduces and thickens. Another option is to add a bit of cornstarch mixed with water. Stir it in while cooking for a thicker texture. These sprouts pair well with many dishes. Try serving them with roasted chicken or grilled fish. They also go great with quinoa or rice for a vegetarian meal. Add a fresh salad for a balanced plate. This blog post shared the best way to make Maple Mustard Brussels Sprouts. We covered key ingredients, cooking steps, and tips for perfect results. Remember to experiment with flavors and variations to find your favorite mix. Proper storage keeps the sprouts fresh, and simple reheating makes easy meals. Exploring this dish can lead to delicious new ideas for your kitchen. Enjoy crafting this tasty recipe that fits your taste and needs!

Maple Mustard Brussels Sprouts Sheet-Pan Delight

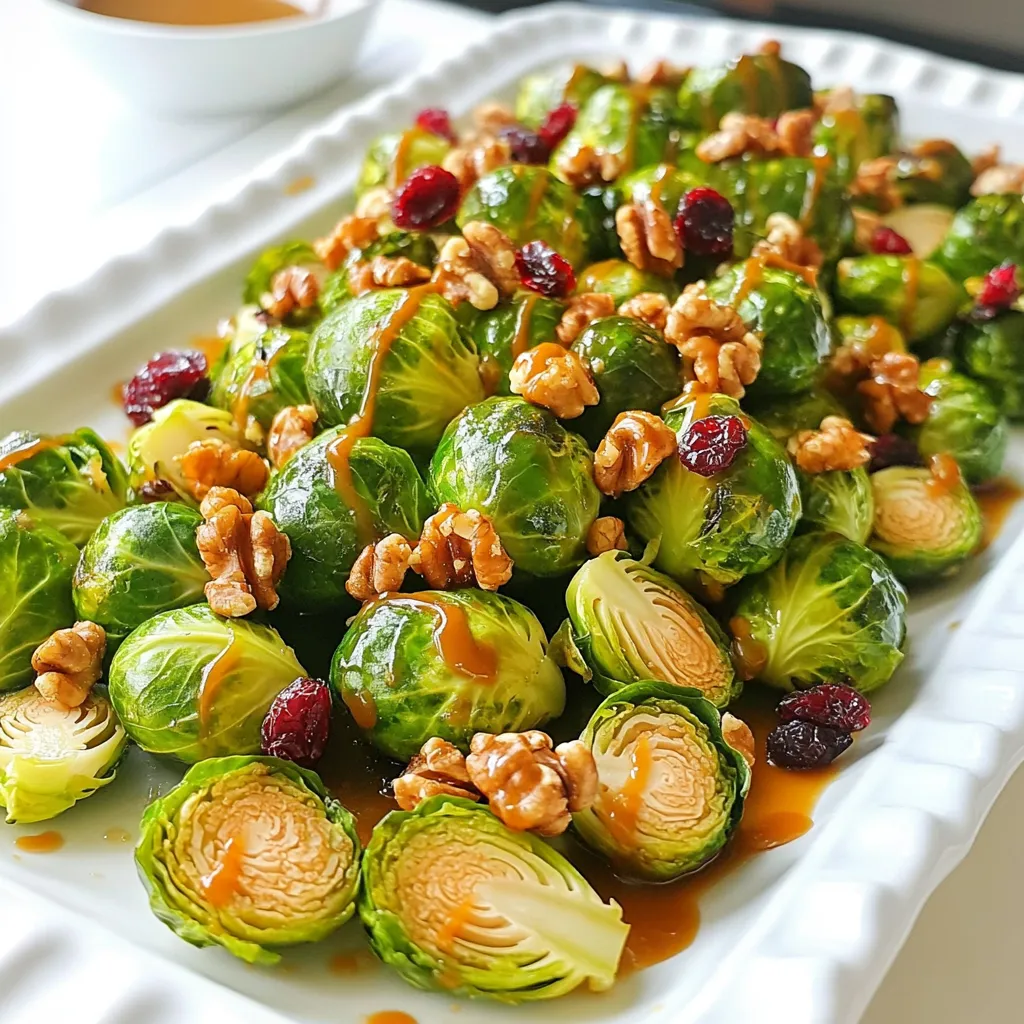
Looking for a delicious side dish that impresses? My Maple Mustard Brussels Sprouts Sheet-Pan Delight is the answer! This recipe

Older posts
Newer posts
← Previous Page1 Page2 Page3 Page4 … Page86 Next →

dsad

© 2026 recipesstation • Built with GeneratePress

Our Policies

  • Copyright Policy
  • Cookie Policy
  • GDPR Policy
  • Privacy Policy
  • Disclaimer
  • Terms Of Use

More Information

  • Home
  • About
  • Contact
  • Appetizers
  • Dessert
  • Dinner
  • Drinks
©2026, recipesstation About Back To Top