Skip to content
DisclaimerTerms Of UseGDPR PolicyCookie Policy

recipesstation

  • Home
  • Drinks
  • Appetizers
  • Dinner
  • Dessert
  • About
  • Contact
  • Privacy Policy
DisclaimerTerms Of UseGDPR PolicyCookie Policy

Emily

To make a Spring Berry Parfait, gather the following ingredients: - 2 cups Greek yogurt (vanilla for sweetness or plain for a tart taste) - 1 cup granola (choose any kind you like) - 1 cup mixed berries (strawberries, blueberries, and raspberries) - 1 ripe mango (diced into small cubes for added sweetness) - 2 tablespoons honey or maple syrup (optional, for extra sweetness) - Fresh mint leaves (for a bright garnish) These ingredients create a mix of flavors and textures. The yogurt gives a creamy base, while the granola adds crunch. The berries and mango bring fresh fruitiness. Honey or maple syrup can sweeten it up if you prefer. Fresh mint makes it look pretty and adds a nice pop of flavor. With this list, you are ready to make your parfait. For the full recipe, follow the detailed instructions to layer these delicious ingredients into a beautiful dish. Start by rinsing the mixed berries under cool water. For strawberries, remove the green tops and slice them into small pieces. You can use any mix of berries you like, such as blueberries and raspberries. Once rinsed and cut, set the berries aside for layering. Grab a tall glass or parfait cup. Spoon a layer of Greek yogurt into the bottom. This creates a smooth base for your parfait. Next, sprinkle a layer of granola on top of the yogurt. This gives a nice crunch. Now, add a layer of mixed berries and diced mango. For added sweetness, you can drizzle honey or maple syrup over the fruit. Repeat these layers until the glass is full. Make sure the last layer shows off colorful berries on top. To finish, add a dollop of Greek yogurt on the top layer. Decorate with a few berries and a fresh mint sprig. This makes your parfait look bright and inviting. If you have time, chill the parfaits in the fridge for 10-15 minutes. This helps the flavors mix together well. For the full recipe, check out the detailed steps above! Using clear cups makes your parfait look great. You can see all the colorful layers inside. This adds a fun touch to any table. Serve your parfaits on a bright platter. Scatter fresh mint leaves around it for a lively look. This creates a garden vibe that feels fresh and inviting. Greek yogurt is a star in this parfait. It packs protein, calcium, and probiotics. These help keep your gut happy and healthy. Mixed berries are also fantastic. They are full of vitamins and antioxidants. They help you stay healthy and feel good. This parfait is perfect for spring. Fresh berries are in season, making them taste their best. Eating seasonal fruit is smart. It supports local farms and gives you the best flavor. Enjoy this Spring Berry Parfait for a sweet, healthy treat! For the full recipe, you can refer to the instructions above. {{image_4}} You can switch up the berries in your parfait for fun. Try using peaches, cherries, or kiwi. You can even mix in tropical fruits like pineapple or banana. Each fruit adds its own taste. When it comes to yogurt, you have options. You can use flavored yogurts like coconut or strawberry. These add a sweet twist. Plain yogurt gives you a nice tart taste. It’s all about what you like most! Want a vegan parfait? Use plant-based yogurt made from almond, soy, or coconut. These yogurts taste great and keep the parfait creamy. You won’t miss the dairy at all. If you need gluten-free options, look for gluten-free granola. Many great brands make tasty blends. You can also use nuts or seeds for crunch. They provide a healthy option that works well in your parfait. For more ideas, check out the Full Recipe. Enjoy your delicious and colorful creation! To keep your Spring Berry Parfait fresh, store it in the fridge. Use an airtight container. This helps lock in moisture and flavor. Avoid mixing the layers before storage. Keep yogurt, granola, and fruit separate if possible. This method keeps the granola crunchy. If you notice some sogginess, try adding fresh granola before serving. You can make parfaits in advance. Layer them in jars for easy grab-and-go meals. Use glass jars or plastic containers with lids. These containers keep the parfaits safe and fresh. Prepare them the night before to save time in the morning. Just grab and enjoy! For best taste, eat within two days. Making a Spring Berry Parfait is simple and fun. Start by rinsing your berries. For strawberries, slice them into smaller pieces. Next, grab a tall glass or a parfait cup. Begin layering with Greek yogurt for a creamy base. Add a sprinkle of granola for crunch, then top with your mixed berries and diced mango. You can drizzle honey or maple syrup if you want extra sweetness. Repeat these layers until your glass is full. Finish with a dollop of yogurt, some berries, and a mint leaf on top. This recipe is quick and takes only 15 minutes to prepare. Tips for beginners: - Use fresh berries for the best taste. - Choose a clear glass to show off the layers. - Don’t rush the layering; take your time for a pretty look. Yes, you can use frozen berries! They are a great option when fresh berries are not available. Frozen berries are often picked at their peak ripeness. This means they can taste just as good as fresh ones. However, frozen berries may be softer when thawed. This can change the texture of your parfait. Pros of frozen berries: - Convenient and easy to store. - Usually cheaper than fresh. Cons of frozen berries: - They can be mushy when thawed. - They may not look as vibrant in your parfait. A parfait can last about 2 to 3 days in the fridge. To keep it fresh, store it in an airtight container. This helps prevent the granola from getting soggy. Best practices: - Layer the granola just before serving. - Keep the parfait covered to avoid drying out. If you want to switch up your parfait, there are many alternatives to granola. You can try nuts, seeds, or even puffed rice. These options can add crunch without the sweetness of granola. Alternative toppings: - Chopped nuts like almonds or walnuts. - Seeds like chia or sunflower seeds. - Oats for a chewy texture. Feel free to experiment with different toppings to find your perfect flavor! For the full Spring Berry Parfait recipe, check out the [Full Recipe]. This blog post explored how to craft a delicious Spring Berry Parfait. We covered key ingredients like Greek yogurt, granola, and fresh fruits. You learned simple steps for prepping and layering each component to create a stunning dish. Tips for presentation and health benefits highlighted why this parfait is a great choice. You can mix flavors and store leftovers easily. Overall, this parfait not only tastes great but also boosts nutrition. Enjoy making your own variations and sharing this treat with others!

Spring Berry Parfait Fresh and Flavorful Delight

Get ready to enjoy a burst of flavors with my Spring Berry Parfait! This delicious treat layers creamy Greek yogurt,

- 2 large chicken breasts, marinated in a mixture of olive oil, lemon juice, dried oregano, salt, and pepper - 1 cup quinoa or bulgur wheat - 2 cups vegetable or chicken broth - 1 cup cherry tomatoes, halved - 1 cucumber, diced - 1 red onion, thinly sliced - 1 cup kalamata olives, pitted and halved - 1 cup feta cheese, crumbled - ¼ cup fresh parsley, chopped These main ingredients create a tasty and healthy bowl. The marinated chicken gives each bite a burst of flavor. Quinoa or bulgur adds a nice texture and nutrition. The veggies add freshness and color. - 1 cup Greek yogurt - 1 cucumber, grated (squeeze out excess water) - 2 cloves garlic, minced - 1 tablespoon olive oil - 1 tablespoon lemon juice - Salt and pepper to taste Tzatziki sauce makes the bowl creamy and cool. Greek yogurt provides protein. The grated cucumber adds crunch. Garlic gives it a kick. This sauce is easy to make and enhances the whole dish. - Extra chopped parsley - Slices of lemon - Additional feta cheese Garnishes make your Greek chicken bowls look even better. A sprinkle of parsley adds a pop of green. Lemon slices give a fresh touch. More feta cheese can make it richer. These small details make your meal feel special. For the full recipe, check out Greek Chicken Bowls with Tzatziki Sauce. Start by mixing olive oil, lemon juice, dried oregano, salt, and pepper in a bowl. This mix makes the chicken juicy and flavorful. Add the chicken breasts to the bowl and coat them well. Cover the bowl and let the chicken marinate for at least 30 minutes. For the best taste, let it sit overnight in the fridge. This deepens the flavor and makes a huge difference. First, rinse your quinoa or bulgur wheat under cold water. This step removes any bitterness. Then, bring vegetable or chicken broth to a boil in a pot. Stir in the rinsed grains, cover the pot, and reduce the heat to low. Let it simmer for about 15 minutes or until the grains are fluffy and tender. After cooking, let it sit for a few minutes before fluffing it with a fork. In a separate bowl, mix Greek yogurt, grated cucumber, minced garlic, olive oil, lemon juice, salt, and pepper. Make sure to squeeze out the extra water from the cucumber to keep the sauce thick. Stir everything until it's well combined. Taste it and adjust the seasoning if needed. Refrigerate the sauce until you’re ready to serve. This helps the flavors blend well. Preheat your grill pan or outdoor grill to medium heat. Take the marinated chicken out of the bowl and place it on the grill. Cook for about 5-7 minutes on each side. The chicken is ready when it reaches an internal temperature of 165°F (75°C). Once it's cooked through, let it rest for 5 minutes before slicing it into strips. This resting time makes it more tender. To build your bowls, scoop some cooked quinoa or bulgur into each bowl. Next, add the grilled chicken strips. Then, top each bowl with halved cherry tomatoes, diced cucumber, sliced red onion, and halved kalamata olives. Don’t forget to sprinkle crumbled feta cheese on top. This adds creaminess and flavor. Finally, add a generous dollop of tzatziki sauce over each bowl. Garnish with chopped fresh parsley to make it look pretty. This step not only adds flavor but also makes your dish vibrant and appealing. Enjoy every bite of these Greek chicken bowls! For the full recipe, check out the details above. To marinate chicken well, mix olive oil, lemon juice, dried oregano, salt, and pepper. This mix adds great flavor. Make sure each chicken breast is fully coated. I recommend marinating for at least 30 minutes. If you have time, marinate overnight. This step makes the chicken tender and tasty. Cooking quinoa or bulgur is simple. Start by rinsing the grains under cold water. This removes any bitterness. In a pot, boil your broth. Add the rinsed grains and cover. Lower the heat and let it simmer for about 15 minutes. Quinoa is usually done when it's fluffy. If using bulgur, check the package for specific times. Allow the grains to sit for a few minutes after cooking. Fluff with a fork for the best texture. Making tzatziki sauce is easy and can save time. Combine Greek yogurt, grated cucumber, garlic, olive oil, and lemon juice. Remember to squeeze out excess water from the cucumber. Mix well and adjust the seasoning. It's best to chill the sauce in the fridge. Letting it sit for a bit allows the flavors to blend nicely. You can make this sauce a day in advance for added convenience. {{image_4}} If you prefer a meat-free meal, try a vegetarian Greek bowl. Use roasted chickpeas or grilled halloumi instead of chicken. You can still enjoy the quinoa or bulgur as a base. Add lots of fresh veggies like bell peppers, zucchini, and spinach for crunch. The flavors from the olives and feta will still shine through, making it satisfying and tasty. For a low-carb option, swap the grains for cauliflower rice. It’s light and absorbs all the great flavors. Use grilled chicken as usual and load up on veggies. You can add avocado for creaminess and extra healthy fats. The tzatziki sauce will still give it that creamy bite, making it a great choice for low-carb diets. To mix it up, try a Mediterranean grain bowl. Use farro or barley instead of quinoa or bulgur. These grains add a nice chew and a nutty flavor. Top with the same delicious chicken and fresh veggies. You can even add some roasted nuts for crunch. This twist keeps the meal exciting while staying true to those Greek flavors. For the full recipe, check out the Greek Chicken Bowls with Tzatziki Sauce. After you enjoy your Greek chicken bowls, store any leftovers in an airtight container. This keeps them fresh and safe to eat. Place the container in the fridge. Your meal will stay good for about three days. If you want to keep it longer, consider freezing it. To reheat your Greek chicken bowls, you can use the microwave. Place your bowl in the microwave for about 1-2 minutes. Make sure to stir halfway through to heat it evenly. If the chicken seems dry, add a bit of broth or water before heating. You can also reheat on the stove. Just add a splash of water in a pan and heat over low. Stir gently until warmed through. For freezing, separate the grains, chicken, and veggies. This helps keep each part fresh. Place them in freezer-safe bags or containers. Make sure to remove as much air as possible. You can freeze the chicken bowls for up to three months. When ready to eat, thaw overnight in the fridge, then reheat. This way, you can enjoy your Greek chicken bowls anytime! The best way to cook chicken for Greek chicken bowls is grilling. Grilling gives the chicken a nice char and adds flavor. Marinate your chicken breasts first for at least 30 minutes. This helps the chicken absorb the flavors. Preheat your grill to medium heat. Cook the chicken for about 5-7 minutes on each side. Ensure the internal temperature reaches 165°F (75°C). Let it rest for 5 minutes before slicing. This keeps the juices in and makes it tender. Yes, you can use other grains. Brown rice, farro, or couscous are great options. Each grain has its own taste and texture. Brown rice adds a nutty flavor, while farro is chewy. You can also use cauliflower rice for a low-carb choice. Just cook according to package instructions for the best results. Tzatziki sauce lasts about 3 to 5 days in the fridge. Store it in an airtight container. The flavors may get stronger as it sits. If it separates, just stir it before using. Always check for any off smells or colors before eating. Yes, Greek chicken bowls are healthy. They are packed with lean protein from the chicken. The grains provide fiber and energy. Fresh veggies add vitamins and minerals, while tzatziki sauce offers probiotics. This meal is balanced and satisfying. You can also customize it to fit your diet. Absolutely! You can prepare many parts ahead of time. Marinate the chicken the night before. Cook the grains and store them in the fridge. You can even make the tzatziki sauce a day ahead. Just assemble everything when you're ready to eat. This makes meal prep easy and quick. Check out the Full Recipe for more details. In this article, we covered how to make delicious Greek chicken bowls. We looked at key ingredients like chicken, grains, and tzatziki sauce. You learned step-by-step how to marinate, cook, and assemble your dish. I shared tips to enhance flavor and storage advice for leftovers. Remember, you can customize these bowls for any diet. Enjoy creating your perfect Greek meal at home!

Savory Greek Chicken Bowls Healthy and Flavorful Meal

Looking for a meal that’s tasty and good for you? These Savory Greek Chicken Bowls are packed with flavor and

- 1 package (1.5 lbs) pizza dough (can be store-bought or homemade) - 4 tablespoons unsalted butter, melted - 5 cloves garlic, finely minced - 1 teaspoon dried oregano - 1 teaspoon dried basil - 1 teaspoon garlic powder - Salt, to taste - Freshly cracked black pepper, to taste To make garlic knots, you need a few key ingredients. Pizza dough is the base. You can use store-bought or make your own. You also need butter, which adds richness. Garlic, both fresh and powder, gives the knots their distinct flavor. Dried herbs like oregano and basil enhance the taste. Don’t forget salt and pepper to season. - Grated Parmesan cheese - Fresh parsley for garnish Adding grated Parmesan cheese is a lovely touch. It gives a salty, nutty flavor. Fresh parsley adds color and freshness on top. These optional ingredients make the knots even more special. You can choose to use them based on your taste. For the full recipe, check out the detailed instructions that follow. - Preheat your oven to 400°F (200°C). - Line a baking sheet with parchment paper for easy cleanup. - If using store-bought pizza dough, let it rest for 30 minutes. Letting the dough rest helps it soften. This makes it easier to shape into knots. If you make your own dough, skip this step. - Lightly flour a clean surface and roll out the dough. Aim for a rectangle about ½ inch thick. - Use a sharp knife or pizza cutter to slice the dough into strips. Each strip should be about 1 inch wide and 5-6 inches long. - Take each strip and tie it into a knot. Tuck the ends underneath for a nice shape. Arrange them on the baking sheet, leaving space between each knot. Shaping the knots can be fun! You can make them as loose or tight as you like. Just remember, they will puff up in the oven. - In a bowl, mix melted butter, minced garlic, oregano, basil, garlic powder, and a pinch of salt and pepper. Stir well. - Use a pastry brush to coat each knot with this garlic butter mixture. Make sure to get garlic and herbs on every knot. - Place the baking sheet in the oven and bake for 15-18 minutes. Look for a golden brown color and a puffed-up look. After baking, brush the knots with any leftover garlic butter. Sprinkle chopped parsley and Parmesan cheese on top for extra flavor. These garlic knots are warm and tasty! You will want to eat them right away. For the full recipe, check the details above. Using store-bought dough is quick and easy. It saves time and effort. Allow the dough to rest for 30 minutes. This helps it become soft and easy to shape. Homemade dough is great if you have time. It gives a fresh taste and texture. For both types of dough, ensure you shape the knots well. Tie each strip into a secure knot. Tuck the ends underneath. This helps them rise nicely in the oven. Space them apart on the baking sheet. They need room to expand while baking. To boost flavor, add herbs like thyme or rosemary. They add a nice twist to the garlic knots. You can also sprinkle in some crushed red pepper for heat. Adjust the garlic amount to suit your taste. If you love garlic, use more! If you prefer less, reduce it. Mix your herbs into the garlic butter well. This ensures each knot gets a burst of flavor. You can also experiment with different oils. Olive oil can replace butter for a lighter option. These small changes can make the knots your own. For the full recipe, check the details above and enjoy making these delightful treats! {{image_4}} You can make garlic knots even more fun with flavor twists. One great option is adding cheese. You can stuff the knots with mozzarella or cheddar before tying them. Melted cheese inside adds a gooey, delicious surprise. Just press some cheese into the dough before you tie the knot. Another twist is to make spicy garlic knots. Simply add chili flakes to the garlic butter mix. This gives your knots a kick. Adjust the amount based on your spice level. I love the heat, and it pairs well with the garlic. If you're gluten-free, you can still enjoy these knots. Many stores sell gluten-free pizza dough. Just follow the same steps for preparation. The taste may differ slightly, but they will still be tasty. For those who avoid dairy, there are vegan options too. You can replace the butter with olive oil or vegan butter. The garlic and herbs will still shine through. This way, you can enjoy garlic knots without compromising your diet. For more details and the complete recipe, check out the Full Recipe. To keep your garlic knots fresh, store them in an airtight container. Place a paper towel inside to absorb moisture. This helps maintain their soft texture. If you plan to eat them within three days, store them at room temperature. For longer storage, refrigerate them for up to a week. When reheating, the oven gives the best results. Preheat it to 350°F (175°C). Place your garlic knots on a baking sheet. Heat for about 5 to 10 minutes. The knots will regain their crispness. You can use a microwave too, but they may turn soft. Heat them in 15-second bursts until warm. Enjoy these tasty treats just like when they were fresh! How long can garlic knots be stored? You can store garlic knots in the fridge for up to three days. Just place them in an airtight container. If you want them to last longer, try freezing them. They can stay fresh in the freezer for about three months. Can garlic knots be frozen? Yes, garlic knots can be frozen! To freeze, let them cool completely. Then, wrap them tightly in plastic wrap and place them in a freezer bag. When you're ready to eat, just thaw and reheat them. Can I use pizza dough for other recipes? Absolutely! Pizza dough is very versatile. You can use it for calzones, breadsticks, or even flatbreads. Just shape it as needed and bake. What's the best way to keep garlic knots warm while serving? To keep garlic knots warm, place them in a bread basket lined with a clean kitchen towel. This will help trap heat. You can also cover them loosely with foil. You learned how to make garlic knots from scratch. We covered the main and optional ingredients, along with step-by-step instructions. I shared tips for perfecting the knots and ideas for flavor variations. Storage and reheating methods were also discussed. With these simple steps, you can enjoy warm, tasty garlic knots any time. Get creative with flavors and enjoy sharing this treat with others. Happy cooking!

Garlic Knots Irresistible Twist on Pizza Dough

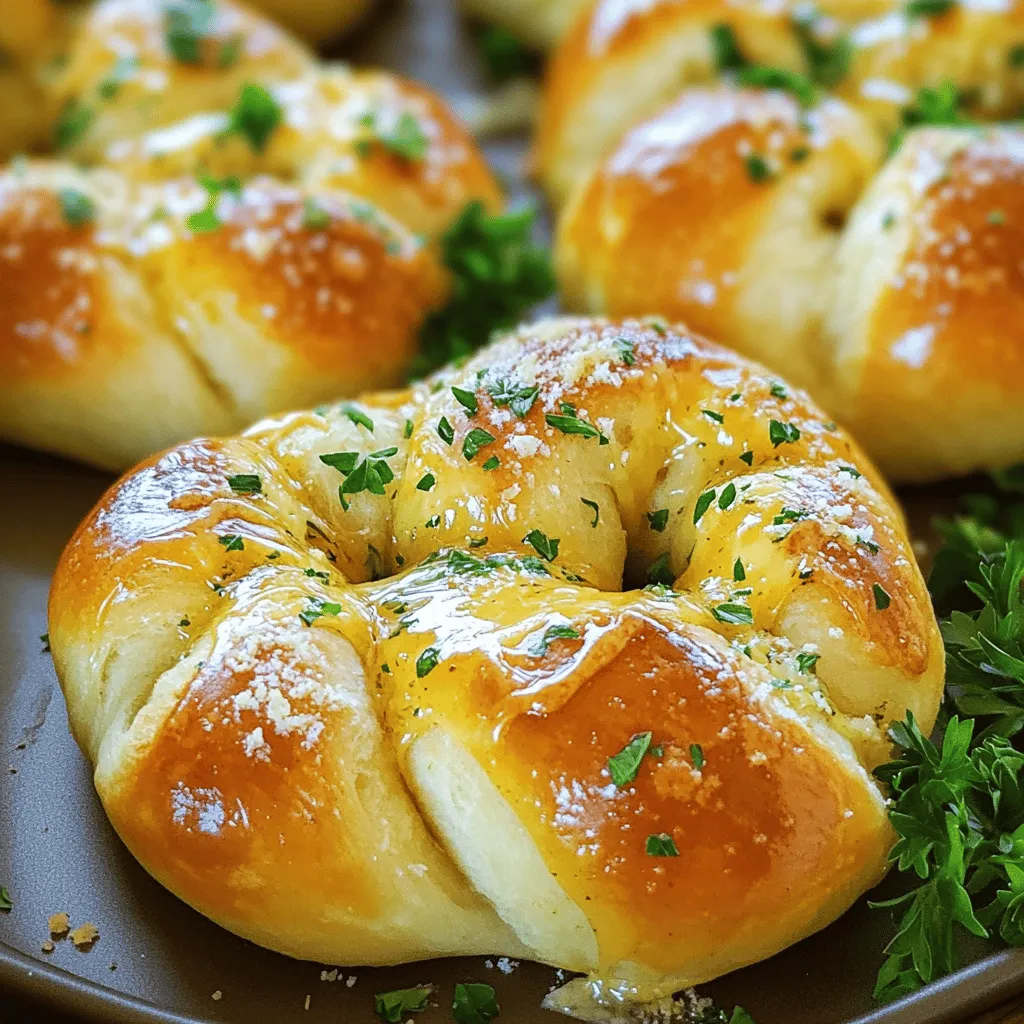
Do you love pizza? Then you’ll adore garlic knots! These soft, buttery twists bring pizza dough to a new level.

- 1 pound boneless, skinless chicken breasts - 1 cup buttermilk (or milk + vinegar) - 1 cup all-purpose flour - 1 teaspoon garlic powder - 1 teaspoon onion powder - 1 teaspoon smoked paprika - 2 large eggs - 2 cups panko breadcrumbs - Oil for frying Gather these ingredients to create your crispy chicken nuggets. You can adjust seasonings to match your taste. Using buttermilk adds flavor and helps tenderize the chicken. If you don’t have buttermilk, mix regular milk with vinegar for a quick substitute. The combination of garlic powder, onion powder, and smoked paprika gives the nuggets a rich taste. Panko breadcrumbs create a light and crunchy texture. For frying, choose an oil with a high smoke point, like vegetable or canola oil. For the full recipe, check out the details on preparation and cooking times. Enjoy making these delightful nuggets! First, combine buttermilk with garlic powder, onion powder, smoked paprika, salt, and pepper. Whisk it well until mixed. Next, take your chicken pieces and submerge them in the buttermilk mixture. Cover the bowl with plastic wrap and let it sit in the fridge for at least 30 minutes or up to 2 hours. This marinating time adds flavor and tenderness to the chicken. Now, set up your breading station. Place the flour in one shallow bowl. In another bowl, beat the eggs. In a third bowl, put the panko breadcrumbs. This setup makes it easy to coat the chicken. Then, heat enough oil in a deep skillet or frying pan. Aim for about 2 inches of oil. Heat it to 350°F (175°C). Make sure it’s hot enough for frying but not smoking. Remove chicken pieces from the marinade. Let any excess buttermilk drip off. Coat each piece in flour, shaking off the extra. Next, dip it in the eggs, then roll it in panko breadcrumbs. This gives the nuggets a crispy coating. When your oil is hot, carefully add a few pieces. Don’t overcrowd the pan. Fry the nuggets for about 4-5 minutes on each side. Check that the internal temperature reaches 165°F (75°C) for safety. Use a slotted spoon to take out the nuggets and place them on a paper towel-lined plate. Repeat the process for the rest of the chicken. Enjoy your crispy chicken nuggets! You can find the complete recipe in the Full Recipe section. To get that perfect crunch, use panko breadcrumbs. They offer a light and crispy texture. Regular breadcrumbs can turn soft and soggy. Panko stays crisp even after frying. Avoid overcrowding the pan while frying. If you put too many nuggets in at once, they may steam instead of fry. This will lead to a less crispy result. You can add more spices to the marinade for extra flavor. Try adding cayenne pepper for a kick. You can also use Italian seasoning for a herbaceous taste. Enhance the marinade by letting the chicken sit longer. Marinate for at least one hour for the best flavor. Crispy chicken nuggets taste great with many sauces. Honey mustard is a classic choice. BBQ sauce adds a sweet and smoky flavor. For a spicy option, use sriracha mayo. You can also make a homemade ranch sauce for a creamy dip. Mix sour cream, mayo, and herbs for a fresh taste. {{image_4}} You can make crispy chicken nuggets in a healthier way. Try oven-baking instead of frying. Baking cuts the oil and fat. Just coat the nuggets and place them on a baking sheet. Set your oven to 400°F (200°C) and bake for about 20 minutes. Flip halfway for even crispiness. If you need gluten-free options, use gluten-free breadcrumbs. They work just as well for a crunchy finish. You can also use crushed cornflakes or almond flour for a different texture. Want a kick? Try making spicy chicken nuggets. Add cayenne pepper or hot sauce to the buttermilk marinade. It gives the nuggets a nice heat. Mix sweet and savory by adding honey or maple syrup to your batter. This creates a tasty glaze that kids love. You can also play with herbs. Adding fresh herbs like rosemary or thyme to the breadcrumb mix adds a fresh twist. Just chop them finely and mix them in. For dairy-free nuggets, use plant-based milk. Almond or oat milk works best. You can also skip the eggs. A mixture of ground flaxseed and water can replace eggs in the breading process. If you follow a keto diet, use almond flour instead of all-purpose flour. This keeps your nuggets low in carbs. Pair it with a sugar-free dipping sauce for a complete meal. Store leftover crispy chicken nuggets in an airtight container. This helps keep them fresh. They can last in the fridge for up to 3 days. Make sure they cool down before sealing. This prevents steam from making them soggy. To freeze nuggets, let them cool completely. Then, layer them on a baking sheet in a single layer. This step stops them from sticking together. Freeze them for about 1-2 hours until firm. Next, transfer them to a freezer bag or container. Label it with the date. They can last up to 3 months in the freezer. When you’re ready to eat, do not thaw them. Just bake or fry them straight from the freezer. This keeps them crispy and tasty. To keep the nuggets crispy when reheating, use an oven or air fryer. Preheat the oven to 400°F (200°C). Place the nuggets on a baking sheet in a single layer. Heat for about 10-15 minutes. If using an air fryer, set it to 375°F (190°C) and cook for 5-7 minutes. Both methods help regain their crunch. Avoid using a microwave as it makes them soggy. For more details, check out the Full Recipe for Crispy Chicken Nuggets. To make crispy chicken nuggets, follow these steps: 1. Marinate the chicken. Use buttermilk mixed with spices. Let it soak for at least 30 minutes. 2. Set up a breading station. Use flour, beaten eggs, and panko breadcrumbs. 3. Coat the chicken. Dip each piece in flour, then eggs, and finally breadcrumbs. 4. Fry in hot oil. Heat oil to 350°F. Cook nuggets for 4-5 minutes per side. 5. Drain excess oil. Use a paper towel-lined plate to keep them crispy. These steps ensure a perfect texture that is crunchy on the outside and juicy inside. Yes, you can use chicken thighs. Chicken thighs have more fat and flavor. They stay juicy even when cooked longer. However, they may take a bit longer to fry. Breasts give a leaner bite, while thighs add richness. Choose based on your taste preference. For frying chicken nuggets, vegetable oil or canola oil is best. Both have high smoke points. This helps to achieve a golden, crispy finish. Avoid oils with low smoke points like olive oil. They can burn and affect the taste. Marinate the chicken for at least 30 minutes. For more flavor, marinate up to 2 hours. This allows the chicken to soak up the spices and buttermilk. Longer marination enhances taste and helps tenderize the meat. To reheat chicken nuggets, use an oven or air fryer. Preheat the oven to 400°F. Place nuggets on a baking sheet and heat for 10-15 minutes. This keeps them crispy. Avoid microwaving, as it can make them soggy. For the complete recipe, including prep time and servings, check the [Full Recipe]. It has all the details you need for this tasty dish! Cooking crispy chicken nuggets at home is simple and fun. You learned about key ingredients like chicken, panko, and spices. Following the steps to marinate, bread, and fry will achieve the perfect crunch. Don’t forget the tips on storage and reheating for delicious leftovers. You can also explore variations to suit your taste or diet. Enjoy experimenting in your kitchen and serving these tasty nuggets. Happy cooking!

Crispy Chicken Nuggets Easy Homemade Delight Recipe

Are you ready to make the juiciest, crispiest chicken nuggets right at home? With just a few simple ingredients, including

To make fluffy biscuits, gather these key ingredients: - 2 cups all-purpose flour - 1 tablespoon baking powder - 1 teaspoon baking soda - 1 teaspoon salt - 1/4 cup cold unsalted butter, cut into small cubes - 3/4 cup buttermilk (or substitute with regular milk mixed with a splash of lemon juice) - 1 tablespoon honey (optional, for added sweetness) - Extra flour for dusting the surface These ingredients work together to create that light and fluffy texture you crave. The cold butter is crucial. It helps form flaky layers when baked. You might not have all the ingredients on hand. Here are some easy swaps: - For buttermilk, mix regular milk with a splash of lemon juice or vinegar. - Use vegan butter if you prefer a dairy-free option. - Gluten-free flour blends are great for those avoiding gluten. Just make sure it has a rising agent. You will need the right tools to make this process smooth: - Mixing bowls: For combining ingredients. - Baking sheet and parchment paper: To prevent sticking and for easy cleanup. - Biscuit cutter or glass: For shaping your biscuits. With the right ingredients and tools, you can create biscuits that are simple yet delightful. Try the full recipe to see how it all comes together! - Preheat the oven to 450°F (232°C). This high heat helps the biscuits rise well. - Line your baking sheet with parchment paper. This prevents sticking and makes cleanup easy. - In a large mixing bowl, combine 2 cups of all-purpose flour, 1 tablespoon of baking powder, 1 teaspoon of baking soda, and 1 teaspoon of salt. Whisk these dry ingredients together well. This ensures they mix evenly and aerate. - Add 1/4 cup of cold, cubed unsalted butter to the flour mixture. You can use your fingertips or a pastry cutter to work the butter in. Aim for a crumbly texture that looks like coarse sand. - Slowly pour in 3/4 cup of buttermilk. If you want some sweetness, add 1 tablespoon of honey. Mix gently with a wooden spoon until everything is just combined. The dough should be slightly sticky but not too wet. - Lightly flour your work surface and put the biscuit dough on it. Pat the dough into a rectangle, about 1 inch thick. Don’t over-knead. This keeps your biscuits light and fluffy. - To create flaky layers, fold the dough over itself 3 to 4 times. Roll it out again into a rectangle, keeping it about 1 inch thick. - Use a round biscuit cutter or a glass to press straight down and cut out biscuits. Place them on the prepared baking sheet. Avoid twisting the cutter; this helps the biscuits rise better. - Gather any scraps of dough, lightly re-roll them, and cut out more biscuits. Be careful not to overwork the dough here. - Bake the biscuits in the preheated oven for 12-15 minutes. Look for a golden-brown top that calls out to you. This simple and fluffy biscuit recipe will make your kitchen smell amazing. For the complete recipe, check the Full Recipe link. Enjoy your biscuits warm with butter, jam, or honey! To get fluffy biscuits, cold butter is key. Cold butter helps create layers. When it melts in the oven, it releases steam. This steam makes the biscuits rise. Avoid overworking the dough. Too much mixing makes tough biscuits. Mix just until the dough comes together. It should feel slightly sticky but not wet. You can add herbs or cheese to your dough. Try fresh chives, rosemary, or sharp cheddar. These add a nice flavor twist. For a sweet option, mix in chocolate chips or dried fruit. Honey is a great sweetener. A tablespoon can enhance the flavor. You can also use maple syrup or brown sugar for a different taste. If your dough is too sticky, add more flour. Dust your hands and the work surface lightly. If it’s too dry, you may need more liquid. A splash of buttermilk can help. For dense biscuits, check your baking powder. Old or expired powder won’t rise well. Make sure to follow the recipe closely for best results. {{image_4}} Buttermilk biscuits are soft and fluffy. The buttermilk adds a nice tang. It also helps the biscuits rise. To make these, follow the full recipe I shared. If you don’t have buttermilk, mix regular milk with a splash of lemon juice. Let it sit for about five minutes. This mimic's buttermilk's acidity, ensuring great flavor and texture. You can also spice up your biscuits with flavors. Try cheddar and chive for a savory twist. Just add shredded cheddar and chopped chives into the dough. For sweet options, mix in fruits like blueberries or chopped strawberries. These fruits bring a burst of flavor. You can also drizzle honey or maple syrup over sweet biscuits. Think outside the box with biscuit sizes and shapes! Mini biscuits make perfect appetizers. Cut them smaller and serve with dips. For fun themes, shape your biscuits into hearts or stars. Use cookie cutters for creative designs. Kids love this too! These variations make your meal more exciting and fun. To keep your biscuits fresh, store them in an airtight container. This helps trap moisture and keeps them soft. If you want to maintain their crispy edges, place a piece of bread in the container. It will help keep the biscuits from drying out. When it comes to reheating, use the oven. Preheat it to 350°F (175°C). Place the biscuits on a baking sheet for about 5-10 minutes. This method brings back their fluffy texture. You can also use a microwave, but this may make them chewy. Freezing unbaked biscuits is easy. First, cut the biscuits and place them on a baking sheet. Freeze them for about an hour until firm. Once frozen, transfer them to a resealable plastic bag. This way, you can bake them fresh whenever you want. To thaw and bake from frozen, simply preheat your oven to 450°F (232°C). Place the frozen biscuits directly on the baking sheet. Bake for 15-20 minutes until golden brown. No need to thaw them first! Homemade biscuits last about 2-3 days at room temperature. If you store them in the fridge, they can last about a week. Always check for signs of spoilage. Look for mold or an off smell. If biscuits feel hard or dry, they may not taste good. Always trust your senses! Yes, you can make biscuits without buttermilk. You can use regular milk mixed with a splash of lemon juice. This mixture makes a good substitute. You can also try yogurt or sour cream mixed with water. Each option will still give you tasty biscuits. Dense biscuits often come from overmixing the dough. If you mix too much, you develop gluten, which makes biscuits tough. Also, using old baking powder or baking soda can lead to density. Always check that your leavening agents are fresh. To make biscuits fluffier, use cold butter and buttermilk. Cold butter makes layers, which helps biscuits rise. Also, don’t overwork the dough. Just mix until wet. You can also fold the dough a few times to create more layers. This technique adds air, making your biscuits light and airy. Homemade biscuits shine when served warm. You can spread butter, jam, or honey on top. For a savory touch, pair them with gravy or cheese. They also go well with soups or stews. Enjoy them straight from the oven for the best taste! Now you have all you need to make perfect homemade biscuits. Remember the key ingredients and tools. Use cold butter and mix carefully for the best texture. Don't shy away from trying different flavors and shapes. Store them right to keep them fresh. Your baking journey can be fun and rewarding. Enjoy your biscuits with family and friends, and experiment with your favorite additions. Happy baking!

Homemade Biscuits Simple and Fluffy Recipe Guide

Homemade biscuits can transform any meal into a feast! With just a few simple ingredients, you can whip up fluffy,

- 1 cup graham cracker crumbs - 1/4 cup unsalted butter, melted - 2 tablespoons brown sugar - 8 oz cream cheese, softened at room temperature - 1/2 cup granulated sugar - 1 teaspoon pure vanilla extract - 1/4 cup sour cream - 2 large eggs, at room temperature - 1 cup crushed pineapple, well-drained to avoid excess moisture - Maraschino cherries, for garnish - Additional crushed pineapple - Mint leaves or fresh fruit for garnish For these mini pineapple upside-down cheesecakes, I love using simple ingredients that pack a big punch. The base starts with graham cracker crumbs and melted butter to form a crunchy crust. This crust gives a nice contrast to the creamy filling. The brown sugar adds a touch of caramel flavor that pairs well with the pineapple. The star of the show, cream cheese, makes the filling rich and smooth. I find that using room temperature cream cheese blends the best. It mixes easily with granulated sugar, vanilla extract, and sour cream, creating a sweet and tangy flavor. The eggs help bind it all together, making the texture light. Crushed pineapple adds a fruity burst. Make sure to drain it well; extra moisture can make the cheesecakes soggy. Lastly, I top each cheesecake with a maraschino cherry for a sweet finish. Feel free to get creative with optional toppings! A little extra crushed pineapple on top adds sweetness. Fresh mint leaves or fruit slices brighten up the dish and create a beautiful presentation. - Preheat the oven: Set your oven to 325°F (160°C) to get it ready. - Mixing the crust ingredients: In a medium bowl, combine 1 cup of graham cracker crumbs, 1/4 cup of melted butter, and 2 tablespoons of brown sugar. Stir until it looks like damp sand. - Filling and pressing the crust into muffin tins: Line a muffin tin with 12 paper liners. Divide the crumb mixture evenly among the cups. Use your fingers or the back of a spoon to press the crumbs down firmly. - Beating the cream cheese: In a large bowl, beat 8 oz of softened cream cheese until creamy and smooth. - Adding sugars and vanilla: Gradually mix in 1/2 cup of granulated sugar and 1 teaspoon of pure vanilla extract. Keep mixing until there are no lumps. - Mixing in sour cream and eggs: Add 1/4 cup of sour cream and mix until blended. Beat in 2 large eggs one at a time. Keep the speed low and mix just until combined. - Filling the cups with batter: Spoon the cheesecake batter into each muffin cup. Fill them just above the crust layer for even baking. - Baking time and temperature: Bake in the oven for 20-25 minutes. The edges should be set, but the centers can jiggle a bit. - Cooling instructions before refrigeration: Turn off the oven and leave the cheesecakes inside for another 10 minutes. After that, cool them at room temperature for about 30 minutes. Then, put the muffin tin in the fridge to chill for at least 2 hours. For the full recipe, you can refer to the earlier section. To ensure your mini pineapple upside-down cheesecakes turn out just right, focus on the texture. First, use softened cream cheese. This makes it easy to mix and keeps your filling smooth. Avoiding overmixing is key too. Mix your ingredients until just combined. This keeps the air in the batter, which makes it light and fluffy. For even baking, fill each muffin cup with the same amount of batter. Use a spoon to scoop it out evenly. This helps all the cheesecakes bake at the same time. When serving, place your mini cheesecakes on pretty plates. You can add a slice of fresh pineapple or a sprig of mint for color. This makes your dessert look extra special. For garnishing, place a maraschino cherry on top of each cheesecake. You can also add a little scoop of crushed pineapple for sweetness. If you have leftovers, store them in an airtight container. They stay fresh in the fridge for up to four days. You can enjoy them cold or let them warm up a bit at room temperature before serving. {{image_4}} You can change the flavor of your mini cheesecakes in fun ways. One great idea is to make coconut-flavored mini cheesecakes. To do this, swap some cream cheese for coconut cream. This adds a tropical twist that pairs well with pineapple. You can also fold in shredded coconut for extra texture and flavor. Another fun option is to add spices like cinnamon or nutmeg. Just a pinch can warm up the taste. These spices can make your cheesecakes feel cozy and comforting. They bring a unique touch to the classic treat. If you need to adjust for diet preferences, you can create a gluten-free crust. Use almond flour or gluten-free graham cracker crumbs instead. This way, you can enjoy the same great taste without gluten. For those who want dairy-free options, swap cream cheese with cashew cream or tofu. Both will give you a creamy texture while keeping it plant-based. You can also use coconut yogurt instead of sour cream for a dairy-free version. These adjustments let everyone enjoy mini pineapple upside-down cheesecakes. For the full recipe, check out the link above. You can use Greek yogurt or ricotta cheese. These options make the dish lighter. Greek yogurt adds a tangy taste, while ricotta gives a creamy texture. Both work well in this recipe. To avoid cracks, mix the batter gently. Do not overbeat it. Make sure all ingredients are at room temperature. This helps the mixture blend smoothly. Also, let the cheesecakes cool slowly in the oven before chilling. Yes, you can make them a day in advance. After baking, cool them at room temperature. Then, store them in the fridge. They stay fresh and tasty for up to three days. Just remember to add the toppings before serving. For the full recipe, check the earlier section! Mini Pineapple Upside-Down Cheesecakes are a fun twist on a classic dessert. They are cute and tasty. You will love how easy they are to make. Ingredients: - 1 cup graham cracker crumbs - 1/4 cup unsalted butter, melted - 2 tablespoons brown sugar - 8 oz cream cheese, softened at room temperature - 1/2 cup granulated sugar - 1 teaspoon pure vanilla extract - 1/4 cup sour cream - 2 large eggs, at room temperature - 1 cup crushed pineapple, well-drained - Maraschino cherries, for garnish - Additional crushed pineapple, for topping (optional) Prep Time: 20 minutes Cook Time: 20-25 minutes Chill Time: 2 hours Total Time: 2 hours 45 minutes Servings: 12 These mini cheesecakes are perfect for parties or a sweet treat at home. To make this dessert, you follow simple steps. First, mix the crust. Then, beat the cream cheese and add other ingredients. After that, bake them and chill. Enjoy these delightful bites with family and friends. You can find the Full Recipe for all the steps and tips to make them shine! You've learned how to make mini cheesecakes by following simple steps. We covered ingredients like graham cracker crumbs, cream cheese, and crushed pineapple, plus tips for a perfect bake. Remember to bake and cool them properly for the best texture. Don't forget the fun variations, like coconut flavor or gluten-free options. With these easy recipes and tricks, you can create delicious treats for any occasion. Enjoy your baking adventure!

Mini Pineapple Upside-Down Cheesecakes Delight

Get ready to indulge in a delightful treat with my Mini Pineapple Upside-Down Cheesecakes! This recipe combines a creamy cheesecake

- Riced cauliflower options - You can use a medium head of cauliflower or 4 cups of pre-riced cauliflower. Fresh cauliflower offers great flavor and texture when riced at home. The pre-riced option saves time. - Fresh vegetables and proteins - Cherry tomatoes provide sweetness and color. Cooked chickpeas add protein and fiber. Diced red bell pepper and cucumber contribute crunch and freshness. You can also include avocado for creaminess and feta cheese for a tangy finish. - Seasonings and garnishes - Olive oil and fresh lemon juice enhance the taste. Garlic powder and ground cumin add depth. You can season with salt and black pepper to fit your taste. Fresh parsley makes a lovely garnish. - Suggestions for additional protein sources - Try adding grilled chicken, shrimp, or tofu for more protein. Nuts and seeds also work well. - Ideas for sauces or dressings - A tahini dressing or yogurt sauce adds creaminess. A splash of soy sauce or sriracha brings heat. - Flavor-enhancing herbs and spices - Consider fresh basil or cilantro for extra flavor. A sprinkle of smoked paprika or chili flakes can add warmth. For the complete recipe, check out the [Full Recipe]. To start, you can choose either fresh cauliflower or pre-riced cauliflower. If you pick a whole head, cut it into florets. Then use a food processor to rice it. Pulse until you have small, rice-sized pieces. This helps create a nice texture. Pre-riced cauliflower saves time and is just as good. Next, let's sauté the riced cauliflower for the best flavor. Heat 1 tablespoon of olive oil in a large skillet over medium heat. Once it's hot, add your riced cauliflower. Sprinkle in garlic powder, cumin, salt, and black pepper. Sauté for about 5-7 minutes. Stir occasionally until the cauliflower is tender but not mushy. It should still have a bit of bite. Once done, take it off the heat and set it aside. Now, it’s time to mix the veggies! In a large bowl, combine halved cherry tomatoes, cooked chickpeas, diced red bell pepper, and diced cucumber. These fresh ingredients bring great flavor and crunch. Drizzle the last tablespoon of olive oil and fresh lemon juice over the mix. Toss gently to coat everything well. Don't forget to season with salt and pepper. This step is key for boosting flavor. For the final touch, let's assemble your bowl. Start with a base of sautéed cauliflower rice in each serving bowl. This will be your hearty foundation. Next, top it with the vegetable medley you just mixed. Arrange avocado slices on one side to make it look pretty. Finally, sprinkle crumbled feta cheese over the top. This adds a creamy, salty flavor that pairs well with the veggies. To make your dish even more eye-catching, garnish with freshly chopped parsley. This small step adds color and freshness. You can serve your Cauliflower Rice Delight Bowl just like this, or add a handful of roasted nuts or seeds for extra crunch. Enjoy your beautiful meal! To avoid mushiness while cooking cauliflower rice, follow these steps: - Use fresh cauliflower: Always start with a fresh head. - Don't overcook: Sauté for just 5-7 minutes. You want it tender but firm. - Dry it out: After ricing, spread it on a towel to absorb extra moisture. - Use high heat: A hot pan helps keep the texture intact. To boost flavor, try these tips: - Season well: Salt and pepper enhance taste. - Add herbs: Fresh herbs like parsley or cilantro add freshness. - Use zesty flavors: A squeeze of lemon or lime brightens the dish. - Experiment with spices: Try smoked paprika or chili powder for a kick. Making bowls ahead of time is simple and smart. Here’s how: - Cook in bulk: Prepare multiple servings of cauliflower rice at once. - Mix veggies: Combine your favorite vegetables in advance. - Separate storage: Keep cauliflower rice and veggies in different containers. For leftovers, use these storage tips: - Use airtight containers: This keeps everything fresh longer. - Refrigerate promptly: Store leftovers within two hours of cooking. - Label and date: This helps you keep track of freshness. Pair your cauliflower rice bowl with proteins for a balanced meal. Here are some ideas: - Grilled chicken: Adds lean protein and flavor. - Chickpeas: Great for plant-based options. - Shrimp or fish: Quick-cooking and delicious. For presentation, follow these tips: - Layer it nicely: Start with cauliflower, then add veggies and protein. - Garnish carefully: Fresh herbs or nuts make a beautiful finish. - Serve in colorful bowls: Bright dishes make your food pop. Try creating your own version of the Cauliflower Rice Delight Bowl with the [Full Recipe]. {{image_4}} You can swap out vegetables based on what’s in season. If zucchini is fresh, use it instead of cucumber. For fall, try roasted butternut squash. These swaps add flavor and keep your bowl exciting. If you have dietary needs, consider alternatives like bell peppers for nightshades or shredded carrots for sweetness. This way, everyone can enjoy their meal! You can add protein to your bowl in many ways. For a vegan option, try marinated tofu. It soaks up flavors well. If you prefer meat, grilled chicken or shrimp works great. Both add a nice texture and taste. You can also use beans or lentils for a hearty option. Mix in chickpeas for extra protein and fiber! Finding the right sauce can elevate your bowl. A light tahini dressing or a zesty lemon vinaigrette pairs nicely with the fresh flavors. Homemade versions are often healthier and tastier. If you’re in a hurry, look for store-bought options with clean ingredients. A simple drizzle can make your bowl feel fancy and flavorful! To keep your cauliflower rice bowl fresh, store it properly. Place the assembled bowl in an airtight container. Use a container that fits the bowl snugly to avoid air exposure. Store it in the refrigerator for up to three days. If you want to keep it longer, freeze the bowl. However, I recommend not freezing any avocado or fresh toppings, as they do not freeze well. Instead, store those separately. When it’s time to enjoy leftovers, reheat them carefully. The best method is to use a skillet over medium heat. Add a splash of water or olive oil to keep the bowl moist. Stir occasionally until warmed through. This method helps maintain the texture of the cauliflower rice. Avoid using the microwave if possible. Microwaving can make the rice mushy and less enjoyable. For the best taste, enjoy your cauliflower rice bowl fresh! For the full recipe, check out the Cauliflower Rice Delight Bowl! A cauliflower rice bowl is a meal that uses cauliflower instead of regular rice. It offers a fresh, light, and healthy option for your plate. Cauliflower rice is made by grating or processing cauliflower into small, rice-like pieces. This dish is packed with flavor and nutrients. It is low in carbs and calories, making it perfect for many diets. You can enjoy it warm or cold, making it quite versatile. To make this recipe healthier, you can use less olive oil. Consider swapping feta cheese for a low-fat version. You can also add more vegetables like spinach or kale for extra vitamins. Use fresh herbs instead of salt to boost flavor without added sodium. If you want protein, try adding grilled chicken or tofu. These swaps keep the dish tasty while reducing calories. Yes! To make this recipe vegan, skip the feta cheese or use a plant-based alternative. You can add more veggies or legumes for protein. Use nutritional yeast for a cheesy flavor without dairy. Replace olive oil with vegetable broth for sautéing. These simple swaps make it easy to enjoy a vegan cauliflower rice bowl. Leftovers will last about three to four days in the fridge. If you keep the cauliflower rice and vegetables separate, they may last longer. Store them in airtight containers to keep them fresh. When ready to eat, reheat in a pan or microwave. Just don’t let them sit too long, or they may lose their flavor. Cauliflower rice offers many health benefits. It is low in calories and high in fiber. This can help with digestion and keep you feeling full. Cauliflower is rich in vitamins C and K. These vitamins are good for your immune system and bone health. Compared to white rice, cauliflower rice has fewer carbs, making it a great option for low-carb diets. You learned about making great cauliflower rice bowls, from choosing fresh ingredients to perfecting texture. These bowls offer a healthy and fun way to enjoy meals. You can mix and match flavors, proteins, and veggies to suit your taste. With meal prep tips and storage advice, you’ll enjoy these bowls all week. Remember, being creative with your ingredients can lead to tasty surprises. Try new combinations and share your favorites with friends! Enjoy your cooking journey with these vibrant, healthy meals.

Cauliflower Rice Bowl Fresh and Flavorful Delight

Are you ready to enjoy a fresh and flavorful delight? A Cauliflower Rice Bowl packs a punch of nutrients while

- 4 boneless, skinless chicken breasts - 4 tablespoons of unsalted butter, divided - 6 cloves of garlic, finely minced - 1 teaspoon dried thyme - 1 teaspoon smoked paprika - 1 teaspoon onion powder - Salt and freshly ground black pepper, to taste - 1 cup chicken broth - 1 tablespoon fresh lemon juice - Fresh parsley, chopped (for garnish) For this recipe, I use boneless, skinless chicken breasts. They cook fast and stay juicy. The unsalted butter adds a rich flavor. Fresh garlic brings a bold taste that everyone loves. I like to mix dried herbs, like thyme and smoked paprika, to give it warmth. Onion powder adds depth. Don't forget salt and pepper to bring it all together. - Fresh parsley for garnish - Chicken broth - Fresh lemon juice To make the dish even better, I suggest adding fresh parsley. It brightens the look and taste. Chicken broth boosts the flavor of the sauce. A splash of fresh lemon juice adds a nice zing that balances the richness. - Steamed vegetables - Rice or quinoa - Salad options For sides, I love steamed vegetables. They add color and nutrients. Rice or quinoa are great for soaking up the sauce. You can also serve a fresh salad. These pairings make the meal complete. For the full recipe, check out Garlic Butter Chicken Delight! To start, pat the chicken breasts dry. Use paper towels to soak up any moisture. This step helps the chicken sear well. Next, season both sides with salt, pepper, thyme, smoked paprika, and onion powder. Make sure the seasonings cover the chicken evenly. This adds great flavor. Heat a large skillet over medium heat. Add 2 tablespoons of butter and let it melt. Once it bubbles, place the seasoned chicken breasts in the skillet. Cook for about 5-7 minutes on each side. The chicken should turn golden brown and reach an internal temperature of 165°F (75°C). Remove the chicken from the skillet and set it aside on a plate. In the same skillet, add the remaining 2 tablespoons of butter. Once melted, add the minced garlic. Sauté the garlic for 1-2 minutes. Keep an eye on it to avoid burning. Burning garlic will make it taste bitter. After that, pour in the chicken broth and lemon juice. Stir well to mix all the ingredients. Use a wooden spoon to scrape any bits stuck to the bottom of the skillet. This adds rich flavor to your sauce. Let it simmer for about 3-5 minutes to reduce slightly. Return the cooked chicken breasts to the skillet. Make sure they are well-coated with the garlic butter sauce. Use a spoon to baste the chicken with the sauce. Cook for an additional 2-3 minutes. This helps the chicken absorb all those wonderful flavors. Before serving, sprinkle the chicken with freshly chopped parsley for a pop of color and freshness. For the full recipe, refer to the Garlic Butter Chicken Delight. Searing chicken gives a nice brown crust. It locks in juices and adds flavor. To sear, heat your pan and use butter. Place the chicken in the hot pan and don’t move it for a few minutes. This helps form a crust. Baking is another great option. It cooks the chicken evenly. Use lower heat for a longer time. This makes the chicken juicy and tender. A meat thermometer helps with both methods. Aim for 165°F (75°C) for safe eating. This ensures your chicken is fully cooked. Herbs and spices boost flavor. You can try fresh rosemary or basil for a twist. These pair well with garlic and butter. For a spicy kick, add red pepper flakes. This gives the dish a nice heat. You can also add vegetables to your garlic butter chicken. Think about using bell peppers or broccoli. They add color and nutrients. Just sauté them in the garlic butter for a few minutes before adding the chicken. This way, they soak up all that delicious flavor. Plating is key for a great meal. Start with a clean plate. Place the chicken in the center. Drizzle extra garlic butter sauce over the top. This makes it look appealing. For a pop of color, sprinkle fresh parsley on top. You can also add lemon wedges on the side. They add brightness and freshness to the dish. Serve with rice or steamed veggies to complete the meal. Enjoy your beautiful garlic butter chicken! For the complete process, check out the Full Recipe. {{image_4}} You can switch chicken for shrimp or tofu in this dish. Shrimp cooks fast and brings a sweet flavor. Sauté shrimp for about 2-3 minutes per side. For tofu, use firm or extra-firm tofu. Press the tofu to remove moisture and cut it into cubes. Cook the tofu in butter until it’s golden brown, about 5-7 minutes. Each protein brings a unique taste to garlic butter sauce. Adding cream can make the sauce richer and creamier. Simply stir in half a cup of heavy cream after cooking the garlic. This will give a smooth texture. If you like heat, add red pepper flakes. Start with a pinch and adjust to your taste. This will spice up your garlic butter chicken and add extra depth. Use seasonal vegetables to brighten your dish. In spring, try asparagus or peas. In fall, add roasted squash or Brussels sprouts. Fresh herbs also change with the season. Use basil in summer, or thyme in winter. Adjusting your recipe with these ingredients keeps it fresh and exciting. For the full recipe, check out the Garlic Butter Chicken Delight. After you enjoy your garlic butter chicken, store leftovers in an airtight container. This keeps the chicken fresh and tasty. Place it in the fridge within two hours of cooking. For best results, eat leftovers within 3-4 days. If you want to save it longer, freeze it. Wrap the chicken tightly in plastic wrap before placing it in a freezer-safe bag. This helps prevent freezer burn. When you’re ready to eat your leftovers, use the oven or a skillet. These methods keep the chicken juicy. If using an oven, preheat it to 350°F (175°C). Place the chicken in a dish and cover it with foil. Heat for about 15-20 minutes. In a skillet, add a splash of chicken broth and reheat over low heat. This helps maintain flavor and moisture. Avoid using a microwave if you can. It can dry out the chicken. Garlic butter chicken lasts about 3-4 days in the fridge. Check for any bad smells or changes in color or texture. If you see any signs of spoilage, it’s best to throw it away. When frozen, garlic butter chicken can last up to three months. Just remember to label your containers, so you know when to use them. Cook garlic butter chicken for about 15-20 minutes. Start with 5-7 minutes per side. Use medium heat to get a nice golden color. Always check the internal temperature. It should reach 165°F (75°C). This ensures the chicken is safe to eat. The cooking time may vary based on thickness. Thicker pieces may take a bit longer. Yes, you can use frozen chicken. Just remember to adjust your cooking time. Start by thawing the chicken in the fridge overnight. If you are in a rush, you can cook it straight from frozen. Increase the cooking time by 5-10 minutes. Check the internal temperature to ensure it is safe to eat. If you need a garlic substitute, try garlic powder or garlic salt. You can also use shallots for a milder flavor. Onion powder can add some depth as well. If you want a different taste, consider using fresh herbs like basil or thyme. They won't taste the same but will still add flavor. Garlic butter chicken can fit into a healthy diet. It has protein from chicken and healthy fats from butter. However, it is high in calories due to the butter. You can lighten it by using less butter or swapping in olive oil. Serve it with veggies or whole grains for balanced meals. Always watch portion sizes to maintain good health. For more details, check the Full Recipe. Garlic butter chicken is a simple dish with rich flavors. We covered the basic ingredients, key cooking techniques, and tips for perfecting the recipe. You can enhance flavors with fresh herbs or try different proteins. Leftovers can be stored and reheated easily, making this a practical choice. Overall, this dish is versatile and satisfying. With these steps, you can create a delightful meal for any occasion. Enjoy cooking, experimenting, and serving your garlic butter chicken!

Garlic Butter Chicken Simple and Flavorful Dish

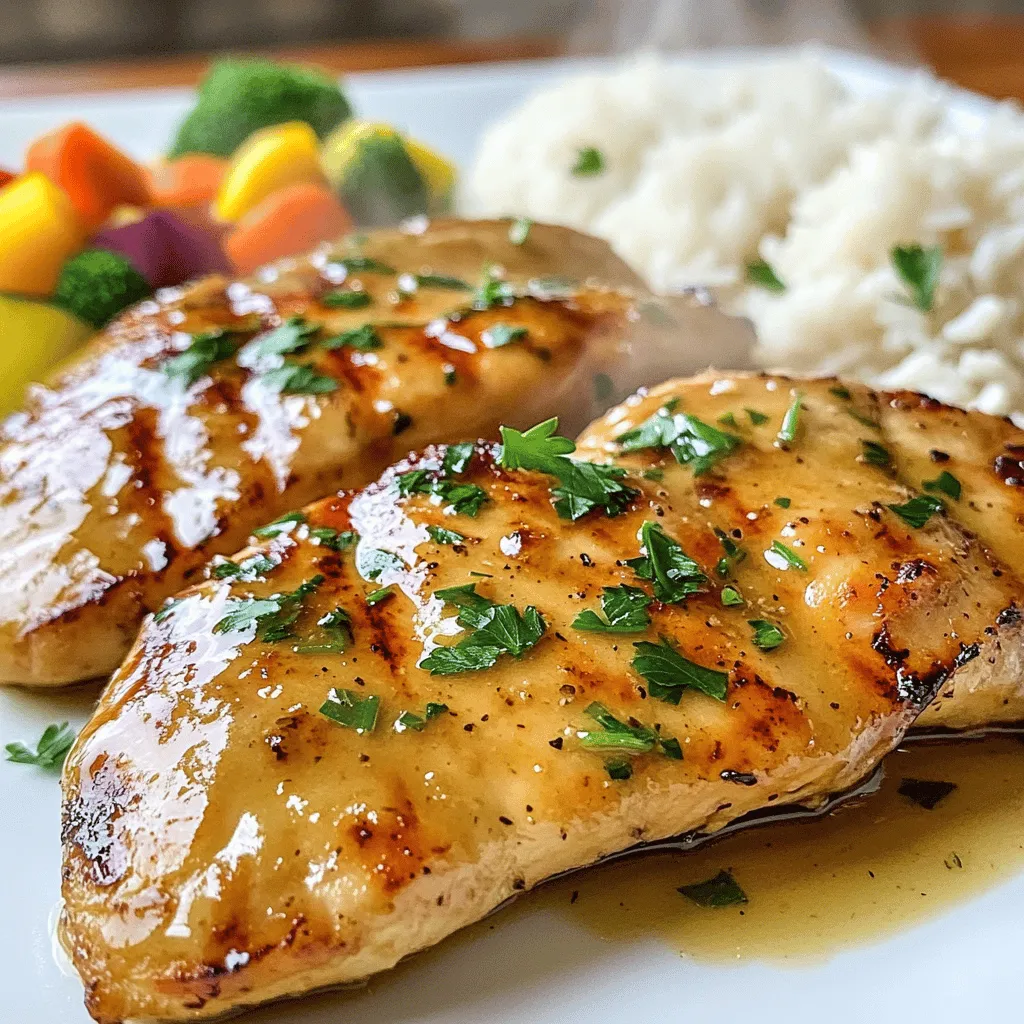
Looking for a simple yet flavorful dish? Garlic Butter Chicken is your answer! This recipe is packed with tasty ingredients

To make creamy smothered chicken and rice, gather these ingredients: - 4 boneless, skinless chicken thighs - 1 cup long-grain white rice - 2 cups chicken broth - 1 cup heavy cream - 1 medium onion, finely chopped - 3 cloves garlic, minced - 1 cup frozen peas and carrots mix - 1 teaspoon paprika - 1 teaspoon dried thyme - 1 tablespoon olive oil - Salt and black pepper to taste - Fresh parsley, chopped, for garnish These ingredients create a rich and flavorful meal. The chicken thighs add juiciness, while the rice absorbs all the delicious flavors. Heavy cream provides a smooth texture, and the mix of peas and carrots adds color and nutrition. When picking your ingredients, fresh herbs can enhance the dish. You can find the full recipe above to see how these items come together in a hearty, comforting meal. First, take the chicken thighs and season them well. Use salt, black pepper, and paprika. This adds flavor and color. Let the chicken marinate for about 15 minutes. This step helps the spices soak in for a richer taste. Next, heat olive oil in a large skillet over medium heat. Once the oil is hot, add the chopped onion and minced garlic. Sauté them for about 3-4 minutes until the onion turns soft and clear. This step is key. It releases wonderful flavors that enhance the dish. Now, add the marinated chicken thighs into the skillet. Cook them for 4-5 minutes on each side. You want them browned but not fully cooked. This browning step adds depth to the flavor. Once done, remove the chicken and set it aside on a plate. In the same skillet, add uncooked rice, stirring it in the leftover oil and juices. Toast the rice for about 2 minutes until it changes color and smells nutty. This step adds a nice base flavor. Then, pour in the chicken broth and heavy cream. Stir well and bring the mix to a gentle boil. Return the browned chicken thighs to the skillet along with the frozen peas and carrots mix. Stir everything together to ensure even distribution of ingredients. This helps all the flavors mix well. Cover the skillet with a lid and let it simmer on low heat for 20-25 minutes. This allows the rice to absorb most of the liquid and become tender. Check it now and then, stirring gently to prevent sticking. After cooking, sprinkle dried thyme over the mixture. Use a fork to fluff the rice gently. This helps mix the flavors. Taste the dish and adjust seasoning with more salt and black pepper if needed. For serving, plate generous portions of the creamy chicken and rice. Make sure to include both chicken and vegetables. Garnish with freshly chopped parsley for a pop of color and freshness. For an appealing look, use shallow bowls and drizzle a bit of extra heavy cream on top. For the full recipe, check [Full Recipe]. To get the best creaminess in your dish, always use heavy cream. It makes the sauce rich and smooth. Adjust the liquid ratios to keep it balanced. If you find it too thick, add a little more chicken broth. Stir well to blend the flavors. For the right texture, let the dish simmer. This allows the rice to absorb the sauce and become tender. Add extra spices and herbs to elevate the taste. Consider using garlic powder or onion powder for extra flavor. Dried oregano or basil also works well. You can try fresh herbs like rosemary or thyme too. Experiment with different aromatics, like bell peppers or celery. These additions can change the whole dish and make it unique. Different rice types need different cooking times. Long-grain rice cooks faster than brown rice. If using brown rice, add 10 to 15 minutes to your cooking time. Check for doneness by tasting the rice. It should be tender but not mushy. The chicken should be fully cooked, with no pink inside. If you notice any pink, cook it a bit longer. {{image_4}} You can switch out chicken for other proteins. Turkey works well if you want a leaner option. Tofu is a great choice for a plant-based meal. If you use turkey, cook it for a bit longer. Tofu cooks faster, so add it near the end to keep it tender. Feel free to add more veggies to the dish. Broccoli, bell peppers, or spinach can all work nicely. You can choose seasonal veggies for the best flavor. Personal favorites are always a good option too. Just make sure to cut them into small pieces so they cook evenly. You can change the flavor by adding different sauces. Try soy sauce for a savory twist or hot sauce for some heat. Adjust the spice levels to match your taste. If you like it spicy, toss in some red pepper flakes. This will make your creamy smothered chicken and rice even more exciting. For more details, check the Full Recipe. To store your creamy smothered chicken and rice, follow these steps: - Allow the dish to cool down to room temperature. - Use airtight containers to keep the dish fresh. - Store in the fridge for up to 3 days. Keeping it sealed helps maintain flavor and moisture. When you want to enjoy your leftovers, reheating correctly is key: - Use a microwave or stovetop to heat gently. - Add a splash of chicken broth or cream for extra moisture. - Stir often to keep the creamy texture. This way, you avoid that dry or clumpy texture. If you wish to freeze your creamy chicken and rice, do this: - Let the dish cool completely before freezing. - Use freezer-safe containers, leaving some space for expansion. - It can last in the freezer for up to 2 months. For best results, thaw it overnight in the fridge before reheating. This helps keep the dish creamy and delicious. I recommend using long-grain white rice. It cooks well and stays fluffy. Jasmine rice is also a good choice. It adds a nice aroma and flavor. Avoid short-grain rice, as it can become too sticky. Long-grain rice absorbs the creamy sauce nicely without clumping. Yes, you can prepare creamy smothered chicken and rice ahead of time. Cook the dish fully and let it cool. Store it in an airtight container in the fridge for up to three days. When ready to eat, reheat it in the microwave or on the stove. Add a splash of chicken broth to keep it creamy. Absolutely! You can freeze creamy chicken and rice. Allow it to cool before placing it in a freezer-safe container. It will last up to three months in the freezer. To reheat, thaw it in the fridge overnight and heat it on the stove. Stir in a bit of cream or broth to revive the creaminess. To lighten up this dish, try using low-fat cream or unsweetened almond milk. You can also swap heavy cream for Greek yogurt. Use skinless chicken breasts instead of thighs for fewer calories. Add more veggies, like spinach or broccoli, to boost nutrition without adding many calories. This dish goes well with green salads or steamed vegetables. Try a fresh cucumber salad for crunch. Garlic bread or crusty rolls can also be great for soaking up the sauce. Consider pairing it with roasted asparagus or green beans for a colorful plate. In this blog post, we explored how to make creamy smothered chicken and rice. We covered essential ingredients, step-by-step cooking instructions, and helpful tips to boost flavor and texture. Remember to try different proteins and vegetables to make the dish your own. Proper storage and reheating keep leftovers tasty. Enjoy this comforting meal any night of the week! Your kitchen can bring joy with every bite.

Creamy Smothered Chicken and Rice Delightful Recipe

Are you ready to indulge in a dish that’s both creamy and comforting? My Creamy Smothered Chicken and Rice Delightful

- 2 cups cooked rice (white or brown) - 2 boneless, skinless chicken breasts - 1 cup rich chicken broth - 1 cup heavy cream - 1 cup frozen peas and carrots blend - 1 medium yellow onion - 3 cloves of garlic - 1 teaspoon dried thyme - 1 teaspoon smoked paprika - Salt and pepper to taste - 2 tablespoons olive oil - Fresh parsley for garnish In this recipe, the main ingredients come together to create a warm and creamy dish. You need two cups of cooked rice. This can be either white or brown, based on your choice. The chicken breasts should be boneless and skinless. Cut them into bite-sized pieces for easy cooking. The chicken broth adds flavor, while heavy cream gives the dish its rich, creamy texture. For vegetables, I like to use a blend of frozen peas and carrots. They add color and nutrition. You’ll also need a medium yellow onion and three cloves of minced garlic. Seasoning is key! Dried thyme and smoked paprika bring warmth and depth. Don't forget to add salt and pepper to taste. Finally, use olive oil for cooking and fresh parsley for a lovely garnish. These simple ingredients come together to create a comforting meal. For the complete details, check the Full Recipe. To start, heat your olive oil in a large skillet over medium heat. Once the oil is hot, add the chopped onion. Sauté it for about 3-4 minutes until it turns translucent. This brings great flavor to your dish. Next, add the minced garlic. Sauté for one more minute, stirring often to avoid burning. Now, it’s time to add the chicken. Cut the chicken breasts into bite-sized pieces. Season them with salt, pepper, thyme, and smoked paprika. Cook the chicken for 7-10 minutes. Stir occasionally until there’s no pink left inside. Your kitchen will smell amazing at this point. Once the chicken is ready, stir in the frozen peas and carrots. Cook them for 3-4 minutes until they are warm and tender. Then, pour in the chicken broth. Bring it to a gentle simmer for about 5 minutes. This step allows the flavors to blend well together. Now, reduce the heat a bit more. Gradually whisk in the heavy cream, stirring non-stop. This will give your dish a creamy finish. Carefully fold in the cooked rice. Make sure everything is mixed well. Taste it and add more salt or pepper if needed. Let the dish simmer for an extra 5 minutes. This allows the flavors to meld beautifully. After that, take the skillet off the heat. Let it rest for one minute to thicken the sauce. For the full recipe, check out the details above. Enjoy your comforting meal! To get that perfect creamy texture, heavy cream is a must. It gives the dish a rich, smooth feel. You can also reduce the chicken broth. This step concentrates the flavors and thickens the sauce. Adjusting seasoning is key. Taste as you cook and add salt and pepper to make it just right. Serving your creamy chicken and rice in deep bowls makes it look fancy. A sprinkle of fresh parsley adds a pop of color. For sides, crusty bread pairs well. It soaks up the creamy sauce and adds texture. Try to make your meal look inviting. It makes each bite more enjoyable. {{image_4}} You can easily modify this creamy chicken and rice dish for different diets. If you need a gluten-free option, use gluten-free rice or broth. This simple swap keeps the dish safe and tasty. For a vegetarian alternative, replace chicken with tofu or chickpeas. You can also use vegetable broth instead of chicken broth. These changes let everyone enjoy this meal. Adding different herbs or spices can change the flavor. Try adding basil, oregano, or rosemary for a fresh twist. You can also sprinkle in some chili flakes for heat. Think about mixing in extra veggies too. Spinach, bell peppers, or mushrooms work well. This boosts nutrition and adds color to your dish. You can adapt this recipe to suit your kitchen tools. For a slow cooker version, sauté the onion and garlic first, then add all ingredients to the slow cooker. Cook on low for 4-6 hours. If you prefer an Instant Pot, use the sauté function first. Then, add all ingredients and cook on high pressure for about 10 minutes. Both methods save time and create delicious results. If you want to explore the full recipe, check out the Creamy Chicken and Rice Delight 🥣. Store your leftovers in the fridge. Use airtight containers to keep it fresh. Glass or plastic containers work well. Make sure to cool the dish before sealing. This prevents moisture build-up and keeps flavors intact. Enjoy your creamy chicken and rice within three days for the best taste. Freezing is a great option for longer storage. Divide the dish into smaller portions. Use freezer-safe containers or bags. Remove any excess air to avoid freezer burn. You can freeze it for up to three months. When you're ready to enjoy it again, thaw in the fridge overnight. To reheat, use the stovetop or microwave. Heat gently, stirring often. Add a splash of chicken broth or cream to restore the creamy texture. Enjoy this comforting meal anytime with these easy storage tips! For the full recipe, check out my Creamy Chicken and Rice Delight. Creamy Chicken and Rice lasts about 3 to 4 days in the fridge. Store it in an airtight container. This keeps it fresh and tasty. Make sure to cool it down before putting it in the fridge. Yes, you can make Creamy Chicken and Rice ahead of time. I suggest cooking it, letting it cool, and then storing it. This makes a quick meal later. You can reheat it in a pot or microwave before serving. Just add a splash of broth or water to keep it creamy. Creamy Chicken and Rice pairs well with many sides. Here are some great options: - Steamed broccoli for crunch - A simple side salad for freshness - Garlic bread for a hearty touch - Roasted carrots for sweetness These sides add color and flavor to your meal. Enjoy your delicious dinner! This blog post detailed a simple recipe for Creamy Chicken and Rice, from ingredients to storage tips. You learned about the key components, like chicken, rice, and heavy cream, to create a rich dish. I shared step-by-step instructions to guide you through cooking. Remember, you can easily adjust this recipe for dietary needs or flavors. With proper storage, you can enjoy this meal later. I hope you find these tips helpful as you make this delicious dish!

Creamy Chicken and Rice Easy Comfort Food Recipe

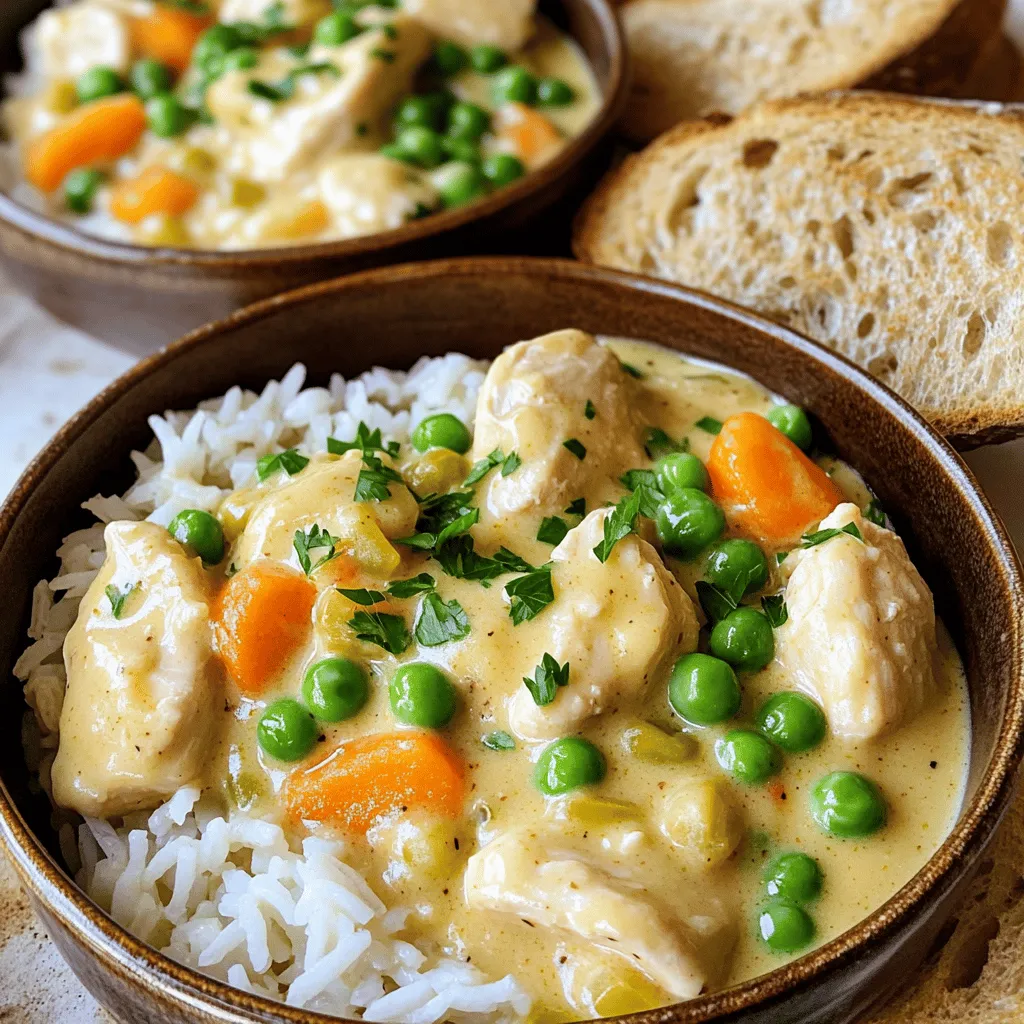
When comfort food calls, nothing beats a warm bowl of Creamy Chicken and Rice. This easy recipe combines tender chicken,

Older posts
Newer posts
← Previous Page1 … Page99 Page100 Page101 … Page116 Next →

dsad

© 2025 recipesstation • Built with GeneratePress

Our Policies

  • Copyright Policy
  • Cookie Policy
  • GDPR Policy
  • Privacy Policy
  • Disclaimer
  • Terms Of Use

More Information

  • Home
  • About
  • Contact
  • Appetizers
  • Dessert
  • Dinner
  • Drinks
©2025, recipesstation About Back To Top