Skip to content
DisclaimerTerms Of UseGDPR PolicyCookie Policy

recipesstation

  • Home
  • Drinks
  • Appetizers
  • Dinner
  • Dessert
  • About
  • Contact
  • Privacy Policy
DisclaimerTerms Of UseGDPR PolicyCookie Policy

Emily

- 1 lb flank steak - 2 cups mixed greens (a blend of arugula, spinach, and romaine) - 1/2 cup crumbled Gorgonzola cheese - 3 tablespoons balsamic vinegar - 2 tablespoons olive oil (divided) - 1 cup fresh or frozen corn kernels - 1 cup cherry tomatoes, halved - 1 ripe avocado, sliced - 1/4 red onion, thinly sliced This salad brings together bold flavors and fresh ingredients. The flank steak gives a hearty touch, while the mixed greens add a crisp base. Gorgonzola cheese adds a creamy, tangy twist. The balsamic vinegar and olive oil create a zesty dressing that ties it all together. Grilled corn adds a sweet crunch that makes every bite enjoyable. For garnishes, cherry tomatoes bring color and sweetness. Avocado slices add rich creaminess. Red onion gives a sharp note, balancing the dish. For the full recipe, check the complete guide. Enjoy creating this delightful salad! To marinate flank steak effectively, start with a simple mix. In a bowl, whisk together 2 tablespoons of balsamic vinegar, 1 tablespoon of olive oil, and a pinch of salt and pepper. This mix gives the steak flavor. Next, place the flank steak in the marinade. Make sure it is fully coated. Cover it and let it sit at room temperature for at least 30 minutes. This time allows the flavors to soak in well. For the ideal flavor, you can add herbs like rosemary or thyme. These herbs enhance the taste without overpowering it. Prepare fresh corn by husking and cleaning the ears well. If using frozen corn, you can skip this step. Preheat your grill or grill pan to medium-high heat. Brush the corn lightly with olive oil. This helps it not stick to the grill. Grill the corn for about 10-15 minutes. Turn it every few minutes. You want it to be charred and tender for the best taste. If using frozen corn, heat a skillet with some olive oil. Sauté the corn on medium heat. Stir occasionally until it’s heated and slightly caramelized. Start by preparing the salad base. In a large serving bowl, mix the greens, halved cherry tomatoes, and thinly sliced red onion. Drizzle the remaining 1 tablespoon of balsamic vinegar, 1 tablespoon of olive oil, and honey over the salad. Toss gently. You want all the ingredients coated evenly. Now, it’s time to assemble the salad. On a serving plate, lay down a generous portion of the mixed greens. Next, arrange the sliced steak, grilled corn, sliced avocado, and crumbled Gorgonzola cheese on top. For a final touch, drizzle any leftover dressing over the salad. If you wish, sprinkle with a bit more salt and freshly ground black pepper. This adds extra flavor to your dish. To cook steak just right, use a meat thermometer. Here are some key temperatures: - Rare: 125°F - Medium Rare: 135°F - Medium: 145°F - Medium Well: 150°F - Well Done: 160°F After cooking, let the steak rest for five minutes. This helps keep the juices inside. When you cut into the steak, it will be juicy and tender. Make your salad look great! Here are some fun ideas: - Use a large wooden board for a rustic touch. - Serve individual plates for a fancy look. - Layer the ingredients for depth and color. Add colorful items like cherry tomatoes and avocado to make it pop. A mix of textures also adds interest. You can boost flavor with simple extras. Try these ideas: - Add a sprinkle of garlic powder or smoked paprika for kick. - Fresh herbs like basil or parsley can add brightness. - Pair with a light white wine, like Sauvignon Blanc, for a nice touch. These little changes can take your salad from good to great! For the full recipe, check out Balsamic Bliss: Steak & Gorgonzola Salad with Grilled Corn. {{image_4}} If you want to switch up the protein in your salad, flank steak is not the only choice. Here are some great alternatives: - Sirloin steak: This cut is tender and flavorful. - Chicken breast: Grilled chicken adds lean protein. - Pork tenderloin: This is juicy and pairs well with balsamic. - Tofu: For a vegetarian option, try marinated, grilled tofu. - Tempeh: A great vegan protein that absorbs flavors well. You can adapt this recipe to fit the season and use fresh produce. Here are some ideas: - Spring: Use asparagus or snap peas for a crunchy bite. - Summer: Try adding ripe peaches or strawberries for sweetness. - Fall: Incorporate roasted squash or pumpkin seeds for warmth. - Winter: Use Brussels sprouts or hearty greens like kale. These ingredient swaps keep your salad fresh and exciting all year long. Changing the cheese or dressing can alter the flavor of the salad. Here are some tasty ideas: - Different cheeses: Feta or goat cheese can replace Gorgonzola. They have unique flavors that work well. - Alternative dressings: You can use a lemon vinaigrette or ranch for a different twist. Honey mustard dressing adds a sweet touch. These variations let you explore new tastes while enjoying the core elements of your dish. For the complete recipe, check out the Full Recipe. To store your Balsamic Steak Gorgonzola Salad, keep it in the fridge. Use an airtight container to prevent wilting. This helps maintain the freshness of the greens and other ingredients. Place the steak and salad separately to keep the salad crisp. You can combine them later when you're ready to eat. If you have leftover steak, slice it and wrap it tightly in plastic wrap or foil. Place it in a freezer-safe bag. This way, it can last for up to three months. When you're ready to eat, thaw it in the fridge overnight. To reheat grilled corn, simply warm it in a skillet over medium heat. Stir it often until hot. The salad can last about 2-3 days in the fridge. Watch for any signs of spoilage, like slimy greens or bad smells. The steak should stay good for about 3-4 days. Always check for a change in color or texture before eating. Enjoy your salad at its best! For more details, check the Full Recipe. Yes, you can prepare parts of this salad ahead of time. Here are some best practices: - Steak: Marinate the flank steak the night before. This adds flavor. - Corn: Grill or sauté the corn in advance. Store it in the fridge. - Salad Base: You can mix the greens, tomatoes, and onions early. Keep them separate until serving. - Dressing: Make the dressing ahead and store it in a jar. Shake before use. This salad shines on its own, but some sides enhance the meal: - Garlic bread adds a nice crunch. - A light soup, like tomato basil, balances flavors. - Roasted vegetables bring extra nutrition and color. - A fresh fruit platter offers a sweet finish. You can easily adjust this salad for different needs: - Gluten-Free: The recipe is already gluten-free. Just ensure all ingredients are certified gluten-free. - Dairy-Free: Skip the Gorgonzola or use a dairy-free cheese. - Nut Allergies: Always check dressings for hidden nuts. This recipe is nut-free. - Vegetarian: Swap the steak for grilled portobello mushrooms or chickpeas for protein. This salad is not only tasty but also nutritious. Here’s a breakdown: - Calories: Approximately 450 per serving. - Protein: About 30 grams from the steak and cheese. - Fats: Roughly 25 grams, mainly from olive oil and avocado. - Health Benefits: The salad has vitamins from greens, healthy fats from avocado, and protein from steak. Gorgonzola offers calcium and probiotics. For the full recipe, refer to the Balsamic Bliss: Steak & Gorgonzola Salad with Grilled Corn. This blog post covered how to make a delicious Balsamic Steak Gorgonzola Salad. We explored key ingredients like flank steak, mixed greens, and Gorgonzola cheese. You learned about prepping, grilling, and assembling your salad. I shared tips for perfect steak doneness and creative garnishes to impress guests. In the end, this salad is versatile and easy to customize, making it perfect for any season. Enjoy trying new flavors and variations. Don't hesitate to make it your own!

Balsamic Steak Gorgonzola Salad with Grilled Corn Delight

Craving a dish that’s both delicious and satisfying? Try my Balsamic Steak Gorgonzola Salad with Grilled Corn! This salad combines

- 1 lb flank steak, cut into bite-sized pieces - 4 medium red potatoes, diced into 1-inch cubes - 4 tablespoons unsalted butter, melted - 4 cloves garlic, finely minced - 1 teaspoon fresh rosemary, finely chopped - 1 teaspoon fresh thyme, finely chopped - Salt and freshly ground black pepper, to taste - 1 cup cherry tomatoes, halved - Fresh parsley, chopped (for garnish) - Aluminum foil When I cook, I love to focus on fresh ingredients. The flank steak gives a nice flavor, while the red potatoes add heartiness. Garlic is a must, as it brings everything together. The butter adds richness that makes each bite so satisfying. I use fresh herbs like rosemary and thyme. They give a lovely aroma and taste. Don't forget to season with salt and pepper. It enhances every flavor in the dish. Adding cherry tomatoes brings a pop of color and sweetness. I always finish with fresh parsley. It brightens up the dish and looks beautiful. Make sure you have aluminum foil ready. It keeps everything juicy while cooking. You can find the full recipe at the end of this section. Enjoy cooking this delicious meal! - Preheat grill or oven to 400°F (200°C). - Prepare a mixing bowl and aluminum foil. - Toss potatoes with butter, garlic, herbs, salt, and pepper. - Divide seasoned potatoes among foil packets. - Layer bite-sized steak on potatoes. - Add cherry tomatoes around steak. - Seal foil packets tightly. - Cook on grill or oven for 20-25 minutes. When you prepare these garlic butter steak and potato foil packets, each step counts. Start by preheating your grill or oven to ensure even cooking. Next, mix your diced red potatoes with melted butter, minced garlic, fresh herbs, salt, and pepper. This blend makes every bite flavorful. Take four pieces of aluminum foil and lay them flat. Divide the seasoned potatoes evenly among the packets. Then, add the bite-sized steak pieces on top. Drizzle the remaining butter over the steak for extra flavor. Scatter halved cherry tomatoes around the meat for color and taste. Now, fold the sides of the foil to the center and seal tightly. This keeps all the juices inside while cooking. Place the sealed packets on your grill or in the oven and let them cook for 20-25 minutes. This time will make your steak tender and your potatoes soft. After cooking, let the packets sit for a few minutes. Be careful when you open them, as steam will escape. Stir the contents gently for even flavor. Garnish with fresh parsley for a nice finish. You can find the full recipe in the previous section. Enjoy your delicious meal! - Always check for desired doneness of steak. Use a meat thermometer for best results. - Ensure potatoes are tender. You can poke them with a fork to test. - Serve on individual plates for an elegant touch. It makes the meal feel special. - Drizzle extra melted garlic butter before serving. This adds flavor and richness. - Allow packets to sit for a few minutes before opening. This helps flavors blend. - Garnish with fresh parsley for color and flavor. It makes the dish pop! These tips can elevate your Garlic Butter Steak and Potato Foil Packets. For the full recipe, check out the details mentioned earlier. {{image_4}} When making garlic butter steak and potato foil packets, you can mix it up! Here are some fun ideas to try. - Add bell peppers or zucchini for more flavor. These veggies cook well and add a nice crunch. - Substitute sweet potatoes for red potatoes. They bring a sweeter taste that many enjoy. - Use chicken breast instead of flank steak. Chicken cooks nicely and stays juicy. - Try shrimp for a seafood variation. Shrimp cooks fast and adds a different flavor. - Add crushed red pepper flakes or jalapeños for a kick. These ingredients will heat up your dish! - Incorporate spicy seasonings for heat. A little cayenne or chili powder can change things up. You can find the full recipe to get started on these variations! Enjoy the cooking adventure. After enjoying your meal, let leftovers cool completely. Place them in airtight containers. This helps keep the flavors fresh. Store them in the refrigerator for up to 3 days. You can easily enjoy this dish again! When it's time to reheat, you have options. You can use the oven or microwave. If you choose the oven, set it to 350°F. For the microwave, use a safe dish. To add more flavor, include a little extra butter or oil when reheating. This keeps the dish moist. If you want to save some for later, freezing is a great choice. Assemble the packets before cooking. Wrap them well in foil and place them in a freezer bag. You can store these for up to 3 months. Just remember to defrost them before cooking. This way, you can have a delicious meal ready anytime! To know if your steak is cooked, check the internal temperature with a meat thermometer. For medium-rare, aim for 130°F (54°C). For medium, look for 140°F (60°C). This ensures a juicy, flavorful steak. Yes, you can substitute with chicken or pork. Chicken thighs or pork tenderloin work well. Just adjust the cooking time as needed. Chicken should reach 165°F (74°C) for safety. No, the potatoes will cook in the foil packets along with the steak. Dicing them into 1-inch cubes helps them cook evenly and fully. This keeps the meal simple and quick. This blog covered how to make tasty steak and potato foil packets. We started with the main ingredients like flank steak and red potatoes, then moved on to step-by-step cooking instructions. I shared tips for cooking and presenting your dish beautifully. You can even try variations with different vegetables or proteins. With these easy steps, you can cook and enjoy a flavorful meal quickly. Using foil packets makes cleanup a breeze. Try this recipe to impress your family or friends!

Garlic Butter Steak and Potato Foil Packets Delight

Are you ready to elevate your dinner game? Garlic Butter Steak and Potato Foil Packets are simple, tasty, and fun!

To make Sweet Potato Cranberry Gratin, you need a mix of tasty items. Here’s what you will need: - 4 medium sweet potatoes, peeled and thinly sliced into rounds - 1 cup fresh or frozen cranberries (if using frozen, ensure they are thawed) - 1 cup heavy cream - 1 cup sharp cheddar cheese, shredded - 1/2 cup Parmesan cheese, grated - 2 cloves garlic, minced finely - 1 tablespoon fresh rosemary, chopped (or 1 teaspoon dried rosemary) - 1 teaspoon salt - 1/2 teaspoon black pepper - 1/4 teaspoon nutmeg - 2 tablespoons unsalted butter, for greasing the baking dish - 1/4 cup breadcrumbs (optional, for added crunch) Each ingredient plays a special role. The sweet potatoes bring a creamy texture. Cranberries add a tart burst that balances the dish. Heavy cream makes everything rich and smooth. Cheddar and Parmesan cheeses melt beautifully, creating a golden top. Garlic and rosemary offer fresh, bold flavors that brighten each bite. Seasonings like salt, black pepper, and nutmeg enhance all the tastes. Butter helps the gratin not stick to the dish. If you want a bit of crunch, sprinkle breadcrumbs on top before baking. Using these ingredients, you will create a delicious holiday dish that everyone will love. {{ingredient_image_2}} 1. First, preheat your oven to 375°F (190°C). This helps cook the gratin evenly. 2. Next, grease a 9x13 inch baking dish with 2 tablespoons of unsalted butter. This keeps the gratin from sticking. 3. In a medium bowl, mix 1 cup of cranberries with a sprinkle of salt. Let them sit for a few minutes to release their juices. 4. In a large mixing bowl, whisk together 1 cup of heavy cream, 2 cloves of minced garlic, 1 tablespoon of chopped rosemary, 1 teaspoon of salt, 1/2 teaspoon of black pepper, and 1/4 teaspoon of nutmeg. This creamy sauce adds flavor and richness. 1. Start by creating the first layer in your greased dish. Arrange half of the 4 medium sweet potatoes, thinly sliced, at the bottom. Overlap them slightly for even coverage. 2. Then, evenly distribute half of the cranberry mixture over the first layer of sweet potatoes. Ensure each slice has some cranberry. 3. Pour half of the creamy sauce mixture over the sweet potatoes and cranberries. Next, sprinkle half of the 1 cup of shredded cheddar cheese over this layer. 4. Repeat the layering process with the remaining sweet potatoes, followed by the rest of the cranberries and creamy mixture. Finally, top with the remaining cheddar cheese. If you want some crunch, sprinkle 1/4 cup of breadcrumbs on top. 1. Cover the dish with aluminum foil and place it in your preheated oven. Bake for 30 minutes. This helps the sweet potatoes cook through. 2. After 30 minutes, carefully remove the foil. This allows the top to brown. Continue baking for an additional 20-25 minutes. The gratin is done when the sweet potatoes are tender and the top is golden and bubbly. 3. Once finished, take the gratin out of the oven and let it rest for about 10 minutes. This resting time helps the gratin set, making it easier to serve. - Choosing the right sweet potatoes: I always pick medium-sized sweet potatoes. They should feel firm and smooth. Look for bright orange flesh; it has the best flavor. - Tips for cheese melting: Use shredded cheese for better melting. I like sharp cheddar for its strong flavor. Mixing it with Parmesan gives a nice depth. - Adjusting seasoning to taste: Taste your creamy sauce as you mix. You can add more salt or pepper. A pinch of nutmeg adds warmth. A little can go a long way. - Ideal pairings with roasted meats: This gratin pairs great with roasted turkey or ham. The sweet and savory mix complements the meat well. - Garnishing options: I love to add a sprig of fresh rosemary on top. It makes the dish look pretty and adds a nice smell. - Vegetarian main course ideas: Serve this gratin as a main dish for vegetarians. It is hearty and filling, perfect for a holiday table. Add a side salad for a complete meal. Pro Tips Layering is Key: Make sure to evenly distribute the sweet potatoes and cranberries in each layer for balanced flavor in every bite. Cheese Variety: Experiment with different cheese combinations, such as Gruyère or Gouda, for a unique flavor profile in your gratin. Resting Period: Allow the gratin to rest for 10 minutes after baking; this helps it set and makes serving easier. Breadcrumbs for Crunch: Adding breadcrumbs on top gives a delightful crunch; consider mixing them with herbs for extra flavor. {{image_4}} You can easily change the taste of your sweet potato cranberry gratin. Here are some ideas: - Herbs: Try adding different herbs like thyme or sage. These fresh flavors add depth and warmth to your dish. - Cheese: You can swap the cheddar for Gruyère or mozzarella. Each cheese brings its own unique flavor. Gruyère adds a nutty touch, while mozzarella offers a mild creaminess. Making this gratin fit different diets is simple. Here are some tips: - Vegan Alternatives: To make it vegan, use coconut cream instead of heavy cream. Replace the cheese with a vegan cheese or nutritional yeast. These swaps keep the flavor while meeting your needs. - Gluten-Free Modifications: For a gluten-free dish, skip the breadcrumbs or use gluten-free ones. This way, everyone can enjoy this delicious meal without worry. To keep your Sweet Potato Cranberry Gratin fresh, store it in an airtight container. Make sure it cools down first. This helps keep the flavors locked in. Place the gratin in your fridge. It will stay fresh for about 3 to 5 days. If you want to store it longer, consider freezing it. When you're ready to enjoy the leftovers, reheating them correctly is key. For the best texture, use an oven. Preheat your oven to 350°F (175°C). Place the gratin in an oven-safe dish. Cover it with foil to avoid drying out. Heat for about 20 to 25 minutes. You can also use a microwave if you're in a hurry. Place a portion on a microwave-safe plate. Heat it on medium power for 1 to 2 minutes. Keep an eye on it to avoid overheating. Enjoy your delicious gratin again! Yes, you can use other potatoes, like Yukon gold or russet. However, sweet potatoes give a nice sweetness. They also create a creamy texture that pairs well with cranberries. If you want a twist, mix sweet potatoes with another type. Just remember that cooking times might change slightly. The gratin is done when the top is golden and bubbly. You can also poke a sweet potato slice with a fork. If it goes through easily, it is ready. Let it rest for ten minutes after baking. This helps it set and makes serving easier. Yes, you can freeze the gratin. Prepare it but do not bake it. Cover it tightly with foil or wrap it well. You can freeze it for up to three months. When ready to eat, thaw it in the fridge overnight. Then, bake it until hot and bubbly. If you lack heavy cream, use whole milk mixed with butter. For each cup of cream, use 3/4 cup milk and 1/4 cup melted butter. This mix gives a similar richness. You can also use a plant-based milk, like coconut milk, for a dairy-free option. This blog post explored how to make a delicious Sweet Potato Cranberry Gratin. You learned about key ingredients, step-by-step baking instructions, and helpful tips. We also discussed variations and storage to keep your dish fresh. Knowing how to adapt this recipe can make it perfect for any meal. Try it today for a tasty side or main dish! Enjoy your cooking adventure with this comforting gratin.

Sweet Potato Cranberry Gratin Flavorful Holiday Dish

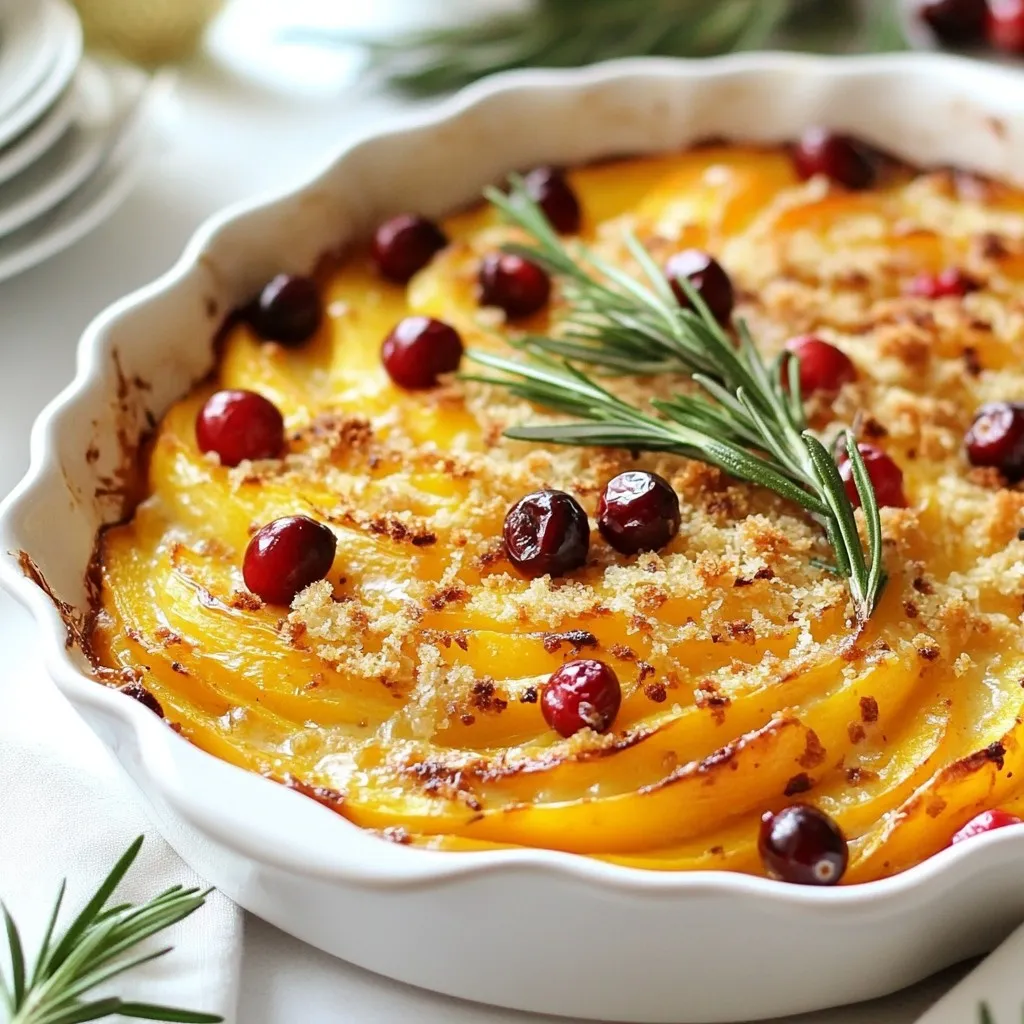
Get ready to impress your holiday guests with my Sweet Potato Cranberry Gratin! This vibrant dish combines smooth, sweet potatoes

For a delicious Greek Chicken Bowl, you need fresh and vibrant ingredients. Here’s what you will use:

Greek Chicken Bowls Flavorful Meal Prep Idea

Looking for a tasty meal prep idea that’s both healthy and easy to make? You’re in the right place! Greek

To make garlic knots, you need the following ingredients:

Garlic Knots Easy Recipe for Flavorful Appetizer

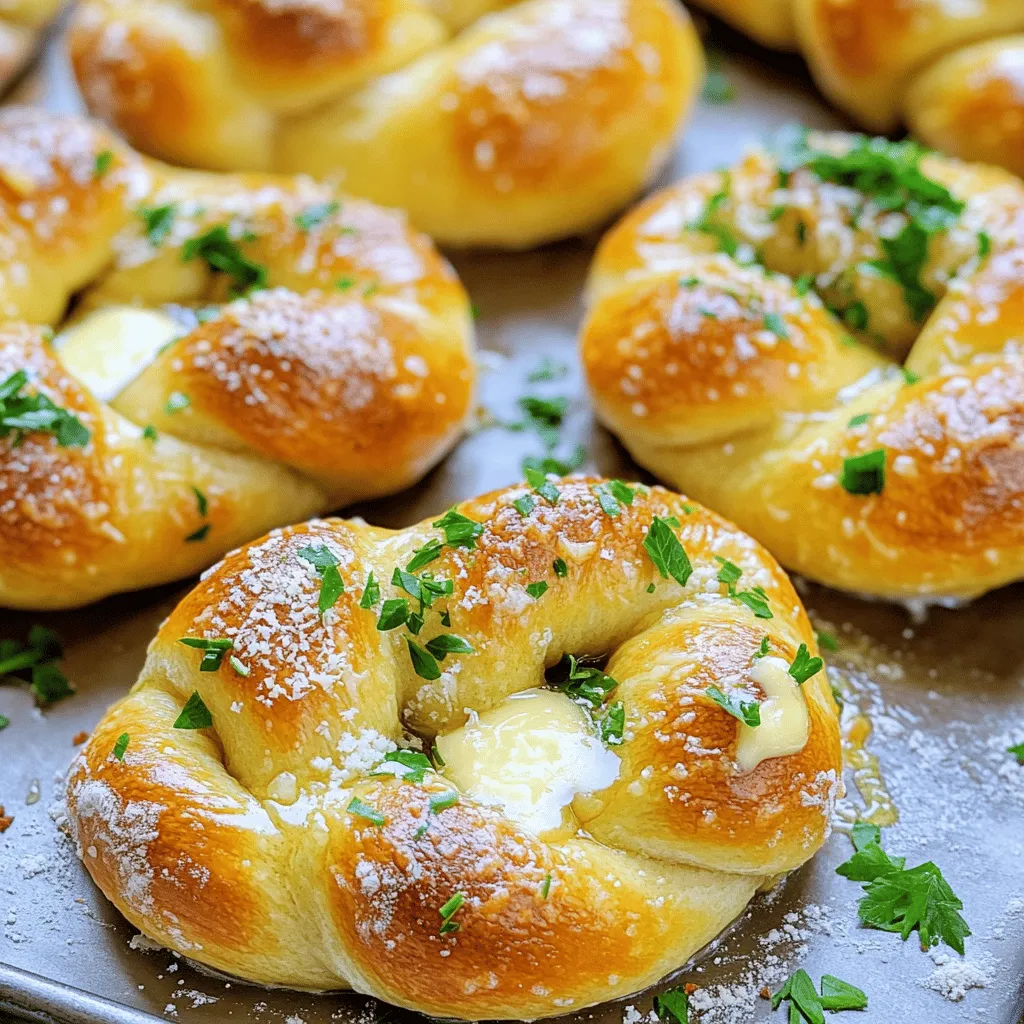
Looking for a delicious snack that’s easy to make? Try my Garlic Knots recipe! This flavorful appetizer combines simple ingredients

- 1 lb (450g) boneless, skinless chicken breasts, cut into bite-sized pieces - 1 cup all-purpose flour - 2 large eggs, beaten - 1 cup panko breadcrumbs - 1 teaspoon garlic powder - 1 teaspoon onion powder - 1 teaspoon paprika - ½ teaspoon black pepper - ½ teaspoon salt - ½ teaspoon cayenne pepper (optional, for a spicy kick) - Cooking oil (for frying, such as vegetable or canola) - Honey mustard or your favorite dipping sauce

Crispy Chicken Nuggets Simple and Tasty Recipe

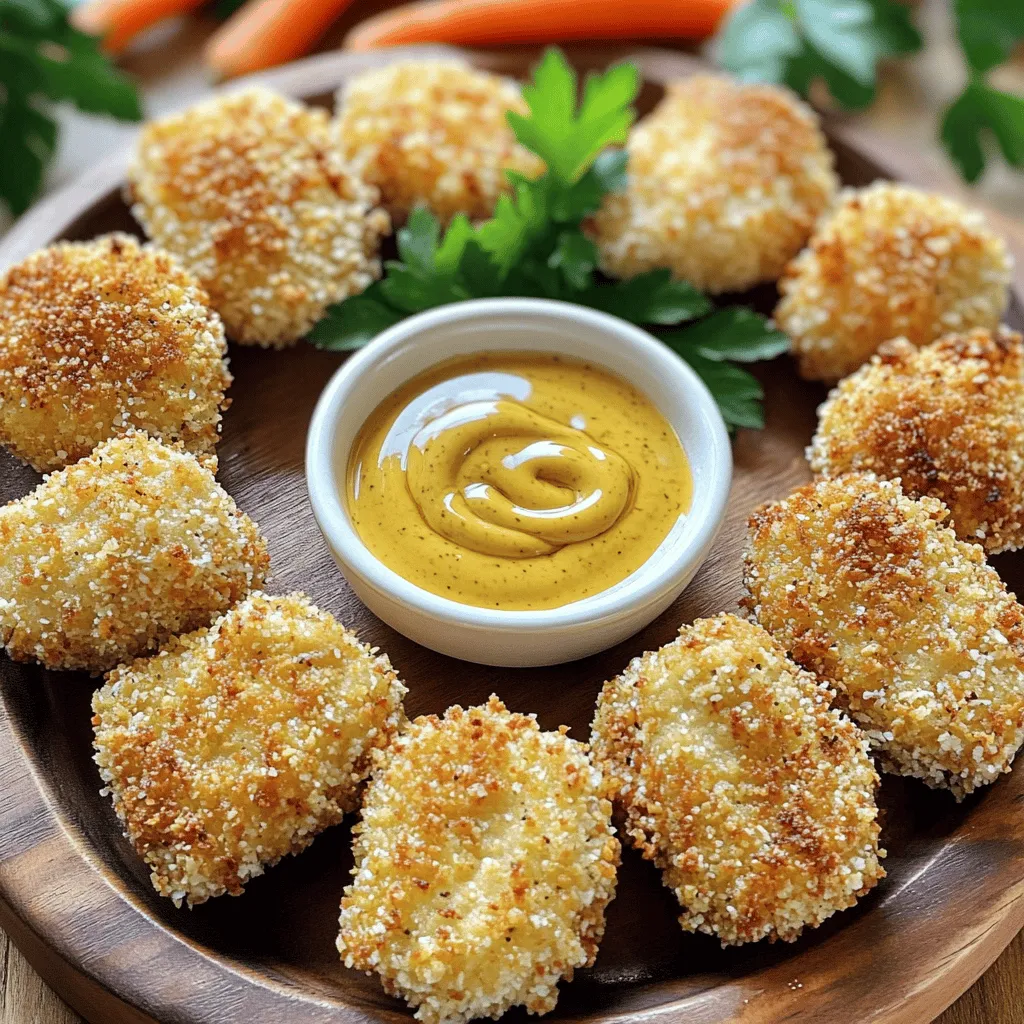
Looking for a fun and easy recipe for crispy chicken nuggets? You’ve come to the right place! These nuggets are

For my homemade biscuits, you will need: - 2 cups all-purpose flour - 1 tablespoon baking powder - 1/2 teaspoon baking soda - 1 teaspoon salt - 1/4 cup granulated sugar - 1/2 cup unsalted butter, cold and cubed - 3/4 cup buttermilk - 1 teaspoon vanilla extract - Optional: 1/2 cup shredded cheese (like cheddar) or fresh herbs for added flavor

Homemade Biscuits Simple and Flaky Recipe Guide

Are you ready to elevate your baking skills? This Homemade Biscuits Simple and Flaky Recipe Guide will teach you how

- 1 cup crushed graham crackers - 1/4 cup unsalted butter, melted - 2 tablespoons brown sugar - 1 (8 oz) package cream cheese, softened - 1/2 cup granulated sugar - 1 teaspoon vanilla extract - 1/2 cup sour cream - 1 large egg - 1 cup crushed pineapple, well-drained - Maraschino cherries for garnish

Mini Pineapple Upside-Down Cheesecakes Delightful Treat

Craving a delicious dessert that’s both fun and easy to make? Mini Pineapple Upside-Down Cheesecakes are the perfect treat! These

- 1 medium head of cauliflower, riced - 1 tablespoon extra virgin olive oil - 1 teaspoon garlic powder - 1 teaspoon smoked paprika - Salt and freshly ground black pepper to taste - 1 cup canned black beans, rinsed and drained - 1 cup corn (use fresh, frozen, or canned) - 1 red bell pepper, diced into small pieces - 1 ripe avocado, diced - 1 cup cherry tomatoes, halved - Juice of 1 lime - Fresh cilantro, finely chopped, for garnish

Cauliflower Rice Bowl Flavorful and Healthy Meal Option

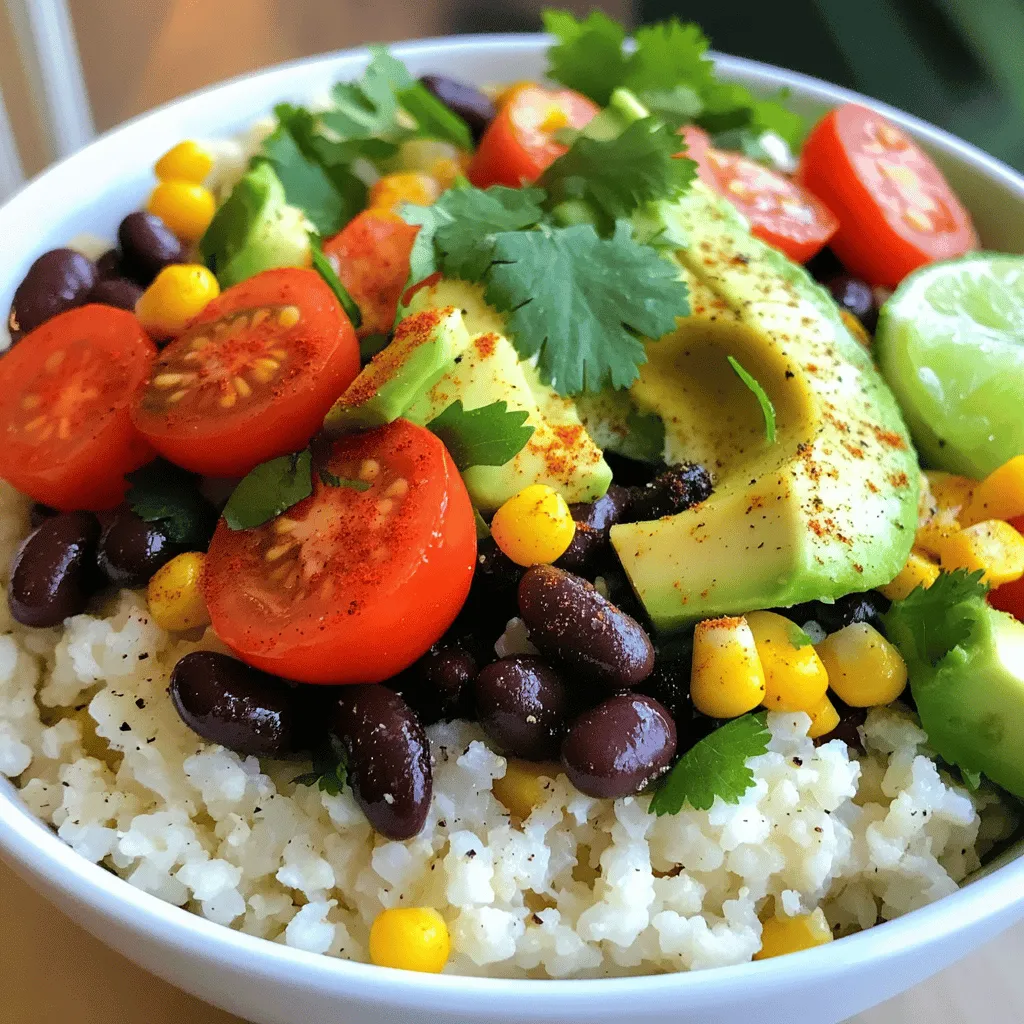
Looking for a colorful, tasty meal that’s also healthy? Look no further than the Cauliflower Rice Bowl! This dish packs

To make this tasty garlic butter chicken, you need a few key items:

Garlic Butter Chicken Juicy and Flavorful Delight

If you crave a dish that delights your taste buds, then garlic butter chicken is for you! This juicy and

Older posts
Newer posts
← Previous Page1 … Page101 Page102 Page103 … Page116 Next →

dsad

© 2025 recipesstation • Built with GeneratePress

Our Policies

  • Copyright Policy
  • Cookie Policy
  • GDPR Policy
  • Privacy Policy
  • Disclaimer
  • Terms Of Use

More Information

  • Home
  • About
  • Contact
  • Appetizers
  • Dessert
  • Dinner
  • Drinks
©2025, recipesstation About Back To Top