Skip to content
DisclaimerTerms Of UseGDPR PolicyCookie Policy

recipesstation

  • Home
  • Drinks
  • Appetizers
  • Dinner
  • Dessert
  • About
  • Contact
  • Privacy Policy
DisclaimerTerms Of UseGDPR PolicyCookie Policy

Emily

- Boneless Chicken Thighs - Orange Marmalade - Soy Sauce The main ingredients for this quick orange chicken dish are simple yet flavorful. First, you need boneless chicken thighs. They cook quickly and stay juicy. Next, orange marmalade gives a sweet and tangy taste. It adds a bright flavor that pairs perfectly with chicken. Lastly, soy sauce brings a savory note to the dish. Together, these three ingredients create a tasty meal in no time. - Large Mixing Bowl - Skillet or Frying Pan - Meat Thermometer To make this dish, you will need some basic kitchen tools. A large mixing bowl helps you combine the chicken and sauce easily. A skillet or frying pan is best for cooking the chicken. You want it to get nice and golden. A meat thermometer is important too. It ensures your chicken is cooked safely to 165°F (75°C). These tools make the cooking process smooth and fun. For the full recipe, check out the [Full Recipe]. - Cutting the Chicken Thighs Start by taking one pound of boneless chicken thighs. Cut them into bite-sized pieces. This makes them easy to cook and eat. Make sure each piece is uniform in size for even cooking. - Mixing the Sauce In a separate bowl, combine one cup of orange marmalade with two tablespoons of soy sauce. Stir well until the mixture is smooth. This sauce will bring sweet and salty flavors to the chicken. - Marinating the Chicken Pour the sauce over the chicken pieces in the mixing bowl. Toss gently to coat each piece well. Let it marinate for 15 to 20 minutes. This step is key. It allows the chicken to soak up all the tasty flavors. - Sizzling & Stir-Frying Heat a skillet over medium-high heat. Once it's hot, add the marinated chicken along with any leftover sauce. Cook for 8 to 10 minutes, stirring often. This helps the chicken cook through and caramelize a bit. Use a meat thermometer to check that the chicken reaches 165°F (75°C). - Transfer to Serving Dish After cooking, remove the chicken from the heat. Carefully transfer it to a serving dish. - Garnishing Suggestions For a beautiful touch, serve the chicken over fluffy white rice. Add sliced green onions and sesame seeds on top. This not only adds color but also enhances the dish's flavor. - Ensuring Proper Cooking Temperature Start by heating your skillet over medium-high heat. This helps the chicken cook evenly. Use a meat thermometer to check if the chicken reaches 165°F (75°C). This ensures it is safe to eat. - Achieving the Right Caramelization Cooking the chicken until it caramelizes is key. Stir it gently to avoid burning. The sugar in the orange marmalade helps create a nice brown color. This adds flavor and makes the dish look great. - Accompanying Side Dishes Serve your orange chicken with white rice. The rice soaks up the flavorful sauce well. You can also add steamed veggies, like broccoli or snap peas. They add color and nutrients to your meal. - Pairing with Drinks A light drink pairs well with this dish. Try iced tea or a citrus soda. For adults, a crisp white wine can complement the flavors nicely. Choose drinks that won’t overpower the sweet taste of the chicken. {{image_4}} Switching chicken for tofu can make this dish vegan-friendly. Tofu absorbs flavors well. Use firm or extra-firm tofu. Cut it into cubes, just like the chicken. Marinate it in the same orange-marmalade mix for 15-20 minutes. This will help it soak up the zest. Using other citrus marmalades can add a twist. Try lemon or grapefruit marmalade. Each type brings a unique taste. You can mix and match based on what you have at home. This keeps your meal exciting and fresh. Adding garlic or ginger can boost the flavor. Both ingredients add warmth and depth. Mince one clove of garlic or a small piece of ginger. Mix them into the orange-marmalade sauce. This extra step will enhance the dish's aroma and taste. Incorporating vegetables makes the meal more colorful and healthy. You can add bell peppers, broccoli, or snap peas. Chop them into bite-sized pieces and stir-fry with the chicken. This not only adds nutrition but also brightens the dish. For the full recipe, refer to the earlier section. Enjoy your cooking adventure! How to Store Leftovers After enjoying your meal, let any leftovers cool down first. Place the orange chicken in a shallow dish. Cover it tightly with plastic wrap or a lid. This helps keep the chicken fresh. You can store it in the fridge for up to three days. Recommended Storage Containers Use airtight containers for best results. Glass or plastic containers work well. Choose a size that fits your portion needs. If you plan to freeze, use freezer-safe bags. This will prevent freezer burn. Best Methods to Reheat Orange Chicken To reheat, you have a few options. The microwave is quick and easy. Place the chicken in a microwave-safe dish. Cover it with a damp paper towel to keep moisture in. Heat in short bursts, stirring in between. You can also use the stovetop. Heat a skillet on medium heat, adding the chicken. Stir until hot. Avoiding Dryness To avoid drying out the chicken, add a splash of water or broth. This creates steam and keeps it moist. For the microwave, you can add a little orange juice for extra flavor. Always check that it’s heated to 165°F (75°C) to ensure safety. Yes, you can use frozen chicken. Just make sure to thaw it first. Thawing helps the chicken cook evenly. You can leave it in the fridge overnight or use the microwave for quick thawing. After thawing, cut it into bite-sized pieces as usual. You can store leftover orange chicken for up to three days in the fridge. Place the chicken in an airtight container to keep it fresh. Make sure it cools down before you seal it. This will help prevent condensation and sogginess. Absolutely! You can marinate the chicken a few hours before cooking. This allows the chicken to soak up the flavors. You can also cook it in advance and store it in the fridge. Just reheat it when you are ready to serve. For a gluten-free option, try using tamari sauce. Tamari is similar to soy sauce but made without wheat. You can also use coconut aminos for a sweeter taste. Both options work well in this orange chicken recipe. Yes! To add heat, include red pepper flakes or sriracha in the sauce mix. Start with a small amount and adjust to your taste. You can also add fresh ginger for a spicy kick. Enjoy experimenting with flavors! For the full recipe, check out the zesty 3-ingredient orange chicken recipe. This blog post covers how to make a tasty orange chicken dish. We discussed key ingredients, the right equipment, and step-by-step instructions. You learned cooking tips, serving ideas, and variations for this recipe. Storing and reheating tips are also shared. Now you can confidently cook this dish and impress everyone. Enjoy making your orange chicken, and don't forget to have fun!

3 Ingredient Orange Chicken Quick and Easy Meal

Looking for a quick and easy meal? This 3 ingredient orange chicken recipe is your answer! With just boneless chicken

To make One Pot Taco Pasta, you need a few key items. Here’s the list: - 1 lb ground beef (or ground turkey) - 1 medium onion, diced - 2 cloves garlic, minced - 1 bell pepper, diced - 1 packet of taco seasoning (about 1 oz) - 1 can (14 oz) diced tomatoes with green chilies - 2 cups beef broth (or chicken broth) - 8 oz pasta (shells or rotini) - 1 can (15 oz) black beans, rinsed and drained - 1 cup corn (frozen or canned) - 1 cup shredded cheddar cheese - Salt and pepper, to taste - Fresh cilantro, chopped (for garnish) - Sour cream (for serving) You can make this dish your own by adding some optional items. Consider these: - Jalapeños for heat - Avocado for creaminess - Lime juice for brightness - Extra veggies like zucchini or spinach - Different cheese types like Monterey Jack or pepper jack The quality of your ingredients matters. Use fresh vegetables for the best flavor. Opt for good quality meat, as it impacts the dish. I prefer using low-sodium broth to control salt levels. For beans and tomatoes, choose brands with no added sugar or preservatives. Fresh herbs, like cilantro, will elevate the dish and add a burst of freshness. Enjoy your cooking! To make One Pot Taco Pasta, start by cooking the meat. Use a large pot or Dutch oven. Heat it over medium heat. Add 1 pound of ground beef or turkey. Cook until it turns brown. Break it apart with a wooden spoon. If there's extra fat, drain it. Next, add 1 diced onion, 2 minced garlic cloves, and 1 diced bell pepper. Cook for 3-4 minutes until soft and fragrant. Sprinkle 1 packet of taco seasoning over the mixture. Stir well and let it cook for 1 minute. This helps the flavors blend. Then, pour in 1 can of diced tomatoes and 2 cups of beef broth. Add 8 ounces of pasta. Stir to make sure the pasta is covered in liquid. Bring everything to a boil. Once boiling, reduce the heat to low. Cover the pot and let it simmer for 10-12 minutes. Stir occasionally until the pasta is al dente. If it gets too dry, add a splash of broth or water. After the pasta cooks, mix in 1 can of drained black beans and 1 cup of corn. Cook for an extra 3-5 minutes until warm. Remove the pot from heat and add 1 cup of shredded cheddar cheese on top. Cover the pot for a couple of minutes, letting the cheese melt. Finally, taste and add salt and pepper as needed. Garnish with chopped cilantro and serve with sour cream. The total cooking time is about 30 minutes. Prep takes 10 minutes, while cooking takes about 20 minutes. Cook on medium heat until boiling, then lower to a simmer. Keep the pot covered during cooking to lock in heat and flavor. To keep the flavors bright, use fresh ingredients. Fresh herbs boost taste. Taste as you go; adjust seasoning if needed. If you want more spice, add hot sauce or jalapeños. For extra creaminess, mix in more sour cream before serving. To make your One Pot Taco Pasta perfect, follow these tips: - Brown the meat well for deep flavor. - Use fresh veggies for the best taste. - Stir often to prevent sticking. - Adjust the liquid based on pasta type. - Let the dish rest after cooking to blend flavors. Many cooks make simple mistakes. Here are some to watch for: - Not draining excess fat from the meat can make the dish greasy. - Skipping the sauté step for veggies can lead to dull flavors. - Adding too much liquid can make it soupy. - Overcooking the pasta will result in mushy noodles. - Forgetting to taste before serving can leave the dish bland. For the best experience, try these serving ideas: - Serve the pasta straight from the pot for a rustic feel. - Use bowls for individual servings, topping with extra cheese. - Add fresh cilantro for a pop of color and flavor. - Offer sour cream on the side for added creaminess. - Pair with tortilla chips for a fun crunch. For the full recipe, check out the One Pot Taco Pasta Delight. {{image_4}} You can easily make this dish meat-free. Swap the ground beef with lentils or mushrooms. These ingredients add great texture and flavor. Use vegetable broth instead of beef broth for a lighter touch. You can also add more veggies, like zucchini or spinach. This makes the dish even more colorful and healthy. For a gluten-free meal, choose gluten-free pasta. There are many great options made from rice or chickpeas. Ensure that your taco seasoning is gluten-free as well. Many brands offer gluten-free blends. This way, you can enjoy the same great taste without the gluten. Want to spice things up? Add some diced jalapeños or a splash of hot sauce. You can also mix in some salsa for extra flavor. If you love cheese, try different types like pepper jack or queso fresco. For a fresh twist, add lime juice and zest before serving. This brightens the dish and adds a nice zing. Check out the Full Recipe for more ideas! To keep your One Pot Taco Pasta fresh, let it cool first. Once cool, place it in an airtight container. Store it in the fridge for up to three days. Make sure to label your container with the date. This helps you track freshness. When reheating, use a microwave or stovetop. If using a microwave, heat in 30-second intervals. Stir between intervals to ensure even heating. If using the stovetop, add a splash of broth to keep it moist. Heat over low until warm. For longer storage, freeze your One Pot Taco Pasta. Use a freezer-safe container or bag. It can last up to three months in the freezer. Thaw in the fridge overnight before reheating. This keeps the texture and flavor intact. For the full recipe, visit the main article. To make One Pot Taco Pasta spicier, add extra taco seasoning or diced jalapeños. You can also mix in hot sauce or crushed red pepper flakes. Start with small amounts, then taste as you go. This way, you can find the perfect heat level for you. Yes, you can use any pasta you like! Shells, rotini, or even penne work well. Just adjust cooking time based on the pasta shape. Follow the package directions to ensure it cooks perfectly in the pot. For a lighter option, use ground turkey or chicken. You can also try lentils or chopped mushrooms for a vegetarian twist. Each substitute will add a unique taste and texture to the dish. One Pot Taco Pasta can last in the fridge for about 3 to 5 days. Store it in an airtight container to keep it fresh. Reheat it on the stove or in the microwave before serving. Yes, to make it dairy-free, skip the cheese and sour cream. Use a dairy-free cheese alternative if you want some creaminess. You can also add avocado slices for a rich flavor and texture. For the best results, check the labels on all ingredients to ensure they are dairy-free. For the full recipe, check out the detailed steps and ingredients list! In this post, we covered the essential ingredients for One Pot Taco Pasta and how to customize it. You learned the cooking steps, timing, and tips to keep flavors bold. We shared tricks to perfect your dish and discussed variations for different diets. Finally, we provided storage info and FAQs to help you enjoy it longer. One Pot Taco Pasta is fun to make and easy to enjoy. With these tips, you're ready to create a tasty meal!

One Pot Taco Pasta Quick and Flavorful Dinner Treat

Looking for a quick and tasty dinner? One Pot Taco Pasta is your answer! It combines bold flavors, easy steps,

The magic of fudgy chewy brookies lies in two layers: brownie and cookie. Each layer brings its own charm and flavor. Here’s what you need to create this delightful treat. - 1 cup unsalted butter, melted - 1 1/4 cups packed brown sugar - 1/2 cup granulated sugar - 4 large eggs - 1 cup all-purpose flour - 1/2 cup cocoa powder - 1 teaspoon vanilla extract - 1/4 teaspoon salt - 1 cup semi-sweet chocolate chips - 1/2 cup unsalted butter, softened to room temperature - 1/2 cup granulated sugar - 1/2 cup packed brown sugar - 1 large egg - 1 teaspoon vanilla extract - 1 1/2 cups all-purpose flour - 1/2 teaspoon baking soda - 1/2 teaspoon salt - 1 cup semi-sweet chocolate chips These ingredients create a rich, sweet, and chewy dessert. The brownie layer is dense and chocolatey, while the cookie layer adds a soft, chewy texture. You can find the full recipe details to guide you through the process of making these delicious brookies. - Set the oven temperature to 350°F (175°C). - Prepare a 9x13 inch baking pan by greasing it or lining it with parchment paper. - In a bowl, combine melted butter, brown sugar, and granulated sugar. - Whisk until smooth and creamy. - Add eggs one at a time. Mix well after each addition. - Stir in the vanilla extract. - In another bowl, mix all-purpose flour, cocoa powder, and salt. - Gradually add this to the wet mixture and stir until just combined. - Fold in the chocolate chips gently. - In a new bowl, cream softened butter with brown and granulated sugar. - Mix until light and fluffy, about 2-3 minutes. - Beat in the egg and vanilla extract. - In a separate bowl, whisk together all-purpose flour, baking soda, and salt. - Gradually mix this into the wet ingredients until just combined. - Fold in the chocolate chips. - Pour the brownie batter into the prepared baking pan. - Spread it evenly across the bottom. - Using a spoon, scoop dollops of the cookie dough on top of the brownie layer. - With a knife, lightly swirl the two batters to create a marbled effect. - Place the pan in the oven and bake for 25-30 minutes. - Check for doneness by inserting a toothpick into the center; it should come out with moist crumbs. - After baking, let the brookies cool on a wire rack for about 20 minutes. - Once cool, cut into squares for serving. To get that ideal fudgy or chewy texture in your brookies, adjust your baking time. For fudginess, take them out when a toothpick shows moist crumbs. For more chewiness, bake them a bit longer. Clean mixing is key. Make sure to mix your wet and dry ingredients separately before combining them. This helps ensure even mixing. Overmixing can lead to tough brookies. A gentle hand is all you need! Serving these brookies warm is a must! I love adding a scoop of vanilla ice cream on top. Drizzle some warm chocolate sauce over it for a decadent touch. It’s a crowd-pleaser! For special occasions, cut the brookies into fun shapes using cookie cutters. You can also top them with whipped cream or colorful sprinkles. This adds a festive vibe to any dessert table. To make your baking easy, invest in a few essential tools. A sturdy mixing bowl, whisk, and rubber spatula are must-haves. A 9x13 inch baking pan is perfect for this recipe. When using your baking pan, make sure to grease it well or line it with parchment paper. This ensures easy removal after baking. You don't want to lose any of that delicious brownie or cookie goodness! {{image_4}} You can easily change up your brookies. Adding nuts like walnuts or pecans gives a nice crunch. If you love chocolate, try using dark chocolate chips or white chocolate. Each choice adds a fun twist to the classic taste. Want to make brookies that fit special diets? You can use gluten-free flour instead of all-purpose flour. This swap keeps the brookies tasty for everyone. For vegan options, replace the eggs with applesauce or flaxseed. You can use coconut oil instead of butter, too. These changes keep the flavor while making them friendly for various diets. Seasonal flavors can make brookies extra special. Try adding peppermint extract for a holiday touch or pumpkin spice in the fall. You can also mix in festive toppings like crushed candy canes or seasonal sprinkles. These small changes can make your brookies stand out and match the season perfectly. For the complete recipe, check the Full Recipe. To keep your fudgy chewy brookies fresh, store them in an airtight container. This helps seal in moisture and flavor. Place a piece of parchment paper between layers if you stack them. This way, they won’t stick together. Here’s how to store them for optimal freshness: - Room Temperature: Keep brookies at room temperature for up to three days. - Cool Completely: Make sure they are cool before storing to prevent sogginess. Using airtight containers is key. You can use glass or plastic. Both options work well. Just ensure they are sealed tightly. You can freeze brookies to enjoy later. Here are the steps: 1. Cool Completely: Let the brookies cool to room temperature. 2. Wrap Well: Wrap each piece in plastic wrap. This helps avoid freezer burn. 3. Place in a Bag: Put the wrapped brookies in a freezer bag. Seal it well to keep air out. To thaw and serve: - Thawing: Place brookies in the fridge overnight or on the counter for a few hours. - Reheat: If you want them warm, pop them in the microwave for about 15 seconds. Brookies stay fresh for about three days at room temperature. After this time, they may start to dry out. Look for these signs of spoilage: - Dry Texture: If they feel dry and crumbly, it’s time to toss them. - Off Smell: Any strange or sour smell means they are no longer good. By following these storage tips, you can enjoy your fudgy chewy brookies for longer. For the full recipe, check out the earlier section! Fudgy chewy brookies blend brownies and cookies into one tasty treat. The bottom layer is rich and fudgy, while the top layer is soft and chewy. This mix creates a delightful experience in every bite. You get the best of both worlds with these brookies. They are perfect for anyone who loves chocolate. Yes, you can make brookies ahead of time. I often prepare them a day before serving. Just bake, cool, and store them in an airtight container. This keeps them fresh. You can also freeze them for longer storage. Just wrap each piece in plastic wrap and place them in a freezer bag. Thaw them at room temperature before serving. To check if your brookies are done, use the toothpick test. Insert a toothpick into the center. If it comes out with moist crumbs, they are ready. If it has wet batter on it, bake for a few more minutes. Be careful not to overbake, as this can dry them out. Yes, you can substitute some ingredients. For the butter, you can use coconut oil or vegan butter. Instead of eggs, try unsweetened applesauce or flaxseed meal mixed with water. You can also switch out the chocolate chips for white chocolate or butterscotch chips. Just keep in mind that these changes can affect taste and texture. Brookies are delicious on their own, but you can enhance them. Serve them warm with a scoop of vanilla ice cream. A drizzle of chocolate sauce adds extra flair. Fresh berries or whipped cream also make great toppings. These pairings add flavor and make for a great dessert. You can adjust the sweetness by changing the sugar. To reduce sweetness, cut back on the sugar by 1/4 cup. If you want them sweeter, add an extra 1/4 cup of sugar. You can also use a sugar substitute like stevia or monk fruit. Just remember to check the conversion ratios on the package for best results. For the full recipe, check out the detailed instructions above. In this blog post, we covered how to make delicious fudgy-chewy brookies and what ingredients you need. You learned to layer brownie and cookie dough for a tasty treat. We discussed tips for perfect texture, serving ideas, and even variations for your brookies. Remember, baking is all about having fun and experimenting. So don’t hesitate to try new flavors and variations. Enjoy your delicious brookies! Happy baking!

Fudgy Chewy Brookies Soft and Decadent Dessert Delight

Indulge your sweet tooth with Fudgy Chewy Brookies—an irresistible blend of brownies and cookies! This dessert is soft, decadent, and

- 8 oz. farfalle pasta (or your favorite pasta shape) - 1 cup cherry tomatoes, halved - 1 cup cucumber, diced - 1/2 cup Kalamata olives, pitted and sliced - 1/2 cup feta cheese, crumbled - 1/4 cup extra-virgin olive oil - 2 tablespoons fresh lemon juice - 1 teaspoon dried oregano - Salt and pepper to taste - Fresh herbs (basil, mint) - Other vegetables (bell peppers, spinach) I love using farfalle pasta because it adds a fun shape to the dish. You can pick any pasta you like. Cherry tomatoes bring sweetness, while cucumbers add crunch. Kalamata olives give a salty kick, and feta cheese adds creaminess. For the dressing, I use high-quality olive oil and fresh lemon juice for zest. Do not skip the oregano; it gives that classic Mediterranean taste. Feel free to add fresh herbs like basil or mint for extra flavor. You can also mix in other vegetables, such as bell peppers or spinach, for more texture and color. For the full recipe, check out the complete details. Enjoy crafting this fresh and flavorful Mediterranean pasta salad! - Boil pasta in salted water until al dente. - Drain and rinse with cold water to stop cooking. I start by boiling a pot of salted water. It should taste like the sea. Add 8 oz. of farfalle pasta. Cook it until it is al dente, firm but not hard. This takes about 8-10 minutes. When your timer goes off, drain the pasta in a colander. Rinse it with cold water. This helps stop the cooking process and keeps the pasta from sticking together. Set it aside to cool. - Combine tomatoes, cucumber, olives, feta, onion, and parsley in a bowl. - Gently mix ingredients without smashing. In a large mixing bowl, toss together 1 cup of halved cherry tomatoes, 1 cup of diced cucumber, 1/2 cup of sliced Kalamata olives, and 1/2 cup of crumbled feta cheese. Add in 1/4 cup of finely chopped red onion and 1/4 cup of fresh parsley. Use a spatula to mix gently. You want the veggies to stay whole. - Whisk together olive oil, lemon juice, oregano, salt, and pepper. For the dressing, grab a small bowl. Whisk together 1/4 cup of extra-virgin olive oil and 2 tablespoons of fresh lemon juice. Add in 1 teaspoon of dried oregano, and a pinch of salt and pepper. This dressing adds a zesty kick to the salad. Make sure it’s well mixed. - Add cooled pasta to the vegetable mixture. - Pour dressing over and toss gently. Now, add the cooled pasta to your bowl of veggies. Pour the dressing over the top. Use a large spoon to toss everything gently. Make sure the pasta gets coated well with the dressing. Taste it. Adjust the salt and pepper if needed. - Cover and refrigerate for at least 30 minutes. Cover the bowl with plastic wrap or a lid. This salad needs to chill for at least 30 minutes. This time helps all the flavors blend together. After chilling, your Mediterranean pasta salad will be fresh and flavorful, ready to serve! - Use salted water for boiling. This step helps the pasta absorb flavor. - Rinse pasta with cold water after cooking. This stops the cooking process and prevents stickiness. - Let the salad sit for a while. This allows the flavors to blend and deepen. - Adjust seasoning to fit your taste. Everyone has different preferences, so add salt or pepper as you like. - Serve in a shallow bowl. It makes the salad look more appealing and allows for easy serving. - Garnish with lemon slices and fresh parsley. This adds color and a fresh taste to your dish. For complete instructions, check the Full Recipe. {{image_4}} You can change this salad based on what's in season. For example, swap in fresh zucchini or asparagus for a bright crunch. Roasted red peppers add a smoky taste, enhancing the salad's depth. Using seasonal veggies makes the dish lively and fresh. Need to add protein? Grilled chicken or shrimp works great. These additions give the salad a hearty touch. For a plant-based option, add chickpeas. They are full of protein and blend well with the Mediterranean flavors. If you need a gluten-free option, choose gluten-free pasta. It still tastes great and fits your needs. For a vegan twist, use dairy-free feta. This keeps the salad creamy while staying plant-based. These adjustments help everyone enjoy this tasty dish. For the Full Recipe, check the earlier section! To keep your Mediterranean pasta salad fresh, store it in an airtight container in the fridge. This helps keep the flavors locked in. It tastes best when eaten within 3-4 days. After that, the ingredients may start to lose their crunch. I do not recommend freezing this salad. When you freeze pasta, it may become mushy when thawed. If you decide to freeze it, store the dressing separately. This way, you can add it fresh when you serve the salad. You can serve this pasta salad cold or at room temperature. Avoid reheating it, as this may change the texture. The fresh tastes of the vegetables and feta shine when served as is. For the best experience, enjoy it straight from the fridge. Mediterranean pasta salad typically lasts 3-4 days when stored properly. Keep it in an airtight container to maintain freshness. After that, the flavors may fade, and the veggies can become soggy. Yes, you can make this salad up to 24 hours ahead for best flavor. Preparing it early allows the ingredients to blend well. The longer it sits, the more the flavors mix, making each bite even tastier. If you need a substitute for feta cheese, goat cheese works well. Vegan feta is another good option for dairy-free diets. Both choices add a nice creaminess that complements the salad. Absolutely! This recipe is great for meal prepping. The salad stays tasty over time, making it easy to grab for lunch or dinner. Plus, it holds up well, so you can enjoy it all week. For the full recipe, check out the earlier sections! This Mediterranean Pasta Salad is full of fresh ingredients and flavor. You learned about key ingredients like farfalle pasta, cherry tomatoes, and olives, along with a simple dressing. I shared steps to make and chill the salad for the best taste. You can customize it with seasonal veggies and proteins. Remember to store leftovers properly for the best flavor. Enjoy this dish at your next gathering or as a tasty meal prep option!

Mediterranean Pasta Salad Fresh and Flavorful Recipe

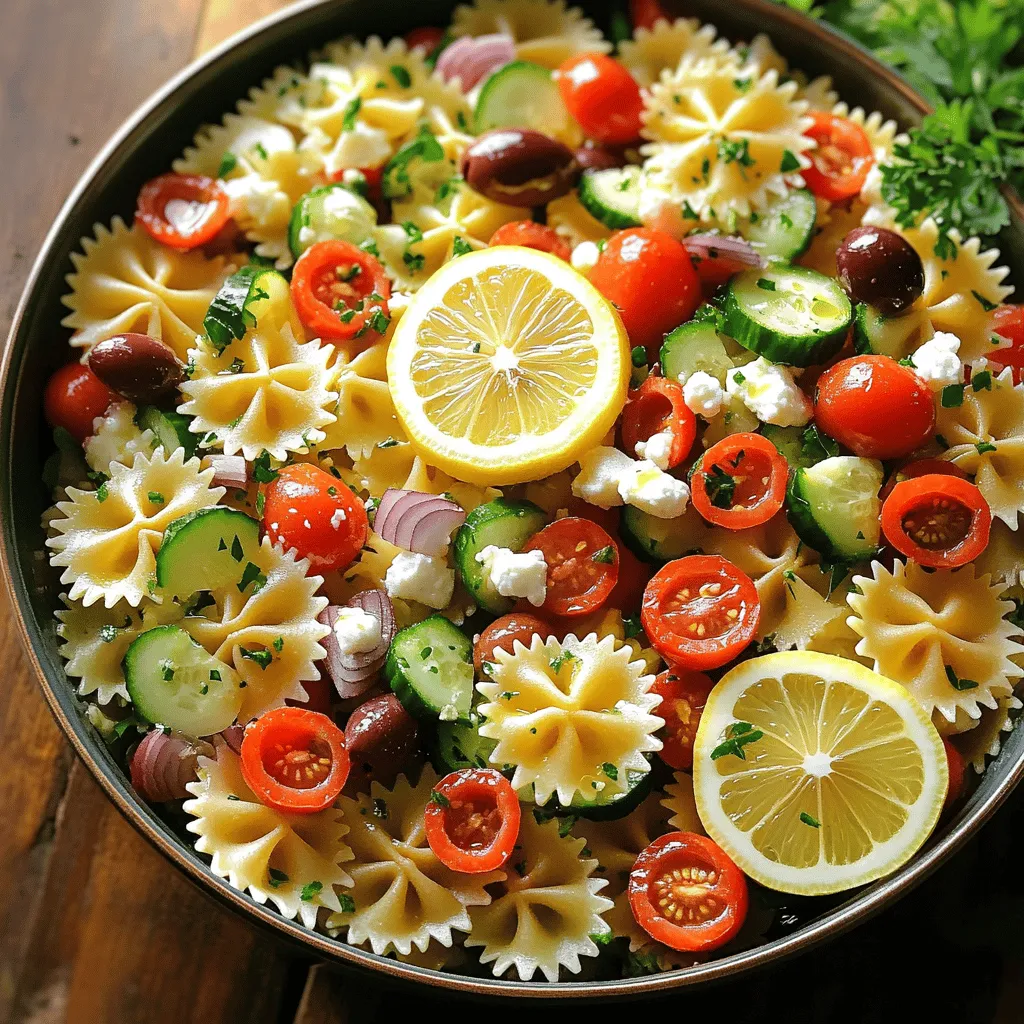
Looking for a dish that bursts with flavor and freshness? Try my Mediterranean Pasta Salad! This recipe combines vibrant veggies,

For these savory chicken club lettuce wraps, you need fresh and tasty ingredients. Here’s what you will use: - 2 cups cooked chicken breast, shredded - 1/2 cup cooked bacon, crumbled - 1 ripe avocado, sliced - 1 medium tomato, diced - 1/2 cup shredded cheddar cheese - 1/4 cup mayonnaise - 1 tablespoon Dijon mustard - 1 tablespoon fresh lemon juice - Salt and black pepper to taste - 12 large romaine or butter lettuce leaves - Fresh parsley, chopped (for garnish) These essentials create a strong flavor base. The chicken and bacon provide protein, while the avocado adds creaminess. You can make your wraps even better with some optional add-ins. Here are a few ideas: - Sliced cucumber for crunch - Pickles for tang - Red onion for a sharp bite - Jalapeños for heat - Fresh herbs like cilantro or basil Feel free to mix and match these add-ins. They can enhance the taste and texture of your wraps. Each wrap is not only tasty but also packs a nutritious punch. Here’s a rough breakdown per wrap: - Calories: 300-350 - Protein: 25g - Carbohydrates: 10g - Fat: 20g These wraps are low in carbs and high in protein, making them great for a healthy meal. You can enjoy them guilt-free while satisfying your hunger. For the full recipe, check out the Chicken Club Lettuce Wraps section. To make Chicken Club Lettuce Wraps, start with your ingredients. Gather 2 cups of cooked chicken breast, shredded. You can use leftover chicken or rotisserie chicken for ease. Next, crumble 1/2 cup of cooked bacon. Then, dice 1 medium tomato and slice 1 ripe avocado. You will also need 1/2 cup of shredded cheddar cheese. In a medium mixing bowl, combine the shredded chicken, crumbled bacon, diced tomato, and cheddar cheese. Stir gently to mix well. In a separate small bowl, whisk together 1/4 cup of mayonnaise, 1 tablespoon of Dijon mustard, and 1 tablespoon of fresh lemon juice. Add a pinch of salt and black pepper to taste. This dressing adds flavor and moisture to your wrap. Now, it’s time to assemble. Take 12 large romaine or butter lettuce leaves. Lay one leaf flat on a clean surface. Place about 1/4 cup of the chicken mixture in the center of the leaf. Add a few slices of avocado on top for creaminess. Next, fold the sides of the lettuce leaf over the filling. Roll it up tightly like a burrito. If you prefer, you can serve the wraps open-faced for a different look. Repeat this process until all wraps are ready. Arrange the finished wraps on a large platter. Garnish with freshly chopped parsley for color. You can also add extra slices of avocado and diced tomatoes around the wraps for a pretty presentation. Consider serving toothpicks with the wraps for easy eating. A small bowl of extra dressing on the side makes a great dipping option too. This adds a fun touch to your meal. For the full recipe, check this out: Chicken Club Lettuce Wraps 🥬. To keep your Chicken Club Lettuce Wraps fresh, store them in an airtight container. Make sure to separate the filling from the lettuce. This keeps the lettuce crisp. You can enjoy leftovers for up to three days. Just reheat the filling if needed. You can prepare the filling a day before serving. Mix the chicken, bacon, cheese, and veggies in a bowl. Cover it and store it in the fridge. When ready to serve, just cut the lettuce and assemble the wraps. This saves time on busy days. If you have dietary needs, you can easily adapt this recipe. For a lower-carb option, use turkey or tofu instead of chicken. You can also swap the mayo for Greek yogurt or avocado for a healthier twist. Always check for allergens in ingredients to stay safe. This recipe is all about making delicious food easy! For the full recipe, check out the details above. {{image_4}} You can swap the chicken for other proteins. Try turkey, shrimp, or even tofu. Each choice brings its own taste and texture. Ground beef or pork can also work well. They add a rich flavor that many love. Besides the classic mayo and mustard mix, you have many choices. A yogurt-based dressing can add a tangy twist. You could also use ranch or a spicy chipotle sauce. If you like it sweet, try a honey mustard. Each dressing changes the flavor and feel of the wrap. Add herbs or spices for an extra kick. Fresh cilantro or basil can brighten the dish. You might also sprinkle in some garlic powder or smoked paprika. For crunch, try adding sliced radishes or chopped nuts. Each boost can make your wraps even more exciting. Check out the Full Recipe for more ways to enjoy these wraps! Store any leftover chicken club lettuce wraps in an airtight container. Keep the wraps in the fridge for up to three days. If you want to keep the lettuce crisp, store the filling and lettuce separately. This way, your wraps stay fresh and crunchy. You can freeze the chicken mixture, but not the lettuce. Place the filling in a freezer-safe bag. Remove as much air as possible before sealing. This filling can last up to three months in the freezer. When ready to eat, thaw it overnight in the fridge. To keep your wraps fresh, assemble them just before serving. If you make them ahead, wrap each one tightly in plastic wrap. This helps avoid wilting. For extra flavor, prepare the dressing and store it separately. This keeps everything tasty and fresh. For the full recipe, check out the recipe section. To make Chicken Club Lettuce Wraps, start with cooked chicken. Shred two cups of chicken breast. Next, crumble half a cup of cooked bacon and dice one medium tomato. Combine these in a bowl with half a cup of shredded cheddar cheese. In another bowl, mix a quarter cup of mayonnaise, a tablespoon of Dijon mustard, and a tablespoon of fresh lemon juice. Add salt and pepper to taste. Pour this dressing over the chicken mix and stir well. Take a large lettuce leaf and place about a quarter cup of the mixture inside. Add avocado slices on top. Fold the sides and roll up. Repeat with the rest of the ingredients. This easy method ensures quick assembly and great taste. Yes, you can use other types of lettuce. While romaine and butter lettuce work best, you can try iceberg or green leaf lettuce. Each type offers a different crunch and flavor. Iceberg gives a crisp bite, while green leaf adds a tender touch. Just choose leaves that are large enough to hold the filling. The key is to pick fresh leaves for the best wraps. You can serve Chicken Club Lettuce Wraps with many sides. Fresh veggie sticks, like carrots and cucumbers, complement the wraps well. You could also add a light salad with a tangy dressing. For a fun twist, serve sweet potato fries or a fruit salad. These options balance the savory flavors of the wraps. You may also provide extra dressing for dipping. This creates a tasty and complete meal. This recipe for chicken club lettuce wraps is simple and very tasty. You start by gathering the ingredients. Here’s what you need: - 2 cups cooked chicken breast, shredded - 1/2 cup cooked bacon, crumbled - 1 ripe avocado, sliced - 1 medium tomato, diced - 1/2 cup shredded cheddar cheese - 1/4 cup mayonnaise - 1 tablespoon Dijon mustard - 1 tablespoon fresh lemon juice - Salt and black pepper to taste - 12 large romaine or butter lettuce leaves - Fresh parsley, chopped (for garnish) First, mix the chicken, bacon, tomato, and cheese in a medium bowl. Make sure you blend them well. In another bowl, whisk together the mayonnaise, mustard, lemon juice, salt, and pepper. This dressing adds great flavor. Next, pour the dressing over the chicken mixture. Toss it gently to coat everything. Now you can make the wraps! Take a lettuce leaf and put about 1/4 cup of the chicken mix in the center. Add some avocado slices on top for creaminess. Fold the sides of the lettuce leaf over the filling. Roll it up tightly, like a burrito. You can also serve the wraps open-faced if you prefer that style. Repeat this with the remaining ingredients until you have all your wraps ready. Once you finish, arrange the wraps on a platter. Garnish with fresh parsley for a nice touch. This dish is colorful and fun to eat. You can find the full recipe in the earlier sections. Enjoy your savory chicken club lettuce wraps! This blog post covers everything you need for Chicken Club Lettuce Wraps. We talked about key ingredients, step-by-step instructions, and helpful tips. You can choose protein, adjust dressings, and make ahead for easy meals. Storing leftovers can keep your wraps fresh. Remember to have fun with different flavors and options. With this guide, you can create tasty and healthy wraps your family will love. Enjoy the cooking process and feel proud of your delicious creation!

Savory Chicken Club Lettuce Wraps Easy and Flavorful

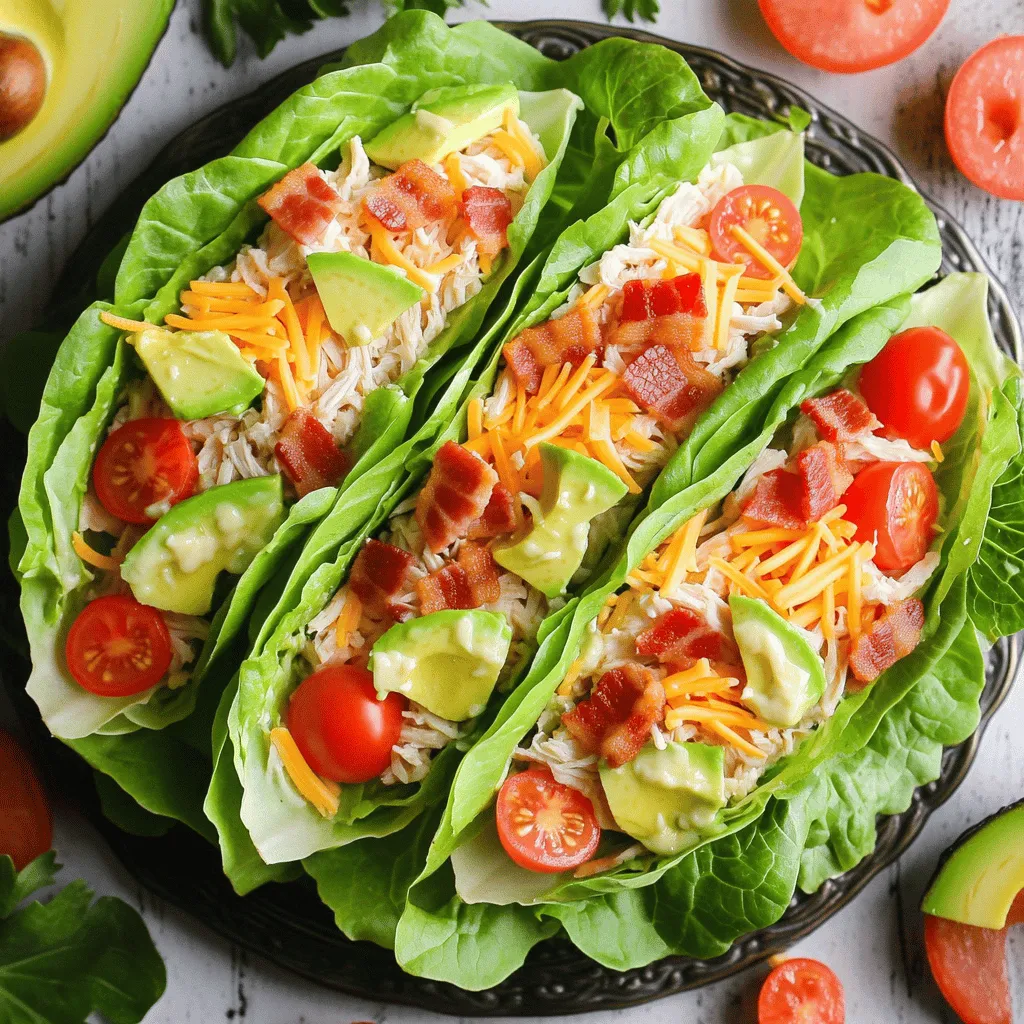
Are you ready to take your meal prep to the next level? Savory Chicken Club Lettuce Wraps are the perfect

- 2 cups cooked chicken, shredded - 1/2 cup Buffalo sauce (adjust based on spice preference) - 1 cup cream cheese, softened - 1/2 cup shredded cheddar cheese - 1/4 cup ranch dressing - 1/4 cup green onions, finely chopped - 4 large flour tortillas - Fresh lettuce leaves (for garnish) - Celery sticks (for garnish) Choosing the right chicken When making these roll-ups, use cooked chicken. You can use rotisserie chicken for ease. Just shred it up. If you prefer, boil or bake your chicken. Make sure it is fully cooked and tender. This way, it mixes well with the sauce. Adjusting spice levels Buffalo sauce can be spicy. If you love heat, add more sauce. If you prefer mild flavors, use less. You can also mix in some ranch dressing with the Buffalo sauce. This will tone down the heat while adding creaminess. - Mixing bowls - Hand mixer (optional) - Sharp knife for slicing This simple list of ingredients and tips will help you create tasty Buffalo Chicken Tortilla Roll-Ups. For the full recipe, check the details above! 1. Mixing the Buffalo chicken Start by grabbing a large bowl. Add 2 cups of shredded chicken. Pour in 1/2 cup of Buffalo sauce. Mix it well until the chicken is fully coated. Set this aside for later. 2. Combining cream cheese and ranch dressing In another bowl, combine 1 cup of softened cream cheese, 1/4 cup of ranch dressing, and 1/2 cup of shredded cheddar cheese. Blend these ingredients until the mix is smooth and creamy. 1. Spreading the cream cheese mixture Take a large flour tortilla and lay it flat. Use a spatula to spread the cream cheese mix over the tortilla. Leave a half-inch border around the edges to avoid spills while rolling. 2. Filling and rolling the tortillas Spoon some of the Buffalo chicken mix down the center of the tortilla. Sprinkle 1/4 cup of finely chopped green onions on top for extra flavor. Roll the tortilla tightly from one end to the other. Repeat with the rest of the tortillas. 1. Slicing the roll-ups Once all the tortillas are rolled, use a sharp knife to slice each roll into 1-2 inch pieces. This creates fun little pinwheels that are easy to eat. 2. Arranging for presentation Place the roll-ups on a serving platter. For a fresh look, add crisp lettuce leaves and celery sticks around the edges. This makes for a colorful and inviting dish. For the full recipe, check out the complete instructions above. Enjoy your tasty Buffalo Chicken Tortilla Roll-Ups! - The right tortilla size: Use large flour tortillas. They hold the filling well and roll easily. A smaller tortilla may lead to more mess. - How to avoid spillage: Spread the cream cheese mixture close to the edge but leave a small border. This keeps the filling from oozing out when you roll up. - Suggested add-ins to the filling: You can add diced celery for crunch or crumbled blue cheese for a stronger taste. Chopped jalapeños can also kick up the heat. - Recommended dipping sauces: Serve with ranch or blue cheese dressing. A drizzle of extra Buffalo sauce adds a spicy touch. - Creative platter ideas: Arrange the roll-ups on a colorful plate. Add celery sticks and carrot sticks for a fresh look. Use small bowls for dips to make it fun. - Pairing with beverages: These roll-ups go well with cold drinks. Try them with iced tea or a light beer. A citrusy lemonade can balance the spiciness, too. For the full recipe, check out the Buffalo Chicken Tortilla Roll-Ups ! {{image_4}} You can change the meat in this recipe. Try using turkey or beef instead of chicken. These swaps can give a new taste to the roll-ups. For a vegetarian option, use plant-based chicken or beans. This keeps the recipe fun and tasty for all diets. Switch up the sauce for more flavor. BBQ or teriyaki sauce can work great. You can also add spices like garlic powder or paprika. Fresh herbs like cilantro or parsley add a nice touch, too. Getting creative with flavors keeps the dish exciting. You can turn these roll-ups into a salad. Just chop the roll-ups and mix them with greens. They can also serve as bite-sized appetizers at parties. Simply slice them smaller. This makes sharing easy and fun for guests. For the full recipe, check out the cooking instructions above. To keep your Buffalo Chicken Tortilla Roll-Ups fresh, store them in the fridge. Place the roll-ups in an airtight container to prevent drying out. I recommend using a container that fits them snugly. This way, they won't move around and become messy. You can freeze the roll-ups for later. Wrap each roll-up in plastic wrap tightly. Then, put them in a freezer bag or container. This keeps them safe from freezer burn. To thaw, take them out of the freezer and leave them in the fridge overnight. This will help them regain their texture. In the fridge, these roll-ups last about 3 to 4 days. If you freeze them, they can last up to 2 months. Always check for spoilage before eating. If you see mold or notice a bad smell, it's best to toss them. Enjoy your tasty snacks fresh! Can I make Buffalo Chicken Tortilla Roll-Ups ahead of time? Yes, you can make these roll-ups a day in advance. Just wrap them tightly in plastic wrap. Store them in the fridge. This helps the flavors blend well. What can I substitute for cream cheese? You can use Greek yogurt or cottage cheese as a lighter option. Both keep the texture creamy. They also add some tangy flavor to your roll-ups. Are there gluten-free tortilla options? Absolutely! Look for gluten-free tortillas made from rice or corn. They work great and taste good too. How do I make the roll-ups ahead for parties? Prepare the roll-ups as usual. After rolling, slice them and place them on a platter. Cover with plastic wrap and chill until party time. How do I spice up the dish? Add diced jalapeños or a sprinkle of cayenne pepper to the chicken mixture. This gives a nice heat boost. You could also try different sauces for variety. Can I heat the roll-ups before serving? Yes, you can heat them! Just place them in the oven at 350°F for about 10 minutes. This warms them nicely and enhances the flavors. How many calories are in Buffalo Chicken Tortilla Roll-Ups? Each roll-up has about 150 calories. This can vary based on the ingredients you choose. Check the labels for exact counts. Are they suitable for meal prepping? Yes, they are perfect for meal prep! They keep well in the fridge for about three days. You can grab them for a quick snack or lunch option. For the complete recipe, check out the Full Recipe. You now have a full guide to making Buffalo Chicken Tortilla Roll-Ups. We covered ingredients, step-by-step instructions, and helpful tips. You learned how to customize flavors and improve presentation. With these simple steps, you can create delicious roll-ups for any event. Remember to store leftovers properly to enjoy them later. Now it’s time to get cooking and impress your friends and family with this tasty dish!

Buffalo Chicken Tortilla Roll-Ups Tasty and Easy Snack

Looking for a quick and tasty snack? Buffalo Chicken Tortilla Roll-Ups are here to save the day! With just a

- 4 medium apples (Granny Smith or Honeycrisp) - 1 cup packed brown sugar - 1 teaspoon ground cinnamon - 1/4 teaspoon ground nutmeg - 2 tablespoons freshly squeezed lemon juice - 1 tablespoon cornstarch - 1 package of pre-made pie crusts - 1/2 cup caramel sauce - 1 egg, beaten - Whipped cream or vanilla ice cream for serving Gathering the right ingredients is key. I choose Granny Smith or Honeycrisp apples for their tartness. Their firm texture holds up well during baking. The brown sugar adds depth and sweetness. Ground cinnamon and nutmeg bring warmth and spice to the filling. Fresh lemon juice brightens the flavors and prevents browning. Cornstarch thickens the apple filling, making it less runny. Using pre-made pie crusts saves time. If you want to make your own, feel free! The caramel sauce adds a rich, sweet layer. A beaten egg gives the crust a nice golden color. For serving, whipped cream or vanilla ice cream makes the pie even better. You don’t need all the optional toppings, but they sure do enhance the experience. Check out the Full Recipe for a complete guide. - Preheat oven to 425°F (220°C). - In a bowl, mix apples with brown sugar, cinnamon, nutmeg, and lemon juice. Toss until coated. Let it sit for 15 minutes. This helps the flavors blend nicely. - Take one pie crust from the package and roll it out. Line a 9-inch pie dish. - Spoon the apple mixture into the crust. Drizzle half of the caramel sauce over the apples for added sweetness. - Roll out the second crust. You can place it whole over the apples or cut it into strips for a lattice design. - Use a pastry brush to apply the beaten egg wash on top. This gives a nice golden color when baked. - Bake the pie for 25-30 minutes until the crust turns golden brown. The apples should be soft but still hold their shape. - Let the pie cool slightly before serving. Drizzle the remaining caramel sauce on top for a sweet touch. For detailed ingredients and additional tips, check the Full Recipe. For the best caramel apple pies, I love using Granny Smith or Honeycrisp apples. These apples are tart and sweet, giving a great flavor. Their firm texture holds up well during baking. If these apples are not available, you can use Fuji or Braeburn apples. They also taste good and add a nice crunch. A soggy bottom crust can ruin your pie. To avoid this, pre-bake the crust for about 10 minutes before adding the apple filling. Line the crust with parchment paper and fill it with pie weights or dried beans. This helps keep the shape. When working with pie crust dough, keep it cold. If it warms up, it may become sticky and hard to handle. Use a light touch when rolling it out to prevent tearing. Making your own caramel sauce is simple and fun. You need just three ingredients: sugar, butter, and cream. Start by melting one cup of sugar in a pot over medium heat. Stir it until it turns a nice amber color. Then, add 6 tablespoons of butter and mix well. Finally, slowly pour in half a cup of heavy cream while stirring. This gives you a smooth sauce. If it is too thick, add a little more cream. For better flavor, add a pinch of salt to balance the sweetness. {{image_4}} To give your caramel apple pies a twist, try adding spices. Cloves and allspice can bring warmth and depth. Just a pinch of each can elevate the flavor. Start with 1/4 teaspoon of either spice. Mix it into your apple filling for a cozy feel. The blend of spices pairs well with the sweet caramel. Bite-sized treats are fun! To make mini caramel apple pies, use a muffin tin. Cut your pie crusts into smaller circles. Each circle should fit into the muffin holes. Fill them with the apple mixture and caramel sauce. Bake these mini pies for 15-20 minutes. They are done when the crust turns golden. For a gluten-free version, choose a gluten-free pie crust. Many brands offer great options at stores. You can also make your own using almond flour or oat flour. Just follow your favorite gluten-free pie crust recipe. This way, everyone can enjoy this tasty dessert! For the best flavor, stick to the same apple filling recipe. Check out the Full Recipe for all the steps you need to make these variations shine! To keep your caramel apple pies fresh, store them in the fridge. Place the pie in an airtight container or cover it tightly with plastic wrap. This way, you can enjoy the pie for up to four days. If you have slices left, it's best to wrap them individually. For reheating, use the oven. Preheat to 350°F (175°C) and warm the pie for about 10-15 minutes. This method revives the flaky crust and gooey caramel. Yes, you can freeze caramel apple pies! Freezing is a great way to save a pie for later. To freeze, let the pie cool completely. Wrap it tightly in plastic wrap and then cover it with aluminum foil. This double wrap prevents freezer burn. You can freeze the pie for up to three months. When you're ready to eat, defrost it in the fridge overnight. After thawing, reheat it in the oven at 350°F (175°C) for about 20-25 minutes. Enjoy your pie as if it were fresh! Caramel apple pies last about 3 to 4 days in the fridge. To store, cover the pie with plastic wrap or foil. This keeps the pie fresh and tasty. If you want to keep it longer, you can freeze the pie. It will last up to 3 months in the freezer. Just make sure to wrap it well to avoid freezer burn. Yes! You can use other fruits if you like. Pears, peaches, or berries work well. Each fruit brings its own flavor. Just cut the fruit into small pieces like you do with apples. You might need to adjust the sugar, depending on the fruit's sweetness. For example, berries may need less sugar than apples. You can serve caramel apple pies with many toppings. Whipped cream adds lightness. Vanilla ice cream is a big favorite too. For an extra treat, drizzle more caramel sauce on top. Chopped nuts or a sprinkle of cinnamon can also make it special. Feel free to get creative with your toppings! You can tell the pie is done by looking at the crust. It should be golden brown. You can also poke a fork into the apples. If they are soft but not mushy, the pie is ready. Lastly, the house will smell amazing when it’s baking. Trust your nose; it knows when the pie is done! This article walks you through making the perfect caramel apple pie. You learned about the key ingredients and step-by-step instructions. I shared tips for choosing apples and achieving a flaky crust. You explored variations and storage options to keep your pies fresh. In the end, making this pie is fun and rewarding. You can impress family and friends with each slice. Happy baking!

Easy Caramel Apple Pies Deliciously Simple Dessert

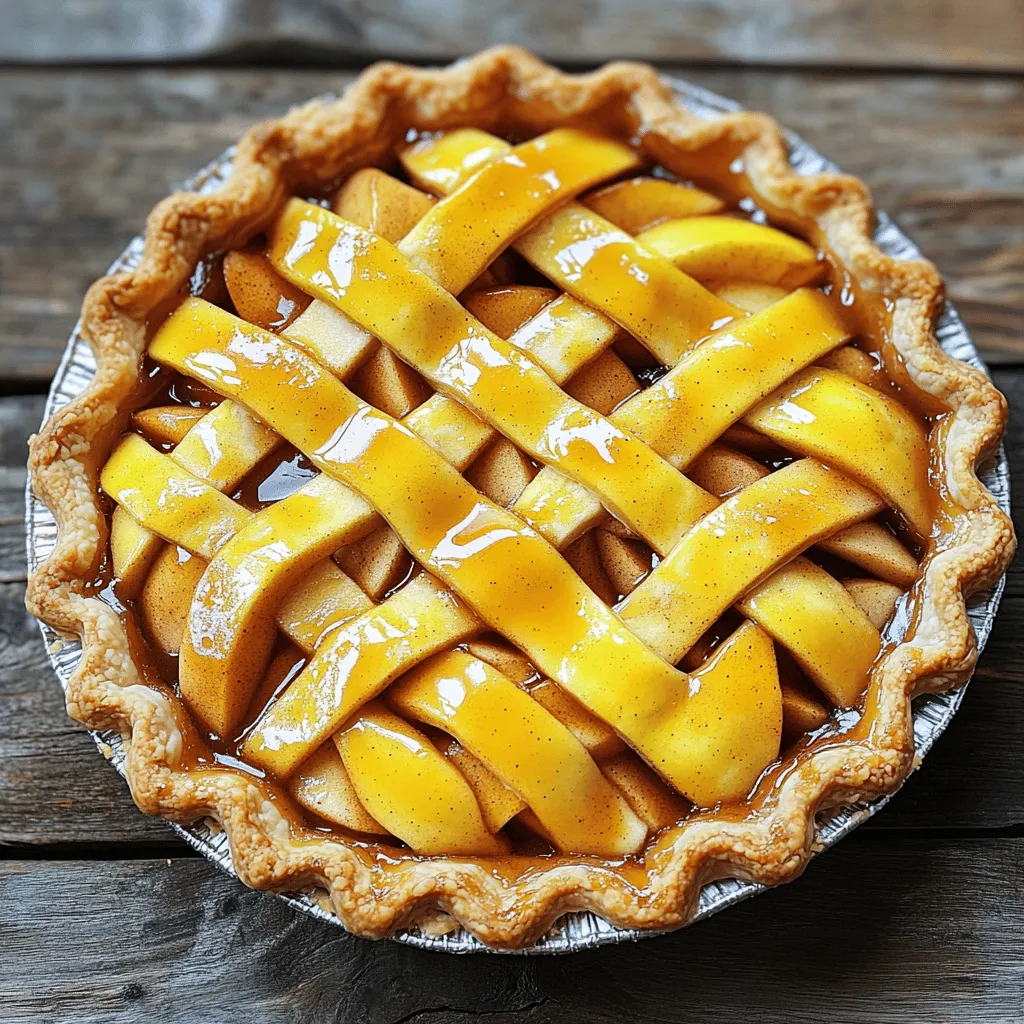
If you want a dessert that’s easy and delicious, you’ve hit the jackpot! In this guide to making Easy Caramel

To make this tasty dish, you'll need these main ingredients: - 8 oz fettuccine pasta - 1 lb large shrimp, peeled and deveined - 2 tablespoons extra virgin olive oil - 3 cloves garlic, finely minced - 1 cup heavy cream - 1 cup shredded mozzarella cheese - 1/2 cup fresh basil leaves, chopped - 1/4 teaspoon red pepper flakes (optional for heat) - Salt and freshly ground black pepper to taste - Fresh parsley, chopped, for garnish - Grated Parmesan cheese for serving These ingredients create a creamy and rich base for the dish. The shrimp adds a nice protein boost, while the mozzarella brings a delightful creaminess. You can boost the flavor with these optional ingredients: - Lemon zest for a zesty kick - Sun-dried tomatoes for a touch of sweetness - Spinach for extra nutrients and color - Peas for a pop of sweetness and texture Adding these extras can make your dish even more exciting. Try mixing and matching to find your favorite flavors. To prepare this dish, gather these tools: - Large pot for boiling pasta - Skillet for sautéing shrimp and making the sauce - Measuring cups and spoons for accurate portions - Wooden spoon or spatula for mixing - Colander for draining pasta Having the right tools makes cooking smoother and more enjoyable. This way, you can focus on creating your delicious meal without fuss. For the full recipe, check out the detailed steps. Start by boiling water in a big pot. Make sure to add salt to the water. Once the water is at a rolling boil, add the fettuccine. Cook it according to the package directions, usually about 8-10 minutes. The pasta should be firm but tender, known as al dente. After you cook it, drain the pasta in a colander. Remember to save about half a cup of the pasta water for later. This water helps to make the sauce creamy. In a large skillet, warm two tablespoons of extra virgin olive oil over medium heat. Add three cloves of finely minced garlic. Sauté the garlic for about one minute until it smells great but does not brown. Next, toss in one pound of peeled and deveined shrimp. Cook the shrimp for around 2-3 minutes on each side. They should turn pink and opaque when done. After cooking, take the shrimp out of the skillet and set them aside on a plate. Using the same skillet, pour in one cup of heavy cream. Stir it well to mix with the garlic oil. Bring the mixture to a gentle simmer. This step is key to making the sauce creamy. Lower the heat to keep the sauce warm without boiling. Then, gradually add one cup of shredded mozzarella cheese. Whisk it in until the cheese melts fully. If the sauce gets too thick, add small amounts of reserved pasta water until it reaches the right consistency. Once the sauce is creamy, return the sautéed shrimp to the skillet. Next, add the drained fettuccine. Gently toss everything together, ensuring the pasta and shrimp are well coated in the sauce. Fold in half a cup of chopped fresh basil. Season to taste with salt, freshly ground black pepper, and red pepper flakes if you like a bit of heat. Transfer the creamy shrimp pasta onto serving plates. To make it look nice, sprinkle some chopped parsley on top. Finish with a generous amount of grated Parmesan cheese. Serve this dish right away for the best flavor, and enjoy every bite of this creamy mozzarella shrimp pasta. For the complete recipe, refer to the Full Recipe section. To make a smooth cream sauce, start with low heat. High heat can curdle the cream. After adding the cream, stir gently. This keeps the sauce silky. Add the mozzarella gradually. If the sauce gets too thick, mix in a bit of pasta water. This helps you control the consistency. Season with salt and pepper, but taste as you go. If you have dietary restrictions, don’t worry! You can swap out the heavy cream for a plant-based milk. Almond or coconut milk works well. For a lighter option, use Greek yogurt. You can also change the cheese. Try goat cheese or a dairy-free alternative. If shrimp isn’t your thing, substitute with chicken or tofu for protein. To save time, prep all your ingredients first. Chop the garlic and basil before you cook. Cook the pasta while you sauté the shrimp. This way, everything finishes at the same time. Keep your skillet on low heat while you mix the sauce. This helps you manage the cooking process without rushing. For the full recipe, check out the Creamy Mozzarella Shrimp Pasta. {{image_4}} You can easily boost the nutrition in your creamy mozzarella shrimp pasta. Adding vegetables not only adds color but also flavor. Consider using spinach, cherry tomatoes, or bell peppers. Just sauté them with the garlic before adding the shrimp. For spinach, cook it until wilted. For cherry tomatoes, add them until they burst. Bell peppers should be soft but still crunchy. This will give you a dish full of vitamins and minerals. If you love heat, try making a spicy version. You can add more red pepper flakes to the sauce. Start with one teaspoon instead of just a pinch. For an extra kick, toss in sliced jalapeños or diced serrano peppers when cooking the shrimp. This will give your pasta a fiery twist. Just remember to balance the spice with more cream or cheese. You can make a lighter version of this dish if you want to eat healthier. Swap out the heavy cream for half-and-half or Greek yogurt. You can also use zucchini noodles instead of fettuccine. This keeps the dish low in carbs. Reducing the amount of mozzarella cheese can also help cut calories. These small changes can make a big difference while still keeping the meal tasty. For the complete cooking process, check out the Full Recipe. After enjoying your creamy mozzarella shrimp pasta, store leftovers in an airtight container. Make sure to let the pasta cool down first. This helps keep it fresh. Place it in the fridge if you plan to eat it within three days. For longer storage, consider freezing it. When you reheat creamy pasta, do it gently. Use a skillet over low heat. Add a splash of water or cream to keep it moist. Stir often to prevent sticking. If using a microwave, cover the dish to trap steam. Heat in short bursts, stirring in between. To freeze your creamy shrimp pasta, first let it cool completely. Portion it into smaller containers for easier thawing. Seal tightly to avoid freezer burn. It can last up to three months in the freezer. When ready to eat, thaw in the fridge overnight and reheat as described above. For the full recipe, check out the Creamy Mozzarella Shrimp Pasta details. Yes, you can use other pasta types. I suggest penne or spaghetti. Both work well with the creamy sauce. Just cook them according to the package. Make sure they are al dente for the best texture. If you don’t have mozzarella, try using provolone or fontina cheese. They melt nicely and give a great flavor. You can also use a dairy-free cheese if you want a vegan option. Just ensure it melts well to keep that creamy texture. This dish takes about 25 minutes total. You’ll spend about 10 minutes prepping and 15 minutes cooking. It’s quick and perfect for busy weeknights. Absolutely! You can easily double or triple the recipe. Just make sure you have a big enough pot and skillet. Adjust cooking times slightly for larger amounts, but keep the same flavors. You can make the pasta and sauce ahead of time. Just store them separately in the fridge. When you’re ready to eat, mix and heat them together. The dish tastes best fresh, but it still holds up well. Check the full recipe for tips on storage. In this blog post, we explored the key ingredients and steps for making creamy mozzarella shrimp pasta. You learned how to cook the fettuccine, sauté shrimp, and create a rich sauce. We also discussed helpful tips and variations to suit your taste. Remember, this dish is flexible; feel free to swap ingredients or adjust spice levels. With the right techniques, you can make a delicious meal your friends and family will love. Now, gather your ingredients and start cooking! Enjoy your culinary adventure!

Creamy Mozzarella Shrimp Pasta Flavorful Dinner Recipe

Looking for a tasty weeknight meal? My Creamy Mozzarella Shrimp Pasta is just what you need! This dish combines juicy

Here’s what you need for Tuscan White Bean Soup Delight. This recipe is simple and fun to make. - 2 cans (15 oz each) white beans (cannellini or great northern), drained and rinsed - 4 cups vegetable broth - 1 medium onion, finely diced - 3 garlic cloves, minced - 2 medium carrots, peeled and chopped - 2 celery stalks, chopped - 1 cup diced tomatoes (canned or fresh) - 1 teaspoon dried thyme - 1 teaspoon dried rosemary - 1 teaspoon red pepper flakes (adjust to your preferred spice level) - 2 cups kale, stems removed and chopped - 2 tablespoons extra-virgin olive oil - Salt and pepper to taste - Freshly grated Parmesan cheese (for serving, optional) - Fresh parsley, finely chopped (for garnish) Gather these ingredients to create a warm and hearty soup. Each component adds flavor and nutrition. The white beans provide protein, while the vegetables add color and taste. Fresh herbs bring a lovely aroma. If you want to make it your own, sprinkle some cheese or parsley on top when serving. You can find the Full Recipe for more detailed steps to bring this dish to life! To make Tuscan White Bean Soup Delight, start by gathering your ingredients. You will need two cans of white beans, vegetable broth, and fresh veggies. 1. In a large pot, heat two tablespoons of olive oil over medium heat. 2. Add one diced onion, two chopped carrots, and two chopped celery stalks. 3. Sauté these for about 5-7 minutes. Stir often until the onion turns clear. 4. Next, add three minced garlic cloves. Cook for one more minute, stirring well. 5. Now mix in one cup of diced tomatoes, one teaspoon dried thyme, one teaspoon dried rosemary, and one teaspoon red pepper flakes. Cook for 2-3 minutes. Tip: When checking the doneness of the beans, they should be soft but not mushy. For the kale, it should wilt and stay bright green. 6. Pour in four cups of vegetable broth and bring it to a boil. 7. Reduce the heat to low and let it simmer. 8. Add the rinsed white beans and simmer for 15-20 minutes. This helps the flavors blend nicely. 9. After that, stir in two cups of chopped kale. Cook for another 5 minutes until the kale is tender. 10. Taste your soup and add salt and pepper as needed. For perfect flavor, keep the heat at medium when cooking the veggies. A slow simmer lets the tastes develop well. If you want a creamier soup, use an immersion blender. Blend a part of the soup and stir it back in. This creates a nice texture without losing the hearty feel of the soup. Serve your soup hot. Top it with freshly grated Parmesan cheese and sprinkle some chopped parsley for a lovely finish. You can find the Full Recipe for a detailed guide on making this tasty dish. - Ensuring proper ingredient preparation: Always rinse your canned beans well. This helps remove excess salt and improves the soup’s flavor. Dice your veggies evenly. This ensures they cook at the same rate. - Avoiding overcooking the vegetables: Keep an eye on your veggies while sautéing. You want them tender, not mushy. Overcooked vegetables lose texture and flavor, making your soup less enjoyable. - Suggestions for herbs and spices to elevate the soup: Fresh herbs like basil and thyme can boost flavor. You can also experiment with smoked paprika for a deeper taste. If you like heat, add more red pepper flakes. - Recommendations for high-quality vegetable broth: Use a low-sodium vegetable broth. This gives you better control over the salt level in your soup. A rich, flavorful broth makes all the difference in taste. For a special touch, try homemade broth if you have the time. For the complete experience, check the Full Recipe for Tuscan White Bean Soup Delight. Enjoy your cooking! {{image_4}} You can easily switch out white beans in this recipe. Lentils make a great swap. They cook faster and add a nice texture. You can also try chickpeas for a different flavor. If you want more greens, use spinach or Swiss chard. These greens cook down nicely and add color. For a gluten-free version, check your broth. Make sure it has no gluten. You can also leave out the cheese to make it vegan. Add nuts or seeds for extra protein. To lower the sodium, choose low-sodium broth. Or, you can use fresh herbs instead of salt. Feel free to explore these variations to make Tuscan White Bean Soup Delight your own! For the complete recipe, check the Full Recipe section above. After enjoying your Tuscan White Bean Soup Delight, store leftovers right away. Place the soup in an airtight container. It keeps well in the fridge or freezer. If you put it in the fridge, let it cool first. Make sure to seal it tightly. This helps keep the flavors fresh. For freezing, use freezer-safe containers or bags. Leave some space for the soup to expand. You can also portion it out for easy reheating. When you are ready to eat, thaw overnight in the fridge. For quick defrosting, place the container in warm water. To reheat, use a pot on medium heat. Stir often to avoid sticking. You can also use a microwave. Heat it in short bursts, stirring in between. This keeps the soup warm and tasty. In the fridge, this soup lasts about 3 to 5 days. If you freeze it, it can stay good for 3 months. Always check for signs of spoilage. Look for changes in color or smell. If it smells sour or looks off, throw it away. It's better to be safe than sorry! If you notice any mold, discard the soup immediately. Keeping track of how long it's been stored helps you enjoy your soup at its best. Proper storage ensures that you can savor the flavors of Tuscan White Bean Soup Delight whenever you like! Yes, you can use fresh beans! However, fresh beans take longer to cook. Dried beans need soaking overnight. After soaking, cook them until tender, which can take 1 to 2 hours. Once cooked, you can add them to your soup. This method gives a great taste but takes more time and effort. Pair this soup with simple sides. Here are some tasty ideas: - Crusty bread or baguette for dipping - A fresh green salad with lemon vinaigrette - Roasted vegetables for added flavor - Garlic bread for a classic touch These sides complement the soup and make a full meal. Yes, this soup is very healthy! It is rich in fiber and protein from the beans. Plus, the vegetables add vitamins and minerals. Kale is a great source of nutrients, and the olive oil provides healthy fats. This dish is low in calories and helps keep you full. Enjoying it regularly can support a balanced diet. This blog post shared a recipe for Tuscan White Bean Soup Delight. You learned about the key ingredients, preparation steps, and cooking techniques. I highlighted common mistakes to avoid and tips for enhancing flavor. I also covered ingredient swaps and dietary options to fit your needs. Lastly, I provided storage tips and answered important FAQs. Now, you can create a delicious soup that fits your taste and dietary needs. Enjoy the warmth and health benefits this meal brings!

Tuscan White Bean Soup Delight Simple and Tasty Meal

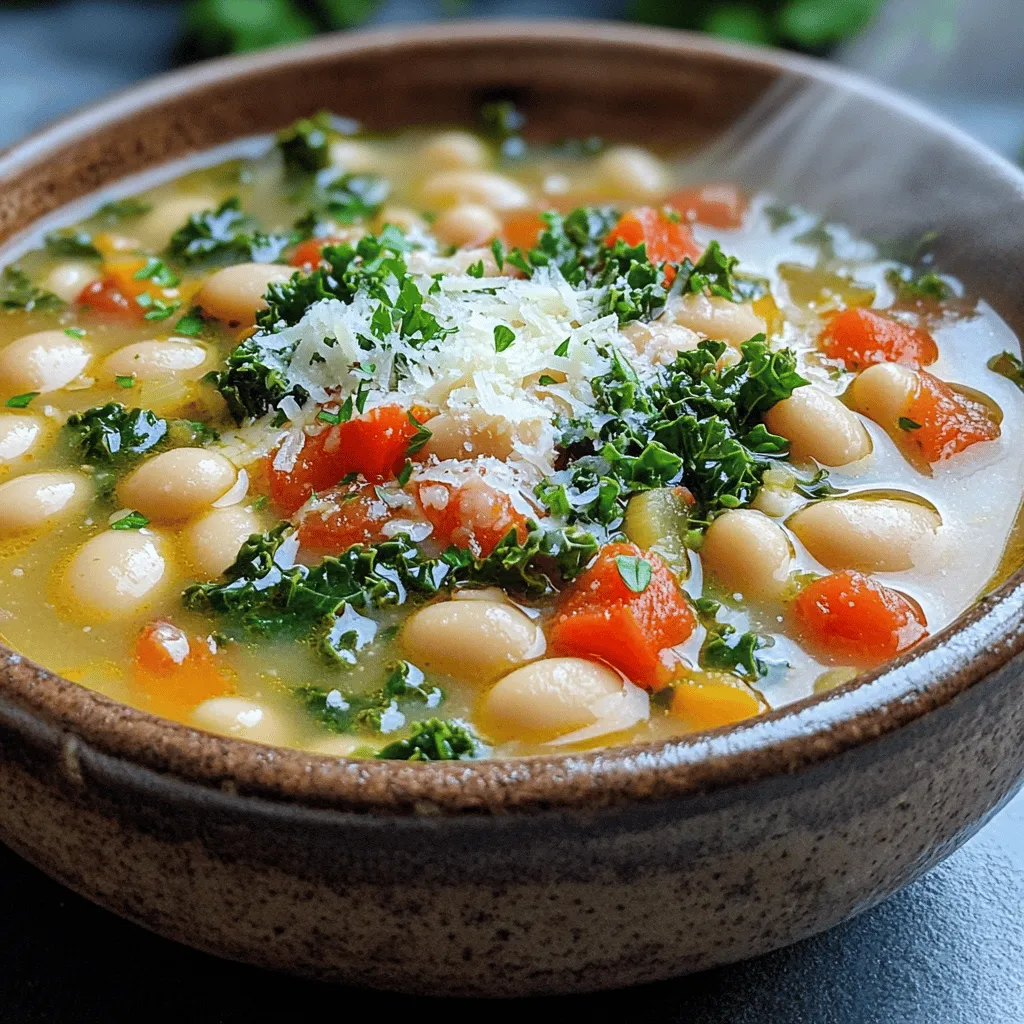
Looking for a warm and comforting meal? Let me introduce you to Tuscan White Bean Soup Delight! This simple and

To create a moist and tasty Strawberry Bundt Cake, you need these simple ingredients: - 2 cups all-purpose flour - 1 ½ teaspoons baking powder - ½ teaspoon baking soda - ¼ teaspoon salt - ½ cup unsalted butter, softened - 1 cup granulated sugar - 2 large eggs - 1 teaspoon pure vanilla extract - 1 cup buttermilk - 1 ½ cups fresh strawberries, hulled and chopped - ½ cup powdered sugar (for glaze) - 2 tablespoons milk (for glaze) - Whole fresh strawberries (for garnish) Each ingredient plays a key role in achieving the best flavor and texture. The flour gives structure, while the baking powder and baking soda help it rise. The butter adds richness and moisture, creating a soft crumb. Eggs bind the mixture and provide stability. Vanilla extract adds warmth, and buttermilk gives a slight tang that balances the sweetness. Fresh strawberries are the star of this cake, offering bursts of flavor in every bite. The glaze, made from powdered sugar and milk, adds a sweet finish that complements the fruit. Don't forget to garnish with whole strawberries for a beautiful look. For the full recipe, follow along as we dive into the step-by-step instructions to create this delightful treat. First, set your oven to 350°F (175°C). This temperature helps the cake bake evenly. Next, generously grease and flour a 10-cup Bundt pan. This step is key to ensure the cake releases easily after it bakes. In a medium bowl, mix the dry ingredients together. Combine 2 cups of all-purpose flour, 1 ½ teaspoons of baking powder, ½ teaspoon of baking soda, and ¼ teaspoon of salt. Set this mixture aside. In a large bowl, cream together ½ cup of softened butter and 1 cup of granulated sugar. Use an electric mixer on medium speed. Beat for about 3-4 minutes until it’s light and fluffy. Next, add 2 large eggs one by one, mixing well after each. Finally, mix in 1 teaspoon of pure vanilla extract until it's just combined. Now, slowly add the dry ingredients and 1 cup of buttermilk to the butter mixture. Start with one-third of the flour, then half of the buttermilk. Repeat this twice, ending with the flour mixture. Mix just until combined—do not overmix. Using a spatula, gently fold in 1 ½ cups of chopped fresh strawberries. Make sure they are well distributed without crushing them. Carefully pour the batter into your prepared Bundt pan. Use a spatula to smooth the top. Place the pan in the preheated oven and bake for 45-50 minutes. To check if it’s done, insert a toothpick into the center. It should come out clean when ready. After baking, let the cake cool in the pan for about 10-15 minutes. Then, carefully invert the pan onto a wire rack. This allows the cake to cool completely. To make the glaze, whisk together ½ cup of powdered sugar and 2 tablespoons of milk in a small bowl. Keep whisking until smooth and creamy. If you'd like a thinner glaze, add a little more milk until you reach the right consistency. Once the cake has cooled, drizzle the glaze over the top. Let it cascade down the sides for a beautiful look. For a lovely finish, garnish with whole fresh strawberries before serving. You can find the Full Recipe for this delightful Strawberry Bundt Cake Bliss for more details. To get the best texture in your Strawberry Bundt cake, pay close attention to the temperature of your ingredients. Use room temperature butter and eggs. This helps them blend well and creates a light cake. If your butter is too cold, it won't mix properly, leading to a dense cake. Avoid overmixing when you combine the wet and dry ingredients. Mix just until you see no dry flour. Overmixing can make the cake tough. Remember, a few lumps are okay. They will bake out and keep your cake soft. You can enhance the flavor of your cake by substituting ingredients. If you want a richer taste, try using brown sugar instead of granulated sugar. This will add a lovely caramel note. Adding lemon zest can brighten the flavor. Just a teaspoon will do. You can also add almond extract for a nutty twist. Just remember to adjust your vanilla amount if you add more flavors. Serving your Strawberry Bundt cake is key to its appeal. Place it on a pretty platter to catch the eye. Add a sprig of fresh mint for a pop of color. This small touch makes a big impact. For a delightful finish, dust the cake with powdered sugar before serving. It’s a simple way to make your cake look fancy. You can also arrange whole fresh strawberries around the cake for a beautiful display. This makes the cake even more inviting. Enjoy crafting your Strawberry Bundt cake bliss with these tips! For more details, check the Full Recipe. {{image_4}} You can change the flavor of your Strawberry Bundt Cake by using different fruits. Blueberries and raspberries are great options. They add a nice burst of color and taste. Just swap the strawberries for the same amount of another berry. For a tropical twist, try mango or pineapple. These fruits give a fun, sunny vibe to your cake. If you want a gluten-free version, use a gluten-free flour blend. Many blends work well as a direct substitute. You may need to adjust the wet ingredients to keep the cake moist. Start with a little less buttermilk or add a touch more if needed. For a vegan version, replace eggs and butter with plant-based options. Use flax eggs or applesauce for the eggs. Coconut oil or vegan butter can replace regular butter. Instead of buttermilk, use almond milk or soy milk with a splash of vinegar. This keeps your cake moist and tasty while being animal-friendly. For the complete recipe, check the Full Recipe. To keep your Strawberry Bundt Cake fresh, you have two main options: room temperature or refrigeration. If you plan to eat the cake within a few days, storing it at room temperature works well. Wrap it tightly in plastic wrap or foil. This helps seal in moisture and keeps it soft. If you want to store the cake for longer, the fridge is a better choice. It will stay fresh for about a week. Just make sure to wrap it well. You can also place it in an airtight container. This helps prevent it from drying out or absorbing other smells from the fridge. Freezing is a great way to keep your cake for later. To freeze the cake, wait until it cools completely. Then, wrap it tightly in plastic wrap. After that, put it in a freezer-safe bag or container. This keeps it fresh for about three months. When you're ready to enjoy it, take the cake out of the freezer. Let it thaw in the fridge overnight. If you're in a hurry, you can leave it at room temperature for a few hours. Just be careful not to rush it, as this can change the cake's texture. Enjoy your cake when it’s perfectly thawed! To check if your Bundt cake is done, use a toothpick. Insert it into the center of the cake. If it comes out clean, your cake is ready. If there are wet crumbs, bake a little longer. Remember, the baking time is about 45 to 50 minutes. Make sure to check often after the 40-minute mark. Yes, but they will change the cake's texture. Frozen strawberries release more juice. This can make the cake moister, but it may also be denser. If using frozen strawberries, make sure to thaw and drain them first. This helps keep your cake light and fluffy. You can easily make buttermilk at home. Mix one cup of milk with one tablespoon of lemon juice or vinegar. Let it sit for about 5 minutes. This mixture will work just like buttermilk. You can also use plain yogurt or sour cream mixed with some water. To make the glaze thicker, add more powdered sugar. For a thinner glaze, add more milk. Start with one tablespoon at a time. Mix well after each addition until you reach your desired consistency. A thicker glaze stays on top, while a thinner glaze drizzles down beautifully. This blog post walks you through a tasty Bundt cake recipe. You learned the key ingredients, from flour to fresh strawberries. I detailed step-by-step instructions to make baking easy. Plus, I shared tips for a perfect texture and flavor. You also discovered fun variations, including gluten-free and vegan options. Lastly, I covered storage and answered common questions. With this guide, you're ready to create a delicious Bundt cake. Enjoy baking and sharing your treat!

Strawberry Bundt Cake Bliss Deliciously Sweet Treat

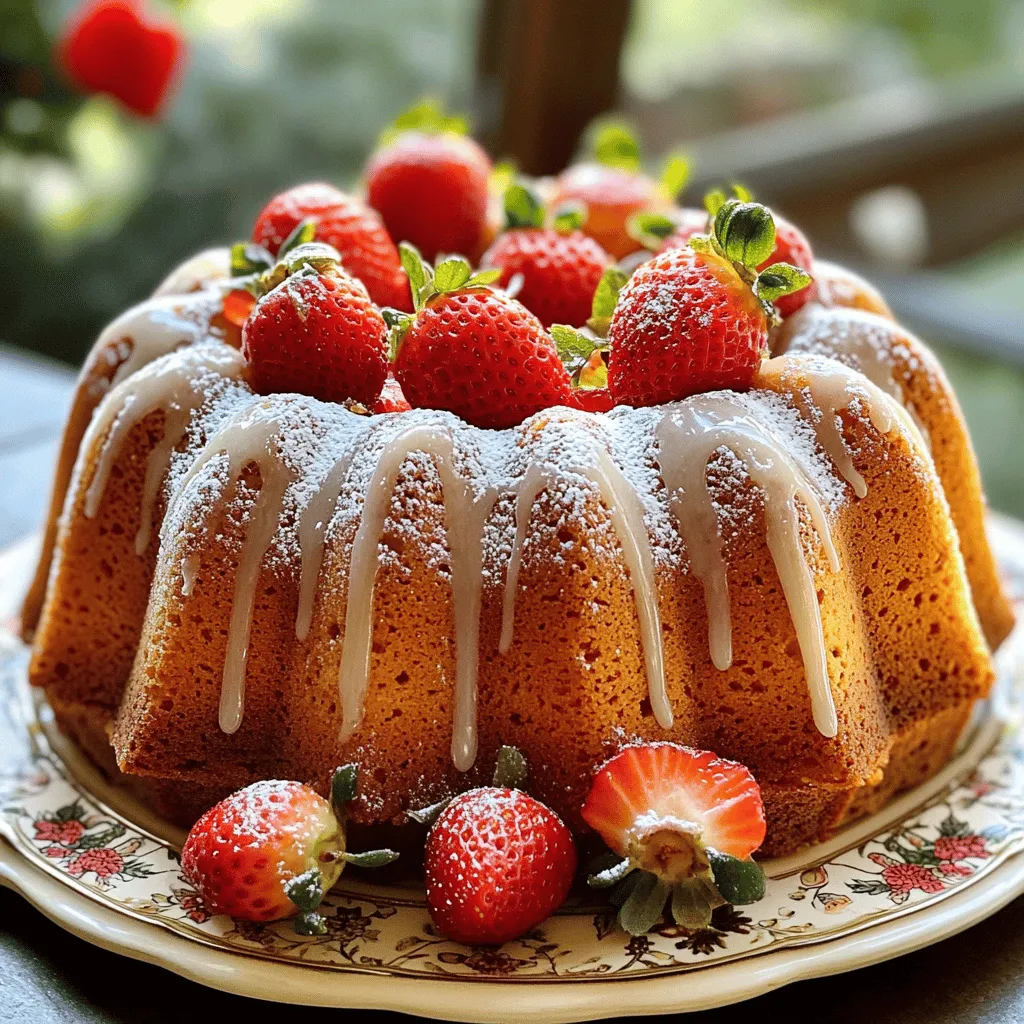
Welcome to a slice of heaven! In this blog post, I’ll share my favorite Strawberry Bundt Cake recipe. This cake

Older posts
Newer posts
← Previous Page1 … Page81 Page82 Page83 … Page91 Next →

dsad

© 2025 recipesstation • Built with GeneratePress

Our Policies

  • Copyright Policy
  • Cookie Policy
  • GDPR Policy
  • Privacy Policy
  • Disclaimer
  • Terms Of Use

More Information

  • Home
  • About
  • Contact
  • Appetizers
  • Dessert
  • Dinner
  • Drinks
©2025, recipesstation About Back To Top