Shrimp Scampi Made Easy Simple and Fast Recipe
Are you craving a flavorful meal that’s quick and easy to make? You’re in the right place! I’ll guide you
Are you craving a flavorful meal that’s quick and easy to make? You’re in the right place! I’ll guide you
![Creating a creamy cucumber salad starts with fresh ingredients. Here’s what you need: - 2 large cucumbers, thinly sliced - 1/2 cup plain Greek yogurt - 1/4 cup sour cream - 2 tablespoons fresh dill, finely chopped - 1 tablespoon fresh lemon juice - 1 teaspoon garlic powder - Sea salt and freshly ground black pepper to taste - 1 tablespoon extra virgin olive oil - Optional: 1/4 cup cherry tomatoes, halved These ingredients give the salad its fresh taste and creamy texture. The cucumbers add crunch, while the yogurt and sour cream create a smooth dressing. Fresh dill brings a bright flavor, and lemon juice adds a nice zing. Garlic powder gives depth, and the sea salt enhances all the flavors. If you want a pop of color, add cherry tomatoes. This salad is simple yet delicious! For the full recipe, check out the [Full Recipe]. Start by washing your cucumbers. Use cold water to clean them well. Slice the cucumbers into thin rounds. A sharp knife or a mandolin slicer works best for this. Once sliced, place the cucumbers in a large colander. Sprinkle a light amount of salt over them. Let the salted cucumbers rest for 10 to 15 minutes. This step helps draw out extra moisture. It also makes them crispier. While the cucumbers rest, it’s time to make the dressing. In a mixing bowl, combine the following ingredients: - 1/2 cup plain Greek yogurt - 1/4 cup sour cream - 2 tablespoons fresh dill, finely chopped - 1 tablespoon fresh lemon juice - 1 teaspoon garlic powder Whisk these ingredients together until the mixture is smooth. Ensure everything is well-blended. The dressing should be creamy and flavorful. After the cucumbers have released moisture, pat them dry with paper towels. This step removes excess salt and water. In a spacious mixing bowl, add the sliced cucumbers to the creamy dressing. Toss everything together gently. Make sure all the cucumber slices are coated in the dressing. Season with sea salt and freshly ground black pepper to taste. Next, drizzle 1 tablespoon of extra virgin olive oil over the salad. Mix lightly again. If you want a pop of color, add the optional cherry tomatoes, halved. This adds both flavor and visual appeal. For the best taste, let the salad chill in the fridge for at least 30 minutes. This rest time helps the flavors meld beautifully. For a complete meal, consider serving slices of crusty bread or fresh pita on the side. For the full recipe, check the main article. Using fresh herbs makes a big difference. Fresh dill adds bright taste and aroma. Dried herbs can lose flavor over time. So, always choose fresh when you can. Chilling the salad is also key. It allows flavors to blend well. A cool salad feels refreshing and makes each bite better. Serve your salad in decorative bowls. A beautiful bowl can make your dish pop. You can also use garnishes to add flair. A sprig of dill on top looks nice. Cherry tomatoes add color too, making your dish more inviting. Over-salting cucumbers can ruin your salad. Salting draws out moisture, but too much salt is bad. Always taste before adding more salt. Also, don’t skip the chilling step. Letting the salad chill helps the flavors mix. If you serve it too soon, it won’t taste as good. {{image_4}} You can easily change this salad by adding new ingredients. For creaminess, try adding diced avocado or crumbled feta cheese. They will add a rich texture that blends well with cucumbers. You can also mix in sliced olives or bits of red onion. These add a nice salty flavor and crunch. Switching herbs can make this salad exciting. Use fresh basil or cilantro instead of dill for a different taste. You can also spice it up! Adding a pinch of cayenne pepper or paprika gives it a nice kick. This will make your creamy cucumber salad stand out even more. If you want a dairy-free option, use coconut yogurt instead of Greek yogurt. This keeps the creaminess while being plant-based. For low-calorie swaps, replace sour cream with a lighter yogurt or skip it altogether. You can still enjoy a tasty salad without the extra calories. For the full recipe, check out the detailed instructions above! To keep your creamy cucumber salad fresh, store it in an airtight container. Place it in the fridge right after serving. This way, it stays cool and tasty. The salad can last for about 2 to 3 days in the fridge. After that, the cucumbers may become too soft and lose their crunch. Can you freeze creamy cucumber salad? No, it is best not to freeze it. Freezing changes the texture of cucumbers. They become mushy when thawed. If you want to prep ahead, make the dressing and chop the cucumbers. Store them separately. Mix them just before serving for the best taste. Creamy cucumber salad is best served cold. If you have leftovers, enjoy them straight from the fridge. If the salad looks too watery, gently stir it. You can add a pinch of salt or a squeeze of lemon juice to refresh the flavor. You can keep Creamy Cucumber Salad in the fridge for about three days. Make sure to store it in an airtight container. After that, the salad might lose its crunch and flavor. Always check for any changes in smell or texture before eating. Yes, you can use sour cream instead of Greek yogurt. This swap will make the salad tangier. However, Greek yogurt adds more protein and creaminess. If you want a thicker dressing, sour cream works well too. Feel free to try both and see which you like more! You can add many veggies to your Creamy Cucumber Salad! Some tasty options include: - Cherry tomatoes - Red onion - Bell peppers - Radishes - Carrots These vegetables add color and crunch. Just chop them small so they mix well with the cucumbers. Yes, this salad is great for meal prep! You can make it ahead of time and store it in the fridge. Just keep the cucumbers and dressing separate until you are ready to eat. This way, they stay fresh and crunchy. To add some heat, try these ideas: - Add a pinch of cayenne pepper. - Mix in some chopped jalapeños. - Use a spicy yogurt or sour cream. These options will give your salad a nice kick! Experiment to find the right spice level for you. For more tasty ideas, check out the Full Recipe. In this blog post, I shared how to make a fresh and tasty Creamy Cucumber Salad. We covered the ingredients, step-by-step instructions, and tips to enhance flavor and presentation. I also shared variations and storage info to keep it fresh. This salad is easy to make and perfect for any meal. Try it with your favorite twists for a fun dish. Enjoy your cooking adventure!](https://recipesstation.com/wp-content/uploads/2025/04/20df6254-d10b-451d-a66d-0d5ecef25789.webp)
Are you ready to beat the heat with a cool and creamy cucumber salad? This simple recipe combines crunchy cucumbers
![- 4 boneless, skinless chicken breasts - 1 cup homemade or high-quality store-bought pesto - 1 cup heavy cream - 1 cup cherry tomatoes, halved - 2 tablespoons extra virgin olive oil - 1 teaspoon garlic powder - Salt and freshly ground black pepper, to taste - ½ cup freshly grated Parmesan cheese - Fresh basil leaves for garnish To make this dish, you need some key kitchen tools. A sharp knife is great for slicing the tomatoes. Use a cutting board for safe chopping. A large skillet will help sear the chicken and mix the sauce. A baking sheet is essential for roasting the tomatoes. You also need measuring cups for the cream and pesto. For storage, have some airtight containers ready. After cooking, let the dish cool before placing it in the containers. This keeps it fresh for later use. Each serving of creamy pesto chicken with roasted tomatoes has about 500 calories. It contains around 30 grams of fat, 40 grams of protein, and 10 grams of carbs. This meal is rich in flavor and nutrition, making it a great choice for any dinner. If you want to know more about the full recipe, you can check the [Full Recipe]. Start by preheating your oven to 400°F (200°C). This heat is key for roasting the tomatoes. A hot oven helps them caramelize well, adding great flavor to your dish. In a large mixing bowl, toss together the halved cherry tomatoes, olive oil, garlic powder, salt, and pepper. Make sure each tomato gets coated nicely. This adds flavor and makes them taste great. Spread the seasoned tomatoes on a parchment-lined baking sheet in a single layer. This helps them roast evenly. Next, season both sides of the chicken breasts with salt and pepper. Heat a large skillet over medium-high heat and add a splash of olive oil. When the oil shimmers, carefully place the chicken in the skillet. Sear the chicken for about 5-7 minutes on each side until golden brown. Browning adds flavor and texture, but the chicken is not fully cooked yet. After browning the chicken, lower the heat to medium-low. Pour in the heavy cream followed by the pesto. Stir gently to mix well. Timing is important here. You want the sauce to blend smoothly without boiling. Cover the skillet and let it simmer for about 10-12 minutes. This ensures the chicken cooks through. Use a meat thermometer to check that the internal temperature reaches 165°F (75°C). This step is crucial for safe eating. Once the chicken is done, take it off the heat. Plate each chicken breast and drizzle the creamy pesto sauce over them. Don’t forget to add the roasted tomatoes on the side. For a lovely touch, garnish with fresh basil leaves. Serve with crusty bread or pasta for a complete meal. Enjoy the vibrant colors and flavors of this dish! For more details, check the Full Recipe. To boost the taste of your creamy pesto chicken, try adding a pinch of red pepper flakes. This small change will give your dish a nice kick. You can also mix in fresh lemon juice for a bright, zesty touch. If you love herbs, consider adding thyme or oregano. They work well with both chicken and pesto. Feel free to experiment with these spices to create your perfect flavor. One common mistake is overcooking the chicken. It can become dry and tough. Always check the internal temperature with a meat thermometer. Aim for 165°F (75°C) to ensure it’s safe and juicy. Another mistake is under-seasoning the dish. Make sure to taste and adjust the salt and pepper before serving. This small step can make a big difference in flavor. Finding high-quality pesto can elevate your dish. Look for local markets or specialty stores that offer fresh, homemade pesto. If you prefer store-bought, choose brands that use fresh basil and olive oil. For tomatoes, visit farmers' markets for the ripest, sweetest cherry tomatoes. Fresh ingredients will give your creamy pesto chicken the best taste. You can also check your local grocery store for organic options. {{image_4}} You can easily change this dish by adding more veggies or proteins. For a colorful twist, try adding: - Baby spinach - Zucchini slices - Bell pepper strips - Mushrooms You can also swap the chicken for other proteins. Consider using shrimp, salmon, or even tofu. Each option brings a unique flavor to the creamy pesto. If you need to make this dish gluten-free, choose gluten-free pasta or serve it without pasta. For a dairy-free version, replace heavy cream with coconut milk or a dairy-free cream. Use nutritional yeast instead of Parmesan cheese for added flavor without dairy. Pair this dish with fresh sides for a well-rounded meal. Here are some ideas: - Garlic bread or a crusty baguette - A crisp green salad with lemon vinaigrette - Roasted asparagus or green beans A nice white wine, like Pinot Grigio, complements the flavors well. For a non-alcoholic option, try sparkling water with a slice of lemon. Enjoy the delightful flavors of your creamy pesto chicken with roasted tomatoes! For the complete recipe, check out [Full Recipe]. To store leftovers, let the Creamy Pesto Chicken cool to room temperature. Then, place it in an airtight container. This helps keep it fresh. In the fridge, it stays good for about three days. Make sure to label the container with the date. This way, you know when to use it. If you want to keep your dish longer, freezing is a great option. First, cool the chicken completely. Then, wrap each piece in plastic wrap. After that, put them in a freezer-safe bag. Try to remove all the air from the bag. This helps prevent freezer burn. The chicken can last about three months in the freezer. To reheat, you want to keep the chicken juicy and tasty. One way is to use the oven. Preheat it to 350°F (175°C). Place the chicken in a baking dish and cover it with foil. Heat for about 20 minutes. You can also use a microwave. Just be careful not to overcook it. Heat in short bursts of 30 seconds, checking often. Enjoy it warm with the creamy sauce and roasted tomatoes from the Full Recipe. You can use half-and-half for a lighter option. It won’t be as thick but still gives a creamy taste. Coconut milk works too, but it adds a different flavor. If you want a low-fat choice, try Greek yogurt. Just mix it with a bit of milk to make it smoother. Each choice will change the dish's richness but will still taste good. Yes, you can use grilled chicken. Just make sure it is cooked and cut into pieces. Since it’s already cooked, you can skip the searing step. Simply add the grilled chicken to the sauce after mixing in the cream and pesto. Cook it until heated through, about five minutes. To serve more people, double the chicken and sauce ingredients. Use eight chicken breasts and two cups of cream and pesto. You may need a larger pan to cook it all. Keep an eye on cooking time, too. You may need a few extra minutes to ensure everything heats well. To reheat, place the chicken in a skillet over low heat. Add a splash of cream or water to keep it moist. Cover the skillet with a lid to hold in steam. Heat for about 10 minutes or until warm. You can also use the microwave, but do it in short bursts to avoid drying it out. Yes, this recipe is kid-friendly. Kids love the creamy sauce and tasty chicken. To make it even more appealing, serve it over pasta or rice. You can also add some veggies like peas or broccoli to the dish. This adds color and nutrition without changing the flavor much. For the full recipe, check out the Creamy Pesto Chicken with Roasted Tomatoes recipe. This recipe for Creamy Pesto Chicken is simple and tasty. You learned about the ingredients, preparation steps, and helpful tips. Cooking well doesn’t have to be hard. Remember to season your chicken and use fresh ingredients. Variations allow you to personalize the dish as needed. Follow storage tips to keep leftovers fresh. Whether for family or friends, this dish is sure to impress. Enjoy making it your own and sharing it with others. You’ll be glad you tried this recipe!](https://recipesstation.com/wp-content/uploads/2025/04/63eba379-5d7f-4e65-a995-6a8108ed5b97.webp)
Are you ready to elevate your dinner game? My Creamy Pesto Chicken with Roasted Tomatoes is a simple yet luxurious
![To make Coconut Chicken with Apricot Sauce, gather these ingredients: - 2 boneless, skinless chicken breasts - 1 cup unsweetened coconut flakes - 1 cup all-purpose flour - 2 large eggs, beaten - 1 teaspoon garlic powder - 1/2 teaspoon salt - 1/2 teaspoon freshly ground black pepper - 1 tablespoon olive oil - 1 cup apricot preserves - 1 tablespoon Dijon mustard - 1 tablespoon apple cider vinegar - Fresh cilantro leaves, for garnish These ingredients come together to create a dish full of flavor. You can customize this recipe to suit your taste. Here are some optional ingredients: - Chili flakes for heat - Lime zest for a citrus kick - Chopped green onions for freshness - Toasted nuts for crunch Feel free to mix and match these options to make the dish yours! If you need to make substitutions, here are some ideas: - Use coconut flour instead of all-purpose flour for a gluten-free option. - Swap apricot preserves with peach or mango preserves for a different fruit flavor. - Replace olive oil with coconut oil for an extra coconut taste. - Use maple syrup instead of Dijon mustard for sweetness. These substitutions can change the dish and keep it exciting. For more details, check the Full Recipe. Start by patting the chicken breasts dry. This helps the breading stick better. Slice each breast in half to make thinner cutlets. These will cook evenly and quickly. Next, set up your breading station. Use three shallow bowls. In the first bowl, mix flour, garlic powder, salt, and pepper. In the second bowl, add the beaten eggs. In the third bowl, put the coconut flakes. This setup makes breading simple and neat. Now it’s time to cook. Heat olive oil in a large skillet over medium heat. When the oil is hot, add the breaded chicken cutlets. Cook for about 4-5 minutes on each side. You want them golden brown and fully cooked. Adjust the heat if needed. This keeps the chicken from burning. While the chicken cooks, let’s prepare the apricot sauce. In a small saucepan, mix apricot preserves, Dijon mustard, and apple cider vinegar. Heat this over low. Stir until it’s warm and smooth. This should take about 3-4 minutes. If the sauce is too thick, add a splash of water. Once everything is ready, plate the chicken and drizzle the warm apricot sauce on top. Enjoy this tasty dish! For the full recipe, check out the details above. To make sure your chicken turns out great, follow these tips: - Use thin cutlets: This helps the chicken cook evenly. Slice the breasts in half for faster cooking. - Preheat the skillet: Heating the oil until it shimmers is key. This gives you a nice golden brown crust. - Don’t overcrowd the pan: Cook in batches if needed. This helps the chicken fry rather than steam. When serving coconut chicken, you want to create a feast for the eyes and the palate: - Serve on rice: A fluffy bed of jasmine rice is perfect. It soaks up the apricot sauce well. - Add fresh veggies: Steamed broccoli or a light salad balances the meal. The crunch adds nice texture. - Pair with a drink: A light iced tea or a fruity mocktail complements the dish well. Making your meal look good is easy with a few simple touches: - Use fresh herbs: Cilantro sprigs add color and freshness. They also give a nice aroma. - Sprinkle toasted coconut: This adds crunch and enhances the coconut flavor. It also looks beautiful. - Add lime wedges: A pop of green makes the plate vibrant. Plus, a squeeze of lime brightens the flavors. For more details, check the Full Recipe for Coconut Chicken with Apricot Sauce. {{image_4}} You can try different sauces with coconut chicken. For a spicy kick, use mango salsa. It adds a fresh burst of flavor. If you like savory, try a soy sauce mix with honey and ginger. This gives a nice Asian twist. Barbecue sauce also works well, adding a smoky touch. You can bake the chicken if you want a healthier option. Preheat your oven to 400°F. Place breaded chicken on a lined baking sheet. Bake for about 20 minutes, flipping halfway. This method keeps the chicken juicy. If you prefer frying, use medium heat. Fry until golden brown, about 4-5 minutes per side. Both methods yield delicious results! You can swap ingredients to fit your needs. For a gluten-free option, use almond flour instead of all-purpose flour. Coconut flakes are naturally gluten-free. If you want a vegan dish, replace chicken with tofu. Use unsweetened coconut yogurt for the sauce. This keeps the flavors while fitting different diets. Check the [Full Recipe] for all the details. After enjoying your coconut chicken, let it cool first. Place the leftover chicken in an airtight container. This keeps it fresh. Store it in the fridge for up to three days. Make sure to separate the apricot sauce if you want to keep it fresh longer. To reheat coconut chicken, use the oven for the best results. Preheat your oven to 350°F (175°C). Place the chicken on a baking sheet and cover it with foil. Heat it for about 15 minutes. This warms it evenly without drying it out. You can also use a microwave. Heat it in short bursts, checking often so it doesn’t get too hot. If you want to save some coconut chicken for later, freezing is a great option. Wrap each piece in plastic wrap tightly. Then, place them in a freezer-safe bag. This will prevent freezer burn. You can freeze the chicken for up to three months. Remember to label the bag with the date. When you’re ready to eat, thaw it overnight in the fridge before reheating. For the apricot sauce, store it in a small container in the fridge or freeze it in ice cube trays for easy use. To make Coconut Chicken with Apricot Sauce gluten-free, swap the all-purpose flour for gluten-free flour. Many brands offer good options. You can also use almond flour or coconut flour for a nutty flavor. Ensure all your sauces, like the apricot preserves and Dijon mustard, are gluten-free. Check labels, as some brands may contain gluten. Yes, you can use other meats. Turkey cutlets work well and have a similar texture. Pork chops are another tasty option. Just remember to adjust cooking times. For fish, try firm white fish like cod or halibut. These options will add different flavors while keeping the dish enjoyable. This dish shines with simple sides. Try steamed jasmine rice for a fluffy base. Quinoa adds a nutty flavor and extra protein. Roasted vegetables like broccoli or asparagus complement the sweetness of the sauce. A light salad with citrus dressing can also balance the meal. These sides will enhance your dining experience! For the full recipe, check out the detailed instructions above. In this blog post, we explored how to make Coconut Chicken with Apricot Sauce. We covered the ingredients, cooking steps, and helpful tips. You learned how to customize the dish and adapt it for special diets. Remember, this dish is flexible. Use your best ingredients and enjoy the process. Try different sauces or cooking methods to match your taste. With these ideas, you'll impress your family and friends. Get ready to serve up a delicious meal!](https://recipesstation.com/wp-content/uploads/2025/04/9f7e334d-cd9b-484e-9884-d2fe8d8990af.webp)
Looking for a quick and tasty dinner that’s sure to impress? You’re in the right place! Coconut Chicken with Apricot
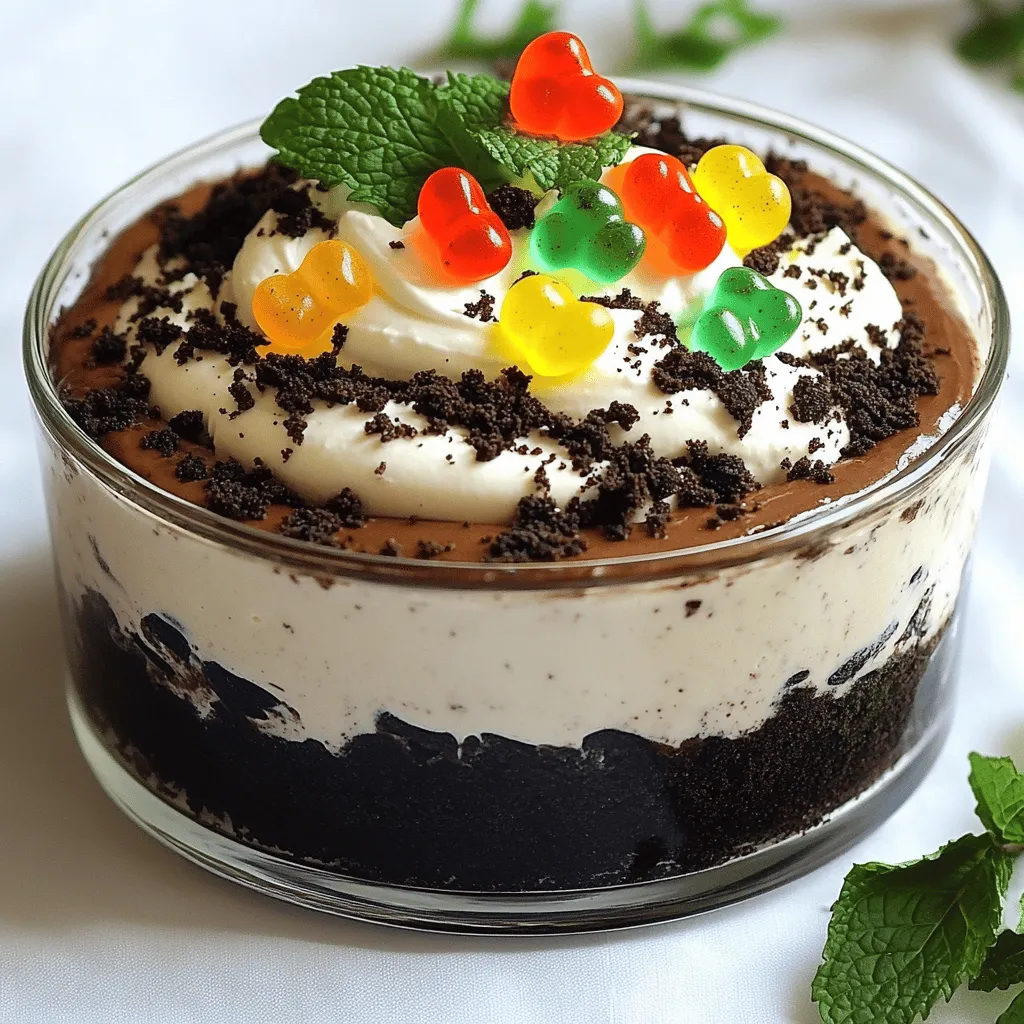
Are you ready to make dessert magic? This OREO DIRT CAKE is both fun and simple to whip up. With
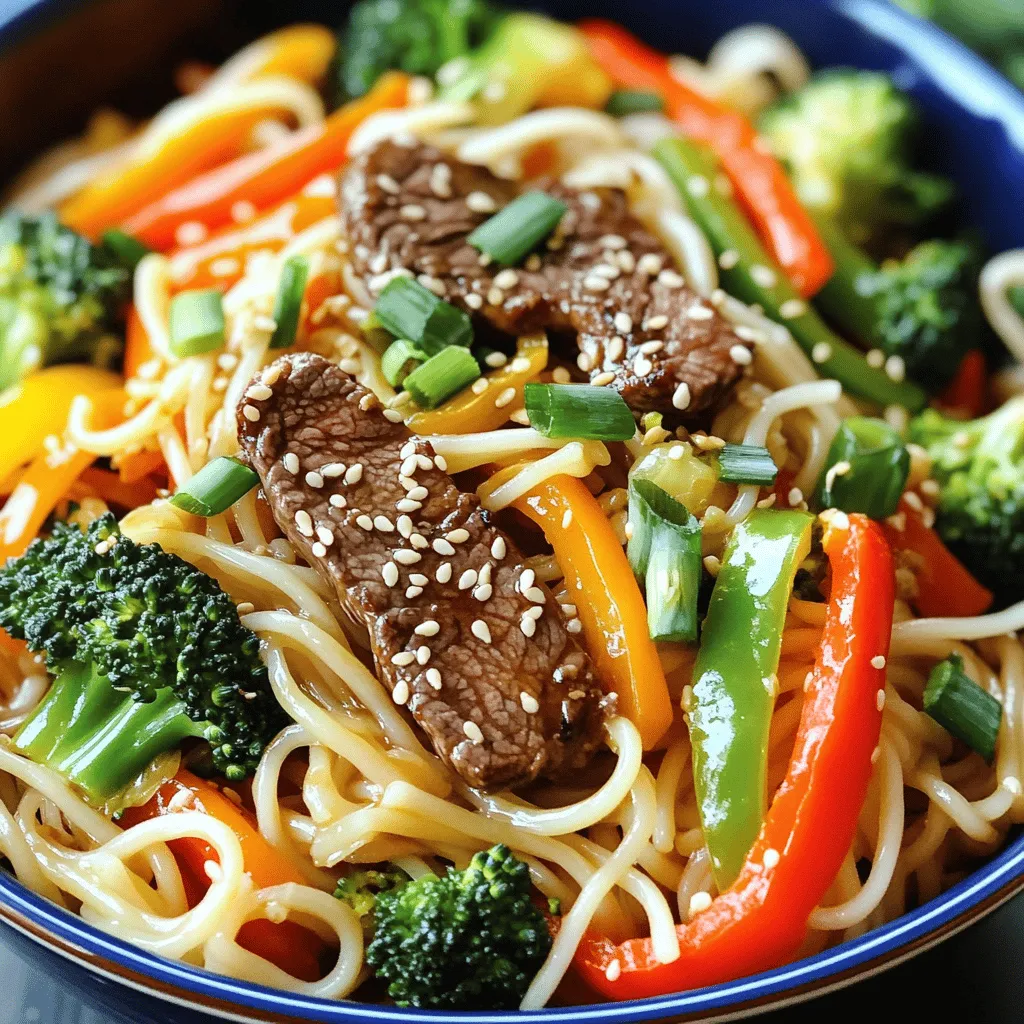
Looking for a meal that’s quick, tasty, and easy? Try my Beef Noodle Stir Fry! This dish packs fresh flavors,
. - Preheat oven to 375°F (190°C). - In a bowl, mix fresh salsa, corn, black beans, cumin, chili powder, salt, and pepper. Start by preheating your oven. A hot oven helps cook the chicken evenly. As you wait, gather your ingredients. Mixing fresh salsa, corn, black beans, and spices creates a vibrant base. This salsa mix adds flavor and color to your dish. - Heat olive oil in a skillet over medium-high heat. - Season chicken breasts with salt and pepper and sear until golden brown. Next, heat olive oil in a skillet. Searing the chicken gives it a nice crust. Season both sides with salt and pepper. When the oil is hot, add chicken breasts. Cook for about 4-5 minutes on each side. Look for a golden brown color; it means it's ready for the next step. - Pour salsa mixture over chicken and sprinkle cheese. - Bake for 20-25 minutes until cooked through. Once the chicken is seared, pour the salsa mixture over it. Make sure each piece is covered. Now, sprinkle shredded Monterey Jack cheese on top. Transfer the skillet to your preheated oven. Bake for 20-25 minutes. To check if it’s done, use a meat thermometer. The chicken should reach 165°F (74°C). After baking, let it rest for 5 minutes. This helps keep the chicken juicy. Enjoy this easy yet delicious Salsa Fresca Chicken! - Always let your chicken sit out for 15 to 30 minutes before cooking. This helps cook it evenly. Cold chicken can take longer to cook and may not brown well. - To check if your chicken is done, use a meat thermometer. Insert it into the thickest part. The chicken should reach 165°F (74°C). This ensures it’s safe to eat. - Want to kick up the flavor? Add spices like smoked paprika or garlic powder. Fresh herbs like parsley or oregano also work well. They add a nice touch. - Making homemade salsa is easy and fun. Just chop fresh tomatoes, onions, and jalapeños. Mix them with lime juice and cilantro. This salsa adds a fresh zing to the chicken. You can find the full recipe in the Full Recipe section. {{image_4}} You can easily switch some ingredients in Salsa Fresca Chicken. If you don’t have black beans, try pinto beans or chickpeas instead. They both add great texture and flavor. For corn, you can use diced bell peppers or zucchini. These swaps keep the dish fresh and exciting. When it comes to cheese, Monterey Jack is tasty, but you can use cheddar or pepper jack. Each cheese will give a different flavor. If you want a dairy-free option, try using vegan cheese. Just make sure it melts well for the best taste. Salsa Fresca Chicken pairs well with many side dishes. Serve it with fluffy rice for a filling meal. You can also use warm tortillas to scoop up the chicken and salsa mix. It's fun and tasty! To elevate the dish, add creamy avocado slices or a dollop of sour cream. Both add richness that balances the zing from the salsa. You might even sprinkle extra cilantro for a fresh touch. These additions make every bite delicious! To store leftover Salsa Fresca Chicken, let it cool first. Place it in an airtight container. It can last in the fridge for three to four days. When you're ready to eat, reheat it gently. Use a skillet over low heat for even warmth. This method keeps the chicken moist. You can also microwave it. Cover the dish with a damp paper towel to prevent drying out. If you want to freeze Salsa Fresca Chicken, ensure it is fully cooled first. Use a freezer-safe container or heavy-duty freezer bags. Remove as much air as possible. The chicken can stay good for up to three months. When you're ready to enjoy it, thaw it in the fridge overnight. For quicker thawing, place the bag in cold water. After thawing, reheat it as mentioned before for the best taste. What can I substitute for chicken breasts? You can use chicken thighs instead of breasts. Thighs stay moist and add flavor. You could also try turkey cutlets or even tofu for a plant-based option. Remember, cooking times may change with different meats. How do I ensure my chicken is juicy? To keep chicken juicy, do not overcook it. Use a meat thermometer to check for 165°F (74°C). Brining your chicken for a couple of hours before cooking can also help lock in moisture. Can I use store-bought salsa? Yes, store-bought salsa works great! It saves time and adds flavor. Just choose a salsa you enjoy, as it will affect the overall taste of your dish. How long will leftovers last in the fridge? Leftovers will last for about 3 to 4 days in the fridge. Make sure to store them in an airtight container. Reheat gently to keep the chicken moist. Is this recipe suitable for meal prep? Yes, this recipe is perfect for meal prep. You can make it ahead of time and portion it out for the week. Just reheat portions in the microwave or oven. Can I make this dish dairy-free? Absolutely! You can skip the cheese or use a dairy-free cheese alternative. This way, you can still enjoy the great flavors without the dairy. This blog post lays out a simple and tasty recipe for Salsa Fresca Chicken. We covered the main ingredients, step-by-step cooking instructions, and helpful tips for success. Variations allow you to make it your own, while storage info ensures you can enjoy leftovers. Cook this dish with confidence to impress anyone at your table. With fresh flavors and easy steps, you will make a meal everyone loves. So, grab your ingredients and get started!](https://recipesstation.com/wp-content/uploads/2025/04/92e1a570-7c75-445e-9146-85a826c8ab75.webp)
Looking for a simple yet flavorful dish? Let me introduce you to Salsa Fresca Chicken! This recipe is packed with
![To make a tasty Skillet Chili Mac, gather these key ingredients: - 1 lb ground beef or turkey - 1 medium onion, finely chopped - 3 cloves garlic, minced - 1 red bell pepper, diced - 1 can (15 oz) kidney beans, drained and rinsed - 1 can (15 oz) black beans, drained and rinsed - 1 can (14.5 oz) diced tomatoes, including juice - 2 cups beef broth (or vegetable broth for a lighter option) - 2 cups elbow macaroni - 3 tablespoons chili powder - 1 teaspoon ground cumin - 1 teaspoon smoked paprika - Salt and freshly ground black pepper to taste - 1 cup shredded sharp cheddar cheese - Fresh cilantro, chopped, for garnish These ingredients bring rich flavors and textures to your Skillet Chili Mac. The ground meat adds protein, while the beans give fiber and heartiness. The diced tomatoes and broth form a savory base. The spices create warmth and depth. Finally, the cheese and cilantro add the finishing touch, making each bite a delight. For the full recipe, check out the Skillet Chili Mac Delight . 1. Start by heating a large skillet over medium heat. 2. Add the ground beef or turkey and cook. Stir until the meat is brown, about 5 to 7 minutes. 3. If there is extra fat, drain it off. 4. Toss in the chopped onion, minced garlic, and diced red bell pepper. 5. Sauté for about 5 minutes until the veggies soften. 6. Next, add in the spices. Sprinkle chili powder, cumin, smoked paprika, salt, and pepper. 7. Stir well to coat the meat and veggies with the spices. 1. Pour in the diced tomatoes with their juice. 2. Add the beef broth, kidney beans, black beans, and elbow macaroni. 3. Mix everything well to combine. 4. Increase the heat to bring it to a gentle boil. 5. Once boiling, reduce the heat and cover the skillet. 6. Let it simmer for about 15 minutes. Stir occasionally until the pasta is cooked al dente. 1. After 15 minutes, remove the lid. 2. Stir in half of the shredded cheddar cheese until it melts into the dish. 3. Taste your skillet chili mac. Adjust seasoning with more salt or pepper if needed. 4. Serve hot with the remaining cheese on top. 5. Garnish with fresh cilantro for a burst of flavor. For the complete recipe, check the [Full Recipe]. To make your skillet chili mac shine, you need the right tools. A large skillet or Dutch oven works best. A wooden spoon helps mix your ingredients well. A can opener is handy for the beans and tomatoes. Use a knife and cutting board for chopping. Here are some tips to boost flavor: - Sauté the onion, garlic, and bell pepper until soft. This adds depth. - Use fresh spices whenever possible. They give a stronger taste. - Taste as you cook. Adjust salt and pepper for your liking. Presentation matters! Serve your chili mac in deep bowls. Top each serving with extra cheese. Add a sprinkle of cilantro for color. A drizzle of olive oil or a dollop of sour cream can enhance the look and flavor. For sides, consider: - A fresh green salad with a light vinaigrette. - Cornbread for a sweet contrast. - Tortilla chips for some crunch. You can easily change the spice level. Add more chili powder for heat. Want it milder? Cut back on the spices. If you prefer vegetarian or vegan options, swap the meat for lentils or mushrooms. Use vegetable broth instead of beef broth. You can also use vegan cheese for a dairy-free dish. Making these adjustments lets you create a chili mac that suits your taste. For the full recipe, check out the complete details. {{image_4}} You can easily change the meat in this dish. Ground chicken or turkey work well. If you prefer plant-based options, try lentils or a meat substitute. These swaps keep the dish tasty while catering to different diets. You can also switch up the pasta. Instead of elbow macaroni, use penne or shells. You can also try grains like quinoa or farro for a unique twist. These options add a different texture and flavor to your Skillet Chili Mac. Want to spice things up? Add more chili powder or a dash of cayenne. You can also mix in fresh herbs like basil or oregano. These flavors brighten up the dish and make it more complex. For a fun twist, toss in corn for sweetness or jalapeños for heat. Both add great texture and flavor. You can also try adding cream cheese. It makes the dish creamy and rich. Different cultures have their own versions of chili mac. For a Tex-Mex style, add black olives or avocado. You can serve it with tortilla chips for crunch. If you want an Italian spin, try adding Italian sausage and using marinara sauce instead of broth. Top it with mozzarella cheese for a cheesy finish. These regional takes add fun flavors to your meal. For the full recipe, be sure to check out the Skillet Chili Mac Delight. Store leftover Skillet Chili Mac in an airtight container. It keeps well in the fridge for up to three days. Make sure to let it cool first before sealing the container. This helps prevent moisture build-up, which can spoil the dish. I recommend using glass containers for better heat retention and easy microwave use. You can freeze Skillet Chili Mac for longer storage. First, let it cool completely. Then, place it in a freezer-safe container. Try to remove as much air as possible to prevent freezer burn. When you're ready to eat, thaw it in the fridge overnight. To reheat, use the microwave or heat it in a skillet on low. Stir often to heat evenly. Enjoy the warmth and comfort of this dish even on busy nights! For the full recipe, check out the Skillet Chili Mac Delight. How long does Skillet Chili Mac last in the fridge? Skillet Chili Mac lasts about 3 to 5 days in the fridge. Store it in an airtight container. Make sure to cool it down first before sealing. Can I make Skillet Chili Mac ahead of time? Yes, you can make this dish ahead of time. It is easy to reheat, and the flavors deepen overnight. Just keep it in the fridge until you're ready to serve. What can I substitute for elbow macaroni? You can use any short pasta like penne or fusilli. Gluten-free pasta works too! Just adjust the cooking time based on the type of pasta you choose. Is it possible to make this dish gluten-free? Yes, it is simple to make Skillet Chili Mac gluten-free. Use gluten-free pasta and ensure your broth is gluten-free as well. How do I know when the pasta is cooked perfectly? Check the pasta for a tender yet firm texture, known as "al dente." It should have a slight bite when you taste it. Can I use canned chili instead of making my own? Absolutely! Canned chili can save time. Just heat it in the skillet before adding pasta and beans. Adjust spices to fit your taste. For more details on preparing and enjoying this dish, refer to the Full Recipe. In this blog post, we explored how to make a delicious Skillet Chili Mac. We covered the key ingredients and detailed step-by-step instructions for preparation and cooking. I shared tips to perfect the dish and even suggested fun variations and storage methods. Remember, you can adjust flavors to your liking. Try different meats, spices, or pasta to make it your own. Enjoy creating this tasty dish that suits your taste and preferences. Happy cooking!](https://recipesstation.com/wp-content/uploads/2025/04/b75af2f9-b4ed-413d-9250-fc51a7ca584d.webp)
Are you ready to spice up your dinner routine? My Skillet Chili Mac is quick, easy, and packed with flavor.
![For this lasagna soup, you will need: - 1 lb ground beef or Italian sausage - 1 medium onion, diced - 3 cloves garlic, minced - 1 bell pepper, diced (any color) - 1 can (28 oz) crushed tomatoes - 4 cups beef broth - 8 oz lasagna noodles, broken into smaller pieces - 1 cup ricotta cheese - 1 cup shredded mozzarella cheese, plus an extra 1/2 cup for topping - 1/2 cup grated Parmesan cheese - Fresh basil or parsley, for garnish These key ingredients create layers of flavor and texture. The ground meat adds richness. The fresh veggies give a nice crunch. And the cheese components melt perfectly to create that comforting feel. You should also include: - 2 teaspoons Italian seasoning - 1 teaspoon dried basil - 1 teaspoon sugar - Salt and pepper, to taste The spices bring the soup to life. Italian seasoning gives it a classic taste. Dried basil adds a fresh note. Sugar balances the acidity of tomatoes. Salt and pepper enhance overall flavor. For the broth, use beef broth for a deep flavor. You can use low-sodium broth if you prefer. The crushed tomatoes are key. They create a thick and hearty base. This base ties all the ingredients together, making each bite feel warm and inviting. For the full recipe, be sure to check the detailed instructions. Enjoy making this delicious lasagna soup! 1. In a large pot over medium heat, add 1 lb of ground beef or Italian sausage. 2. Cook it for about 5-7 minutes, stirring often. Break it apart as it cooks. 3. If you see any extra fat, drain it from the pot. 4. Next, add 1 medium diced onion, 3 minced garlic cloves, and 1 diced bell pepper. 5. Sauté these for about 5 minutes until they are soft and smell great. 1. Pour in 1 can of crushed tomatoes and 4 cups of beef broth. 2. Stir in 2 teaspoons of Italian seasoning, 1 teaspoon of dried basil, and a teaspoon of sugar. 3. Add salt and pepper to taste. 4. Bring this mix to a rolling boil. 5. Once it boils, lower the heat and let it simmer for about 10 minutes. 1. Add 8 oz of broken lasagna noodles to the pot. 2. Cook for 10-12 minutes until the noodles are tender but still a bit firm. 3. In a separate bowl, mix 1 cup of ricotta cheese, 1/2 cup of shredded mozzarella, and 1/2 cup of grated Parmesan. 4. When the noodles are ready, ladle the soup into bowls. 5. Top each bowl with a generous scoop of the cheese mixture and sprinkle with more mozzarella. 6. Finish with fresh basil or parsley for a burst of color and flavor. This hearty dish combines rich flavors and warms your soul. For the full recipe, check out Lasagna Soup Delight . To make your lasagna soup shine, taste it as you cook. Adjust seasonings like salt and pepper to suit your taste. A little extra Italian seasoning can enhance the flavor too. Cooking the noodles to al dente is key. This means the noodles are firm but not hard. If you overcook them, they turn mushy. Remember, they will soften more in the soup. Fresh herbs make a beautiful garnish. I love using basil or parsley. They add color and a fresh taste. Just sprinkle a handful on top right before serving. For serving tips, use a large bowl. Ladle the soup generously, so it looks inviting. Add a dollop of cheese on top. This creates a nice contrast with the soup. Avoid overcooking the noodles. They can lose their texture and become mushy. Keep an eye on them while they cook. Using too much cheese can also be an issue. It may overpower the soup. On the flip side, not enough cheese leaves it bland. Aim for balance with your cheese portions. For the full recipe, check [Full Recipe]. {{image_4}} You can switch up the protein in your lasagna soup. Instead of ground beef or Italian sausage, try using chicken or turkey. This change makes the soup lighter but still tasty. Simply brown the meat as you would with beef. If you prefer a vegetarian option, use lentils or mushrooms. Lentils add protein while mushrooms bring a rich, earthy taste. Both choices make the soup hearty and satisfying. If you need a gluten-free version, don’t worry! You can swap traditional lasagna noodles for gluten-free pasta. Rice noodles or zucchini noodles work well. Just make sure to adjust the cooking time. You can also use different types of broth. Vegetable broth enhances the flavor without gluten. Chicken broth is another great option if you want more depth. Adding extra vegetables is a fun way to change your soup. Spinach, carrots, or zucchini can boost the nutrition and flavor. Just chop them small and add them in when you cook the meat. Experimenting with different herbs can also elevate your dish. Try using fresh oregano or thyme for a new twist. You can mix and match to find your favorite flavor combinations. For more details, check out the Full Recipe. After enjoying your lasagna soup, let it cool. This step helps keep it safe. Use airtight containers to store it. Make sure to fill them, but leave some space at the top. This allows for expansion. You can keep leftovers in the fridge for about 3-4 days. If you want to store it longer, freezing is a great option. When ready to eat your leftovers, the best method is the stove. Pour the soup into a pot and heat it over medium heat. Stir often to keep it from sticking. You can also use a microwave if you’re in a rush. Just heat in short bursts and stir in between. This way, you keep all the great flavors intact. To freeze your lasagna soup, let it cool completely first. Then, pour it into freezer-safe containers or bags. Remove as much air as possible to prevent freezer burn. Label the containers with the date. You can freeze it for about 3 months. When ready to eat, thaw it in the fridge overnight. For quick thawing, use the microwave. Reheat it gently on the stove to maintain the soup's texture. This method keeps it just as delicious as when you first made it. Making lasagna soup is quick and easy. It takes about 15 minutes to prep and 20 minutes to cook. You will have a warm, tasty dish in just 35 minutes. This makes it a great option for a busy weeknight meal. Yes, you can make lasagna soup ahead of time. Store it in an airtight container in the fridge for up to three days. To reheat, simply warm it on the stove over low heat. You might want to add a splash of broth to keep it creamy. For longer storage, freeze it for up to three months. Thaw in the fridge overnight before reheating. Lasagna soup pairs well with many sides. Here are some great options: - Garlic bread for dipping - A fresh garden salad for crunch - Cheese-stuffed breadsticks for extra flavor - Crisp vegetable sticks for a light touch These sides enhance the meal and make it more enjoyable. You can mix and match to find your favorite combinations. Lasagna soup combines savory ground meat, fresh veggies, and melted cheese for a delicious dish. Following the steps I outlined, you can create a flavorful, warm meal. Remember to taste your soup as you cook. This ensures you achieve the best flavor and texture. Don’t shy away from variations or garnishes to make it your own. With proper storage, this dish can be enjoyed later. Now, you have all the tools to make lasagna soup a family favorite!](https://recipesstation.com/wp-content/uploads/2025/04/67db01e5-42d0-4d9e-809f-cd7f6944f89d.webp)
Looking for a meal that’s bursting with flavor and feels like a warm hug? Lasagna soup is your answer! This
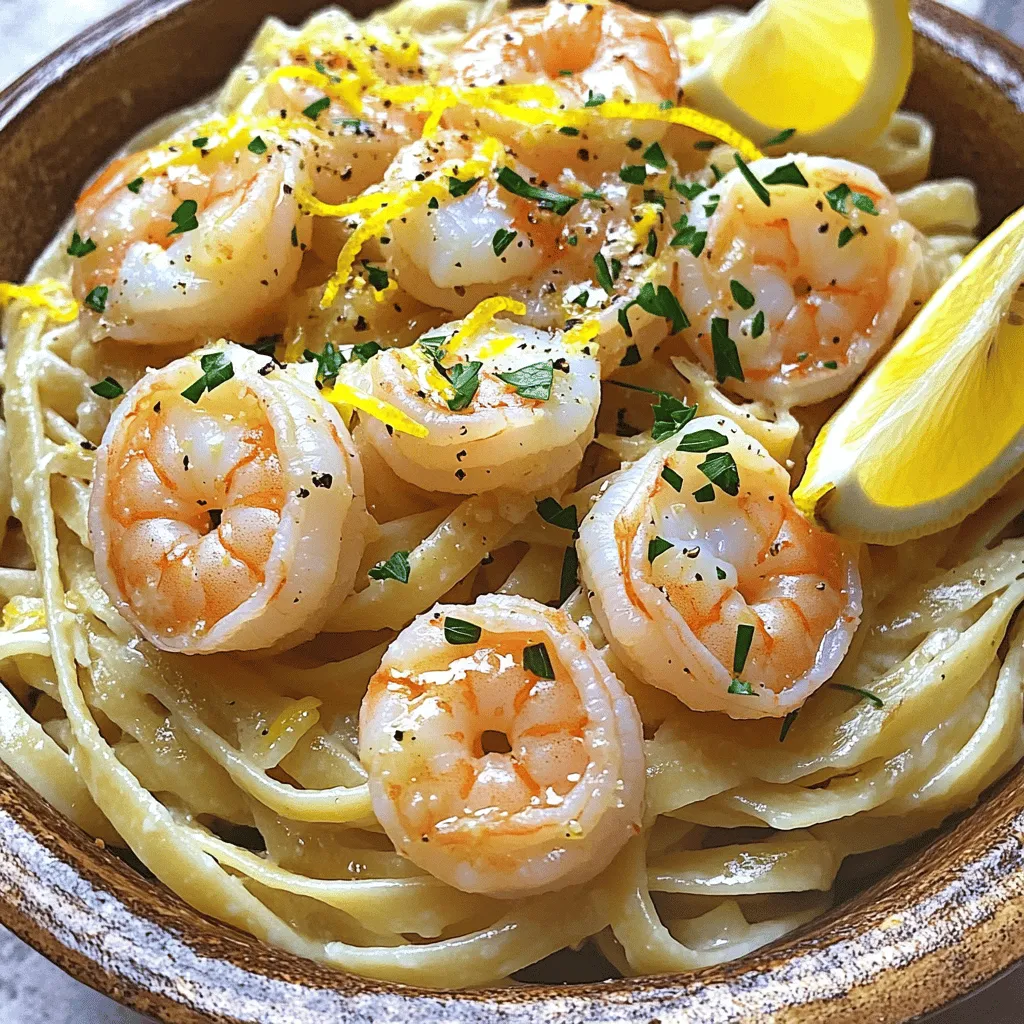
![To create the perfect Bang Bang Shrimp Pasta, gather the following ingredients: - 8 oz spaghetti or fettuccine - 1 lb shrimp, peeled and deveined - 1 tablespoon olive oil - 1 teaspoon garlic powder - 1 teaspoon paprika - Salt and black pepper to taste - 1 cup heavy cream - 1/4 cup mayonnaise - 2 tablespoons sweet chili sauce - 1 tablespoon sriracha (adjust according to spice preference) - 1/2 teaspoon fresh lime juice - 3 green onions, finely chopped (for garnish) - Fresh cilantro leaves, for garnish These ingredients make this dish rich, creamy, and full of flavor. The shrimp adds a lovely texture and protein. The sweet chili sauce and sriracha bring a perfect blend of sweetness and heat. You can adjust the spice level based on your taste. Make sure to use fresh shrimp for the best taste. The pasta choice is flexible; both spaghetti and fettuccine work well. You can find the full recipe for detailed steps on how to combine these ingredients to create a delightful meal. Enjoy cooking! - Bring a large pot of salted water to a boil. - Add 8 oz of spaghetti or fettuccine. - Cook for 8-10 minutes until al dente. - Drain the pasta and set it aside, reserving some pasta water. - Take 1 lb of peeled and deveined shrimp. - Season with 1 tablespoon of olive oil, 1 teaspoon of garlic powder, and 1 teaspoon of paprika. - Add salt and black pepper to taste. - Toss everything together until shrimp are evenly coated. - Heat a large skillet over medium heat. - Place the seasoned shrimp in a single layer in the skillet. - Cook for 2-3 minutes on each side, until shrimp turn pink and opaque. - Remove the shrimp from the skillet and set aside. - In the same skillet, lower the heat to medium-low. - Combine 1 cup of heavy cream, 1/4 cup of mayonnaise, 2 tablespoons of sweet chili sauce, 1 tablespoon of sriracha, and 1/2 teaspoon of fresh lime juice. - Stir well and heat through without boiling for about 3-5 minutes. - Add the cooked pasta to the skillet with the Bang Bang sauce. - Toss the pasta in the sauce using tongs. - If the sauce is too thick, add some reserved pasta water to adjust the consistency. - Gently fold in the cooked shrimp to the pasta. - Serve the Bang Bang Shrimp Pasta in bowls or on a platter. - Garnish with chopped green onions and fresh cilantro for extra flavor. For the complete recipe, refer to the [Full Recipe]. Enjoy your cooking! To make the Bang Bang sauce shine, find the right balance of sweetness and spice. Start with sweet chili sauce for a nice base. Then, add sriracha to give it heat. Adjust the amounts based on your taste. You want a kick, but not too much. Always taste as you mix. This way, you create a sauce that fits your flavor needs perfectly. Cooking shrimp can be tricky. You want them tender, not rubbery. Heat a skillet over medium heat, then add your seasoned shrimp. Cook for 2-3 minutes on each side. Watch closely as they turn pink and opaque. If you cook them too long, they lose their nice texture. Remove them from the heat as soon as they’re done. Presentation makes a big difference. When serving, think about color and freshness. Garnish with lime zest to add brightness. It gives a nice pop and makes the dish look appealing. A drizzle of extra sweet chili sauce can also enhance flavor and appearance. Green onions and cilantro will add a fresh touch. These small details make your Bang Bang Shrimp Pasta really shine. {{image_4}} You can change the pasta to fit your needs. Try gluten-free pasta if you need it. Whole grain pasta is a tasty and healthy option too. If you want to switch the shrimp, you can use chicken. Tofu works well for a veggie twist. You can also add seasonal vegetables like zucchini or bell peppers for extra flavor. Want a kick? Add cayenne for heat or lemon zest for brightness. You can also swap the sauce. Try teriyaki or a spicy garlic sauce. Each sauce brings new life to your dish. These small changes can make your Bang Bang Shrimp Pasta even more fun to eat. Pair your pasta with a fresh side salad. A simple green salad with a light dressing works well. Garlic bread is another great choice. It adds crunch and flavor to your meal. Enjoying these sides makes for a complete and delightful dining experience. You can find the full recipe online to get started! To keep your Bang Bang Shrimp Pasta fresh, store it in airtight containers. This helps prevent moisture loss and keeps flavors intact. Let the pasta cool before sealing. If you have extra sauce, store it separately for best results. Keep the leftovers in the fridge for up to three days. When you reheat, avoid the microwave if you can. Instead, use a skillet over low heat. Add a splash of water or extra cream to keep it moist. Stir gently until heated through. This method helps maintain the pasta's texture. If you must use a microwave, heat in short bursts and stir often. You can freeze Bang Bang Shrimp Pasta for later. Just make sure to cool it completely before freezing. Use freezer-safe containers or bags. Label them with the date. It will last in the freezer for up to two months. To reheat, thaw overnight in the fridge and then follow the reheating tips. Bang Bang Shrimp Pasta is a fun and tasty dish. It combines shrimp, pasta, and a creamy sauce. The sauce has a sweet and spicy kick, making it very popular. This dish likely comes from Asian-inspired flavors. Many chefs enjoy adding their twist to it. You can find it in restaurants or make it at home. I love how easy it is to prepare with simple ingredients. The spice level can vary depending on how much sriracha you use. If you enjoy heat, add more sriracha. If you prefer it milder, use less. The sweet chili sauce helps balance the spice, making it tasty for many. You can always adjust the spice to match your taste. Just remember, you control the heat! Yes, you can prepare parts of this dish ahead of time. Cook the pasta and shrimp earlier in the day. Store them in the fridge until you're ready to combine them. When it's time to eat, warm the sauce and mix everything together. This makes it easy for busy evenings or gatherings. Just make sure to keep everything in separate containers to maintain freshness. To lighten up this dish, consider a few swaps. Use whole grain pasta instead of regular pasta. You can also use low-fat cream and mayonnaise for the sauce. Another option is to add more vegetables, like bell peppers or broccoli. These swaps keep the flavor while making the dish a bit healthier. Enjoying delicious food can also be nutritious! For the full recipe, check out Bang Bang Shrimp Pasta. In this post, I covered the ingredients and steps to make Bang Bang Shrimp Pasta. You learned how to cook the pasta, prepare the shrimp, and create a rich sauce. I shared tips to enhance flavors and suggested ingredient swaps for variety. Proper storage and reheating tips help keep leftovers fresh. This dish is versatile, easy to make, and perfect for quick meals. Try it out and enjoy a burst of delicious flavors!](https://recipesstation.com/wp-content/uploads/2025/04/37667869-61f7-4cbd-bc5a-bec89baa39ac.webp)
Looking for a dinner option that packs flavor and excitement? Look no further! My Savory Bang Bang Shrimp Pasta is
