OREO DIRT CAKE Delightful and Easy Dessert Recipe

Are you ready to make dessert magic? This OREO DIRT CAKE is both fun and simple to whip up. With a mix of creamy goodness, chocolate, and crushed Oreos, it’s a dessert that kids and adults will love. Plus, it requires no baking! In just a few steps, you can create a sweet treat that will wow your family and friends. Let’s dive into the tasty details of this delightful recipe!

Ingredients

Creating Oreo Dirt Cake is simple and fun! Here’s what you need:

– 1 package (15.25 oz) Oreo cookies

– 1/2 cup (1 stick) unsalted butter, melted

– 1 package (8 oz) cream cheese, softened to room temperature

– 1 package (16 oz) powdered sugar

– 1 tub (16 oz) Cool Whip, thawed

– 1 package (3.9 oz) chocolate instant pudding mix

– 2 cups cold milk

– 1 cup gummy worms (optional, for playful decoration)

– Fresh mint leaves (optional, for garnish)

Each ingredient plays a key role in making this dessert delicious and appealing. The Oreo cookies form the base and add rich chocolate flavor. The melted butter helps bind the crust together. Cream cheese and powdered sugar create a sweet, creamy filling that pairs perfectly with the chocolate pudding. The Cool Whip adds lightness, while the gummy worms make it fun!

For the best results, gather all your ingredients before you start. This way, you can work smoothly and enjoy the process. You can find the full recipe in the next section, which will guide you step by step!

Step-by-Step Instructions

Preparing the Cookie Crust

– First, crush the Oreo cookies. You can use a food processor for this. Pulse until they turn into fine crumbs.

– Next, mix the crumbs with melted butter in a bowl. Stir well until every crumb is coated.

– Now, press this mixture firmly into the bottom of a 9×13 inch baking dish. Make sure it is even and packed tight.

Making the Cream Cheese Filling

– In a clean mixing bowl, beat the softened cream cheese with an electric mixer. Aim for a smooth texture.

– Gradually add the powdered sugar while mixing. Keep beating until it is well blended and creamy.

– Finally, gently fold in the thawed Cool Whip with a spatula. This makes the filling light and fluffy.

Combining the Pudding

– In a separate bowl, whisk the chocolate instant pudding mix with cold milk for about 2 minutes. This should thicken to a creamy consistency.

– Let the pudding sit for 5 minutes to firm up before using it.
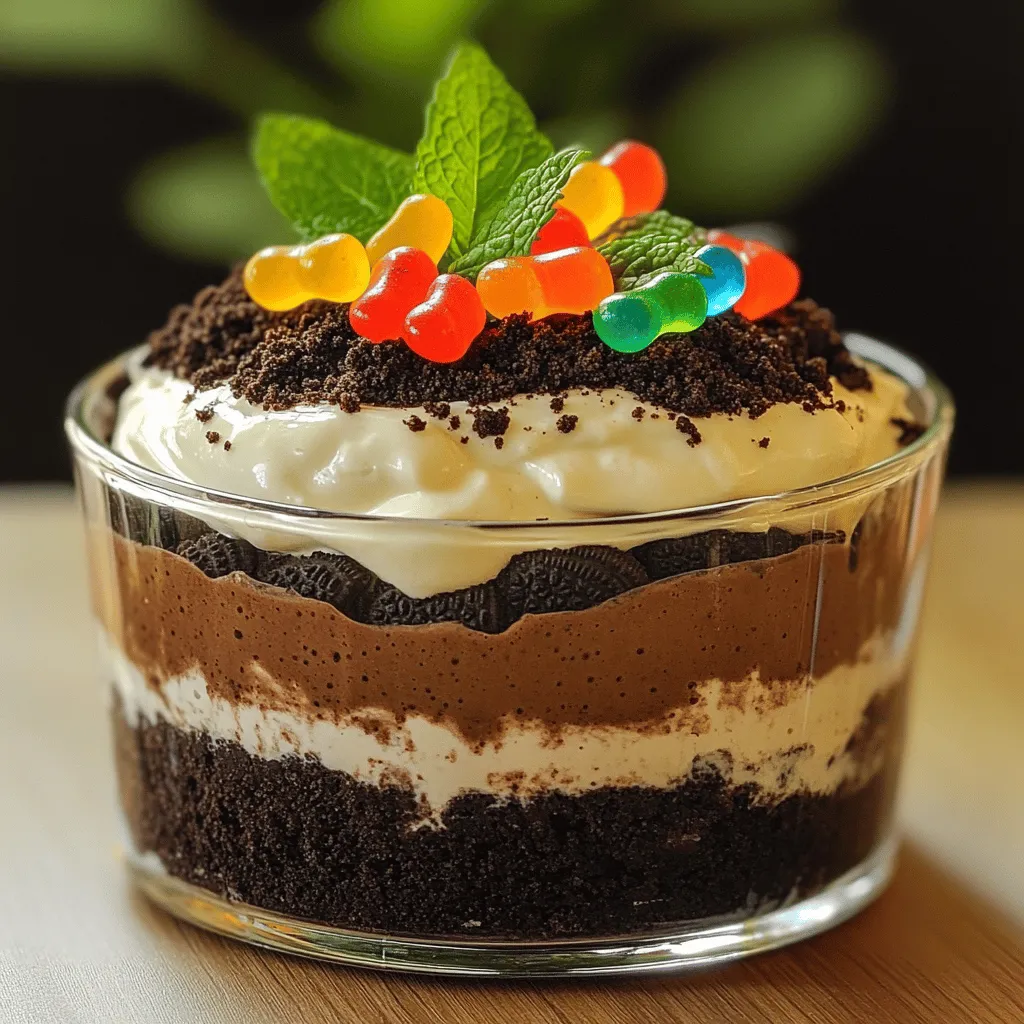
Layering the Cake

– Spread the cream cheese filling evenly over the cookie crust in the baking dish.

– Then, layer the chocolate pudding on top of the cream cheese. Smooth it out to make it even.

– Take the reserved cup of Oreo crumbs and sprinkle it over the pudding. This gives a fun dirt look.

Chilling the Cake

– Cover the baking dish tightly with plastic wrap. Place it in the refrigerator.

– Chill for at least 4 hours, but overnight is best. This lets the flavors mix and the cake set well.

Decorating for Presentation

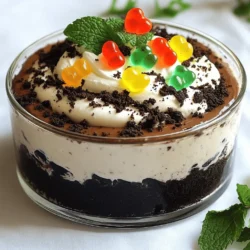
– Just before you serve, add gummy worms on top for a fun touch.

– If you want, garnish with fresh mint leaves to add color and freshness.

Follow these steps for a delightful Oreo Dirt Cake. For the full recipe, check out the detailed instructions provided earlier!

Tips & Tricks

Perfecting the Texture

Chilling time is key for Oreo dirt cake. It helps all the flavors blend well. I find that letting it chill for at least four hours makes a big difference. Ideally, chill it overnight for the best results. This helps the layers firm up, making each slice neat and clean.

Smoothing out layers is also important. After spreading the cream cheese filling, use a spatula to make it even. When adding the pudding, gently spread it over the cream cheese. This keeps the layers distinct and beautiful.

Customization Ideas

You can easily customize your Oreo dirt cake. Try different toppings like crushed nuts or sprinkles for fun textures. You can also swap out the Oreo cookies. Try using mint cookies or peanut butter cookies for unique flavors. These small changes can add a whole new twist to your cake.

Serving Suggestions

Portion sizes matter. You can cut the cake into squares for easy serving. If you want something fun, serve it in clear cups. This way, everyone can see the layers. Plus, it makes for a great party treat!

For creative presentation, consider using a clear glass dish. This shows off the lovely layers. You can also garnish with fresh mint leaves for a nice touch. They add color and freshness to your dessert.

Feel free to check out the Full Recipe for more details on making this delightful treat!

Variations

Different Flavors to Explore

You can change up your Oreo dirt cake in fun ways. A vanilla version tastes great. Just swap out chocolate pudding for vanilla pudding. This gives the dessert a lighter flavor.

Another fun twist is the peanut butter variation. Mix in peanut butter with the cream cheese filling. It adds a rich, nutty taste that pairs well with the cookies. Kids often love this flavor!

Gluten-Free Alternatives

If you need a gluten-free option, use gluten-free sandwich cookies. There are many tasty brands available. Just crush them the same way as regular Oreos. The taste stays rich and delicious, ensuring everyone can enjoy this treat.

Vegan Options

For a vegan dirt cake, you can use dairy-free cream cheese. Brands like Tofutti or Kite Hill work well. They create a creamy texture without dairy.

Also, swap out Cool Whip for a non-dairy whipped topping. Look for brands like So Delicious or CocoWhip. These options keep the dessert light and fluffy while staying vegan-friendly.

By exploring these variations, you can make your Oreo dirt cake perfect for everyone. Check out the Full Recipe for more details!

Storage Info

How to Store Leftovers

To keep your Oreo dirt cake fresh, use an airtight container. This helps prevent the cake from drying out. Store it in the fridge for up to five days. If you notice any changes in texture or smell, it’s best to toss it.

Freezing Options

You can freeze this cake for longer storage. First, cut it into pieces. Wrap each piece tightly in plastic wrap. Then place them in a freezer-safe bag. The cake can last up to three months in the freezer. To thaw, take it out and place it in the fridge overnight.

Shelf Life Notes

Oreo dirt cake stays its best for about five days in the fridge. Look for signs of spoilage like a sour smell or mold. If the cake feels dry or crumbly, it’s time to let it go. Keep an eye on it, and enjoy it while it’s fresh!

FAQs

What is Oreo Dirt Cake?

Oreo Dirt Cake is a fun dessert that looks like dirt! It has layers of creamy goodness and crushed Oreo cookies. This dessert became popular in the 1980s. People love it for its playful look and easy prep. You can enjoy it at parties or family gatherings. The combination of flavors and textures makes it a favorite for many.

How long can I keep Oreo Dirt Cake in the refrigerator?

You can keep Oreo Dirt Cake in the refrigerator for up to five days. Just make sure to cover it well. This helps keep it fresh and tasty. Over time, the layers may soften, but the flavor stays great. If you want the best taste, try to eat it within the first three days.

Can I make Oreo Dirt Cake ahead of time?

Yes, you can make Oreo Dirt Cake ahead of time! This dessert is perfect for planning. You can prepare it a day before you serve it. Just follow the recipe, then chill it overnight. This gives the flavors time to blend. Plus, it saves you time on the day of your event.

What other decorations can I use besides gummy worms?

You can use many fun decorations for Oreo Dirt Cake! Some tasty options include chocolate sprinkles or edible flowers. You could even add mini chocolate cookies or candy rocks for a playful touch. Fresh fruit can add color, too. Choose whatever you like best to match your occasion.

Is Oreo Dirt Cake suitable for kids?

Absolutely! Oreo Dirt Cake is a kid-friendly dessert. Kids love the taste and the fun look. It’s simple to make, so kids can help in the kitchen. Plus, they enjoy adding their favorite toppings. This dessert is sure to make them smile!

This blog post shared a simple recipe for Oreo Dirt Cake. You learned about the key ingredients, like Oreos and cream cheese, as well as step-by-step instructions to make it. Also, we covered tips to custom-make your cake and how to store leftovers.

Oreo Dirt Cake is fun to make and eat. It’s a great dessert for parties or family gatherings. Enjoy creating your own versions and share them with friends.

Creating Oreo Dirt Cake is simple and fun! Here’s what you need: - 1 package (15.25 oz) Oreo cookies - 1/2 cup (1 stick) unsalted butter, melted - 1 package (8 oz) cream cheese, softened to room temperature - 1 package (16 oz) powdered sugar - 1 tub (16 oz) Cool Whip, thawed - 1 package (3.9 oz) chocolate instant pudding mix - 2 cups cold milk - 1 cup gummy worms (optional, for playful decoration) - Fresh mint leaves (optional, for garnish) Each ingredient plays a key role in making this dessert delicious and appealing. The Oreo cookies form the base and add rich chocolate flavor. The melted butter helps bind the crust together. Cream cheese and powdered sugar create a sweet, creamy filling that pairs perfectly with the chocolate pudding. The Cool Whip adds lightness, while the gummy worms make it fun! For the best results, gather all your ingredients before you start. This way, you can work smoothly and enjoy the process. You can find the full recipe in the next section, which will guide you step by step! - First, crush the Oreo cookies. You can use a food processor for this. Pulse until they turn into fine crumbs. - Next, mix the crumbs with melted butter in a bowl. Stir well until every crumb is coated. - Now, press this mixture firmly into the bottom of a 9x13 inch baking dish. Make sure it is even and packed tight. - In a clean mixing bowl, beat the softened cream cheese with an electric mixer. Aim for a smooth texture. - Gradually add the powdered sugar while mixing. Keep beating until it is well blended and creamy. - Finally, gently fold in the thawed Cool Whip with a spatula. This makes the filling light and fluffy. - In a separate bowl, whisk the chocolate instant pudding mix with cold milk for about 2 minutes. This should thicken to a creamy consistency. - Let the pudding sit for 5 minutes to firm up before using it. - Spread the cream cheese filling evenly over the cookie crust in the baking dish. - Then, layer the chocolate pudding on top of the cream cheese. Smooth it out to make it even. - Take the reserved cup of Oreo crumbs and sprinkle it over the pudding. This gives a fun dirt look. - Cover the baking dish tightly with plastic wrap. Place it in the refrigerator. - Chill for at least 4 hours, but overnight is best. This lets the flavors mix and the cake set well. - Just before you serve, add gummy worms on top for a fun touch. - If you want, garnish with fresh mint leaves to add color and freshness. Follow these steps for a delightful Oreo Dirt Cake. For the full recipe, check out the detailed instructions provided earlier! Chilling time is key for Oreo dirt cake. It helps all the flavors blend well. I find that letting it chill for at least four hours makes a big difference. Ideally, chill it overnight for the best results. This helps the layers firm up, making each slice neat and clean. Smoothing out layers is also important. After spreading the cream cheese filling, use a spatula to make it even. When adding the pudding, gently spread it over the cream cheese. This keeps the layers distinct and beautiful. You can easily customize your Oreo dirt cake. Try different toppings like crushed nuts or sprinkles for fun textures. You can also swap out the Oreo cookies. Try using mint cookies or peanut butter cookies for unique flavors. These small changes can add a whole new twist to your cake. Portion sizes matter. You can cut the cake into squares for easy serving. If you want something fun, serve it in clear cups. This way, everyone can see the layers. Plus, it makes for a great party treat! For creative presentation, consider using a clear glass dish. This shows off the lovely layers. You can also garnish with fresh mint leaves for a nice touch. They add color and freshness to your dessert. Feel free to check out the Full Recipe for more details on making this delightful treat! {{image_4}} You can change up your Oreo dirt cake in fun ways. A vanilla version tastes great. Just swap out chocolate pudding for vanilla pudding. This gives the dessert a lighter flavor. Another fun twist is the peanut butter variation. Mix in peanut butter with the cream cheese filling. It adds a rich, nutty taste that pairs well with the cookies. Kids often love this flavor! If you need a gluten-free option, use gluten-free sandwich cookies. There are many tasty brands available. Just crush them the same way as regular Oreos. The taste stays rich and delicious, ensuring everyone can enjoy this treat. For a vegan dirt cake, you can use dairy-free cream cheese. Brands like Tofutti or Kite Hill work well. They create a creamy texture without dairy. Also, swap out Cool Whip for a non-dairy whipped topping. Look for brands like So Delicious or CocoWhip. These options keep the dessert light and fluffy while staying vegan-friendly. By exploring these variations, you can make your Oreo dirt cake perfect for everyone. Check out the Full Recipe for more details! To keep your Oreo dirt cake fresh, use an airtight container. This helps prevent the cake from drying out. Store it in the fridge for up to five days. If you notice any changes in texture or smell, it’s best to toss it. You can freeze this cake for longer storage. First, cut it into pieces. Wrap each piece tightly in plastic wrap. Then place them in a freezer-safe bag. The cake can last up to three months in the freezer. To thaw, take it out and place it in the fridge overnight. Oreo dirt cake stays its best for about five days in the fridge. Look for signs of spoilage like a sour smell or mold. If the cake feels dry or crumbly, it’s time to let it go. Keep an eye on it, and enjoy it while it’s fresh! Oreo Dirt Cake is a fun dessert that looks like dirt! It has layers of creamy goodness and crushed Oreo cookies. This dessert became popular in the 1980s. People love it for its playful look and easy prep. You can enjoy it at parties or family gatherings. The combination of flavors and textures makes it a favorite for many. You can keep Oreo Dirt Cake in the refrigerator for up to five days. Just make sure to cover it well. This helps keep it fresh and tasty. Over time, the layers may soften, but the flavor stays great. If you want the best taste, try to eat it within the first three days. Yes, you can make Oreo Dirt Cake ahead of time! This dessert is perfect for planning. You can prepare it a day before you serve it. Just follow the recipe, then chill it overnight. This gives the flavors time to blend. Plus, it saves you time on the day of your event. You can use many fun decorations for Oreo Dirt Cake! Some tasty options include chocolate sprinkles or edible flowers. You could even add mini chocolate cookies or candy rocks for a playful touch. Fresh fruit can add color, too. Choose whatever you like best to match your occasion. Absolutely! Oreo Dirt Cake is a kid-friendly dessert. Kids love the taste and the fun look. It’s simple to make, so kids can help in the kitchen. Plus, they enjoy adding their favorite toppings. This dessert is sure to make them smile! This blog post shared a simple recipe for Oreo Dirt Cake. You learned about the key ingredients, like Oreos and cream cheese, as well as step-by-step instructions to make it. Also, we covered tips to custom-make your cake and how to store leftovers. Oreo Dirt Cake is fun to make and eat. It’s a great dessert for parties or family gatherings. Enjoy creating your own versions and share them with friends.

OREO DIRT CAKE

Get ready to delight your guests with this easy OREO DIRT CAKE recipe! This no-bake dessert, featuring layers of creamy filling and crushed Oreos, is a tasty treat everyone will love. Add gummy worms for a fun twist or try different flavors to customize it for your next gathering. Dive into the full recipe and learn step-by-step how to create this delicious dessert that’s perfect for any occasion. Click through for all the details!

Ingredients
  

1 package (15.25 oz) Oreo cookies

1/2 cup (1 stick) unsalted butter, melted

1 package (8 oz) cream cheese, softened to room temperature

1 package (16 oz) powdered sugar

1 tub (16 oz) Cool Whip, thawed in the refrigerator

1 package (3.9 oz) chocolate instant pudding mix

2 cups cold milk

1 cup gummy worms (optional, for playful decoration)

Fresh mint leaves (optional, for garnish)

Instructions
 

Prepare the Cookie Crust: Place the Oreo cookies in a food processor and pulse until they turn into fine crumbs. Set aside 1 cup of these crumbs for later. In a medium mixing bowl, combine the remaining cookie crumbs with the melted butter and mix until fully coated. Press the buttery crumb mixture firmly into the bottom of a 9x13 inch baking dish to form an even crust.

    Make the Cream Cheese Filling: In a clean mixing bowl, use an electric mixer to beat the softened cream cheese until it reaches a smooth consistency. Gradually add the powdered sugar, beating continuously until well blended. Once combined, gently fold in the thawed Cool Whip using a spatula until the mixture is light and fluffy—this creates a creamy filling.

      Combine the Pudding: In a separate bowl, whisk the chocolate instant pudding mix together with the cold milk for about 2 minutes, or until the mixture thickens to a creamy consistency. Allow the pudding to sit for an additional 5 minutes to firm up.

        Layer the Cake: Carefully spread the cream cheese filling evenly over the prepared crust in the baking dish. Next, layer the chocolate pudding over the cream cheese, smoothing it out to create an even surface.

          Top with Crumbs: Take the reserved cup of Oreo crumbs and sprinkle them generously over the pudding layer, creating a dirt-like appearance that adds to the fun theme of the cake.

            Chill the Cake: Cover the baking dish tightly with plastic wrap and place it in the refrigerator. Chill for at least 4 hours, but ideally overnight, to allow the flavors to meld and the cake to set properly.

              Decorate: Just before serving, place gummy worms on the surface of the cake for a whimsical touch. If desired, garnish with fresh mint leaves to add a vibrant pop of color.

                Prep Time: 30 minutes | Total Time: 4 hours 30 minutes | Servings: 12

                  - Presentation Tips: Use a clear glass dish to showcase the delightful layers of the cake. For a fun twist, serve individual portions in clear cups, and place a gummy worm on the rim of each cup for added charm and playfulness!

                    Leave a Comment

                    Recipe Rating