Skip to content
DisclaimerTerms Of UseGDPR PolicyCookie Policy

recipesstation

  • Home
  • Drinks
  • Appetizers
  • Dinner
  • Dessert
  • About
  • Contact
  • Privacy Policy
DisclaimerTerms Of UseGDPR PolicyCookie Policy

Emily

- Chicken: boneless skinless thighs - Sauces and Marinades: soy sauce, brown sugar, rice vinegar, sesame oil - Aromatics: garlic, ginger For this Easy Teriyaki Chicken Meal Prep, I use boneless skinless chicken thighs. They stay juicy and tender. You will also need some key sauces: soy sauce, brown sugar, rice vinegar, and sesame oil. These create a rich and sweet glaze. Don't forget the aromatics! Fresh garlic and ginger add a strong flavor. They make a big difference in the taste of your dish. - Rice: jasmine rice - Vegetables: broccoli, bell peppers - Garnishes: green onions, sesame seeds For a complete meal, I like using jasmine rice. It has a nice aroma and fluffy texture. Add some colorful veggies like broccoli and bell peppers. They bring crunch and nutrients. Lastly, sprinkle chopped green onions and sesame seeds on top. They enhance the dish's look and taste. This Easy Teriyaki Chicken Meal Prep is simple and delicious! You can find the Full Recipe for more details on how to make it. To start, you need to prepare the marinade. In a large bowl, mix together: - 1 cup low-sodium soy sauce - 1/2 cup brown sugar - 1/4 cup rice vinegar - 2 tablespoons sesame oil - 2 cloves garlic, minced - 1 tablespoon fresh ginger, minced Stir until the brown sugar dissolves. Next, coat the chicken pieces in the marinade. Make sure each piece is fully covered. Cover the bowl with plastic wrap and refrigerate for at least 30 minutes. For the best flavor, marinate for up to 2 hours. While the chicken marinates, rinse the rice. Place 2 cups of jasmine rice in a fine-mesh strainer. Rinse under cold water until it runs clear. This removes excess starch. In a medium pot, combine the rinsed rice with 2 cups of water. Bring to a boil over high heat. Once boiling, reduce the heat to low. Cover the pot and let it simmer for 15 to 20 minutes. The rice is done when it has absorbed all the water. Remove from heat and let it steam, covered, for 5 more minutes. Next, prepare the vegetables. Bring a pot of water to a boil. Add 2 cups of broccoli florets and 1 cup of sliced bell peppers. Cook for about 3 to 4 minutes. You want them bright and tender-crisp. Drain them in a colander and set aside. Now it's time to cook the chicken. Heat a large skillet or wok over medium-high heat. Add the marinated chicken along with all the marinade. Stir-fry the chicken for 8 to 10 minutes. Stir occasionally until the chicken is cooked through. The sauce will thicken and coat the chicken pieces nicely. To put your meal prep together, start with the cooked rice. Evenly distribute it among your meal prep containers. Next, add the cooked teriyaki chicken on top of the rice. Finally, layer the blanched broccoli and sliced bell peppers over each portion. After assembling, garnish each container with chopped green onions and sesame seeds. Let the meal prep containers cool completely at room temperature. Once cooled, seal them with lids. Store them in the refrigerator for up to 4 days. Enjoy your Easy Teriyaki Chicken Meal Prep whenever you need a quick meal! To enhance the taste of your teriyaki chicken, try different marinades. You can add pineapple juice for sweetness or Sriracha for spice. Both options add a fun twist to the dish. Use fresh herbs like cilantro or basil to give it a bright flavor. For juicy chicken, don't skip marinating. It makes a huge difference! Aim for at least 30 minutes, but let it sit for up to 2 hours. This allows the chicken to absorb all those tasty flavors. When cooking, make sure not to overcrowd the pan. This helps the chicken brown nicely. Having the right tools makes meal prep easy. A good cutting board and a sharp knife are must-haves. A large mixing bowl helps mix your marinade well. A good skillet or wok is key for cooking the chicken evenly. For storage, use airtight containers. Glass containers work best as they keep food fresh. Look for ones that are microwave-safe. This way, you can heat your meals quickly. To save time, prep your ingredients first. Chop your veggies and chicken before you start cooking. This step makes the process much smoother. Try batch cooking too! Make extra teriyaki chicken and freeze it. You can enjoy it later when you need a quick meal. Use your weekends for meal prep. This way, your weeknights stay stress-free. For the full recipe, refer back above. {{image_4}} You can switch the chicken for other proteins. Try pork, beef, or tofu for variety. Each protein gives a unique taste and texture. - Substitutes for chicken: Use boneless pork chops or beef strips. - Vegetarian options: Tofu absorbs flavors well. Tempeh is another great choice. Teriyaki sauce is delicious, but there are alternatives. Sweet and sour or hoisin sauce can add a different flair. - Teriyaki sauce alternatives: Try a homemade sauce with soy sauce, honey, and ginger. - Customizations for spice levels: Add chili paste or sriracha for heat. Adjust based on your taste. Seasonal veggies enhance flavor and nutrition. Fresh produce makes your meal prep even better. - Suggest adding seasonal vegetables: In spring, use asparagus or peas. In fall, add sweet potatoes or Brussels sprouts. - Using different rice types: Substitute jasmine rice with brown rice or quinoa for a health boost. Each grain adds its unique taste and benefits. For the complete recipe, refer to the [Full Recipe]. You can store Easy Teriyaki Chicken Meal Prep in the fridge for up to 4 days. To keep it fresh, place it in airtight containers. Make sure to let the meal cool down completely before sealing them. This helps prevent moisture build-up, which can make your meal soggy. For longer storage, you can freeze the meal prep containers. Wrap each container tightly in plastic wrap before placing it in the freezer. When you’re ready to eat, take it out and thaw it overnight in the fridge. To reheat, microwave it for 3-5 minutes until hot. Stir halfway to heat evenly. Always check for signs of spoilage. If you see any discoloration or strange smells, do not eat it. The chicken should smell savory and good. It's best to follow food safety rules. If in doubt, throw it out! You can store Easy Teriyaki Chicken Meal Prep in the refrigerator for up to 4 days. Make sure to seal the containers tightly. For longer storage, you can freeze the meal prep. In the freezer, it lasts for about 3 months. When you are ready to eat, thaw it in the fridge overnight. Yes, you can use chicken breasts. They are leaner than thighs. This makes them cook faster and result in a different texture. Chicken breasts may also be less juicy. If you prefer a tender bite, thighs work best with teriyaki sauce. If you need a soy sauce substitute, try tamari for gluten-free options. Coconut aminos also work for low-sodium choices. Both will give you a similar umami flavor in your meal prep. To add heat, consider using red pepper flakes or sriracha. You can mix these into the marinade. If you want a fresh kick, add sliced jalapeños when cooking the chicken. This will give your dish a nice spicy boost. Yes! You can use carrots, snap peas, or zucchini. These vegetables pair well with teriyaki chicken. Just be sure to chop them to a similar size for even cooking. Enjoy experimenting with your favorite veggies! In this post, we explored making Easy Teriyaki Chicken Meal Prep. We covered essential ingredients like chicken, sauces, and vegetables. I shared step-by-step directions for marinating, cooking, and assembling your meal. Tips for flavor and storage were also included. Meal prepping saves time and ensures tasty meals. With the right ingredients and methods, you can enjoy delicious teriyaki chicken throughout the week. Get started, and let your kitchen creativity shine!

Easy Teriyaki Chicken Meal Prep Simple and Tasty Dish

Are you looking for a quick and tasty meal prep idea? Look no further! My Easy Teriyaki Chicken Meal Prep

- 1 cup green or brown lentils, thoroughly rinsed - 1 medium onion, finely chopped - 2 cloves garlic, minced - 2 medium carrots, diced - 2 celery stalks, diced - 1 large potato, peeled and cubed - 1 can (14 oz) diced tomatoes, including juice - 4 cups vegetable broth - 1 teaspoon ground cumin - 1 teaspoon ground coriander - ½ teaspoon turmeric - Salt and pepper, to taste - 2 tablespoons olive oil - Fresh lemon wedges for serving - Fresh parsley or cilantro, chopped, for garnish Gathering the right ingredients is key to making this soup. Lentils are the star. They bring protein and fiber. Use green or brown lentils; both work well. Chopping your vegetables small helps them cook faster. Fresh herbs add a nice touch at the end. - Large pot - Cutting board and knife - Measuring cups and spoons - Immersion blender (optional) You need a large pot to cook the soup. A good cutting board and knife will help you chop. Measuring cups and spoons ensure accurate amounts. An immersion blender is handy if you want a creamy texture. For the Full Recipe, check the detailed steps and tips that will guide you through cooking this hearty dish. - Sauté Aromatics: Start by heating the olive oil in a large pot over medium heat. Add the finely chopped onion and minced garlic. Cook for about 4-5 minutes. You want the onions to be soft and clear, and the garlic should have a nice smell. - Add Vegetables: Next, toss in the diced carrots, celery, and cubed potato. Stir them together and let them cook for another 5 minutes. This helps the veggies soften a bit, making them tasty later. - Incorporate Lentils and Spices: Now, add the rinsed lentils to the pot. Pour in the can of diced tomatoes, juice and all. Sprinkle in the ground cumin, ground coriander, turmeric, salt, and pepper. Mix everything well. You want those spices to coat the lentils and veggies. - Simmer the Soup: Pour in the vegetable broth and turn up the heat until it boils. Once boiling, lower the heat, cover the pot, and let it simmer. Cook for about 25-30 minutes. Check that the lentils and veggies are tender. - Blend for Creamy Texture (Optional): If you want a smoother soup, grab an immersion blender. Blend it a bit, leaving some chunks for texture. You can also pour some soup into a regular blender, blend until smooth, and then mix it back in. - Finalize Seasoning: Taste your soup. You might want to add more salt, pepper, or spices to make it just right. - Serve and Garnish: Ladle the soup into bowls. Top with fresh parsley or cilantro. Serve with lemon wedges on the side for a fresh burst of flavor. - Presentation Tips: For a nice touch, drizzle a bit of olive oil on top before serving. Sprinkle more fresh herbs, and don’t forget some crusty bread for dipping. This soup is warm and filling. I love how it brings comfort to any meal. For the full recipe, check out the details above! - Adjusting spice levels: Start with less spice. You can always add more later. I love to taste as I go to find the balance. - Ideal lentil varieties: I recommend using green or brown lentils. They hold their shape well and add a nice texture to the soup. - Enhancing flavors with herbs: Fresh herbs like parsley or cilantro make a big difference. They brighten the soup and add freshness. - Overcooking lentils: Keep an eye on your lentils. Overcooked lentils can turn mushy. You want them tender but still holding their shape. - Incorrect seasoning levels: Don't be shy with seasoning. Taste your soup before serving. Adjust salt and spices to fit your liking. - Skipping the blending step: Blending gives the soup a creamy texture. If you like it smooth, don’t skip this. Blend until you reach your desired consistency. Iraqi Lentil Soup is simple yet so rich in flavor. Follow these tips, and you’ll have a warming bowl every time! For the complete recipe, check out the Full Recipe section. {{image_4}} You can easily change the lentils in this soup. Green or brown lentils work well. You can also try red lentils for a sweeter taste. Adding protein makes the soup heartier. You can include chicken, beef, or tofu for extra nutrition. Each option brings a different flavor. You can also switch the vegetables based on what you have. Try adding spinach, zucchini, or bell peppers. Seasonal vegetables make the soup fresh and vibrant. Spice it up by adding heat. Use cayenne or chili powder for a kick. Just a pinch can change the soup's taste. Herbs can change the flavor too. Add thyme or bay leaves while cooking. They will infuse the soup with rich aromas. Experiment with different broths. You can use chicken broth or mushroom broth. Each option will give the soup a unique touch. Enjoy the endless possibilities with this dish! For the full recipe, check out the Full Recipe section. To keep your Iraqi lentil soup fresh, store it in airtight containers. First, let the soup cool down to room temperature. Then, transfer it into the containers. This helps prevent sogginess. - Use glass or plastic containers with tight lids. - Avoid metal containers, as they may react with the soup. Place the containers in the fridge. The soup stays good for about three to five days. If you want to save some for later, freezing works great. First, make sure the soup is cool. Then, pour it into freezer-safe bags or containers. - Remove as much air as possible from the bags. - Label the bags with the date to track freshness. For thawing, take the soup out of the freezer. Place it in the fridge overnight. If you need it fast, use the microwave on low power. When reheating, warm it on the stove over medium heat. Stir often to avoid burning. Now, you can enjoy your delicious soup anytime! Iraqi Lentil Soup is often served with crusty bread or rice. The bread is great for dipping. A side salad adds freshness. You can also enjoy it with pickled vegetables for a tangy taste. Yes, you can make this soup ahead of time. It tastes even better after the flavors meld overnight. Just cool it, then store it in the fridge. Heat it up when you’re ready to serve. If your soup is too watery, use an immersion blender. Blend some of the soup to create a thicker texture. You can also add more lentils and cook for a few extra minutes. Yes, this soup is naturally vegan. All the ingredients are plant-based. Just ensure your vegetable broth is vegan-friendly too. This dish is perfect for vegans and vegetarians alike. The soup lasts about 3 to 5 days in the fridge. Store it in an airtight container. If you want to keep it longer, consider freezing it. This way, you can enjoy it later! - 1 cup green or brown lentils, thoroughly rinsed - 1 medium onion, finely chopped - 2 cloves garlic, minced - 2 medium carrots, diced - 2 celery stalks, diced - 1 large potato, peeled and cubed - 1 can (14 oz) diced tomatoes, including juice - 4 cups vegetable broth - 1 teaspoon ground cumin - 1 teaspoon ground coriander - ½ teaspoon turmeric - Salt and pepper, to taste - 2 tablespoons olive oil - Fresh lemon wedges for serving - Fresh parsley or cilantro, chopped, for garnish To make this dish, cook lentils and veggies in a pot until soft. I have shared a simple way to make Iraqi Lentil Soup using fresh ingredients. You learned about each ingredient, the steps for cooking, and tips for success. Remember, you can tweak flavors and use different lentils to make the soup your own. This dish not only warms you up but also offers healthy benefits. Enjoy making and sharing this delightful soup with friends and family. Cooking can be fun and rewarding, so unleash your inner chef!

Satisfying Iraqi Lentil Soup Easy and Flavorful Dish

Looking for a warm and hearty dish that bursts with flavor? Let me introduce you to Iraqi Lentil Soup! This

For 20-Minute One-Pan Spinach Gnocchi, gather these ingredients: - 1 package (16 oz) gnocchi (store-bought) - 2 cups fresh spinach, roughly chopped - 1 cup cherry tomatoes, halved - 1 cup vegetable broth - 2 tablespoons extra virgin olive oil - 3 cloves garlic, minced - 1 teaspoon red pepper flakes - 1/2 cup grated Parmesan cheese - Salt and black pepper to taste - Fresh basil leaves for garnish Fresh ingredients make a big difference. They boost flavor and nutrition. Fresh spinach adds bright color and a healthy touch. Cherry tomatoes bring sweetness and juiciness. Always choose the freshest items you can find. This makes your meal taste better. You can swap some ingredients if needed. Use frozen spinach if fresh isn’t available. Canned tomatoes can replace cherry tomatoes. For a vegan option, use nutritional yeast instead of Parmesan. Vegetable broth can be replaced with water. These swaps keep the dish tasty and fun. First, gather all your ingredients. You need gnocchi, fresh spinach, cherry tomatoes, vegetable broth, olive oil, garlic, red pepper flakes, Parmesan cheese, salt, and pepper. Chop the spinach and halve the cherry tomatoes. This makes cooking easier and faster. Use a large skillet for this dish. Heat the olive oil over medium heat. Add minced garlic and red pepper flakes. Sauté for about 30 seconds until the garlic smells good. Then, add the cherry tomatoes. Cook them for 3-4 minutes. You want them to soften and blister slightly. Next, pour in the vegetable broth. Bring it to a gentle simmer. Add the gnocchi, stirring well. Cook for 2-3 minutes until they float to the top. This shows they are done. Lower the heat and fold in the chopped spinach. Stir for another 1-2 minutes until the spinach wilts. Finally, sprinkle in the grated Parmesan cheese. Mix it until it melts into a creamy sauce. Taste and add salt and pepper as needed. Let it rest for a minute before serving. Watch for the gnocchi to float. This means they are cooked. The spinach should look bright green and wilted. The sauce should be creamy and cling to the gnocchi. If it looks thick and rich, you’re ready to serve. Enjoy this quick meal that looks great and tastes even better! For the full recipe, check out the full recipe link. To make your gnocchi burst with flavor, focus on fresh ingredients. Using fresh spinach and ripe cherry tomatoes makes a big difference. Sautéing garlic until it's golden brings out its best taste. Don’t skimp on the red pepper flakes; they add a nice kick. Always taste and adjust your seasoning for a balanced dish. A little extra Parmesan on top? Yes, please! This recipe is quick, but you can save even more time. Chop your spinach and tomatoes in advance. You can also pre-mince the garlic. Keep these in your fridge for easy access. Use store-bought gnocchi to skip the long cooking time. Prepare your ingredients while the skillet heats up. Multitasking makes this dish a breeze! For a creamy sauce, add the Parmesan cheese slowly. Mix it in well as it melts. If the sauce is too thick, add a splash of broth. Stir until it's smooth and creamy. Letting the dish sit for a minute off the heat helps the flavors meld. This trick gives you a perfect creamy texture every time. For the complete recipe, check out the Full Recipe. {{image_4}} You can make your 20-Minute One-Pan Spinach Gnocchi even heartier by adding protein. Chicken works great. Just cut it into bite-sized pieces. Cook it in the pan until golden brown before you add the garlic. Shrimp is another option. Toss them in after the tomatoes, cooking until they turn pink. If you prefer a plant-based option, use tofu. Cube the tofu and sauté it until crispy, then add it to the skillet with the spinach. This dish is easy to adapt for different diets. For a vegetarian version, stick with the original recipe. Just skip the meat and focus on the fresh veggies. If you need it gluten-free, choose gnocchi made from gluten-free flour. Many brands offer this option, and they taste great. Check the package for details to ensure it fits your needs. To boost flavor, don't shy away from herbs and spices. Fresh basil adds a nice touch. You can also try parsley or thyme for a different taste. If you like heat, add more red pepper flakes or try a splash of hot sauce. A squeeze of lemon juice at the end brightens the dish. It enhances the flavors of the spinach and tomatoes. These little changes make a big difference in taste. Explore these variations to make the dish your own! For the full recipe, check the complete guide. After enjoying your meal, cool any leftovers. Place them in a clean, airtight container. Store in the fridge for up to three days. This way, you keep the gnocchi fresh and tasty. To reheat, use a skillet on low heat. Add a splash of vegetable broth. Stir gently as it warms. This keeps the gnocchi creamy and prevents sticking. You can also use a microwave. Just cover the dish and heat in short bursts, stirring in between. You can freeze leftovers for later. Place cooled gnocchi in freezer-safe bags. Make sure to remove as much air as possible. They can last up to two months. When ready to eat, thaw in the fridge overnight. Reheat as mentioned above for best flavor. This meal is quick and easy. You can make it again with the full recipe anytime you want! This dish takes just 20 minutes to make. You’ll spend about 5 minutes prepping the ingredients. The cooking time fills the rest. It’s a quick meal for busy days or weeknights. You can have a tasty meal ready in no time. Yes, you can use frozen gnocchi. Just add the frozen gnocchi directly to the skillet. They will cook in the same way. The cooking time might be just a bit longer. Make sure to stir gently as they cook. This keeps them from sticking together. This gnocchi dish pairs well with many sides. Here are some ideas: - A fresh green salad with vinaigrette. - Garlic bread or crusty bread for dipping. - Roasted vegetables to add color and crunch. - A light soup like tomato or vegetable for warmth. These sides complement the flavors of the gnocchi well. You can mix and match based on what you have. Enjoying this meal with friends and family makes it even better. For the full recipe, check out the earlier section! This post covered how to make a simple, tasty one-pan spinach gnocchi dish. We explored key ingredients, cooking steps, and tips for great flavor. Remember, fresh ingredients make a big difference. Don’t forget to try different proteins and variations to fit your taste. Proper storage ensures your meal stays fresh for later. With these tips, you can enjoy a delicious meal any time. Now, get cooking and make something great today!

20-Minute One-Pan Spinach Gnocchi Quick and Easy Meal

Looking for a quick and tasty dinner? Try this 20-Minute One-Pan Spinach Gnocchi! It’s packed with flavor and uses fresh

To make creamy Cajun shrimp pasta, gather these ingredients: - 8 oz fettuccine pasta - 1 lb shrimp, peeled and deveined - 2 tablespoons Cajun seasoning - 2 tablespoons olive oil - 1 small onion, finely chopped - 3 cloves garlic, minced - 1 cup heavy cream - 1 cup cherry tomatoes, halved - 1/2 cup grated Parmesan cheese - 1/4 cup chopped fresh parsley - Salt and freshly ground black pepper to taste If you want to kick up the flavor, try these optional ingredients: - Red pepper flakes for extra heat - Lemon zest for a fresh twist - Spinach for added nutrition - Bell peppers for a sweeter taste Choosing the right shrimp is key for this dish. Here are some tips: - Look for shrimp that smell fresh and clean. - Choose shrimp that are firm and have a slight sheen. - Avoid shrimp with black spots or a strong odor. - If you can, buy shrimp that are wild-caught. They often taste better and are more sustainable. Now that you have all your ingredients, you're ready to dive into making this delicious dish! For the full recipe, check out the steps that follow. Start by boiling water in a large pot. Add salt to make the water tasty. Once it boils, add 8 oz of fettuccine pasta. Cook it according to the package instructions. You want it to be al dente. This means it should be firm when you bite it. When done, drain the pasta but save 1/2 cup of the water. This water helps the sauce later. In a bowl, mix the shrimp with 2 tablespoons of Cajun seasoning. Add a pinch of salt and black pepper. Toss the shrimp until they are well-coated. Heat 2 tablespoons of olive oil in a large skillet over medium heat. Add the seasoned shrimp to the hot skillet. Cook for 2-3 minutes on each side. They should turn pink and look fully cooked. Remove the shrimp and place them on a plate. In the same skillet, add a small onion, finely chopped. Sauté it for 3-4 minutes. You want the onion to become clear, not brown. Then, add 3 cloves of minced garlic. Cook for another minute until the garlic smells great. Pour in 1 cup of heavy cream. Stir gently and let it simmer. Add 1 cup of halved cherry tomatoes and let them cook for 2-3 minutes. You want them to soften a bit. Next, add 1/2 cup of grated Parmesan cheese to the cream sauce. Stir until it melts. If the sauce is too thick, add some of the reserved pasta water. Finally, return the cooked shrimp to the skillet. Add the drained fettuccine pasta as well. Toss everything together until well mixed. Taste and add more salt or pepper if needed. You can find the complete recipe for Creamy Cajun Shrimp Pasta in the Full Recipe section. To make a creamy sauce, start with heavy cream. This gives the best texture. Let it simmer gently. If the sauce is too thick, use reserved pasta water to thin it. Add the water slowly until you get your desired creaminess. Cajun seasoning is key, but you can boost the flavor even more. Try adding a pinch of smoked paprika or cayenne pepper for heat. A dash of garlic powder can also enhance the taste. Just remember to balance any extra spices to keep the dish delicious. Timing matters for shrimp and pasta. Cook the pasta first, so it’s ready when the sauce is done. Shrimp cooks fast. Sauté it for just 2-3 minutes per side. You want it pink and firm, not rubbery. This way, everything is hot and fresh when you serve your creamy Cajun shrimp pasta. For the full recipe, check out the instructions above. {{image_4}} You can swap out fettuccine for other pasta types. Try penne, spaghetti, or even zoodles for a lighter dish. Each pasta shape gives a new texture. For gluten-free options, use rice or quinoa pasta. This makes the dish more accessible for everyone. Adding veggies boosts nutrition and flavor. Spinach, bell peppers, or zucchini work great. Simply sauté them with the onion. This adds color and crunch. You can even toss in some peas or broccoli. They will blend nicely in the creamy sauce. If shrimp isn’t your favorite, you have options. Chicken, scallops, or even tofu can replace shrimp. Season them with Cajun spices for the same kick. Each protein brings its own taste. This makes the dish versatile and fun. You can find your favorite mix every time you cook! For the full recipe, check out the link. To keep your creamy Cajun shrimp pasta fresh, store it in an airtight container. Place the pasta in the fridge within two hours of cooking. This helps keep it safe and tasty. It can last up to three days this way. Be sure to let it cool down before sealing. When you want to eat your leftovers, the best way to reheat is on the stove. Pour the pasta into a pan over low heat. Add a splash of water or cream to help it stay moist. Stir often until it’s warm. If you're in a hurry, you can use the microwave. Just heat it in short bursts and stir in between. This keeps the pasta from becoming dry. If you want to save some for later, you can freeze it. Place the cooled pasta in a freezer-safe container. It can last up to two months in the freezer. When you’re ready to eat, move it to the fridge to thaw overnight. Then, reheat it on the stove for the best taste. Just remember, the shrimp may lose some of its texture after freezing. For the full recipe, check out the detailed instructions above! Yes, you can use frozen shrimp. Just thaw them first. Place the shrimp in a bowl of cold water for quick thawing. This will make it easier to coat them with Cajun seasoning. Frozen shrimp are a great time-saver. If you want a lighter option, use half-and-half or whole milk mixed with a little cornstarch. You can also try coconut milk for a dairy-free version. Each option gives a different flavor, so choose what you like best. To make it less spicy, use less Cajun seasoning. You can also add dairy, like cream or cheese, which cools the heat. If you want more spice, add extra seasoning or hot sauce. Taste as you go for the best results. For the full recipe, check out the complete process and enjoy making this dish! This blog post covered how to make a delicious shrimp pasta dish. We explored the key ingredients, simple cooking steps, and helpful tips for a creamy sauce. I shared variations to suit your taste and how to store any leftovers. Remember, fresh shrimp and timing can transform your meal. Enjoy experimenting with flavors and make this dish your own. Happy cooking!

Creamy Cajun Shrimp Pasta Flavorful and Easy Delight

Get ready for a flavor explosion with my Creamy Cajun Shrimp Pasta! This dish combines tender shrimp and a rich

- 8 oz spaghetti or fettuccine - 1 lb shrimp, peeled and deveined - 1 lb scallops, patted dry - 3 tablespoons olive oil - 4 cloves garlic, minced - 1 cup cherry tomatoes, halved - 1/2 cup heavy cream - Juice of 1/2 lemon - 1 teaspoon red pepper flakes (adjust to taste) - Salt and black pepper, to taste - 1/4 cup fresh parsley, chopped - Grated Parmesan cheese, for serving This dish starts with simple yet fresh ingredients. You can use either spaghetti or fettuccine; both work well. The shrimp and scallops offer a sweet and briny taste, making the dish feel special. Fresh cherry tomatoes add a burst of flavor and color, while garlic gives it that warm, homey feel. For the sauce, heavy cream makes it rich and smooth. A splash of lemon juice brightens everything up. Red pepper flakes give a bit of heat, but you can adjust them to your taste. To finish, a sprinkle of fresh parsley and Parmesan cheese adds a lovely touch. To see how to combine these ingredients into a delightful meal, check out the Full Recipe. - Step 1: Bring a large pot of salted water to a rolling boil. Add the spaghetti or fettuccine. Cook it according to the package instructions until it is al dente. - Step 2: Reserve 1 cup of the pasta water, then drain the pasta and set it aside. - Step 3: In a large skillet, heat 2 tablespoons of olive oil over medium-high heat. Once the oil is shimmering, carefully add the scallops in a single layer. Sear them for 2-3 minutes on each side until they turn golden brown and opaque. - Step 4: Remove the scallops from the skillet and set them aside on a plate. - Step 5: In the same skillet, add the remaining tablespoon of olive oil. Once hot, add the minced garlic. Sauté for about 30 seconds, stirring constantly until it is fragrant. - Step 6: Add the halved cherry tomatoes and sprinkle in the red pepper flakes. Cook for 3-4 minutes, stirring occasionally, until the tomatoes soften and begin to burst. - Step 7: Reduce the heat to medium-low. Pour in the heavy cream, stirring well to combine. Add the lemon juice, then season with salt and black pepper to taste. Simmer gently for about 2-3 minutes until the sauce thickens slightly. - Step 8: Return the seared scallops to the skillet. Add the cooked pasta and the shrimp to the skillet. Toss everything together. Add reserved pasta water a little at a time until the sauce coats the pasta to your liking. - Step 9: Adjust the consistency as needed with the reserved pasta water. - Step 10: Continue to cook the mixture for another 2 minutes, or until the shrimp turn pink and are cooked through. Ensure everything is heated evenly. - Step 11: Divide the pasta mixture among shallow bowls. Top each serving with a sprinkle of fresh parsley and grated Parmesan cheese, if desired. Enjoy this delightful dinner option! You can find the full recipe here, Shrimp & Scallop Delight Pasta. - Use high-quality scallops for the best flavor. Fresh scallops enhance the dish. - Ensure the skillet is hot before adding scallops to avoid sticking. A hot skillet creates a nice crust. - Add a splash of white wine for extra depth of flavor. It gives a nice tang. - Adjust red pepper flakes for desired spice level. This lets you control the heat. - Use shallow bowls for serving. These create an elegant look. - Garnish with lemon twists or extra parsley for color. This adds a fresh touch to your plate. For more details on crafting this dish, check the Full Recipe. {{image_4}} You can switch the shrimp and scallops for other proteins. Chicken works great in this dish. Simply cut it into bite-sized pieces and cook it until it's no longer pink. If you love seafood, lobster is another tasty option. For a fun mix, add mussels or clams. They bring a tasty briny flavor to your pasta. The type of pasta you choose can change the dish. Whole wheat pasta is a healthy swap, offering more fiber. Gluten-free pasta is another choice for those with dietary needs. You can also try different shapes like penne or linguine. Each shape holds the sauce in a unique way, giving you a new taste each time. To change the sauce, consider using coconut milk instead of heavy cream. This makes the dish lighter and adds a hint of sweetness. Another fun twist is to add pesto. The fresh herbs in pesto give a bright flavor that complements the seafood. You can find the full recipe to explore these variations further. Store any leftovers in an airtight container. Keep them in the fridge for up to 3 days. When you want to enjoy them again, reheat gently on the stove or in the microwave. This keeps the flavors intact and the pasta nice. If you want to save leftovers longer, you can freeze them. Portion out the pasta and seafood before freezing. They will stay good for up to 2 months. When you're ready to eat, thaw them overnight in the fridge. This helps maintain the texture and taste. To keep your pasta from drying out, add a splash of water or broth when reheating. This adds moisture back into the dish. Stir often to ensure even heating. This way, every bite remains delicious and warm. Enjoy your Shrimp Scallop Pasta again with all its flavors! Spaghetti and fettuccine are excellent choices for compatibility with the sauce. Spaghetti offers a classic feel, while fettuccine gives a nice, creamy texture. Both noodles hold the sauce well, making each bite flavorful. When you choose either, make sure to cook them al dente for the best results. This way, the pasta stays firm and complements the tender seafood. Yes, you can use frozen shrimp and scallops. Just ensure they are thawed properly before cooking for the best texture. Thaw them overnight in the fridge or use the cold water method. Place them in a bowl and cover with cold water for about 30 minutes. Avoid using hot water, as it can cook the seafood. Properly thawed ingredients keep their flavor and texture intact. To make this recipe dairy-free, substitute heavy cream with cashew cream or a plant-based alternative. Cashew cream adds a rich texture without dairy. Simply soak cashews in water for a few hours, then blend with water until smooth. You can also use almond or coconut cream as other options. These alternatives keep the dish creamy and delicious while meeting your dietary needs. A light white wine like Pinot Grigio or Sauvignon Blanc complements the dish beautifully. These wines enhance the flavors without overpowering the seafood. Their crisp acidity balances the richness of the sauce. Pour a glass alongside your meal for an enjoyable dining experience. You can even use a splash of wine in the sauce for added depth. This blog post covered a tasty shrimp and scallop pasta dish. You learned about the ingredients, cooking steps, and tips to make it shine. Remember, you can switch proteins or pasta types for a twist. Don't shy away from trying new flavors in the sauce. I believe great meals come from experimenting. Enjoy making this dish, and impress your family or friends. Your kitchen adventures are just beginning!

Savory Shrimp Scallop Pasta Delightful Dinner Option

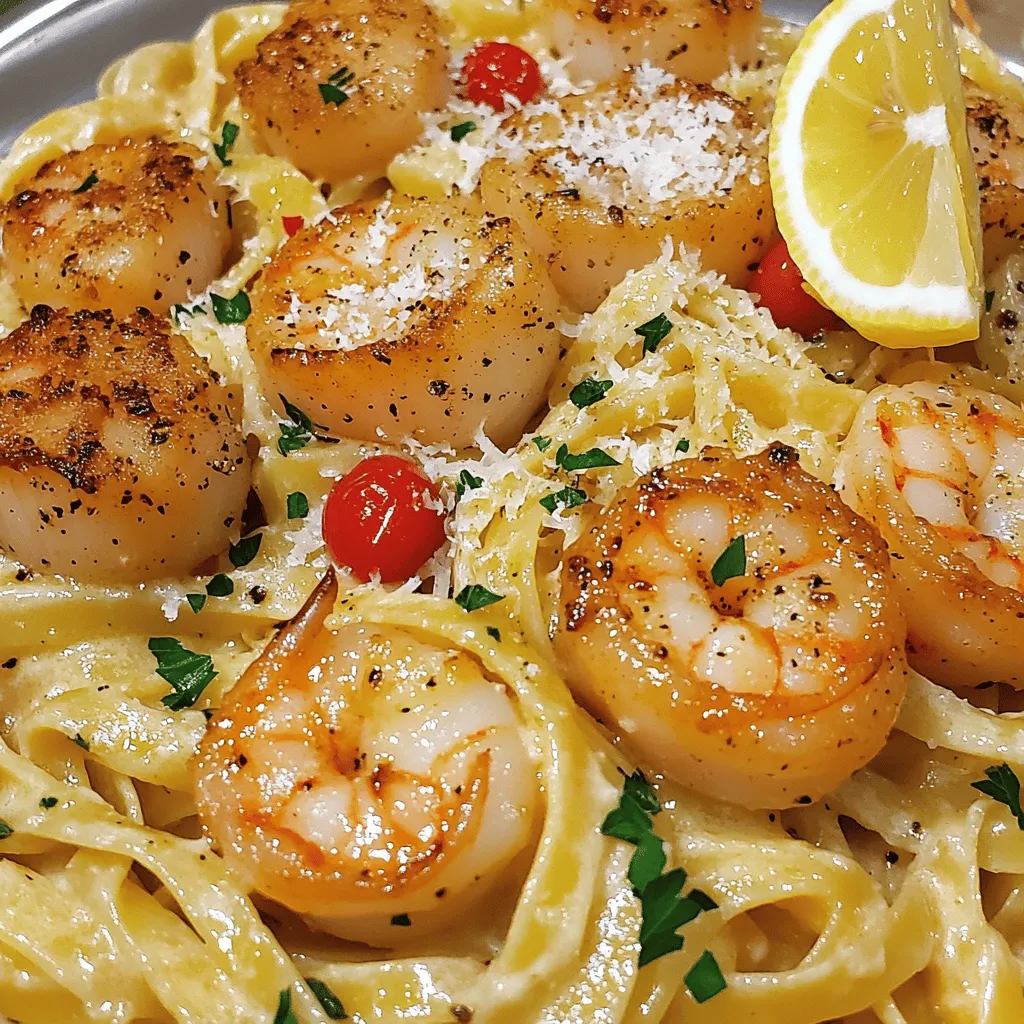
Looking for a tasty dinner that’s quick and easy? This Shrimp Scallop Pasta is just what you need. With tender

To make these delicious cheesecake brownies, you need some key ingredients. Gather the following: - 1 cup unsalted butter (2 sticks) - 8 oz bittersweet chocolate, chopped - 1 cup granulated sugar - 1 cup brown sugar, packed - 4 large eggs - 1 tsp vanilla extract - 1 cup all-purpose flour - 1/2 tsp baking powder - 1/4 tsp salt - 8 oz cream cheese, softened - 1/2 cup powdered sugar - 1 large egg yolk - 1 tsp lemon juice - 1 tsp vanilla extract (for cheesecake layer) These ingredients create a rich brownie base and a creamy cheesecake layer that brings joy in every bite. You can add some fun flavors to your cheesecake brownies. Here are a few optional ingredients: - 1/2 cup chopped nuts (like walnuts or pecans) - 1/2 cup chocolate chips for extra chocolatey goodness - 1/2 tsp instant coffee granules for a mocha twist - A pinch of sea salt on top for contrast These ingredients can take your brownies to a new level of deliciousness. Feel free to mix and match! If you’re out of something, don’t worry! Here are some substitutions: - Use coconut oil instead of butter for a dairy-free option. - Swap granulated sugar with coconut sugar for a healthier choice. - For gluten-free brownies, use almond flour or a gluten-free blend instead of all-purpose flour. - Replace cream cheese with silken tofu for a vegan alternative. These substitutions ensure that everyone can enjoy cheesecake brownies, no matter their dietary needs. Check the full recipe for more details on preparation! Start by preheating your oven to 350°F (175°C). This is a key step to ensure even baking. While the oven heats, take a 9x13-inch baking pan. Grease it lightly or line it with parchment paper. This will help you lift the brownies out easily later. In a medium saucepan, melt 8 oz of chopped bittersweet chocolate with 1 cup of unsalted butter over low heat. Stir often until smooth. After melting, let the mix cool for a few minutes. In a large bowl, mix 1 cup of granulated sugar and 1 cup of brown sugar. Next, pour in your cooled chocolate mix. Whisk it all together until it blends well. Add 4 large eggs and 1 teaspoon of vanilla extract. Mix until the batter is smooth. In a separate bowl, beat 8 oz of softened cream cheese with a hand mixer until creamy. Gradually add 1/2 cup of powdered sugar, 1 large egg yolk, 1 teaspoon of lemon juice, and 1 teaspoon of vanilla extract for the cheesecake layer. Blend these until smooth and nice. Pour half of your brownie batter into the prepared pan. Spread it evenly. Next, spoon dollops of the cheesecake mix on top. Use a spatula to smooth it out. Then, pour the rest of the brownie batter over the cheesecake. For a pretty marbled effect, take a knife and gently swirl the cheesecake into the brownie batter. Bake in the oven for 30-35 minutes. The brownies are ready when a toothpick inserted in the center comes out with a few moist crumbs. Let them cool for at least 30 minutes before cutting into squares. Enjoy your delicious cheesecake brownies! Baking cheesecake brownies is simple if you follow a few key tips. First, always measure your ingredients carefully. This step ensures you get the right texture. Use room temperature ingredients when you can, especially the cream cheese. Soft cream cheese blends better and creates a smooth cheesecake layer. Next, don’t skip the parchment paper. Lining your pan makes it easy to lift the brownies out. This way, you can cut perfect squares without a mess. Bake in the center of your oven for even heat. If your oven has hot spots, rotate the pan halfway through baking. To make a creamy cheesecake layer, beat the cream cheese well. Use a hand mixer to achieve a smooth texture. Gradually add the sugar and egg yolk, mixing until combined. The lemon juice adds brightness, so don’t skip it! Avoid overmixing the cheesecake batter. Mix just until smooth. Overmixing can trap air, leading to cracks. Pour the cheesecake layer gently over the brownie batter. When swirling, use a knife to create a marbled effect without mixing too much. For perfect cheesecake brownies, preheat your oven to 350°F (175°C). Bake for 30-35 minutes. Check for doneness by inserting a toothpick into the center. It should come out with a few moist crumbs, not wet batter. If it comes out clean, the brownies may be overbaked. After baking, let them cool in the pan. Cooling helps set the layers. Let them sit for at least 30 minutes before cutting. This waiting time makes for cleaner slices. Follow these tips for a delicious treat you can enjoy! For the complete process, check out the Full Recipe. {{image_4}} You can easily add fun flavors to your cheesecake brownies. Mint gives a fresh touch. Just mix in some mint extract. Use one teaspoon for a nice hint. Coffee adds a rich flavor. Add one tablespoon of instant coffee or espresso powder to the brownie mix. Peanut butter is a favorite! Swirl in half a cup of creamy peanut butter into the cheesecake layer. These flavors take your brownies to the next level. You can enjoy cheesecake brownies even if you are gluten-free or vegan. For a gluten-free version, swap regular flour for almond or coconut flour. Make sure to check your labels for gluten-free certification. To create vegan brownies, replace eggs with flax eggs. Mix one tablespoon of ground flaxseed with three tablespoons of water. Let it sit for five minutes to thicken. Substitute cream cheese with vegan cream cheese for a delicious dairy-free treat. Toppings can elevate your cheesecake brownies. Try adding fresh berries on top. Strawberries and raspberries pair well with the rich flavor. You can also sprinkle chopped nuts for extra crunch. Walnuts or pecans work great. A drizzle of chocolate sauce can add a sweet touch. For a festive look, add some whipped cream and a dusting of cocoa powder. These toppings make the brownies more fun and appealing. For the full recipe, check out the details above! To keep your cheesecake brownies fresh, store them in an airtight container. This prevents moisture loss and keeps them soft. You can also layer parchment paper between the brownies for extra protection. If you want to keep them pretty, try using a cake dome. When stored properly, cheesecake brownies last about 3-4 days at room temperature. If you put them in the fridge, they can stay fresh for up to a week. Be sure to check for any signs of spoilage before eating. Freezing cheesecake brownies is a great option for longer storage. First, let them cool completely after baking. Then, wrap each brownie tightly in plastic wrap. Place them in a freezer-safe bag or container to avoid freezer burn. They can last up to 3 months in the freezer. When you're ready to enjoy, simply thaw them overnight in the fridge. Yes, you can use white chocolate. It will give a different taste. White chocolate is sweeter and creamier. It pairs well with the tangy cheesecake layer. Just melt it like you would bittersweet chocolate. To avoid cracks, make sure your cream cheese is soft. Mix slowly to keep air out. When baking, do not open the oven door too often. Let the brownies cool slowly in the oven after baking. This helps keep the cheesecake layer smooth and pretty. You can serve them with fresh fruit, like berries. A scoop of vanilla ice cream is also great. Whipped cream adds a nice touch too. Drizzle some chocolate or caramel sauce on top for extra flavor. Check your brownies at 30 minutes. Insert a toothpick in the center. If it comes out with a few moist crumbs, they are done. If it comes out wet, bake a bit longer. Remember, they will set as they cool. You now have all the key steps to make delicious cheesecake brownies. We covered ingredients, preparation, and storage tips. Remember, you can add your favorite flavors and make this recipe unique. Baking is fun, and these brownies will impress anyone who tastes them. Enjoy every bite and share them with your friends and family! Your kitchen will smell amazing, and the results will be worth your effort. Happy baking!

Cheesecake Brownies Delicious Dessert to Satisfy

Looking for the perfect dessert? Cheesecake brownies combine rich chocolate and creamy cheesecake in every bite. You will love how

- 2 pounds ripe tomatoes, halved - 1 medium onion, coarsely chopped - 4 whole garlic cloves, unpeeled - 2 tablespoons extra virgin olive oil - 1 teaspoon balsamic vinegar - 1 teaspoon sea salt - ½ teaspoon freshly ground black pepper - 1 teaspoon dried basil - 1 cup vegetable broth Ripe tomatoes are the star of this soup. Their sweetness shines through when roasted. I like to use a mix of colors for a vibrant look. The onion adds depth, while the garlic gives a warm flavor. Olive oil helps roast the veggies beautifully, and balsamic vinegar adds a hint of tang. Salt and pepper balance the flavors, and dried basil brings a lovely herb note. Vegetable broth gives the soup its body. - ½ cup heavy cream (optional, for a creamy texture) - Fresh basil leaves, for garnish You can add heavy cream for a rich texture. It makes the soup smooth and velvety. Fresh basil leaves are perfect for garnish. They add a pop of color and fresh aroma. If you want a lighter soup, skip the cream. You can also use other herbs if you like. - Baking dish - Blender - Saucepan You will need a baking dish to roast the vegetables. A blender turns the roasted mix into a smooth soup. Finally, a saucepan heats it up before serving. These tools are simple, but they make a big difference in creating this comforting dish. For the full recipe, check the details above. - Preheat your oven to 400°F (200°C). - Gather your ripe tomatoes, onion, and garlic for roasting. - Halve the tomatoes and coarsely chop the onion. - Keep the garlic cloves whole and unpeeled. - Place the halved tomatoes, chopped onions, and whole garlic cloves in a baking dish. - Drizzle 2 tablespoons of extra virgin olive oil and 1 teaspoon of balsamic vinegar over the veggies. - Sprinkle with 1 teaspoon of sea salt, ½ teaspoon of freshly ground black pepper, and 1 teaspoon of dried basil. - Toss the vegetables gently to coat them well. - Roast the vegetables for 25-30 minutes until the tomatoes are soft and charred. - Once roasted, let the vegetables cool for a few minutes. - Squeeze the soft garlic out of its skins and discard the skins. - Transfer the roasted mixture to a blender. - Add 1 cup of vegetable broth and blend until smooth. - If you want a creamy texture, add ½ cup of heavy cream and pulse briefly. - Pour the blended soup into a saucepan. Heat it over low to medium heat until warm. - Taste and adjust the seasoning if needed. - Serve your soup hot, garnished with fresh basil leaves for a lovely finish. For more details, check the Full Recipe. Choosing the right tomatoes Use ripe tomatoes for the best taste. Look for tomatoes that feel heavy and smell sweet. Varieties like Roma or heirloom give great flavor. They hold up well during roasting, enhancing the soup's richness. Balancing acidity Tomatoes can be acidic. To balance this, add a touch of sugar or a splash of balsamic vinegar. This small change makes a big difference. It helps create a smooth, well-rounded flavor. How to achieve optimal roasting Roast your tomatoes at 400°F (200°C) for about 25-30 minutes. This high heat helps to caramelize the sugars. Spread the tomatoes, onions, and garlic in a single layer. Avoid overcrowding to ensure even roasting. A little char brings out the best flavors. Garnishing with fresh basil Fresh basil adds color and aroma. Tear the leaves and sprinkle them on top just before serving. This simple step makes your soup look and taste gourmet. Serving suggestions with bread Serve your soup with crusty bread. A slice of toasted baguette is perfect. You can also drizzle olive oil on the bread for extra flavor. This pairing makes a comforting meal that everyone will enjoy. For more on making this dish, check the Full Recipe. {{image_4}} You can enhance your soup with fresh herbs. Add basil, oregano, or thyme for a tasty twist. Fresh basil gives a bright flavor. Just chop it finely and mix it in before serving. You can also use dried herbs if fresh ones are not available. They add depth but use less, as dried herbs are stronger. Want some heat? Add chili flakes or diced peppers for a spicy kick. Start with a small amount and taste as you go. This way, you can control the heat level. A little spice can really wake up the flavors of the tomatoes. Try using jalapeños or serranos for a fresh, spicy option. For a vegan soup, swap heavy cream for coconut milk. Coconut milk adds a rich, creamy texture without dairy. This gives your soup a unique flavor. You may also use cashew cream for a nutty taste. Blend soaked cashews with water until smooth, then mix it in. You will love how rich and satisfying it feels! For the full recipe, check out the complete guide to making this delightful soup. To store your roasted tomato soup in the refrigerator, let it cool first. Then, pour it into an airtight container. Make sure to seal it well to keep out air. This way, it stays fresh for up to five days. When you are ready to eat, just take it out and reheat. Freezing roasted tomato soup is easy and perfect for later use. Start by letting the soup cool completely. Then, transfer it to freezer-safe bags or containers. Leave some space at the top, as the soup will expand when frozen. Label each container with the date. You can keep it in the freezer for up to three months. When it's time to enjoy your soup again, reheating it right is key. The best method is to use a saucepan over low heat. Stir it often to help it warm evenly. If the soup seems too thick, add a splash of vegetable broth or water. This will keep the flavor strong and delicious. You can also microwave it in short intervals, stirring in between. Yes, you can use canned tomatoes. They save time and are always ripe. However, fresh tomatoes give better flavor. Canned tomatoes may lack the sweetness of fresh ones. If you use them, choose high-quality canned types. Drain excess liquid to avoid a watery soup. The soup lasts about four days in the fridge. Store it in an airtight container. This keeps it fresh and tasty. If you want to keep it longer, consider freezing it. Yes! Adding protein can make the soup heartier. You can mix in shredded chicken for richness. Beans like cannellini or chickpeas also work well. Both options will enhance the soup's texture and flavor. This blog covers easy roasted tomato soup made with ripe tomatoes, onion, and garlic. I shared simple steps to roast, blend, and enhance your soup. You can customize it with cream or herbs for extra flavor. Remember, the right tomatoes and roasting techniques matter. Store leftovers wisely and enjoy this dish again. No matter how you choose to make it, roasted tomato soup can satisfy you any time. Enjoy your cooking adventure!

Easy Roasted Tomato Soup Simple Comforting Delight

Looking for a simple dish that warms your heart? Let me introduce my Easy Roasted Tomato Soup. With just a

- 12 oz (340g) penne pasta and 2 tablespoons extra virgin olive oil - 4 cloves garlic, minced and 1 medium onion, finely chopped - 1 can (14 oz) diced tomatoes, with their juices and 2 cups vegetable broth - 1 cup heavy cream and 1 cup freshly grated Parmesan cheese - 1 teaspoon dried basil and 1 teaspoon dried oregano - Salt and freshly ground black pepper to taste To create this amazing One Pan Creamy Tomato Pasta, gather all your ingredients first. This method saves you time and keeps your kitchen organized. Start with the penne pasta. It cooks well and absorbs the sauce nicely. Use good quality olive oil for a rich taste and to help sauté the onion and garlic. You will need diced tomatoes along with their juices. They add flavor and body to the sauce. The vegetable broth brings a savory depth, making the dish feel hearty. For creaminess, the heavy cream is a must. It gives the pasta its rich texture. Lastly, Parmesan cheese adds a lovely umami kick that ties everything together. Don’t forget your seasonings! The dried basil and oregano elevate the dish with fresh, herbal notes. Adjust salt and pepper to your taste. Gather these ingredients, and you are ready to whip up a delicious meal with the Full Recipe! 1. Sautéing the onion and garlic: First, grab a large skillet. Add 2 tablespoons of olive oil. Heat it over medium heat until it's warm. Next, toss in the finely chopped onion. Cook this for about 3 to 4 minutes. Stir it often so it doesn’t burn. The onion should turn soft and clear. 2. Cooking the pasta with tomatoes and broth: Now, add 4 cloves of minced garlic to the skillet. Cook it for just 1 minute. Keep stirring so it stays fragrant. Then, pour in 1 can of diced tomatoes with their juices. Add 2 cups of vegetable broth, too. Stir in 12 ounces of penne pasta. Turn up the heat to boil it gently. Once it boils, turn down the heat and cover the pan. Let it simmer for 12 to 15 minutes. Stir a few times to keep it from sticking. The pasta should be al dente, and the liquid should soak in. 3. Finishing with cream and cheese: When the pasta is ready, stir in 1 cup of heavy cream. Add 1 teaspoon each of dried basil and oregano. Sprinkle in salt and pepper to taste. Mix until the sauce is creamy. Remove the skillet from the heat and fold in 1 cup of grated Parmesan cheese. Stir it in until it melts. Taste the pasta and adjust the seasonings if needed. Serve hot, topped with fresh basil leaves and extra cheese if you like. Enjoy your meal! - Ensuring perfect al dente pasta: Cook your penne pasta for about 12 to 15 minutes. Stir it every few minutes. This keeps it from clumping. Check the pasta a minute or two before the time is up. It should be firm but not hard. - Adjusting for creaminess and flavor: If you want a richer sauce, add more heavy cream. Start with half a cup and taste as you go. You can also add a bit more cheese for extra flavor. - Preventing sticking in the pan: Stir the pasta often while it cooks. This helps keep it from sticking. If you notice it sticking, add a splash of broth or water. This will help keep it loose. - Ideal pairings and sides: Serve this creamy tomato pasta with a fresh side salad. Garlic bread also pairs well. These sides enhance the meal without overwhelming it. - Garnishing ideas with fresh herbs: Top your pasta with fresh basil leaves. This adds a nice touch of flavor and color. You can also sprinkle extra Parmesan cheese on top for a lovely finish. For the full recipe, check out the [Full Recipe]. {{image_4}} You can change up the ingredients for One Pan Creamy Tomato Pasta. Here are some easy swaps: - Substitutes for heavy cream: If you want a lighter version, use half-and-half or coconut milk. Both give a creamy texture without the extra calories. You can also try Greek yogurt for a tangy twist. - Different pasta types or shapes: You can use any pasta you like! Try spaghetti, fusilli, or even whole wheat pasta. Just adjust the cooking time as needed. - Adding protein options like chicken or shrimp: For extra protein, add cooked chicken or shrimp. Sauté them until golden before adding the onions. This adds flavor and makes the dish heartier. Boost the taste of your creamy tomato pasta with these suggestions: - Infusing the sauce with additional spices: Add a pinch of red pepper flakes for heat or a dash of smoked paprika for a smoky flavor. Fresh herbs like thyme or parsley also work well. - Using fresh tomatoes or homemade sauce: Fresh tomatoes add a bright flavor. Use about 6-8 medium-sized ripe tomatoes, chopped. If you prefer, make your own sauce. Just simmer tomatoes with garlic and onions until thick. Feel free to mix and match these ideas to make your dish unique. Personalizing your pasta is part of the fun! For the full recipe, check out the One Pan Creamy Tomato Pasta details. To keep your One Pan Creamy Tomato Pasta fresh, follow these steps. First, let the pasta cool to room temperature. Then, transfer it to an airtight container. This helps prevent moisture loss and keeps flavors intact. Store it in the fridge. Your creamy pasta will last up to 3 days. After that, the texture may change, and flavors may fade. When it's time to enjoy your leftovers, you want to reheat them just right. There are a few great methods to do this. You can use a microwave or stovetop. If you use a microwave, heat in 30-second bursts. Stir between each burst to ensure even heating. If you prefer the stovetop, add a splash of water or broth in a pan. Heat gently over low heat, stirring often. To restore creaminess, you might want to add a little extra cream. This will help bring back that rich texture. Taste and adjust seasoning if needed. Enjoy your creamy pasta like it's fresh from the pan! How to make One Pan Creamy Tomato Pasta more healthy? To make this dish healthier, use whole grain penne pasta. Whole grain pasta has more fiber. You can also add fresh spinach or kale for extra nutrients. Swap heavy cream with a light version or use cashew cream for a lighter touch. Reducing the cheese amount can also cut calories without losing flavor. Can I make this recipe vegan-friendly? Yes, you can easily make this recipe vegan. Use plant-based pasta and replace heavy cream with coconut cream or a nut-based alternative. For cheese, use nutritional yeast or a vegan cheese option. This keeps the creamy texture and rich flavor without animal products. What can I serve with One Pan Creamy Tomato Pasta? This pasta pairs well with a simple green salad. A side of garlic bread is also great for soaking up the sauce. For added protein, serve with grilled chicken or shrimp. You can also add roasted vegetables for a colorful and healthy side dish. This blog post covers how to make delicious One Pan Creamy Tomato Pasta. You learned about the key ingredients, including pasta, tomatoes, and cream. You discovered easy steps for cooking and tips for perfect results. I shared variations to help you customize your dish. Additionally, you found storage tips to keep leftovers fresh. Cooking can be fun and rewarding. Enjoy your One Pan Creamy Tomato Pasta, and don't be afraid to experiment!

One Pan Creamy Tomato Pasta Quick and Easy Recipe

Looking for a quick and tasty meal that you can make in just one pan? You’re in the right place!

- 2 cups all-purpose flour - 1 tablespoon baking powder - 1/2 teaspoon salt - 1/4 teaspoon freshly ground black pepper - 1/2 cup cold unsalted butter, cut into small cubes - 1 cup shredded sharp cheddar cheese - 1/2 cup finely grated Parmesan cheese - 1/2 cup buttermilk (cold) - 1 large egg (lightly beaten) - Fresh chives, finely chopped (for garnish) To make savory cheese scones, you will need simple ingredients. First, gather your flour. This gives the scones their structure. Next, baking powder helps them rise and become fluffy. Salt adds flavor, while black pepper gives a slight kick. Cold butter is key. It creates flaky layers. Cut the butter into small cubes for easy mixing. The cheese adds rich taste. Sharp cheddar gives a bold flavor. Parmesan brings a nutty note. Buttermilk is important for moisture and tenderness. The egg binds everything together. Finally, fresh chives make a lovely garnish. They add a pop of color and flavor. You can find the full recipe to guide you through the process. Each ingredient plays a role in the end result, creating delightful, savory cheese scones that are perfect for any meal. - Preheat your oven to 400°F (200°C). - Prepare a baking sheet with parchment paper. - Combine flour, baking powder, salt, and pepper in a large bowl. - Whisk until everything mixes well. - Add cold butter to the flour mixture. - Use your fingers or a pastry cutter to work in the butter. - Stop when it looks like coarse crumbs with some larger bits. - Fold in shredded cheddar and grated Parmesan cheese. - Make sure the cheese spreads evenly in the mix. - In a different bowl, mix cold buttermilk and the beaten egg. - Whisk until they are smooth and well combined. - Make a well in the center of the dry mix. - Pour the wet ingredients into the well. - Gently mix until just combined. Don't overwork the dough. - Lightly flour a clean surface. - Pat the dough into a rectangle about 1 inch thick. - Cut the dough into squares or triangles. - Place scones on the prepared baking sheet. - Bake for 15-20 minutes until golden brown. - A toothpick should come out clean when inserted. For the full recipe, check the main article. To get the best texture in your savory cheese scones, start with cold butter. When the butter is cold, it creates little pockets of steam as it melts. This makes scones light and fluffy. Cut the cold butter into small cubes before adding it to the flour mix. Avoid overmixing the dough. Mix just until the wet and dry ingredients are combined. Overmixing can make your scones tough. You want the dough to stay tender and airy. Adding herbs or spices can jazz up your scones. Try mixing in fresh herbs like rosemary or thyme. You can also add some garlic powder or onion powder for extra flavor. A pinch of cayenne can give a nice kick too! Experiment with different cheese blends. Mixing in some blue cheese or gouda can enhance the taste. Get creative and find what flavors you love! Bake your scones on the middle rack of the oven. This ensures even heat distribution. If you place them too high or too low, they may bake unevenly. Check the scones after 15 minutes. They should be puffed and golden brown. A toothpick inserted in the center should come out clean. This means they are ready to enjoy! For a detailed guide, check out the Full Recipe. {{image_4}} You can use different cheeses for your savory cheese scones. Sharp cheddar gives a bold taste. You might also try gouda for a creamy flavor. Parmesan adds a nice salty touch. For a milder flavor, use mozzarella. If you like blue cheese, it adds a strong punch. Mix and match cheeses to find your favorite combo. You can boost flavor by adding vegetables or meats. Chopped green onions give a fresh taste. Spinach adds color and nutrition. Diced ham or crispy bacon brings a savory touch. Sun-dried tomatoes bring a sweet and tangy flavor. Just chop them small so they mix well into the dough. Be careful not to add too much, or your scones may get soggy. If you need a gluten-free option, use gluten-free flour. Look for blends made for baking. These blends usually contain rice flour or almond flour. You can also try oat flour for a nutty taste. Just remember, gluten-free dough may need more liquid. Adjust the buttermilk to get the right texture. Enjoy your gluten-free scones just as much as the classic version. For the full recipe, check the previous section. To store your savory cheese scones at room temperature, place them in an airtight container. Make sure the container is not too big to avoid air getting in. Store them for up to three days. If you notice any moisture, add a paper towel inside the container to absorb it. This keeps your scones fresh and fluffy. For long-term storage, freezing is a great option. First, allow your scones to cool completely after baking. Then, wrap each scone in plastic wrap to keep them safe from freezer burn. Place the wrapped scones in a freezer-safe bag or container. They can stay frozen for up to three months. When you're ready to enjoy them, just pull out how many you need. Reheating your scones properly helps maintain their flavor and texture. The best method is to use an oven. Preheat your oven to 350°F (175°C). Place the scones on a baking sheet and warm them for about 10-12 minutes. This method revives their fluffy texture. You can also reheat them in a microwave, but be cautious. Heat them for 10-15 seconds at a time to prevent them from getting tough. Enjoy your scones warm and fresh! Yes, you can prepare the dough ahead of time. Just follow these steps: - Make the dough and shape it into a rectangle. - Cut the scones and place them on a baking sheet. - Cover the scones with plastic wrap. - Refrigerate for up to 24 hours. When ready, bake them straight from the fridge. This helps keep them fluffy. These scones pair well with a variety of dishes. Here are some ideas: - Serve with a warm bowl of soup. - Enjoy with a fresh garden salad. - Spread butter or your favorite jam on top. - Try them alongside scrambled eggs for breakfast. Enhancing flavors is easy. Consider these tips: - Add herbs like rosemary or thyme to the dough. - Mix in sun-dried tomatoes or olives for a Mediterranean twist. - Use different cheeses, like feta or blue cheese, for a unique taste. - Sprinkle some garlic powder for extra zest. Buttermilk adds flavor and moisture, but it’s not a must. Here are alternatives: - Replace it with regular milk mixed with lemon juice or vinegar. - Use yogurt thinned with water to match the consistency. - Try sour cream as a substitute; it also adds richness. Look for these signs of perfectly baked scones: - They should be golden brown on top. - A toothpick inserted in the center should come out clean. - The scones will feel light and airy when touched. - They should have risen nicely and not look flat. For a detailed guide, check out the Full Recipe for savory cheese scones. You learned how to make savory cheese scones step by step. From gathering ingredients to baking, you can create a delicious treat. Don’t forget tips for texture and flavor too. You can even adapt the recipe with different cheeses or vegetables. Storing and reheating your scones correctly keeps them fresh. With these easy methods, you can impress your family and friends. Now it’s time to bake and enjoy your homemade scones!

Savory Cheese Scones Fluffy and Flavorful Treats

Get ready to bake some delightful Savory Cheese Scones that are fluffy and full of flavor! In this article, I’ll

- 4 slices of hearty bread (e.g., sourdough, whole grain) - 4 large eggs - 1 cup shredded mozzarella cheese - 1/2 cup grated Parmesan cheese - 1/2 teaspoon garlic powder - 1/2 teaspoon dried oregano - 1/4 teaspoon red pepper flakes (optional) - Salt and black pepper to taste - 2 tablespoons fresh chives or parsley (garnish) - 2 tablespoons olive oil or melted butter Creating Cheesy Baked Egg Toast is simple. You need just a few ingredients. Start with four slices of hearty bread. Sourdough or whole grain works great. You will also need four large eggs. Eggs give the dish its creamy texture. Next, grab a cup of shredded mozzarella cheese. This cheese melts beautifully and adds a rich taste. You will also need half a cup of grated Parmesan cheese. It adds a salty kick. Don't forget garlic powder and dried oregano. These spices bring out the flavor. If you like heat, add red pepper flakes, but it's optional. Season with salt and black pepper to your taste. Finally, you will need fresh chives or parsley for garnish. These herbs add color and freshness. Use olive oil or melted butter to brush the bread. This helps it get nice and crispy. You can find the Full Recipe to guide you through the preparation. - Preheat oven to 375°F (190°C). - Line a baking sheet with parchment paper. - Cut an 'X' shape in the center of each bread slice. - Drizzle olive oil or melted butter on the bread. - Crack eggs into the wells of the bread slices. - Mix cheeses and seasonings, then spoon over eggs. - Bake for 15-20 minutes until eggs are set and cheese is bubbly. This method makes the perfect Cheesy Baked Egg Toast. Follow the steps in the Full Recipe for best results. - Use fresh, quality ingredients for better flavor. Fresh eggs and bread make a huge difference. - Adjust cooking time for desired yolk consistency. Bake less for runny yolks or more for firmer ones. - Pair with mixed greens or sliced avocado. This adds freshness and color to your plate. - Offer hot sauce or fresh herbs for extra flavor. A dash of spice can elevate your toast. - Serve on a rustic wooden board. This adds charm and makes your dish look inviting. - Garnish with additional herbs for a pop of color. Chives or parsley create a beautiful finish. Each of these tips helps you create a delicious and attractive Cheesy Baked Egg Toast. For the complete recipe, check out the [Full Recipe]. {{image_4}} Cheesy Baked Egg Toast is great for changing up flavors. You can substitute mozzarella with other cheeses. Try cheddar for a sharp taste or pepper jack for a spicy kick. For extra creaminess, add cream cheese. This will make your toast even richer and more delicious. You can mix in cooked bacon or sausage for protein. This adds heartiness to your dish. If you like veggies, include spinach or tomatoes. These will give your toast a fresh, vibrant look and taste. Seasonal herbs or vegetables can elevate your dish. In spring, use fresh chives or asparagus. During fall, try adding pumpkin or squash for a festive touch. You can also incorporate festive flavors during holidays, like adding cranberries or sage. Don't hesitate to experiment! For the full recipe, check out the [Full Recipe]. To store leftovers, let the Cheesy Baked Egg Toast cool first. Place each piece in an airtight container. You can also use a zip-top bag. If you have multiple pieces, layer parchment paper between them. This helps prevent sticking. The best way to reheat is in the oven. Preheat to 350°F (175°C). Place the toast on a baking sheet. Heat for about 10 minutes or until warm. This keeps the bread crispy. If you want a runny yolk, cover the toast with foil for part of the time. You can freeze Cheesy Baked Egg Toast, but it’s best to freeze before baking. Wrap each piece in plastic wrap, then in foil. This keeps them fresh for up to three months. When ready to eat, thaw in the fridge overnight and bake as usual. For Cheesy Baked Egg Toast, I love using hearty bread. Here are some great options: - Sourdough: Its tangy flavor and sturdy texture work well. - Whole grain: This adds a nutty taste and good nutrition. - Ciabatta: It’s light, airy, and provides a nice crust. - French baguette: This adds a crispy edge and soft inside. Each type of bread holds the egg and cheese well, making each bite delicious. Yes, you can prepare Cheesy Baked Egg Toast ahead of time. Here’s how: - Assemble the toast without baking. - Place it on a baking sheet and cover with plastic wrap. - Store it in the fridge for up to 24 hours. When you’re ready to bake, just remove the wrap and pop it in the oven. This saves time and still tastes fresh. You can easily swap some ingredients if needed. Here are my suggestions: - Cheese: Use cheddar or pepper jack for different flavors. - Herbs: Basil or thyme can replace oregano for a twist. - Bread: Gluten-free bread works well if you need it. - Eggs: You can use egg whites for a lighter version. These substitutions keep the dish tasty while fitting your needs. For the full recipe, check back to the main section! This recipe for Cheesy Baked Egg Toast is simple and tasty. You have learned about the main ingredients, step-by-step instructions, and useful tips. You can make it your own by adding different ingredients or adjusting flavors. Storing and reheating are easy as well. I hope you feel inspired to try this dish. Enjoy your cooking and share it with friends for a fun meal!

Cheesy Baked Egg Toast Simple and Delicious Recipe

Craving a comforting breakfast that’s both simple and delicious? Look no further! My Cheesy Baked Egg Toast recipe will brighten

Older posts
Newer posts
← Previous Page1 … Page92 Page93 Page94 … Page116 Next →

dsad

© 2025 recipesstation • Built with GeneratePress

Our Policies

  • Copyright Policy
  • Cookie Policy
  • GDPR Policy
  • Privacy Policy
  • Disclaimer
  • Terms Of Use

More Information

  • Home
  • About
  • Contact
  • Appetizers
  • Dessert
  • Dinner
  • Drinks
©2025, recipesstation About Back To Top