Skip to content
DisclaimerTerms Of UseGDPR PolicyCookie Policy

recipesstation

  • Home
  • Drinks
  • Appetizers
  • Dinner
  • Dessert
  • About
  • Contact
  • Privacy Policy
DisclaimerTerms Of UseGDPR PolicyCookie Policy

Emily

- 2 boneless, skinless chicken breasts - 1 cup broccoli florets - 1 cup bell peppers (red and yellow), sliced - 1 medium zucchini, sliced - 4 tablespoons honey - 3 cloves garlic, minced - 3 tablespoons soy sauce (or tamari for gluten-free option) - 1 tablespoon sesame oil - 1 tablespoon olive oil - Salt and pepper to taste - Optional: sesame seeds and sliced green onions for garnish When I make honey garlic chicken and veggies, I love how each ingredient plays a part. The chicken shines with sweetness from the honey and the punch of garlic. It’s a simple marinade, but it packs a lot of flavor. The veggies add color and crunch. I prefer vibrant bell peppers and tender broccoli. Zucchini rounds out the mix, soaking up all the tasty marinade. Each bite gives you a bit of everything. When you season the chicken, don’t hold back on the salt and pepper. These basics really bring out the natural flavors. If you want a bit of flair, sprinkle sesame seeds and green onions on top. They add a nice crunch and freshness. You can find the full recipe [here](#). This meal is perfect for busy nights, and it never fails to impress! First, pat the chicken breasts dry with a paper towel. This step helps the seasonings stick better. Next, season both sides with salt and pepper. The seasoning adds flavor. After that, make the marinade. In a bowl, mix honey, minced garlic, soy sauce, and sesame oil. Whisk it well until smooth. Set aside a few tablespoons of the marinade for later use. Now, submerge the chicken in the marinade. Make sure each piece is fully coated. Cover the bowl and refrigerate the chicken. The best marination time is at least 30 minutes. For deeper flavor, marinate for up to 2 hours. This allows the chicken to absorb those sweet and savory flavors. Preheat a large skillet over medium-high heat. Once hot, add the marinated chicken. Cook each side for about 6 to 7 minutes. You want the chicken golden brown and cooked through. The internal temperature should reach 165°F (75°C). After cooking, remove the chicken from the skillet. Let it rest for about 5 minutes before slicing. This keeps the juices inside. While the chicken rests, stir-fry the vegetables in the same skillet. Add the seasoned broccoli, bell peppers, and zucchini. Cook for about 5 to 6 minutes until they are tender-crisp. They should still be bright in color. Finally, combine the sliced chicken with the veggies in the skillet. Pour in the reserved marinade and toss everything together. Cook for an extra 2 to 3 minutes to heat it through. For the complete recipe, check out the Full Recipe section. Resting the chicken is key to keeping it juicy. After you cook the chicken, take it out of the skillet. Let it sit on a cutting board for about five minutes. This helps the juices stay inside. Cook the chicken to the right temperature for safety. Use a meat thermometer to check. The chicken should reach 165°F (75°C). This ensures it is safe to eat and still moist. To get the best texture for veggies, stir-fry them quickly. Cook them on high heat for just a few minutes. This keeps them tender-crisp and bright in color. Avoid overcooking, as they can become mushy. You can switch up the vegetables too. Try snap peas, carrots, or even cauliflower. Each adds a different flavor and color to your dish. For an appealing dish, present it well. Use shallow bowls or a large platter. Layer the chicken and veggies nicely. You can add some extra bell pepper slices or fresh herbs for color. Pair your meal with rice or noodles for a complete dish. They soak up the honey garlic sauce and offer a great balance. Enjoy your meal with family or friends! For the full recipe, check out the Sweet & Savory Honey Garlic Chicken & Veggies 🥦. {{image_4}} To make your honey garlic chicken even better, try adding some spices. Here are a few ideas: - Ginger: Fresh or powdered ginger gives a warm kick. - Red Pepper Flakes: For some heat, sprinkle these in while cooking. - Cilantro or Basil: Fresh herbs can brighten up the dish nicely. You can also swap out the chicken for other proteins. Try these: - Shrimp: Cook quickly and add a sweet flavor. - Tofu: Great for a vegetarian twist, soak it in the marinade. - Pork: Tender pork tenderloin works well with honey and garlic. You can easily tweak this recipe for different diets: - Gluten-Free: Use tamari instead of soy sauce. Check the labels for all ingredients. - Dairy-Free: This recipe is naturally dairy-free. Enjoy it without worry. - Low-Carb: Skip the honey or use a sugar substitute. Pair it with cauliflower rice instead of regular rice. Using seasonal veggies can enhance your dish. Here are some ideas: - Spring: Add snap peas or asparagus for a fresh crunch. - Summer: Zucchini and bell peppers are perfect in this dish. - Fall: Swap in butternut squash or Brussels sprouts for a hearty feel. - Winter: Use root veggies like carrots or parsnips for warmth. For holidays, consider adding a special touch. Try: - Cranberries: Toss in dried cranberries for a sweet contrast. - Nuts: Add toasted almonds or walnuts for crunch. These variations can make your honey garlic chicken and veggies even more fun to eat! For the full recipe, check out the details above. To store leftovers, place them in an airtight container. This keeps them fresh and safe to eat. You can refrigerate the honey garlic chicken and veggies for up to four days. Make sure to let the food cool before sealing the container. This step helps avoid moisture build-up inside. If you want to freeze portions, ensure the dish cools completely first. Then, use freezer-safe bags or containers. Label them with the date for easy tracking. The meal stays good in the freezer for up to three months. To reheat, thaw the meal overnight in the fridge. Heat it in a skillet on low to keep the flavors intact. Preparing in advance can save time on busy days. You can marinate the chicken a day ahead. Store the marinated chicken in the fridge for up to 24 hours. This extra time allows the flavors to deepen. For quicker meals, chop the veggies ahead of time. Keep them in a separate container in the fridge. This way, everything is ready when you are. For the full recipe, check the previous sections. Yes, you can use frozen chicken. Just make sure to thaw it first. The best way to thaw chicken is overnight in the fridge. If you are short on time, you can use the cold water method. Place the chicken in a sealed bag and submerge it in cold water for about an hour. When cooking from frozen, add a few extra minutes to the cooking time. Always check that the chicken is cooked through before serving. If you don’t have honey, there are several options. You can use maple syrup or agave nectar for a similar sweetness. Brown sugar mixed with a bit of water also works well. If you prefer a sugar-free option, try using a sugar substitute like stevia or erythritol. Each option will give a different flavor, but all can work nicely in this recipe. To know if the chicken is fully cooked, check its internal temperature. It should reach 165°F (75°C). Use a meat thermometer for the best accuracy. If you don't have one, look for visual cues. The chicken should be golden brown outside and no longer pink inside. Juices should run clear when you cut into it. You can add many vegetables to this dish based on what you like. Carrots, snap peas, or green beans are great options. You can also use cauliflower, asparagus, or even mushrooms. Just make sure they cook well with the other veggies. Feel free to mix and match to fit your taste or what you have on hand. This recipe shows how to make a tasty chicken and veggie dish. We covered the key ingredients, easy steps, and tips for juicy chicken. Variations let you adapt the meal to your needs. Remember to store leftovers properly or freeze portions for busy days. Cooking can be fun and simple! With practice, you’ll create a dish your family will love. Enjoy the flavors and let your creativity shine in the kitchen!

Honey Garlic Chicken and Veggies Easy Weeknight Meal

Looking for a quick and tasty dinner? Honey Garlic Chicken and Veggies is your answer! This easy recipe combines juicy

- 500g boneless chicken thighs - 2 tablespoons black pepper - 3 tablespoons soy sauce - 1 tablespoon oyster sauce - 2 tablespoons cornstarch - 1 tablespoon vegetable oil - 1 bell pepper, sliced - 1 large onion, sliced - 2 cloves garlic, minced - 1-inch piece ginger, grated - 1 tablespoon sesame oil - 2 green onions, chopped - Cooked rice for serving When I make Black Pepper Chicken, I always keep my ingredients fresh and simple. Using boneless chicken thighs gives a juicy texture. I use two tablespoons of black pepper, which brings a nice kick. Soy sauce and oyster sauce add depth and umami. Cornstarch is key for a crunchy coating. I heat vegetable oil to the right temperature for frying the chicken. Bell peppers and onions add color and sweetness. Garlic and ginger give a great aroma. Finally, sesame oil adds a nutty flavor. You can serve this dish over fluffy cooked rice. It’s a quick meal that packs a flavorful punch! For the full recipe, check out the detailed instructions above. First, take 500g of boneless chicken thighs and cut them into bite-sized pieces. In a mixing bowl, combine the chicken with 3 tablespoons of soy sauce, 1 tablespoon of oyster sauce, and 2 tablespoons of freshly cracked black pepper. Stir well to coat each piece. Cover the bowl and let the chicken marinate in the fridge for at least 30 minutes. This step is key for adding flavor. Next, you’ll prepare the coating. Take the marinated chicken and sprinkle 2 tablespoons of cornstarch over it. Toss the chicken pieces until they are evenly coated. This will give your chicken a nice crunch when cooked. Now, heat up 1 tablespoon of vegetable oil in a large skillet or wok. Use medium-high heat until the oil shimmers. Carefully add the coated chicken in a single layer. If your skillet is small, cook in batches. Fry for about 5-6 minutes until the chicken is golden brown and fully cooked. Once done, remove the chicken and set it aside to keep warm. In the same skillet, add the sliced onion, bell pepper, minced garlic, and grated ginger. Stir-fry this mix for about 3-4 minutes. You want the veggies to be tender but still crisp, with bright colors. Return the cooked chicken to the skillet with the sautéed veggies. Drizzle in a bit more black pepper and 1 tablespoon of sesame oil. Toss everything together to combine well. Cook for an additional 2 minutes to let the flavors blend. Finally, serve your Black Pepper Chicken over fluffy cooked rice. Garnish with chopped green onions and extra black pepper for a tasty touch. For the full recipe, check out the section above. Enjoy your meal! Adjust the black pepper to suit your taste. If you love heat, add more. If you prefer mild, use less. Fresh ingredients make a big difference. They add bright flavors and enhance your dish. Always choose fresh vegetables and herbs for the best results. Cornstarch is key for a crunchy texture. It gives the chicken a nice crust. Coat each piece well, but don’t use too much. Be careful not to overcrowd the skillet. This helps the chicken fry evenly and get that perfect golden color. Garnish your dish with chopped green onions and a sprinkle of black pepper. This adds color and makes it look fancy. Serve Black Pepper Chicken over fluffy rice for a complete meal. You can also add steamed broccoli or snap peas for a nice touch. These veggies not only add color but also nutrition. {{image_4}} Do you like it hot? You can add chili flakes for extra heat. Start with a pinch and add more if you want. This can change your dish from mild to spicy in no time. Another way to adjust spice is by using a pepper blend. Different peppers can add layers of flavor. Try a mix of black pepper, white pepper, and Sichuan pepper. This mix brings a unique twist to your Black Pepper Chicken. Want to make your dish more colorful? You can substitute bell peppers with broccoli or snap peas. These veggies add crunch and nutrition. You’ll love the fresh taste they bring. Mushrooms are another great option. They soak up flavors well and add a nice texture. Carrots also work well. Slice them thin for a sweet and tender bite. Switching up your sauce can create new flavors. Try teriyaki sauce for a sweet twist. It pairs well with the black pepper and adds depth. You can also use hoisin sauce. This sauce adds a rich and savory flavor. If you prefer a vegetarian option, consider using tofu instead of chicken. Tofu absorbs flavors beautifully, making it a great choice. You can follow the same steps in the Full Recipe and enjoy a tasty meal! To keep your Black Pepper Chicken fresh, store leftovers in the fridge. First, let the dish cool down. Then, place it in an airtight container. This helps prevent moisture loss and keeps flavors intact. Use glass or plastic containers with tight lids for best results. To freeze Black Pepper Chicken, start with cooled leftovers. Place portions in freezer-safe bags or containers. Remove as much air as possible to avoid freezer burn. Label each bag with the date. For thawing, simply transfer the chicken to the fridge overnight. Reheat in a skillet over medium heat until it’s hot. Adding a splash of water can help revive the dish and keep it moist. In the fridge, enjoy your leftovers within three to four days. If frozen, Black Pepper Chicken stays good for about three months. After this time, the texture and flavor may decline. Always check for any signs of spoilage before eating. Black Pepper Chicken is a savory dish made with chicken, black pepper, and vegetables. The flavors are bold and spicy. The chicken gets a crunchy coating from cornstarch. Fresh black pepper adds heat and depth. This dish is quick to make and very satisfying. Yes, you can make Black Pepper Chicken ahead of time. After cooking, let it cool completely. Store it in an airtight container. It will stay fresh in the fridge for up to three days. For longer storage, you can freeze it. Just remember to thaw it in the fridge before reheating. You can serve Black Pepper Chicken with various sides. Cooked rice is a classic choice. You can also add steamed broccoli or snap peas for color. A fresh salad pairs well too. If you like bread, try serving it with warm naan or crusty rolls. Black Pepper Chicken can be part of a healthy meal. Chicken is a great source of protein. You can use less oil or replace it with a healthier option. Adding more vegetables boosts the nutrition. A side of brown rice instead of white rice is another healthy swap. For a lighter version, you can try using tofu instead of chicken. In this post, I shared a simple recipe for Black Pepper Chicken. You learned how to marinate, coat, and cook the chicken. We explored tips for flavor and texture. I also offered ideas for variations and storage. This dish is easy and tasty, perfect for any meal. With these steps, you can make it your way. Enjoy your cooking journey and savor every bite!

Savory Black Pepper Chicken Quick and Easy Recipe

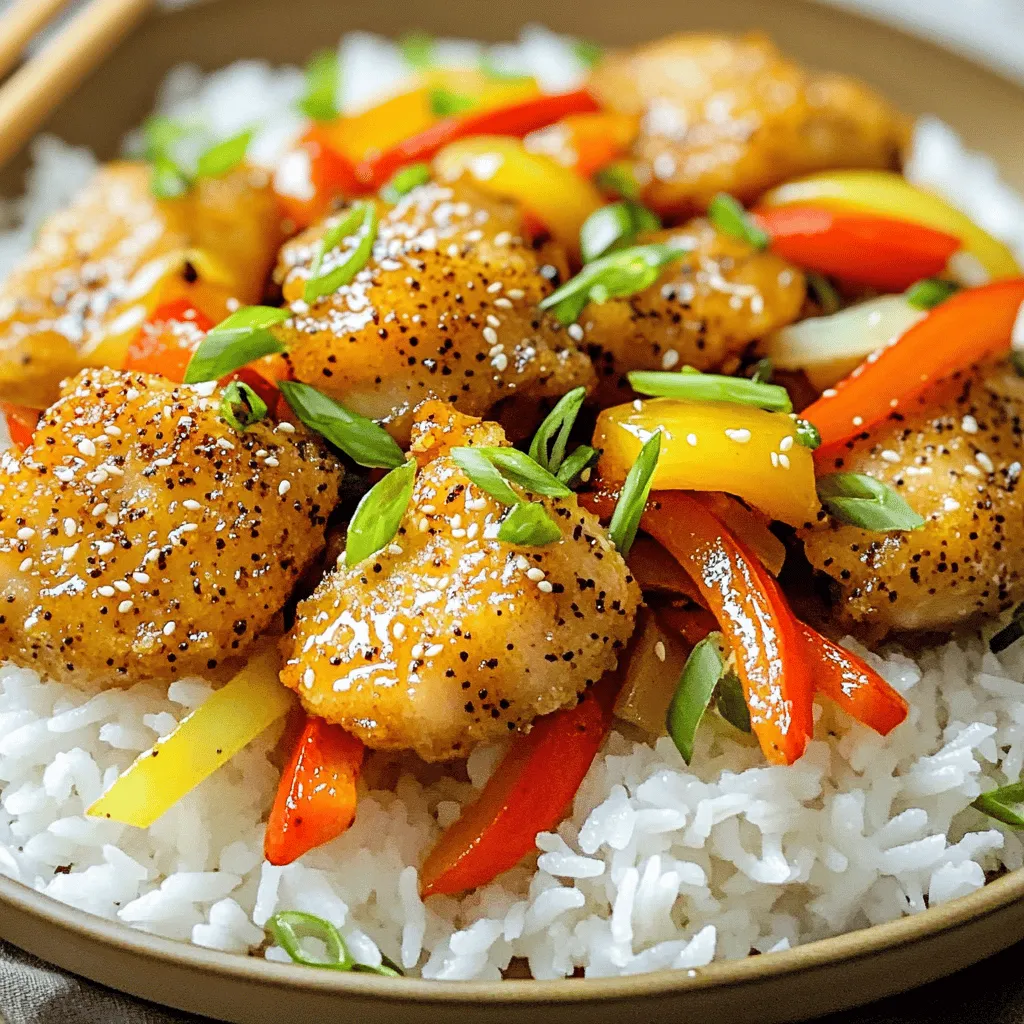
Craving a dish full of flavor that’s quick to make? My Savory Black Pepper Chicken recipe is your answer! With

To make a delicious sausage breakfast casserole, gather these key ingredients: - 1 pound breakfast sausage, casings removed - 6 large eggs - 1 cup whole milk - 1 teaspoon garlic powder - 1 teaspoon onion powder - 1 teaspoon dried thyme - 1/2 teaspoon paprika - Salt and freshly cracked black pepper to taste - 4 cups frozen hash browns, thawed - 1 cup shredded sharp cheddar cheese - 1/2 cup diced bell peppers (a mix of red and green for color) - 1/2 cup chopped green onions Using fresh ingredients makes a big difference in taste. Here are some tips to ensure quality: - Eggs: Look for eggs with clean shells and no cracks. Farm-fresh eggs often have richer flavor. - Sausage: Choose a brand with no fillers. Fresh sausage has better flavor and texture. - Cheese: Opt for block cheese and shred it yourself for the best melt and taste. - Vegetables: Choose vibrant, firm bell peppers and green onions. Avoid any that look wilted or soft. You can customize the casserole with these alternatives: - Sausage: Use turkey sausage for a leaner option or plant-based sausage for a vegetarian twist. - Milk: Swap whole milk for almond or oat milk for a dairy-free version. - Cheese: Try pepper jack cheese for a spicy kick or mozzarella for a milder taste. - Hash Browns: Substitute with diced potatoes or even quinoa for a different texture. By mixing and matching these ingredients, you can create a version of this casserole that suits your taste and diet! For the complete recipe, check out the Full Recipe. Start by gathering all your ingredients. This makes cooking easier. You need: - 1 pound breakfast sausage, casings removed - 6 large eggs - 1 cup whole milk - 1 teaspoon garlic powder - 1 teaspoon onion powder - 1 teaspoon dried thyme - 1/2 teaspoon paprika - Salt and freshly cracked black pepper to taste - 4 cups frozen hash browns, thawed - 1 cup shredded sharp cheddar cheese - 1/2 cup diced bell peppers - 1/2 cup chopped green onions Make sure your hash browns are thawed. This helps them mix well. Preheat your oven to 350°F (175°C) and grease your baking dish. In a large skillet, heat the breakfast sausage over medium heat. Use a wooden spoon to break it apart. Cook it for about 5-7 minutes. You want it to be brown and no longer pink. After it cooks, drain any fat. Let it cool for a few minutes. In a big bowl, whisk the eggs and milk until smooth. Add garlic powder, onion powder, thyme, paprika, and season with salt and pepper. Mix well. Now, fold in your thawed hash browns, making sure they are fully coated. Then, gently mix in the cooked sausage, bell peppers, and half of the cheddar cheese. Pour the mixture into your prepared baking dish. Spread it out evenly. Top it with the rest of the cheese and some chopped green onions. Place it in the oven and bake for 35-40 minutes. The center should be set, and the top should look golden brown. Once it's done, let it cool for a few minutes. Slice into squares and serve warm. Enjoy your delicious creation from the full recipe! To make the best sausage breakfast casserole, I suggest you follow these key tips: - Use fresh ingredients. Fresh eggs and quality sausage enhance flavor. - Thaw the hash browns completely. This helps the casserole cook evenly. - Grease the baking dish well. This prevents sticking and makes serving easier. - Let the casserole cool before slicing. It holds together better when cut. Avoid these common mistakes for a perfect casserole: - Don’t skip seasoning. A good amount of salt and pepper makes a big difference. - Don’t overcook the sausage. It should be browned but not dry. - Forgetting to mix thoroughly. Ensure all ingredients are well combined for even taste. - Baking at the wrong temperature. Stick to the preheated oven for best results. For a great texture, here’s what to do: - Use a mix of soft and crispy textures. The hash browns should be crispy on the edges. - The eggs should be fluffy. Don’t overbeat them; just mix until combined. - Let it bake until golden brown. This gives a nice crust while keeping the inside moist. - If it’s too dry, consider adding a splash of milk before baking. Follow these tips, and you’ll enjoy a delicious and easy sausage breakfast casserole. Check out the Full Recipe for more details! {{image_4}} You can enjoy a vegetarian version of this casserole. Replace the sausage with plant-based sausage. Use mushrooms for a hearty texture. Spinach or kale adds great color and nutrition. Try using a mix of your favorite vegetables to keep it fresh and fun. If you're gluten-free, swap the hash browns for gluten-free versions. You can also use quinoa or rice. For a dairy-free option, try almond or oat milk. Nutritional yeast can replace cheese, giving a cheesy flavor without dairy. Spice things up with jalapeños for some heat. Adding sun-dried tomatoes can give the dish a rich taste. Fresh herbs like parsley or cilantro can brighten the flavors. Try adding olives or feta cheese for a Mediterranean twist. For the full recipe, check out the Sizzling Sausage Sunrise Casserole. After enjoying your casserole, store leftovers in an airtight container. Allow the dish to cool completely before sealing. This prevents moisture build-up, keeping the casserole fresh. You can keep it in the fridge for up to three days. Always label your container with the date to avoid confusion later. To reheat, place individual servings in the microwave for quick warmth. Heat on medium power for about 1-2 minutes. If reheating the whole dish, cover it with foil in a preheated oven at 350°F. Bake for about 20 minutes until hot. This method helps keep the casserole moist and tasty. You can freeze the casserole for longer storage. Allow it to cool down completely, then wrap it tightly in plastic wrap and aluminum foil. This prevents freezer burn. It can stay in the freezer for up to three months. When ready to eat, thaw overnight in the fridge and reheat as mentioned above. This makes enjoying your Sizzling Sausage Sunrise Casserole easy anytime! You can tell the casserole is done when the center is firm. A golden brown top is a good sign, too. Insert a knife in the center; if it comes out clean, it's ready. The baking time is about 35 to 40 minutes at 350°F (175°C), but ovens can vary. Yes, you can prepare the casserole a day in advance. Just assemble it and cover it well. Store it in the fridge overnight. When you're ready to bake, let it sit at room temp for about 30 minutes. Then, bake as directed. This saves time on busy mornings! This casserole pairs well with fresh fruit or a simple green salad. You can also add toast or muffins for extra carbs. For drinks, consider coffee, tea, or fresh juice. These sides make the meal more balanced and delicious. To adjust servings, simply change the amount of ingredients. For a smaller group, cut the recipe in half. For a larger group, double the ingredients. Use a larger baking dish if you make more. Always check the cooking time, as larger casseroles may need a bit longer to bake. This blog post covered tips for making a great sausage breakfast casserole. We looked at the best ingredients, cooking steps, and storage options. Remember to choose fresh ingredients for the best taste. Avoid common mistakes to make sure your dish shines. Try the variations for fun flavors. With these tips, you can create a delicious meal any time. Enjoy the cooking process, and don’t hesitate to experiment and discover your favorite versions of this dish. Happy cooking!

Sausage Breakfast Casserole Easy and Tasty Meal

Looking for an easy and tasty breakfast that will impress your family? This Sausage Breakfast Casserole is your answer! Packed

- 4 medium russet potatoes - 1 medium onion - 3 cloves garlic - 4 cups vegetable broth - 2 cups heavy cream - 1 cup shredded sharp cheddar cheese - 1/2 cup sour cream - 4 green onions - 1/4 cup cooked turkey bacon (optional) - Salt and pepper - 1 teaspoon smoked paprika - 2 tablespoons olive oil - 1 tablespoon fresh chives For the best loaded baked potato soup, I use fresh, simple ingredients. The russet potatoes give the soup a creamy texture. The onion and garlic create a base full of flavor. Vegetable broth adds depth, while heavy cream makes it rich and smooth. I love using sharp cheddar for that extra cheese kick. The sour cream adds a tangy twist, and green onions give a fresh crunch. If you want a bit of crunch, add turkey bacon. It’s not a must, but it’s a tasty option. For seasonings, I add smoked paprika for warmth. Salt and pepper balance the flavors. This mix of ingredients makes the soup comforting and satisfying. Each bite feels like a warm hug on a chilly day. {{ingredient_image_2}} - Heat olive oil in a large pot over medium heat. - Add the finely chopped onion and sauté until it becomes soft, about 5 minutes. - Stir in the minced garlic and cook for one more minute. Watch the garlic closely, so it doesn’t burn. - Add the diced russet potatoes to the pot along with the vegetable broth. - Raise the heat and bring the mixture to a boil. - Once it boils, lower the heat and let it simmer until the potatoes are tender, about 15 to 20 minutes. - Use an immersion blender to puree the soup until it reaches your desired texture. - If you like some chunks, blend only half of the soup. Mix it back with the unblended portion. - Return the pot to medium heat after blending. - Add the heavy cream, shredded cheddar cheese, sour cream, and smoked paprika. - Stir well until the cheese melts and the soup is creamy. - Season with salt and freshly cracked pepper to taste. - Ladle the hot soup into bowls. - Garnish with extra cheddar cheese, sliced green onions, and crumbled turkey bacon if you want. - Sprinkle fresh chives on top for extra color and flavor. To get the best flavor in your Loaded Baked Potato Soup, start with the onions. Sauté the onions in olive oil for about five minutes. This helps soften them and brings out their sweetness. Next, add the garlic and let it cook for just one minute. This step maximizes the flavors without burning the garlic. For the broth, I recommend using vegetable broth. It adds a nice depth without overpowering the potatoes. Do you like your soup smooth or chunky? If you prefer a smooth texture, blend everything until it’s creamy. But if you enjoy some chunks, blend only half the soup. Then mix it back with the unblended portion. This creates a fun contrast in texture that makes each spoonful interesting. Garnishing can elevate your soup. Try adding a sprinkle of extra cheddar cheese on top. You can also include sliced green onions for a fresh crunch. If you want a bit of crunch, crumbled turkey bacon works great. For a pop of color, add chopped chives. Serve the soup in rustic bread bowls for an extra cozy touch. Pro Tips Choose the Right Potatoes: Russet potatoes are ideal for this soup as they become fluffy when cooked, creating a creamy texture. However, you can also mix in some Yukon Gold potatoes for additional creaminess. Enhance the Flavor: For a deeper flavor, consider roasting the diced potatoes before adding them to the soup. This caramelizes the sugars in the potatoes and adds a lovely depth to the soup. Texture Variation: If you prefer a chunkier soup, reserve some diced potatoes before blending and stir them back into the pureed soup for added texture. Garnish Creatively: Experiment with different garnishes such as crispy fried onions, fresh herbs, or even a drizzle of truffle oil to elevate your soup presentation and flavor. {{image_4}} To make a vegetarian or vegan soup, you can swap a few ingredients. Use vegetable broth instead of chicken broth. Replace heavy cream with coconut cream or cashew cream for a rich texture. For cheese, try nutritional yeast or vegan cheese shreds. For sour cream, use a non-dairy version made from cashews or soy. You will still enjoy a creamy and hearty soup without meat. If you want a dairy-free version, there are great options. Use almond milk, oat milk, or soy milk in place of heavy cream. For the cheese, look for vegan cheese that melts well. You can also add a splash of lemon juice for a bit of tang. This keeps the soup creamy while avoiding dairy. You can add fun flavors to your soup. Try using spices like cayenne pepper for heat. Fresh herbs like thyme or rosemary add depth. If you want a smoky touch, add smoked paprika or liquid smoke. For a kick, mix in some diced jalapeños or chili powder. These little changes can make your soup unique and exciting. To store leftovers, let the soup cool first. Transfer it to an airtight container. Store it in the fridge for up to three days. When ready to eat, check for any signs of spoilage. If it looks and smells good, you're set to enjoy it again! You can freeze this soup for longer storage. Use a freezer-safe container or bag. Leave some space for the soup to expand as it freezes. It will last for about two to three months. To thaw, place it in the fridge overnight before reheating. Reheating can be tricky. You want to keep it creamy! The best method is to use a pot on low heat. Stir often to prevent sticking. If the soup seems too thick, add a splash of broth or water. You can also use a microwave. Heat it in short bursts, stirring in between. This keeps the texture just right. To make this soup, start by sautéing onions in olive oil. Cook until they turn soft and clear. Then, add minced garlic and cook for one more minute. Next, add peeled and diced russet potatoes to the pot. Pour in vegetable broth and bring to a boil. Once boiling, lower the heat and let it simmer. Cook until the potatoes are soft, about 15 to 20 minutes. After that, blend the soup until smooth or leave some chunks if you prefer. Return the pot to heat, then stir in heavy cream, shredded cheddar cheese, sour cream, and smoked paprika. Mix well and season to taste. Yes, you can make this soup ahead of time. Cook it completely and let it cool. Store it in an airtight container in the fridge. It stays fresh for about three days. When ready to enjoy, gently reheat the soup on the stove. Stir it well to mix everything again. If it seems thick, add a bit of broth or water. If you want a lighter option, you can use half-and-half or whole milk. For a dairy-free choice, try coconut cream or cashew cream. Both options add creaminess without the dairy. You can also use non-dairy milk with a thickener like cornstarch. Each substitute changes the flavor a bit, so choose what suits your taste. Loaded Baked Potato Soup lasts about three to four days in the fridge. Make sure to store it in a sealed container to keep it fresh. If you want to keep it longer, consider freezing it. Just remember, the texture may change a little after freezing and thawing. This blog post shared how to make Loaded Baked Potato Soup. We started with ingredients, including potatoes, onions, and broth. Next, I showed you step-by-step instructions to create a creamy soup. Tips on improving flavor and texture followed. We even discussed variations for different diets. Now, you can impress your family and friends with this easy recipe. Enjoy making your own soup and exploring new flavors!

Loaded Baked Potato Soup Velvety and Comforting Dish

If you crave a warm, delicious meal, look no further! This Loaded Baked Potato Soup is the perfect cozy dish

- 24 chocolate sandwich cookies (like Oreos) - 2 cups heavy whipping cream - 1 cup cream cheese, softened - 1/2 cup powdered sugar, sifted - 1 teaspoon pure vanilla extract - 1 cup mini chocolate chips - 1 cup crushed cookies for topping - 1/4 cup chocolate syrup for drizzling These ingredients help create that rich, creamy flavor in the lasagna. The chocolate cookies provide a great base and crunch. The cream cheese and heavy cream make the filling light and fluffy. - Add crushed nuts for crunch. - Use different flavored cookies like vanilla. - Swap mini chocolate chips for other types. - Add fruit like berries for a fresh twist. Customizing your cookie lasagna is easy! You can mix and match flavors based on what you like. - A large mixing bowl - An electric mixer - A spatula - A 9x13 inch dish - Plastic wrap for chilling Having the right tools makes the process smooth. An electric mixer helps whip the cream quickly. The spatula is key for layering. {{ingredient_image_2}} In a large bowl, whip the heavy cream with an electric mixer. Set the speed to medium and mix until you see stiff peaks. This takes about 4-5 minutes. In another bowl, mix the softened cream cheese, sifted powdered sugar, and vanilla extract. Beat this mixture for about 2-3 minutes until it becomes smooth and creamy. Next, you will fold the whipped cream into the cream cheese mixture. Use a spatula for this step. Be gentle to keep the whipped cream light and airy. Once combined, stir in the mini chocolate chips for a sweet crunch. Now, grab a 9x13 inch dish. Start by placing a single layer of chocolate sandwich cookies at the bottom. You can leave them whole or break them into halves for easier layering. Spread half of the cream mixture over the cookie layer. Use a spatula to smooth it out evenly. Add another layer of chocolate cookies on top of the cream. Then, spread the rest of the cream mixture over this layer. Finish with one last layer of cookies on top. Cover the dish tightly with plastic wrap. Refrigerate for at least 4 hours, but overnight is best. This helps the cookies soften and flavors blend. Before serving, take the lasagna out of the fridge. Sprinkle the top with crushed chocolate cookies. Drizzle chocolate syrup all over for an extra sweet touch. Cut the lasagna into squares and serve on dessert plates. You can add a dollop of whipped cream and a sprinkle of mini chocolate chips on top for a nice look! To make perfect whipped cream, start with cold heavy cream. Cold cream whips better and faster. Use a large bowl for more space. Beat the cream on medium speed until stiff peaks form. This usually takes about 4 to 5 minutes. Watch closely. If you over-whip, it can turn into butter. When layering cookies, choose your favorite chocolate sandwich cookies. You can leave them whole or break them in half. Breaking them helps fit better in the dish. Place a single layer of cookies at the bottom. Press them down gently for a stable base. Repeat this until you finish all layers. For a stunning look, cut the lasagna into squares. Place each square on a dessert plate. Add a dollop of whipped cream on the side. This adds charm and taste. Sprinkle mini chocolate chips on top for decoration. A drizzle of chocolate syrup can make it even better. This will impress your guests! Pro Tips Chill for Best Results: Allow the lasagna to chill overnight for the best flavor and texture. This helps the cookies soften perfectly and integrates the flavors beautifully. Use a Mixer: For a smoother cream mixture, ensure your cream cheese is at room temperature and use an electric mixer for both the cream and cream cheese mixtures. Add Variety: Feel free to mix in different types of cookies or flavored cream cheese to customize the lasagna to your taste! Presentation Matters: For an eye-catching presentation, layer the crushed cookies and chocolate syrup just before serving to keep them fresh and appealing. {{image_4}} You can change the flavor of your no-bake cookie lasagna easily. Try using peanut butter cookies instead of chocolate ones. This swap gives a nutty taste that pairs well with the creamy filling. For a lighter twist, use vanilla cookies. They add a sweet touch without being too rich. You can also mix flavors. For instance, alternate between chocolate and vanilla layers. This way, you get a rainbow of taste in every bite. If you want a lighter dessert, use low-fat dairy options. Choose low-fat cream cheese and light whipped cream. These swaps cut calories without losing flavor. You can also use Greek yogurt instead of cream cheese. This adds protein and tanginess. To sweeten, use a sugar substitute like stevia. It keeps the sweetness, but with less sugar. If you have allergies, you can still enjoy this dessert. For gluten-free options, use gluten-free chocolate sandwich cookies. They taste just as good and work perfectly. If you have a dairy allergy, try dairy-free cream cheese and whipped cream. These alternatives won’t change the texture. You can still enjoy a rich dessert without worry. Always check labels to ensure the swaps fit your needs. To store your No-Bake Cookie Lasagna, first cover it tightly. Use plastic wrap or aluminum foil. This keeps the dessert fresh and prevents it from drying out. Place it in the fridge. It will stay good for up to 3 days. If you have leftovers, make sure they are well sealed. For the best taste, eat the dessert within the first 24 hours. This allows the layers to blend well. If you need to keep it longer, consider other storage methods. Avoid adding toppings like chocolate syrup or crushed cookies until you are ready to serve. This helps keep it fresh and tasty. You can freeze No-Bake Cookie Lasagna for longer storage. Wrap it tightly in plastic wrap first, then in foil. Make sure it is airtight. Freeze it for up to 2 months. When ready to eat, thaw it in the fridge overnight. Once thawed, add any toppings before serving. Yes, you can use different cookies. Try vanilla sandwich cookies, peanut butter cookies, or graham crackers. Each type brings its own flavor. Experiment with what you love. Mix and match to create your perfect dessert. The No-Bake Cookie Lasagna lasts about 3 to 5 days in the fridge. Make sure to cover it well. Use plastic wrap or a tight lid to keep it fresh. The longer it sits, the softer the cookies become. If you lack cream cheese, use Greek yogurt or mascarpone cheese. Both create a creamy texture. You can also try cottage cheese. Just blend it smooth before mixing. Each option gives a unique taste. Yes, making it ahead is a great idea! You can prepare it a day or two in advance. Just remember to chill it for at least 4 hours. This helps the flavors meld and the cookies soften. Enjoy a stress-free dessert experience! No-Bake Cookie Lasagna is easy, fun, and tasty. We covered key ingredients, steps, and tips for making it perfect. You can customize flavors and make it healthier too. Remember to chill it before serving for the best taste. Store extras properly to keep it fresh. With these ideas and instructions, you can create your own version. Enjoy every bite of this delightful dessert!

No-Bake Cookie Lasagna Delight Easy Dessert Recipe

If you’re searching for a fun and easy dessert, look no further! No-Bake Cookie Lasagna is a perfect treat. It

To make this dish, you need only a few key items. Here’s what you will need: - 4 boneless, skinless chicken breasts - 1 cup Greek yogurt - ½ cup cucumber, finely grated and excess moisture squeezed out - 2 cloves garlic, minced - 1 tablespoon fresh dill, chopped (or 1 teaspoon dried dill) - 1 tablespoon fresh lemon juice - 1 teaspoon extra virgin olive oil - ½ teaspoon salt - ¼ teaspoon freshly ground black pepper - 1 teaspoon smoked paprika - 1 cup cherry tomatoes, halved These items create a tasty chicken dish with a refreshing tzatziki sauce. While the main ingredients shine, a few extras can make your meal even better. Consider adding: - Fresh leafy greens (like arugula or spinach) for serving - Pita bread or steamed rice for a complete meal These options add texture and flavor, making your meal more enjoyable. You might have some of these common items at home already. Check if you have: - Salt - Black pepper - Olive oil These staples are essential for enhancing flavors in your dish. They help balance and elevate the taste of your chicken tzatziki. For the full details on how to prepare this dish, you can refer to the Full Recipe. Enjoy making this easy and tasty meal! To start, grab a medium bowl and mix the Greek yogurt, grated cucumber, minced garlic, dill, lemon juice, olive oil, salt, and black pepper. Stir it until smooth and creamy. This sauce is key to the dish. I always save half of the sauce in a small bowl for later. It adds a fresh touch when serving. Next, take a large baking dish and lay out the chicken breasts in a single layer. Make sure they fit well. Sprinkle the smoked paprika over each piece. Rub it in, so the chicken absorbs the flavor. This step makes a big difference in taste. After seasoning, pour the remaining Tzatziki sauce over the chicken. Ensure each piece is fully covered. Now, here comes the baking part. Cover the dish tightly with aluminum foil. This keeps the chicken moist. Bake it at 375°F (190°C) for 25-30 minutes. Check that the chicken reaches an internal temperature of 165°F (75°C). After that, remove the foil and bake for another 5-10 minutes. This gives the chicken a nice golden color. Once done, let it cool for a few minutes. Now you’re ready to serve! To get the juiciest chicken, start with fresh chicken breasts. Thaw frozen chicken in the fridge, never in warm water. Also, make sure to marinate the chicken in the Tzatziki sauce for at least 30 minutes if you have time. This adds flavor and keeps it moist. When cooking, cover the dish tightly with foil. This helps trap steam and moisture while the chicken bakes. For the best Tzatziki, use full-fat Greek yogurt. It gives a rich taste and creamy texture. Grate the cucumber finely but make sure to squeeze out extra moisture. This helps the sauce stay thick and not watery. Fresh herbs, like dill, add a bright flavor. If you can't find fresh dill, dried works too. Mix the sauce at least 15 minutes before serving. This lets the flavors meld together perfectly. Cooking time may vary based on chicken thickness. For thicker breasts, add a few extra minutes. Always check the internal temperature. It should reach 165°F (75°C) for safety. If your oven runs hot, keep an eye on the chicken after removing the foil. You want a nice golden top, but not overcooked meat. Adjust your baking time and enjoy your perfect Dump-and-Bake Chicken Tzatziki! For the Full Recipe, click here. {{image_4}} You can easily switch up the protein in this recipe. Try using turkey breast or pork tenderloin. Both will cook well and soak up the Tzatziki flavors. If you want something quicker, use chicken thighs for more juicy bites. They are also forgiving if baked a bit longer. Just adjust the cooking time to ensure they reach 165°F. For a vegetarian twist, swap the chicken for hearty veggies. Use eggplant, zucchini, or even chickpeas. Slice the eggplant and zucchini into thick rounds. Toss them in olive oil and spices before baking. Chickpeas can be used whole, mixed with the Tzatziki sauce for extra creaminess. This way, you still get a tasty and filling meal. Add new flavors to your Tzatziki for a fun spin. Mix in some spices like cumin or coriander for a warm touch. For a spicy kick, toss in a bit of cayenne pepper. You can also add a splash of vinegar for a tangier taste. Try serving with olives or roasted red peppers to enhance the dish. Each twist keeps the meal fresh and exciting. For the full recipe and detailed instructions, check out the [Full Recipe]. After enjoying your Dump-and-Bake Chicken Tzatziki, let the leftovers cool. Place them in an airtight container. Store in the fridge for up to three days. Make sure the chicken is fully covered with the Tzatziki sauce to keep it moist. If you have extra cherry tomatoes or greens, store them separately to maintain freshness. When you're ready to eat the leftovers, preheat your oven to 350°F (175°C). Place the chicken in an oven-safe dish. Cover it with foil to prevent drying out. Heat for about 15-20 minutes, or until warmed through. You can also microwave individual portions for 1-2 minutes, checking to avoid overcooking. If you want to freeze the chicken, it’s best to do this before adding the Tzatziki sauce. Wrap the cooled chicken tightly in plastic wrap, then place it in a freezer bag. It will stay good for up to three months. When you’re ready to eat, thaw in the fridge overnight. After thawing, reheat and add fresh Tzatziki sauce for the best flavor. Yes, you can make Dump-and-Bake Chicken Tzatziki ahead of time. Prepare the Tzatziki sauce and coat the chicken. Cover the dish and store it in the fridge for up to 24 hours. When you're ready to cook, just pop it in the oven. This saves time and helps the flavors blend well. If you need a substitute for Greek yogurt, use sour cream. It has a similar texture and taste. You can also try plain yogurt or plant-based yogurt for a dairy-free option. Just keep in mind that these may change the flavor slightly. Yes, this recipe is gluten-free if you use gluten-free pita or rice. The main ingredients, like chicken and vegetables, do not contain gluten. Always check labels to ensure all your ingredients are safe for a gluten-free diet. In this post, I covered the key ingredients and steps for making Dump-and-Bake Chicken Tzatziki. I shared tips for juicy chicken and tasty tzatziki, and I offered variations and storage tips. This dish is easy and fun, perfect for busy days. You now have a simple meal that’s good for you. Enjoy making it your own!

Dump-and-Bake Chicken Tzatziki Simple and Quick Recipe

Are you looking for a meal that’s both easy and delicious? My Dump-and-Bake Chicken Tzatziki recipe is your answer! This

- 1 can (15 oz) chickpeas - ¼ cup tahini - 3 tablespoons extra-virgin olive oil - 2 cloves garlic - 2 tablespoons lemon juice - 1 teaspoon ground cumin - ½ teaspoon salt - Water for desired texture The key to great hummus starts with fresh ingredients. Chickpeas are the star of this dish. They bring a soft texture and a nutty taste. Tahini adds a creamy richness. It’s a paste made from ground sesame seeds. Olive oil makes the hummus smooth and adds flavor. Garlic gives it a nice kick. Lemon juice adds brightness and a tangy bite. Cumin gives the hummus warmth. Salt helps to enhance all these flavors. - Paprika - Fresh parsley Garnishes can make your hummus pop! A sprinkle of paprika adds color. It also gives a hint of smokiness. Fresh parsley brightens up the dish. Plus, it adds a pop of green. You can choose one or both for a beautiful finish. For the complete recipe, check out the Full Recipe. - Start by adding the drained chickpeas, tahini, minced garlic, lemon juice, cumin, and salt to a food processor. - Pulse the mixture several times. This step helps to blend the ingredients well. - As the processor runs, slowly drizzle in the olive oil. This makes your hummus creamy. - If your hummus is thick, add water one tablespoon at a time. Blend well after each addition until smooth. - For a creamy consistency, blend long enough. You want it to be silky, not chunky. - Taste the hummus after blending. Adjust salt and lemon juice if needed. The balance is key. - You can serve hummus with fresh veggies like carrot sticks and cucumber slices. - Pita bread is another great choice for dipping. It adds a nice, fluffy texture. - For a beautiful presentation, create a swirl on top and drizzle with olive oil. Adjusting the salt and lemon juice can change your hummus. Start with the recipe's amounts. Taste it as you go. If you want more zest, add lemon juice. If it needs more depth, add salt. Remember, you can always add more, but you can't take it out. You can also use other spices for variation. Try smoked paprika for a smoky taste. Cumin adds warmth and earthiness. A pinch of cayenne can bring some heat. Experiment with flavors to find your favorite mix. A good food processor is key for smooth hummus. I recommend a model with a strong motor. This helps blend the chickpeas well. Brands like Cuisinart and KitchenAid are great choices. They make your hummus creamy and smooth. For serving, use a nice bowl. A shallow dish allows for easy dipping. Have some spoons or small bowls ready for your veggies and pita. This makes sharing fun and easy. You can prepare hummus in advance. It stays fresh in the fridge for about five days. Just store it in an airtight container. This helps keep the flavors strong. For the best taste and texture when stored, drizzle a bit of olive oil on top. This helps seal in freshness. When you are ready to serve, just give it a quick stir. If it feels thick, add a little water and blend again. For the Full Recipe, check out the complete instructions above. Enjoy your creamy hummus! {{image_4}} You can make hummus fun with classic twists. One popular option is roasted red pepper hummus. Simply blend roasted red peppers into your base recipe. This adds a sweet, smoky flavor that enlivens each bite. Another favorite is spicy hummus with jalapeños. Just toss in some chopped jalapeños for a kick! Adjust the amount to suit your taste. You’ll have a unique treat that impresses everyone. If you want a vegan alternative to tahini, consider using sunflower seed butter. It gives a similar creaminess and flavor. For those on a budget, you can use dried chickpeas. Soak and cook them to save money. It’s a great way to enjoy hummus without breaking the bank. Hummus can fit different diets easily. For gluten-free options, serve it with fresh veggies like carrots and cucumbers. They make perfect dippers! If you’re looking for low-fat variations, reduce the olive oil. You can use water to achieve a creamy texture instead. Hummus is versatile, making it a great addition to any meal. For the full recipe, check out the Creamy Garlic Hummus Delight. To keep your hummus fresh, use airtight containers. They protect the hummus from air and moisture. Store the container in your fridge. This helps maintain its creamy texture and taste. Homemade hummus lasts about 4 to 7 days in the fridge. Check for signs of spoilage before eating. If you see mold or an off smell, discard it. Fresh hummus should smell nutty and bright. You can freeze hummus for longer storage. First, spoon it into a freezer-safe container. Leave some space at the top for expansion. To thaw, place it in the fridge overnight. Use within 3 months for the best taste. To make hummus from scratch, follow these simple steps. First, gather your ingredients. You will need chickpeas, tahini, garlic, lemon juice, olive oil, cumin, and salt. Start by draining and rinsing the chickpeas. Then, put them in a food processor. Add tahini, garlic, lemon juice, cumin, and salt. Pulse the mixture several times. While blending, slowly add olive oil until smooth. If the hummus is thick, add water to reach a creamy texture. Adjust the seasoning to your taste. For more details, check the Full Recipe. Yes, you can use dried chickpeas. First, soak them overnight in water. This helps them soften. The next day, drain the chickpeas and rinse them. Then, boil them in fresh water for about 1 to 1.5 hours. Make sure they are soft before using. Once cooked, you can follow the same steps as with canned chickpeas to make hummus. Leftover hummus is great for many uses. You can spread it on sandwiches or wraps. It adds flavor and creaminess. You can also use it as a dip for veggies or chips. Mix hummus into salad dressings for a unique twist. For a fun dish, try using hummus in pasta sauces or as a base for grain bowls. You can even make hummus-stuffed peppers or add it to soups for extra creaminess. The options are endless! This blog post covered how to make easy hummus from scratch. I discussed essential ingredients, step-by-step instructions, and tips for perfect texture. You learned about various serving ideas and flavor enhancements. I also shared storage tips and answered common questions. Hummus is simple and fun to make. Whether you enjoy classic or unique flavors, there's a recipe for everyone. Get creative with your own twists and enjoy this healthy dish.

Easy Hummus Recipe Quick and Creamy Delight

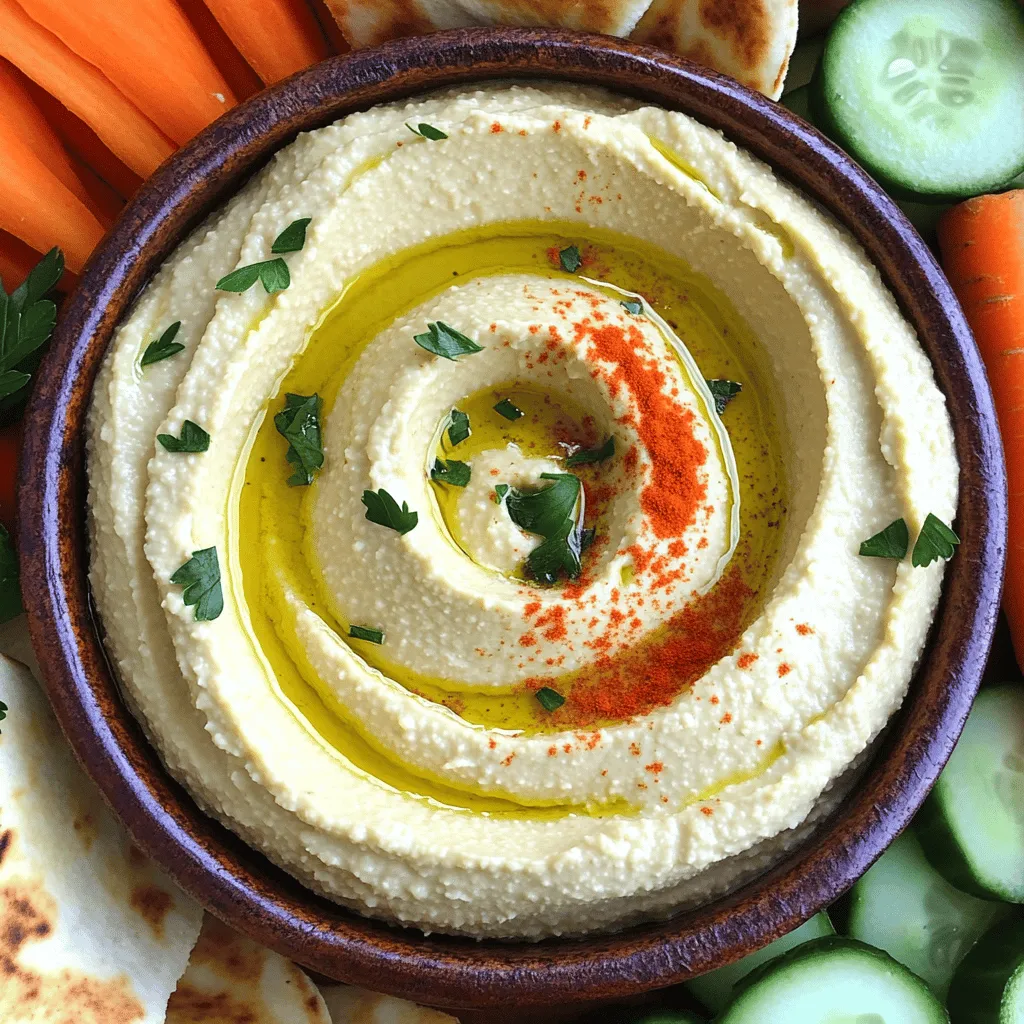
Do you love creamy, delicious hummus but worry about long recipes? I get it! This easy hummus recipe is quick

- 4 bone-in, skin-on chicken thighs - 2 tablespoons olive oil - 2 teaspoons ground cumin - 2 teaspoons smoked paprika - 1 cup fresh cilantro leaves - 1/2 cup mayonnaise - 1/4 cup creamy Greek yogurt - 1 jalapeño pepper - 1 teaspoon garlic powder - 1 teaspoon onion powder - Salt and freshly ground black pepper - 2 tablespoons freshly squeezed lime juice Gather these ingredients for a flavorful meal. The chicken thighs give great taste and texture, while the green sauce adds a fresh kick. I love how the olive oil helps the spices stick to the chicken. Ground cumin and smoked paprika bring warmth and depth to the dish. For the sauce, fresh cilantro is key. It gives that bright, herbaceous flavor. Mayonnaise and Greek yogurt create a creamy base. Plus, the jalapeño adds just the right amount of heat. Don’t forget the seasoning! Garlic powder and onion powder enhance the chicken's flavor. And lime juice balances everything nicely. This combo of ingredients makes for a dish that is not only tasty but also fun to make. You can find the full recipe for even more details on preparation and cooking. First, gather your chicken thighs. In a large bowl, mix the olive oil, cumin, smoked paprika, garlic powder, onion powder, salt, and black pepper. Whisk them together until smooth. Add the chicken thighs to this mix. Use your hands to cover each piece well. This helps the flavors soak in. Cover the bowl with plastic wrap. Place it in the fridge for at least 1 hour. For the best flavor, marinate overnight. Next, grab your food processor. Add the cilantro, mayonnaise, Greek yogurt, jalapeño, lime juice, minced garlic, and a pinch of salt. Pulse this mixture until smooth and creamy. Take a taste and adjust the seasoning. You might need more salt or lime juice. Once you're happy with it, transfer the sauce to a bowl. Cover tightly and chill it in the fridge until serving time. Now it's time to cook! Preheat your oven to 425°F (220°C). Line a baking sheet with parchment paper. This makes cleanup easy. Place the marinated chicken thighs on the sheet, skin-side up. Bake them for 35 to 40 minutes. You want the skin to be golden and crispy. Check that the chicken reaches 165°F (75°C) in the thickest part. This step-by-step guide ensures you enjoy a tasty Peruvian chicken with green sauce. For the full recipe, check the complete instructions above. To get that perfect crispy skin, make sure the chicken skin is dry. Pat it with a paper towel before marinating. The skin needs to be exposed to the heat for it to crisp up. If you want a different method, try grilling the chicken instead of baking. Grilling also gives it a nice smoky flavor. To take your green sauce to the next level, add more herbs like parsley or mint. These herbs will brighten the sauce. You can also spice it up by adding different peppers. Try a serrano or a habanero for extra heat. Just be sure to adjust the amount to your taste! For sides, serve this dish with rice, beans, or roasted vegetables. These pair well with the chicken’s rich flavors. You can also add a fresh salad for a crisp contrast. When serving, garnish the chicken with cilantro and lime wedges. This makes your dish look even more appealing! {{image_4}} You can switch things up by grilling the chicken. Grilling gives a nice smoky flavor. Start by marinating the chicken as you would in the oven method. Then, heat your grill to medium-high. Place the marinated chicken thighs on the grill. Cook them for about 6-8 minutes on each side. Look for those lovely grill marks. The key is to reach an internal temperature of 165°F. For extra flavor, add a squeeze of lime right before serving. Not into chicken? No problem! You can make a tasty vegetarian version. Use plant-based proteins like tofu or tempeh. Press and marinate them just like the chicken. Grill or bake the tofu for crispiness. You can even use hearty veggies like portobello mushrooms. The key is to ensure they soak in all the delicious flavors from the marinade. The green sauce pairs perfectly with these options, too. While the green sauce is a star, you have options. Try a spicy peanut sauce for a different kick. Blend peanut butter with soy sauce, lime juice, and a bit of garlic. Another option is a tangy yogurt sauce with lime and herbs. Mix plain yogurt, lime juice, and fresh dill or parsley. You can even serve the chicken with a simple chimichurri sauce for a fresh twist. Each sauce brings its unique flavor and makes the dish exciting. For more ways to enjoy Peruvian chicken, check the Full Recipe. To keep your leftover chicken fresh, place it in an airtight container. Make sure the chicken is cooled before sealing. Store it in the refrigerator. The chicken stays good for about 3 to 4 days. If you want to keep it longer, consider freezing it. Frozen chicken can last up to 4 months. For the green sauce, use a clean jar or container. Seal it tightly to keep air out. Store it in the fridge. The sauce stays fresh for about 1 week. If you want to save it longer, you can freeze it. Pour the sauce into ice cube trays. This way, you can use small amounts later. Just pop out a cube when needed. When reheating chicken, the oven is a great choice. Preheat the oven to 350°F (175°C). Place the chicken on a baking sheet and cover it with foil. Heat for about 15-20 minutes. For the green sauce, use a small pot. Heat it gently over low heat. Stir often to keep it from burning. These methods keep your chicken juicy and your sauce creamy. Peruvian chicken, or Pollo a la Brasa, is a spiced roast chicken. It is famous for its smoky flavor and crispy skin. The green sauce, known as aji verde, is a spicy, creamy mix made with cilantro and jalapeños. This dish comes from Peru and reflects its rich culinary culture. People enjoy this meal at family gatherings and restaurants across the country. Yes, you can make this recipe ahead of time. Marinate the chicken the night before for better flavor. You can also prepare the green sauce in advance. Store it in the fridge, and it will stay fresh for up to a week. Just remember to give the sauce a good stir before serving. Many sides go well with Peruvian chicken. Here are some ideas: - Rice: White or fried rice complements the chicken nicely. - Beans: Black beans add protein and flavor. - Salad: A fresh salad with lime dressing brightens the meal. - Plantains: Sweet fried plantains add a tasty contrast. To make the green sauce less spicy, you can reduce the jalapeño amount. Remove the seeds and white parts for milder heat. You can also add more mayonnaise or Greek yogurt to tone down the spice. Adjust lime juice to balance the flavor as needed. You can find authentic Peruvian chicken at local Peruvian restaurants or food trucks. Look for places that focus on traditional dishes. Check online reviews for recommendations. You may also find food festivals featuring Peruvian cuisine near you. In this post, we've explored how to make delicious Peruvian chicken with a flavorful green sauce. You learned about the key ingredients, step-by-step cooking instructions, and helpful tips for the best results. We also covered tasty variations and storage options. Embrace this recipe for a fun and satisfying meal. Don't shy away from trying different sides or sauces to make it your own. Enjoy the bold flavors and share with friends for a true culinary delight!

Savory Peruvian Chicken with Green Sauce Recipe

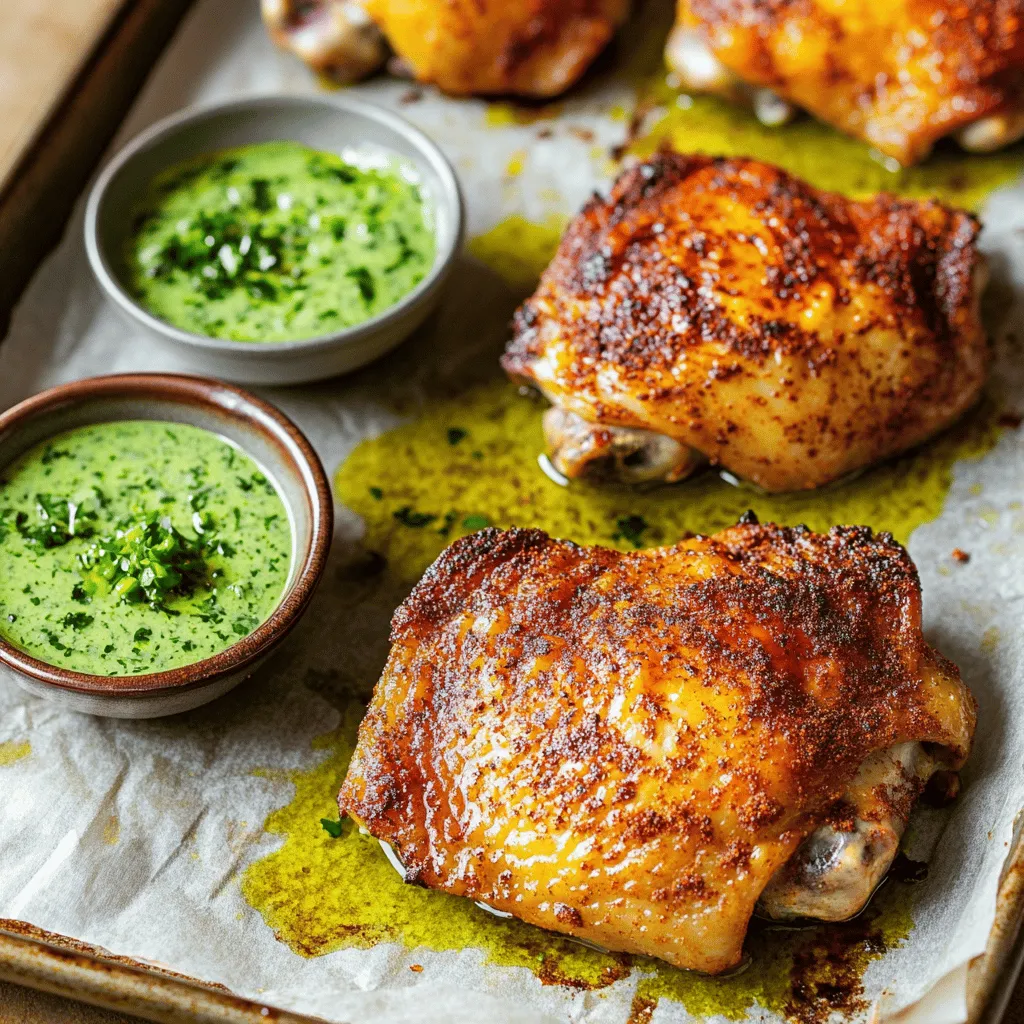
Welcome to the vibrant world of Peruvian cuisine! In this blog, I’ll share my favorite recipe for savory Peruvian chicken

For Baked Crunchy Hot Honey Chicken, you will need: - 1.5 lbs boneless, skinless chicken thighs - 1 cup all-purpose flour - 1 cup panko breadcrumbs - 2 tablespoons cornstarch - 1 teaspoon garlic powder - 1 teaspoon onion powder - 1 teaspoon smoked paprika - 1 teaspoon salt - 1/2 teaspoon freshly ground black pepper - 2 large eggs - 1/4 cup hot honey (store-bought or homemade) - 2 tablespoons olive oil - Fresh parsley, finely chopped, for garnish To make this dish, gather these kitchen tools: - Large mixing bowl - Small bowl for eggs - Whisk for mixing - Baking sheet - Parchment paper or cooking spray - Pastry brush or your hands for drizzling If you need to swap some items, here are a few ideas: - Chicken thighs can be replaced with chicken breasts for a leaner option. - Panko breadcrumbs can be swapped for regular breadcrumbs if needed. - Hot honey can be made by mixing honey with a bit of hot sauce, or you can use regular honey with a pinch of chili powder. - Olive oil can be replaced with melted butter for a richer flavor. These substitutions can help you adapt the recipe to your tastes or what you have on hand. For the full recipe, check out the detailed instructions. Start by preheating your oven to 400°F (200°C). This step is key for even cooking. While the oven heats, prepare a baking sheet. Line it with parchment paper or lightly grease it. This will help prevent the chicken from sticking. Grab a large mixing bowl. In this bowl, combine the following: - 1 cup all-purpose flour - 2 tablespoons cornstarch - 1 teaspoon garlic powder - 1 teaspoon onion powder - 1 teaspoon smoked paprika - 1 teaspoon salt - 1/2 teaspoon freshly ground black pepper Whisk these ingredients together until they are mixed well. Set this bowl aside for now. Next, set up your breading station. In a small bowl, crack open two large eggs. Beat them until blended. In another bowl, pour in 1 cup of panko breadcrumbs. Now, take each chicken thigh. First, dredge it in the flour mixture. Make sure to shake off any excess flour. Next, dip the floured chicken into the beaten eggs. Let any extra egg drip off. Finally, roll the chicken in the panko breadcrumbs. Press gently to ensure a good coating. Place each coated chicken thigh on your prepared baking sheet. Now you can drizzle the hot honey and olive oil over each piece of chicken. Use a pastry brush or your hands to spread it evenly. This adds a great flavor and helps with crispiness. For the complete recipe, check the Full Recipe section. To get that perfect crunch, use panko breadcrumbs. They are lighter and crispier than regular breadcrumbs. Mix cornstarch with flour for extra crunch. Make sure to coat the chicken well. Press the panko onto the chicken firmly. This helps the coating stick during baking. For even cooking, cut the chicken thighs into similar sizes. This way, all pieces cook at the same rate. Place the chicken on a baking sheet with space between each piece. This allows hot air to circulate around them. Flip the chicken halfway through baking for a golden finish. Serve your hot honey chicken with creamy coleslaw or crispy fries. A side of mashed potatoes adds comfort. Drizzle extra hot honey on top before serving for added flavor. Don’t forget to sprinkle fresh parsley for color. Enjoy this dish with friends and family for a fun meal! For the full recipe, check out the details above. {{image_4}} You can spice things up with different hot honey options. Look for brands that add chili flakes or jalapeños for a kick. If you want to make your own, mix honey with cayenne or sriracha. This way, you can control the heat level. Try to find a balance that suits your taste. Feel free to swap out some ingredients for a new twist. Use whole wheat flour instead of all-purpose flour for a nutty flavor. For breadcrumbs, try crushed cornflakes or even crushed nuts. You can also add herbs like thyme or rosemary to the flour mix. Each change adds a unique taste to your dish. Baked Crunchy Hot Honey Chicken pairs well with many sides. Serve it with creamy coleslaw for a crunchy contrast. You could also try crispy fries or sweet potato wedges. For a lighter option, a fresh green salad with a tangy vinaigrette works great too. These pairings will enhance your meal and make it even more enjoyable. After enjoying your baked crunchy hot honey chicken, let it cool down. Place any leftovers in an airtight container. Store them in the fridge for up to four days. Keeping the chicken sealed helps maintain its crunch and flavor. To reheat your chicken, avoid the microwave if you can. Instead, use the oven for the best results. Preheat your oven to 350°F (175°C). Place the chicken on a baking sheet and heat for about 10-15 minutes. This method helps keep the chicken crispy. If using a microwave, heat it in short bursts. This may not keep the crunch but will warm it up. You can freeze baked crunchy hot honey chicken for longer storage. Wrap each piece in plastic wrap, then place them in a freezer bag. This helps protect the chicken from freezer burn. It can last up to three months in the freezer. To enjoy, thaw it overnight in the fridge before reheating. For the best flavor, use it within a month. For the full recipe, check out the detailed instructions above! Yes, you can use chicken breasts instead of thighs. Thighs are juicy and tender. They hold more flavor, but breasts work too. Just adjust the cooking time. Breasts may need less time to cook. Aim for an internal temperature of 165°F (74°C). If you don't have hot honey, use regular honey. Mix it with a bit of hot sauce. This gives a sweet and spicy kick. You can also use maple syrup with chili flakes. This mix keeps the flavor profile close. To keep the chicken crispy when reheated, use the oven. Preheat it to 375°F (190°C). Place the chicken on a baking sheet. Heat for about 10 to 15 minutes. This helps keep it crunchy on the outside. Avoid the microwave, as it can make it soggy. We explored how to make a delicious crispy chicken dish. We covered essential ingredients and tools, along with useful substitutions. I shared step-by-step instructions to help you prepare, coat, and bread the chicken perfectly. Tips and tricks showed how to get a crunchy texture and the best cooking practices. We also talked about fun variations and storage methods. In closing, I hope you feel ready to make this tasty meal at home. Enjoy experimenting in your kitchen!

Baked Crunchy Hot Honey Chicken Irresistible Treat

Looking for a delicious dish that packs a fiery kick? You’re in the right place! My Baked Crunchy Hot Honey

To make a tasty chicken noodle casserole, you need simple ingredients. Here’s the list: - 2 cups cooked rotini pasta - 2 cups cooked chicken, shredded - 1 cup fresh or frozen broccoli florets - 1 cup shredded carrots - 1 can (10.5 oz) cream of chicken soup - 1 cup sour cream - 1 cup shredded cheddar cheese (plus extra for topping) - 1 teaspoon garlic powder - 1 teaspoon onion powder - 1 teaspoon dried thyme - Salt and pepper, to taste - 1 cup panko breadcrumbs - 2 tablespoons butter, melted These ingredients blend well to create a creamy and savory dish. You can easily swap out some ingredients if you want. Here are a few ideas: - For pasta, use any short pasta like penne or fusilli. - Instead of chicken, you can use turkey or even tofu for a vegetarian option. - If you don’t have cream of chicken soup, try using cream of mushroom soup. - For a healthier touch, add spinach or bell peppers instead of broccoli. These changes can keep the dish fresh and exciting. When picking chicken, think about flavor and texture. You can use: - Roasted chicken: This adds great flavor. - Poached chicken: It keeps the meat juicy and tender. - Canned chicken: A quick option if you're short on time. Make sure the chicken is cooked well and shredded into small pieces. This helps it mix nicely with the pasta and sauce. First, I set my oven to 350°F (175°C). This temperature is perfect for baking. Next, I grab a 9x13 inch casserole dish and lightly grease it with cooking spray or butter. This step helps prevent sticking later. I fill a large pot with water and add a pinch of salt. Once the water boils, I add the rotini pasta. I cook it according to the package instructions until it reaches al dente. After cooking, I drain the pasta and let it cool slightly in the pot. In a large mixing bowl, I whisk together the cream of chicken soup and sour cream. I mix until smooth and creamy. Then, I add garlic powder, onion powder, dried thyme, salt, and pepper. I stir everything together until it’s well mixed. This sauce brings all the flavors together. Now it’s time to mix the casserole. I gently fold in the shredded chicken, cooked rotini pasta, broccoli florets, and shredded carrots into the sauce. I make sure all the ingredients are well coated. This step ensures that every bite is full of flavor. Once combined, I pour the mixture into the greased casserole dish. I spread it out evenly to create a nice, even layer. For the full recipe, check the ingredients listed earlier. To get the best bake, preheat your oven to 350°F. Bake the casserole for 30 to 35 minutes. The top should be golden and bubbly. If it browns too fast, cover it with foil. This keeps it from burning while the inside cooks fully. Seasonings make a big difference. I use garlic powder and onion powder for depth. Dried thyme adds a nice earthy taste. Always taste your mix before baking. Adjust salt and pepper to your liking for a balanced flavor. For the best melt, choose a good cheddar cheese. I like sharp cheddar for a stronger flavor. You can mix in mozzarella if you want it extra gooey. Sprinkle extra cheese on top before baking for that perfect cheesy crust. For more tips, check out the Full Recipe. {{image_4}} You can add many veggies to your chicken noodle casserole. Broccoli and carrots work well, but don’t stop there! Think about using peas, green beans, or even bell peppers. Fresh or frozen vegetables both taste great. Just remember to chop them into small pieces so they mix well. This way, every bite has a bit of crunch and color. If you want a change from chicken, try other proteins. Turkey is a great substitute if you have leftovers. You can also use cooked ham or even tofu for a vegetarian option. Each protein brings a new flavor and texture to the dish. Just make sure it’s cooked before mixing it in. This gives your casserole a tasty twist that makes it feel new again. Want to spice things up? Add some heat with red pepper flakes or hot sauce. For a fragrant twist, mix in fresh herbs like parsley or basil. Dried herbs like rosemary or oregano also add great flavor. This way, you can create a dish that suits your taste. Don't be afraid to experiment with spices. Each variation can make your chicken noodle casserole truly unique. For the full recipe, check out the Cheesy Chicken Noodle Casserole section. You can keep leftover chicken noodle casserole in the fridge. Use an airtight container to store it. It will stay fresh for about three to four days. Make sure to let it cool to room temperature before sealing it up. If you want to save it longer, freezing is a great option. First, let the casserole cool completely. Then, wrap it tightly in plastic wrap and place it in a freezer-safe container. It can last up to three months in the freezer. When you're ready to eat it, just thaw it in the fridge overnight. To reheat, preheat your oven to 350°F (175°C). Place the casserole in an oven-safe dish. Cover it with foil to keep it moist. Heat for about 20 to 25 minutes. If you want a crispy top, remove the foil for the last 10 minutes. You can also use the microwave, but the oven gives it a better texture. Enjoy your warm, cheesy chicken noodle casserole from the [Full Recipe]! To make Chicken Noodle Casserole from scratch, you need a few simple steps. First, cook pasta until al dente. Then, mix cream of chicken soup and sour cream in a bowl. Add garlic powder, onion powder, and thyme. Fold in shredded chicken, broccoli, and carrots. Pour everything into a greased casserole dish. Top with cheese and panko breadcrumbs mixed with butter. Bake at 350°F for 30 to 35 minutes. For the full recipe, look above. Yes, rotisserie chicken is a great choice. It saves time and adds flavor. Simply shred the cooked chicken and mix it into your casserole. This shortcut makes your meal quick and easy while keeping it tasty. Serve Chicken Noodle Casserole with a light salad or steamed veggies. A simple green salad with vinaigrette pairs well. You can also add garlic bread for a filling meal. These sides balance the rich flavors of the casserole. Chicken Noodle Casserole lasts about 3 to 5 days in the fridge. Store it in an airtight container for best results. To keep it fresh, make sure to cool it completely before sealing. Reheat it in the oven or microwave when you’re ready to eat. Chicken noodle casserole is a cozy dish. You learned about key ingredients and substitutes. I shared tips for cooking and baking perfectly. You can mix in veggies or proteins for fun twists. Storing leftovers can keep meals easy and tasty. Remember, this meal is versatile and simple. Enjoy making it your own. Dive into your kitchen with confidence and creativity. Your next family dinner is just a recipe away!

Savory Chicken Noodle Casserole Easy and Comforting

Are you ready to enjoy a warm, hearty meal without the fuss? This Savory Chicken Noodle Casserole is your go-to

Older posts
Newer posts
← Previous Page1 … Page98 Page99 Page100 … Page116 Next →

dsad

© 2025 recipesstation • Built with GeneratePress

Our Policies

  • Copyright Policy
  • Cookie Policy
  • GDPR Policy
  • Privacy Policy
  • Disclaimer
  • Terms Of Use

More Information

  • Home
  • About
  • Contact
  • Appetizers
  • Dessert
  • Dinner
  • Drinks
©2025, recipesstation About Back To Top