Skip to content
DisclaimerTerms Of UseGDPR PolicyCookie Policy

recipesstation

  • Home
  • Drinks
  • Appetizers
  • Dinner
  • Dessert
  • About
  • Contact
  • Privacy Policy
DisclaimerTerms Of UseGDPR PolicyCookie Policy

Emily

To make this tasty dish, you'll need these main ingredients: - 8 oz fettuccine pasta - 1 lb large shrimp, peeled and deveined - 2 tablespoons extra virgin olive oil - 3 cloves garlic, finely minced - 1 cup heavy cream - 1 cup shredded mozzarella cheese - 1/2 cup fresh basil leaves, chopped - 1/4 teaspoon red pepper flakes (optional for heat) - Salt and freshly ground black pepper to taste - Fresh parsley, chopped, for garnish - Grated Parmesan cheese for serving These ingredients create a creamy and rich base for the dish. The shrimp adds a nice protein boost, while the mozzarella brings a delightful creaminess. You can boost the flavor with these optional ingredients: - Lemon zest for a zesty kick - Sun-dried tomatoes for a touch of sweetness - Spinach for extra nutrients and color - Peas for a pop of sweetness and texture Adding these extras can make your dish even more exciting. Try mixing and matching to find your favorite flavors. To prepare this dish, gather these tools: - Large pot for boiling pasta - Skillet for sautéing shrimp and making the sauce - Measuring cups and spoons for accurate portions - Wooden spoon or spatula for mixing - Colander for draining pasta Having the right tools makes cooking smoother and more enjoyable. This way, you can focus on creating your delicious meal without fuss. For the full recipe, check out the detailed steps. Start by boiling water in a big pot. Make sure to add salt to the water. Once the water is at a rolling boil, add the fettuccine. Cook it according to the package directions, usually about 8-10 minutes. The pasta should be firm but tender, known as al dente. After you cook it, drain the pasta in a colander. Remember to save about half a cup of the pasta water for later. This water helps to make the sauce creamy. In a large skillet, warm two tablespoons of extra virgin olive oil over medium heat. Add three cloves of finely minced garlic. Sauté the garlic for about one minute until it smells great but does not brown. Next, toss in one pound of peeled and deveined shrimp. Cook the shrimp for around 2-3 minutes on each side. They should turn pink and opaque when done. After cooking, take the shrimp out of the skillet and set them aside on a plate. Using the same skillet, pour in one cup of heavy cream. Stir it well to mix with the garlic oil. Bring the mixture to a gentle simmer. This step is key to making the sauce creamy. Lower the heat to keep the sauce warm without boiling. Then, gradually add one cup of shredded mozzarella cheese. Whisk it in until the cheese melts fully. If the sauce gets too thick, add small amounts of reserved pasta water until it reaches the right consistency. Once the sauce is creamy, return the sautéed shrimp to the skillet. Next, add the drained fettuccine. Gently toss everything together, ensuring the pasta and shrimp are well coated in the sauce. Fold in half a cup of chopped fresh basil. Season to taste with salt, freshly ground black pepper, and red pepper flakes if you like a bit of heat. Transfer the creamy shrimp pasta onto serving plates. To make it look nice, sprinkle some chopped parsley on top. Finish with a generous amount of grated Parmesan cheese. Serve this dish right away for the best flavor, and enjoy every bite of this creamy mozzarella shrimp pasta. For the complete recipe, refer to the Full Recipe section. To make a smooth cream sauce, start with low heat. High heat can curdle the cream. After adding the cream, stir gently. This keeps the sauce silky. Add the mozzarella gradually. If the sauce gets too thick, mix in a bit of pasta water. This helps you control the consistency. Season with salt and pepper, but taste as you go. If you have dietary restrictions, don’t worry! You can swap out the heavy cream for a plant-based milk. Almond or coconut milk works well. For a lighter option, use Greek yogurt. You can also change the cheese. Try goat cheese or a dairy-free alternative. If shrimp isn’t your thing, substitute with chicken or tofu for protein. To save time, prep all your ingredients first. Chop the garlic and basil before you cook. Cook the pasta while you sauté the shrimp. This way, everything finishes at the same time. Keep your skillet on low heat while you mix the sauce. This helps you manage the cooking process without rushing. For the full recipe, check out the Creamy Mozzarella Shrimp Pasta. {{image_4}} You can easily boost the nutrition in your creamy mozzarella shrimp pasta. Adding vegetables not only adds color but also flavor. Consider using spinach, cherry tomatoes, or bell peppers. Just sauté them with the garlic before adding the shrimp. For spinach, cook it until wilted. For cherry tomatoes, add them until they burst. Bell peppers should be soft but still crunchy. This will give you a dish full of vitamins and minerals. If you love heat, try making a spicy version. You can add more red pepper flakes to the sauce. Start with one teaspoon instead of just a pinch. For an extra kick, toss in sliced jalapeños or diced serrano peppers when cooking the shrimp. This will give your pasta a fiery twist. Just remember to balance the spice with more cream or cheese. You can make a lighter version of this dish if you want to eat healthier. Swap out the heavy cream for half-and-half or Greek yogurt. You can also use zucchini noodles instead of fettuccine. This keeps the dish low in carbs. Reducing the amount of mozzarella cheese can also help cut calories. These small changes can make a big difference while still keeping the meal tasty. For the complete cooking process, check out the Full Recipe. After enjoying your creamy mozzarella shrimp pasta, store leftovers in an airtight container. Make sure to let the pasta cool down first. This helps keep it fresh. Place it in the fridge if you plan to eat it within three days. For longer storage, consider freezing it. When you reheat creamy pasta, do it gently. Use a skillet over low heat. Add a splash of water or cream to keep it moist. Stir often to prevent sticking. If using a microwave, cover the dish to trap steam. Heat in short bursts, stirring in between. To freeze your creamy shrimp pasta, first let it cool completely. Portion it into smaller containers for easier thawing. Seal tightly to avoid freezer burn. It can last up to three months in the freezer. When ready to eat, thaw in the fridge overnight and reheat as described above. For the full recipe, check out the Creamy Mozzarella Shrimp Pasta details. Yes, you can use other pasta types. I suggest penne or spaghetti. Both work well with the creamy sauce. Just cook them according to the package. Make sure they are al dente for the best texture. If you don’t have mozzarella, try using provolone or fontina cheese. They melt nicely and give a great flavor. You can also use a dairy-free cheese if you want a vegan option. Just ensure it melts well to keep that creamy texture. This dish takes about 25 minutes total. You’ll spend about 10 minutes prepping and 15 minutes cooking. It’s quick and perfect for busy weeknights. Absolutely! You can easily double or triple the recipe. Just make sure you have a big enough pot and skillet. Adjust cooking times slightly for larger amounts, but keep the same flavors. You can make the pasta and sauce ahead of time. Just store them separately in the fridge. When you’re ready to eat, mix and heat them together. The dish tastes best fresh, but it still holds up well. Check the full recipe for tips on storage. In this blog post, we explored the key ingredients and steps for making creamy mozzarella shrimp pasta. You learned how to cook the fettuccine, sauté shrimp, and create a rich sauce. We also discussed helpful tips and variations to suit your taste. Remember, this dish is flexible; feel free to swap ingredients or adjust spice levels. With the right techniques, you can make a delicious meal your friends and family will love. Now, gather your ingredients and start cooking! Enjoy your culinary adventure!

Creamy Mozzarella Shrimp Pasta Flavorful Dinner Recipe

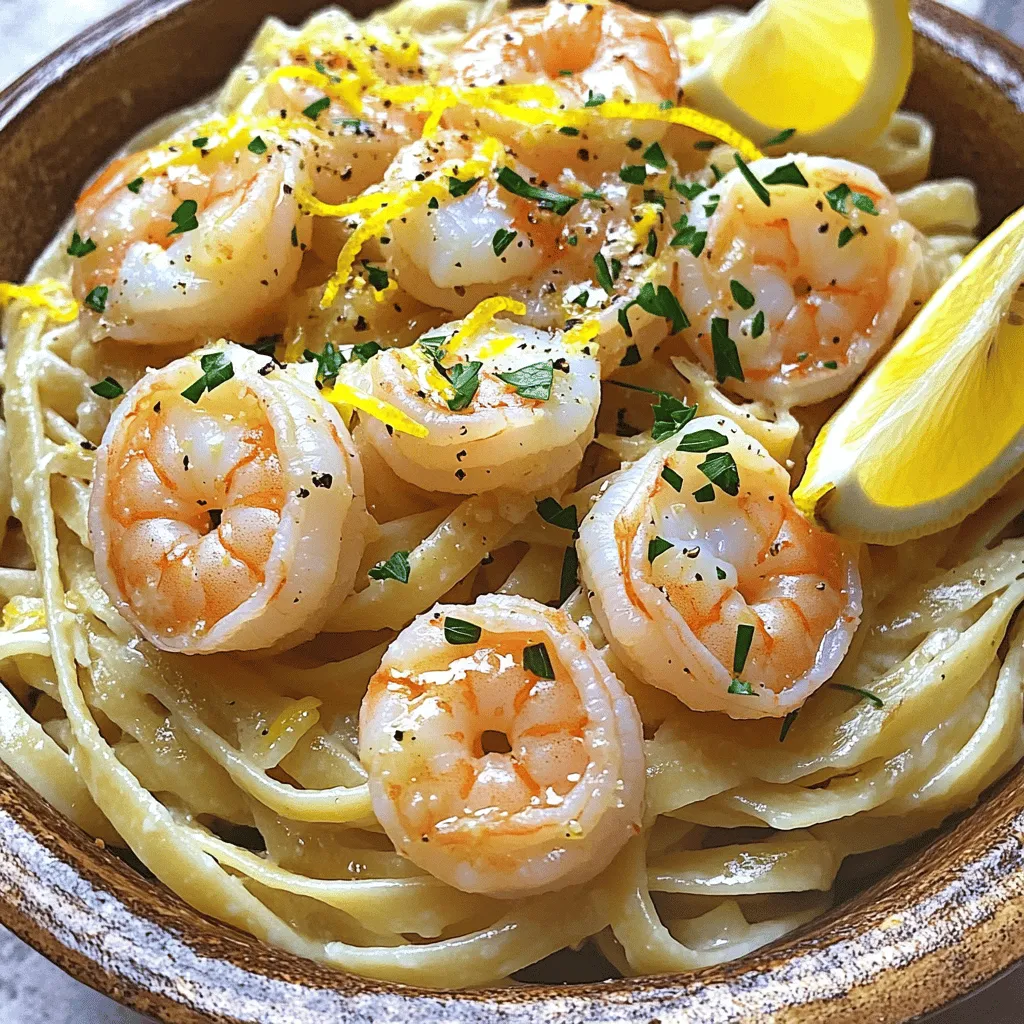
Looking for a tasty weeknight meal? My Creamy Mozzarella Shrimp Pasta is just what you need! This dish combines juicy

Here’s what you need for Tuscan White Bean Soup Delight. This recipe is simple and fun to make. - 2 cans (15 oz each) white beans (cannellini or great northern), drained and rinsed - 4 cups vegetable broth - 1 medium onion, finely diced - 3 garlic cloves, minced - 2 medium carrots, peeled and chopped - 2 celery stalks, chopped - 1 cup diced tomatoes (canned or fresh) - 1 teaspoon dried thyme - 1 teaspoon dried rosemary - 1 teaspoon red pepper flakes (adjust to your preferred spice level) - 2 cups kale, stems removed and chopped - 2 tablespoons extra-virgin olive oil - Salt and pepper to taste - Freshly grated Parmesan cheese (for serving, optional) - Fresh parsley, finely chopped (for garnish) Gather these ingredients to create a warm and hearty soup. Each component adds flavor and nutrition. The white beans provide protein, while the vegetables add color and taste. Fresh herbs bring a lovely aroma. If you want to make it your own, sprinkle some cheese or parsley on top when serving. You can find the Full Recipe for more detailed steps to bring this dish to life! To make Tuscan White Bean Soup Delight, start by gathering your ingredients. You will need two cans of white beans, vegetable broth, and fresh veggies. 1. In a large pot, heat two tablespoons of olive oil over medium heat. 2. Add one diced onion, two chopped carrots, and two chopped celery stalks. 3. Sauté these for about 5-7 minutes. Stir often until the onion turns clear. 4. Next, add three minced garlic cloves. Cook for one more minute, stirring well. 5. Now mix in one cup of diced tomatoes, one teaspoon dried thyme, one teaspoon dried rosemary, and one teaspoon red pepper flakes. Cook for 2-3 minutes. Tip: When checking the doneness of the beans, they should be soft but not mushy. For the kale, it should wilt and stay bright green. 6. Pour in four cups of vegetable broth and bring it to a boil. 7. Reduce the heat to low and let it simmer. 8. Add the rinsed white beans and simmer for 15-20 minutes. This helps the flavors blend nicely. 9. After that, stir in two cups of chopped kale. Cook for another 5 minutes until the kale is tender. 10. Taste your soup and add salt and pepper as needed. For perfect flavor, keep the heat at medium when cooking the veggies. A slow simmer lets the tastes develop well. If you want a creamier soup, use an immersion blender. Blend a part of the soup and stir it back in. This creates a nice texture without losing the hearty feel of the soup. Serve your soup hot. Top it with freshly grated Parmesan cheese and sprinkle some chopped parsley for a lovely finish. You can find the Full Recipe for a detailed guide on making this tasty dish. - Ensuring proper ingredient preparation: Always rinse your canned beans well. This helps remove excess salt and improves the soup’s flavor. Dice your veggies evenly. This ensures they cook at the same rate. - Avoiding overcooking the vegetables: Keep an eye on your veggies while sautéing. You want them tender, not mushy. Overcooked vegetables lose texture and flavor, making your soup less enjoyable. - Suggestions for herbs and spices to elevate the soup: Fresh herbs like basil and thyme can boost flavor. You can also experiment with smoked paprika for a deeper taste. If you like heat, add more red pepper flakes. - Recommendations for high-quality vegetable broth: Use a low-sodium vegetable broth. This gives you better control over the salt level in your soup. A rich, flavorful broth makes all the difference in taste. For a special touch, try homemade broth if you have the time. For the complete experience, check the Full Recipe for Tuscan White Bean Soup Delight. Enjoy your cooking! {{image_4}} You can easily switch out white beans in this recipe. Lentils make a great swap. They cook faster and add a nice texture. You can also try chickpeas for a different flavor. If you want more greens, use spinach or Swiss chard. These greens cook down nicely and add color. For a gluten-free version, check your broth. Make sure it has no gluten. You can also leave out the cheese to make it vegan. Add nuts or seeds for extra protein. To lower the sodium, choose low-sodium broth. Or, you can use fresh herbs instead of salt. Feel free to explore these variations to make Tuscan White Bean Soup Delight your own! For the complete recipe, check the Full Recipe section above. After enjoying your Tuscan White Bean Soup Delight, store leftovers right away. Place the soup in an airtight container. It keeps well in the fridge or freezer. If you put it in the fridge, let it cool first. Make sure to seal it tightly. This helps keep the flavors fresh. For freezing, use freezer-safe containers or bags. Leave some space for the soup to expand. You can also portion it out for easy reheating. When you are ready to eat, thaw overnight in the fridge. For quick defrosting, place the container in warm water. To reheat, use a pot on medium heat. Stir often to avoid sticking. You can also use a microwave. Heat it in short bursts, stirring in between. This keeps the soup warm and tasty. In the fridge, this soup lasts about 3 to 5 days. If you freeze it, it can stay good for 3 months. Always check for signs of spoilage. Look for changes in color or smell. If it smells sour or looks off, throw it away. It's better to be safe than sorry! If you notice any mold, discard the soup immediately. Keeping track of how long it's been stored helps you enjoy your soup at its best. Proper storage ensures that you can savor the flavors of Tuscan White Bean Soup Delight whenever you like! Yes, you can use fresh beans! However, fresh beans take longer to cook. Dried beans need soaking overnight. After soaking, cook them until tender, which can take 1 to 2 hours. Once cooked, you can add them to your soup. This method gives a great taste but takes more time and effort. Pair this soup with simple sides. Here are some tasty ideas: - Crusty bread or baguette for dipping - A fresh green salad with lemon vinaigrette - Roasted vegetables for added flavor - Garlic bread for a classic touch These sides complement the soup and make a full meal. Yes, this soup is very healthy! It is rich in fiber and protein from the beans. Plus, the vegetables add vitamins and minerals. Kale is a great source of nutrients, and the olive oil provides healthy fats. This dish is low in calories and helps keep you full. Enjoying it regularly can support a balanced diet. This blog post shared a recipe for Tuscan White Bean Soup Delight. You learned about the key ingredients, preparation steps, and cooking techniques. I highlighted common mistakes to avoid and tips for enhancing flavor. I also covered ingredient swaps and dietary options to fit your needs. Lastly, I provided storage tips and answered important FAQs. Now, you can create a delicious soup that fits your taste and dietary needs. Enjoy the warmth and health benefits this meal brings!

Tuscan White Bean Soup Delight Simple and Tasty Meal

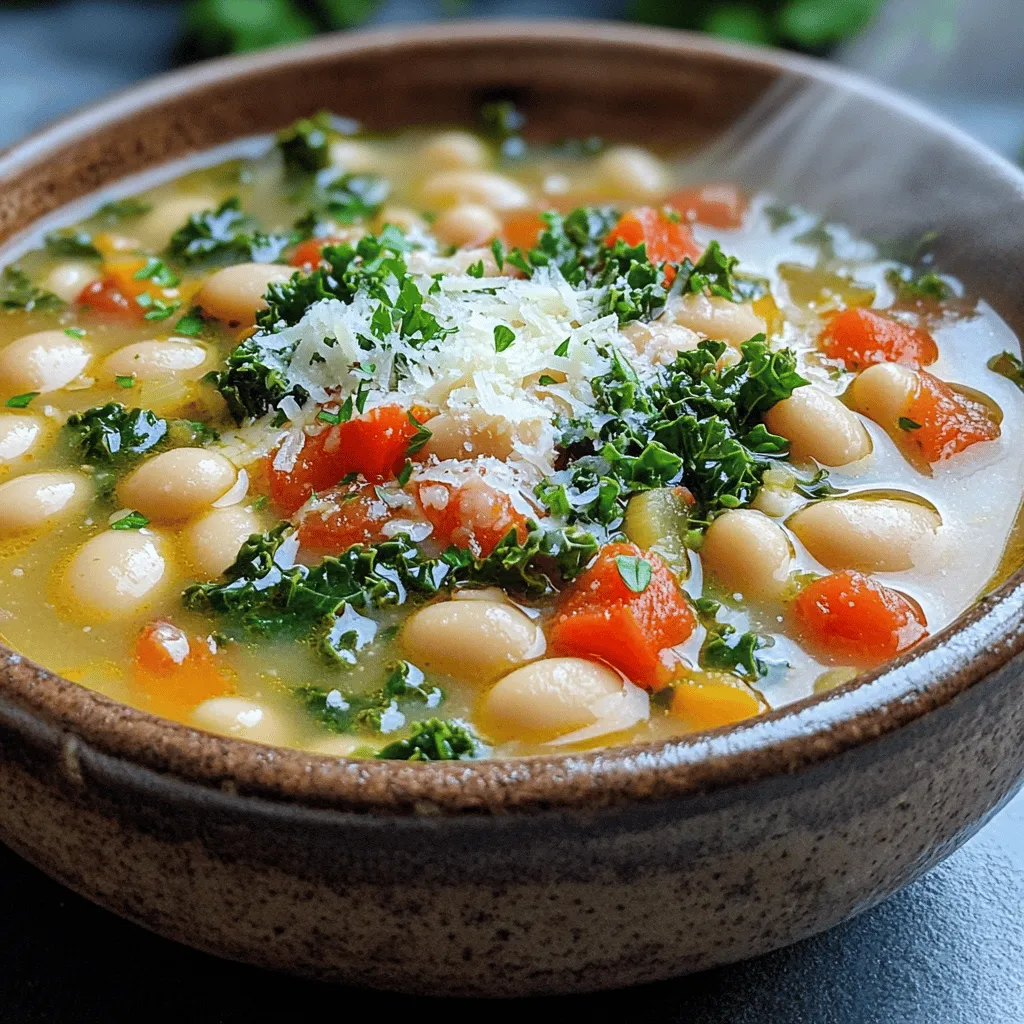
Looking for a warm and comforting meal? Let me introduce you to Tuscan White Bean Soup Delight! This simple and

To create a moist and tasty Strawberry Bundt Cake, you need these simple ingredients: - 2 cups all-purpose flour - 1 ½ teaspoons baking powder - ½ teaspoon baking soda - ¼ teaspoon salt - ½ cup unsalted butter, softened - 1 cup granulated sugar - 2 large eggs - 1 teaspoon pure vanilla extract - 1 cup buttermilk - 1 ½ cups fresh strawberries, hulled and chopped - ½ cup powdered sugar (for glaze) - 2 tablespoons milk (for glaze) - Whole fresh strawberries (for garnish) Each ingredient plays a key role in achieving the best flavor and texture. The flour gives structure, while the baking powder and baking soda help it rise. The butter adds richness and moisture, creating a soft crumb. Eggs bind the mixture and provide stability. Vanilla extract adds warmth, and buttermilk gives a slight tang that balances the sweetness. Fresh strawberries are the star of this cake, offering bursts of flavor in every bite. The glaze, made from powdered sugar and milk, adds a sweet finish that complements the fruit. Don't forget to garnish with whole strawberries for a beautiful look. For the full recipe, follow along as we dive into the step-by-step instructions to create this delightful treat. First, set your oven to 350°F (175°C). This temperature helps the cake bake evenly. Next, generously grease and flour a 10-cup Bundt pan. This step is key to ensure the cake releases easily after it bakes. In a medium bowl, mix the dry ingredients together. Combine 2 cups of all-purpose flour, 1 ½ teaspoons of baking powder, ½ teaspoon of baking soda, and ¼ teaspoon of salt. Set this mixture aside. In a large bowl, cream together ½ cup of softened butter and 1 cup of granulated sugar. Use an electric mixer on medium speed. Beat for about 3-4 minutes until it’s light and fluffy. Next, add 2 large eggs one by one, mixing well after each. Finally, mix in 1 teaspoon of pure vanilla extract until it's just combined. Now, slowly add the dry ingredients and 1 cup of buttermilk to the butter mixture. Start with one-third of the flour, then half of the buttermilk. Repeat this twice, ending with the flour mixture. Mix just until combined—do not overmix. Using a spatula, gently fold in 1 ½ cups of chopped fresh strawberries. Make sure they are well distributed without crushing them. Carefully pour the batter into your prepared Bundt pan. Use a spatula to smooth the top. Place the pan in the preheated oven and bake for 45-50 minutes. To check if it’s done, insert a toothpick into the center. It should come out clean when ready. After baking, let the cake cool in the pan for about 10-15 minutes. Then, carefully invert the pan onto a wire rack. This allows the cake to cool completely. To make the glaze, whisk together ½ cup of powdered sugar and 2 tablespoons of milk in a small bowl. Keep whisking until smooth and creamy. If you'd like a thinner glaze, add a little more milk until you reach the right consistency. Once the cake has cooled, drizzle the glaze over the top. Let it cascade down the sides for a beautiful look. For a lovely finish, garnish with whole fresh strawberries before serving. You can find the Full Recipe for this delightful Strawberry Bundt Cake Bliss for more details. To get the best texture in your Strawberry Bundt cake, pay close attention to the temperature of your ingredients. Use room temperature butter and eggs. This helps them blend well and creates a light cake. If your butter is too cold, it won't mix properly, leading to a dense cake. Avoid overmixing when you combine the wet and dry ingredients. Mix just until you see no dry flour. Overmixing can make the cake tough. Remember, a few lumps are okay. They will bake out and keep your cake soft. You can enhance the flavor of your cake by substituting ingredients. If you want a richer taste, try using brown sugar instead of granulated sugar. This will add a lovely caramel note. Adding lemon zest can brighten the flavor. Just a teaspoon will do. You can also add almond extract for a nutty twist. Just remember to adjust your vanilla amount if you add more flavors. Serving your Strawberry Bundt cake is key to its appeal. Place it on a pretty platter to catch the eye. Add a sprig of fresh mint for a pop of color. This small touch makes a big impact. For a delightful finish, dust the cake with powdered sugar before serving. It’s a simple way to make your cake look fancy. You can also arrange whole fresh strawberries around the cake for a beautiful display. This makes the cake even more inviting. Enjoy crafting your Strawberry Bundt cake bliss with these tips! For more details, check the Full Recipe. {{image_4}} You can change the flavor of your Strawberry Bundt Cake by using different fruits. Blueberries and raspberries are great options. They add a nice burst of color and taste. Just swap the strawberries for the same amount of another berry. For a tropical twist, try mango or pineapple. These fruits give a fun, sunny vibe to your cake. If you want a gluten-free version, use a gluten-free flour blend. Many blends work well as a direct substitute. You may need to adjust the wet ingredients to keep the cake moist. Start with a little less buttermilk or add a touch more if needed. For a vegan version, replace eggs and butter with plant-based options. Use flax eggs or applesauce for the eggs. Coconut oil or vegan butter can replace regular butter. Instead of buttermilk, use almond milk or soy milk with a splash of vinegar. This keeps your cake moist and tasty while being animal-friendly. For the complete recipe, check the Full Recipe. To keep your Strawberry Bundt Cake fresh, you have two main options: room temperature or refrigeration. If you plan to eat the cake within a few days, storing it at room temperature works well. Wrap it tightly in plastic wrap or foil. This helps seal in moisture and keeps it soft. If you want to store the cake for longer, the fridge is a better choice. It will stay fresh for about a week. Just make sure to wrap it well. You can also place it in an airtight container. This helps prevent it from drying out or absorbing other smells from the fridge. Freezing is a great way to keep your cake for later. To freeze the cake, wait until it cools completely. Then, wrap it tightly in plastic wrap. After that, put it in a freezer-safe bag or container. This keeps it fresh for about three months. When you're ready to enjoy it, take the cake out of the freezer. Let it thaw in the fridge overnight. If you're in a hurry, you can leave it at room temperature for a few hours. Just be careful not to rush it, as this can change the cake's texture. Enjoy your cake when it’s perfectly thawed! To check if your Bundt cake is done, use a toothpick. Insert it into the center of the cake. If it comes out clean, your cake is ready. If there are wet crumbs, bake a little longer. Remember, the baking time is about 45 to 50 minutes. Make sure to check often after the 40-minute mark. Yes, but they will change the cake's texture. Frozen strawberries release more juice. This can make the cake moister, but it may also be denser. If using frozen strawberries, make sure to thaw and drain them first. This helps keep your cake light and fluffy. You can easily make buttermilk at home. Mix one cup of milk with one tablespoon of lemon juice or vinegar. Let it sit for about 5 minutes. This mixture will work just like buttermilk. You can also use plain yogurt or sour cream mixed with some water. To make the glaze thicker, add more powdered sugar. For a thinner glaze, add more milk. Start with one tablespoon at a time. Mix well after each addition until you reach your desired consistency. A thicker glaze stays on top, while a thinner glaze drizzles down beautifully. This blog post walks you through a tasty Bundt cake recipe. You learned the key ingredients, from flour to fresh strawberries. I detailed step-by-step instructions to make baking easy. Plus, I shared tips for a perfect texture and flavor. You also discovered fun variations, including gluten-free and vegan options. Lastly, I covered storage and answered common questions. With this guide, you're ready to create a delicious Bundt cake. Enjoy baking and sharing your treat!

Strawberry Bundt Cake Bliss Deliciously Sweet Treat

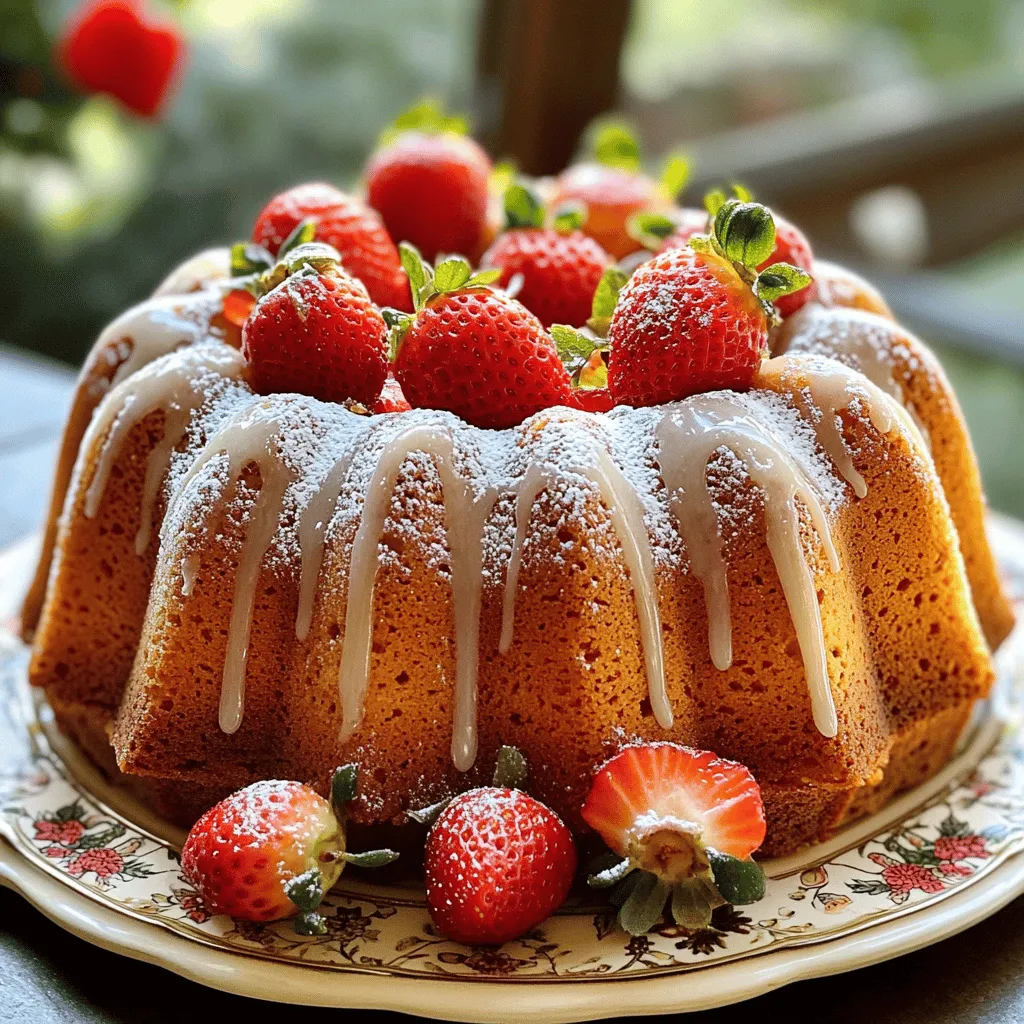
Welcome to a slice of heaven! In this blog post, I’ll share my favorite Strawberry Bundt Cake recipe. This cake

- 1 pound large shrimp, peeled and deveined - 8 oz linguine or spaghetti - 4 tablespoons unsalted butter - 2 tablespoons extra virgin olive oil - 4 cloves garlic, finely minced - 1 teaspoon red pepper flakes - Juice and zest of 1 fresh lemon - 1/4 cup fresh parsley, finely chopped - Salt and freshly ground black pepper Shrimp scampi is simple to make and full of flavor. The main ingredients are shrimp, pasta, butter, and olive oil. When you cook these together, you create a quick and tasty meal. The flavor enhancers really make a difference. Fresh garlic adds a rich taste, while red pepper flakes bring a little heat. The lemon juice and zest brighten the dish up, making it fresh and zesty. Finally, the parsley and seasonings tie everything together. You can use salt and black pepper to make it just right for your taste. These ingredients make shrimp scampi easy and delicious. Check out the Full Recipe to see how to put it all together! To start, fill a large pot with salted water. Bring it to a boil. Add 8 oz of linguine or spaghetti. Cook it according to the package directions, usually about 8 to 10 minutes. Once done, reserve 1 cup of the pasta water before draining. Set the pasta aside in a colander. Next, grab a large skillet. Heat 2 tablespoons of olive oil and 2 tablespoons of butter over medium heat. Let the butter melt fully and mix with the oil. Then, add 4 cloves of finely minced garlic and 1 teaspoon of red pepper flakes. Sauté this mix for about 1 to 2 minutes. Stir often until the garlic smells great and softens. Be sure not to let it brown; that can make it bitter. Now it's time to cook the shrimp. Increase the heat to medium-high. Add 1 pound of peeled and deveined shrimp to the skillet. Season them with salt and black pepper. Cook the shrimp for 3 to 4 minutes. Stir occasionally until they turn pink and opaque. This shows they are fully cooked. Once the shrimp are ready, pour in the juice and zest of 1 fresh lemon. Next, add the cooked pasta to the skillet along with the reserved pasta water. Toss everything gently in the skillet. Make sure the pasta is evenly coated with the lemony buttery sauce. Finally, remove the skillet from the heat. Add the remaining 2 tablespoons of butter and 1/4 cup of finely chopped parsley. Stir well until the butter melts and mixes with the dish. Taste it and adjust the seasoning if needed, adding more salt, pepper, or red pepper flakes based on your preference. For the full recipe, check out the Easy Shrimp Scampi Delight section. To avoid overcooking shrimp, watch the time closely. Cook them for just 3-4 minutes. They will turn pink and opaque when done. If they curl up tightly, they are likely overcooked. For seasoning, use salt and fresh black pepper. They enhance the shrimp's natural taste. You can also sprinkle some red pepper flakes for a kick. Try adding fresh herbs like basil or thyme. Chopped parsley also adds a nice touch. You can mix in a pinch of Italian seasoning for extra depth. Pair shrimp scampi with garlic bread or a light salad. A crisp white wine like Sauvignon Blanc works well too. It complements the lemon and garlic flavors nicely. Serve shrimp scampi in a large pasta bowl. This makes it look inviting and generous. You can add a sprinkle of parsley on top for freshness. For added color, place lemon wedges around the dish. A light dusting of black pepper on top adds a nice finishing touch. Check out the Full Recipe for more details! {{image_4}} You can easily swap linguine for spaghetti. Other types of pasta work too. Try penne, fettuccine, or even bowtie pasta. If you need gluten-free options, look for gluten-free pasta made from rice or corn. These alternatives taste great and cook well in the dish. If you want a change from shrimp, try scallops or chicken. Scallops cook quickly and add a sweet flavor. Chicken provides a heartier option. For a vegan twist, use plant-based protein like tofu or tempeh. You can also try chickpeas for added texture. Adjust the heat to suit your taste. Start with less red pepper flakes if you prefer mild. You can add fresh chili peppers for more heat. Sliced jalapeños or serrano peppers bring a nice kick. Just remember to taste as you go and find your perfect balance! For the full recipe to make this dish, check the Easy Shrimp Scampi Delight section above. To store leftovers, first let the shrimp scampi cool. Place it in an airtight container. This helps keep it fresh. I recommend using glass or plastic containers with tight lids. Your dish will stay good for 2-3 days in the fridge. If you want to freeze shrimp scampi, use a freezer-safe container. Make sure to leave some space at the top for expansion. It’s best to freeze it within one day of cooking for the best taste. To thaw, place the container in the fridge overnight. This keeps the shrimp tender and juicy. To reheat shrimp scampi, use the stovetop. Heat it on low to avoid overcooking the shrimp. Stir gently to warm it through. You can also use a microwave. Heat it in short bursts, about 30 seconds at a time. Check often to make sure the shrimp don’t cook too long. Enjoy your delicious dish again! Shrimp scampi stays good in the fridge for about 2 to 3 days. Make sure to store it in an airtight container. This keeps the dish fresh and tasty. Yes, you can use frozen shrimp! Just make sure to thaw them first. Rinse them under cold water until they are no longer icy. This helps them cook evenly. There are many tasty sides to pair with shrimp scampi. Some great options include: - Garlic bread - A fresh garden salad - Steamed broccoli - Rice or couscous Each of these adds a nice touch to the meal. Shrimp scampi can be made gluten-free. Use gluten-free pasta instead of regular pasta. Check the labels to ensure all ingredients are gluten-free. You can prepare shrimp scampi ahead of time. Cook the pasta and shrimp separately. Store them in the fridge, and combine them just before serving. This keeps the dish fresh. Shrimp scampi uses garlic, lemon, and butter for flavor. Shrimp alfredo is creamy and rich, made with heavy cream and cheese. Both are delicious, but they have different taste profiles. In this blog post, we explored how to make delicious shrimp scampi using simple ingredients. We covered the main components, cooking methods, and added tips to enhance flavor and presentation. I hope this guide inspires you to try making shrimp scampi at home. It's easy, tasty, and can be customized to suit your taste. Enjoy cooking and savor your meal!

Shrimp Scampi Made Easy Simple and Fast Recipe

Are you craving a flavorful meal that’s quick and easy to make? You’re in the right place! I’ll guide you

Creating a creamy cucumber salad starts with fresh ingredients. Here’s what you need: - 2 large cucumbers, thinly sliced - 1/2 cup plain Greek yogurt - 1/4 cup sour cream - 2 tablespoons fresh dill, finely chopped - 1 tablespoon fresh lemon juice - 1 teaspoon garlic powder - Sea salt and freshly ground black pepper to taste - 1 tablespoon extra virgin olive oil - Optional: 1/4 cup cherry tomatoes, halved These ingredients give the salad its fresh taste and creamy texture. The cucumbers add crunch, while the yogurt and sour cream create a smooth dressing. Fresh dill brings a bright flavor, and lemon juice adds a nice zing. Garlic powder gives depth, and the sea salt enhances all the flavors. If you want a pop of color, add cherry tomatoes. This salad is simple yet delicious! For the full recipe, check out the [Full Recipe]. Start by washing your cucumbers. Use cold water to clean them well. Slice the cucumbers into thin rounds. A sharp knife or a mandolin slicer works best for this. Once sliced, place the cucumbers in a large colander. Sprinkle a light amount of salt over them. Let the salted cucumbers rest for 10 to 15 minutes. This step helps draw out extra moisture. It also makes them crispier. While the cucumbers rest, it’s time to make the dressing. In a mixing bowl, combine the following ingredients: - 1/2 cup plain Greek yogurt - 1/4 cup sour cream - 2 tablespoons fresh dill, finely chopped - 1 tablespoon fresh lemon juice - 1 teaspoon garlic powder Whisk these ingredients together until the mixture is smooth. Ensure everything is well-blended. The dressing should be creamy and flavorful. After the cucumbers have released moisture, pat them dry with paper towels. This step removes excess salt and water. In a spacious mixing bowl, add the sliced cucumbers to the creamy dressing. Toss everything together gently. Make sure all the cucumber slices are coated in the dressing. Season with sea salt and freshly ground black pepper to taste. Next, drizzle 1 tablespoon of extra virgin olive oil over the salad. Mix lightly again. If you want a pop of color, add the optional cherry tomatoes, halved. This adds both flavor and visual appeal. For the best taste, let the salad chill in the fridge for at least 30 minutes. This rest time helps the flavors meld beautifully. For a complete meal, consider serving slices of crusty bread or fresh pita on the side. For the full recipe, check the main article. Using fresh herbs makes a big difference. Fresh dill adds bright taste and aroma. Dried herbs can lose flavor over time. So, always choose fresh when you can. Chilling the salad is also key. It allows flavors to blend well. A cool salad feels refreshing and makes each bite better. Serve your salad in decorative bowls. A beautiful bowl can make your dish pop. You can also use garnishes to add flair. A sprig of dill on top looks nice. Cherry tomatoes add color too, making your dish more inviting. Over-salting cucumbers can ruin your salad. Salting draws out moisture, but too much salt is bad. Always taste before adding more salt. Also, don’t skip the chilling step. Letting the salad chill helps the flavors mix. If you serve it too soon, it won’t taste as good. {{image_4}} You can easily change this salad by adding new ingredients. For creaminess, try adding diced avocado or crumbled feta cheese. They will add a rich texture that blends well with cucumbers. You can also mix in sliced olives or bits of red onion. These add a nice salty flavor and crunch. Switching herbs can make this salad exciting. Use fresh basil or cilantro instead of dill for a different taste. You can also spice it up! Adding a pinch of cayenne pepper or paprika gives it a nice kick. This will make your creamy cucumber salad stand out even more. If you want a dairy-free option, use coconut yogurt instead of Greek yogurt. This keeps the creaminess while being plant-based. For low-calorie swaps, replace sour cream with a lighter yogurt or skip it altogether. You can still enjoy a tasty salad without the extra calories. For the full recipe, check out the detailed instructions above! To keep your creamy cucumber salad fresh, store it in an airtight container. Place it in the fridge right after serving. This way, it stays cool and tasty. The salad can last for about 2 to 3 days in the fridge. After that, the cucumbers may become too soft and lose their crunch. Can you freeze creamy cucumber salad? No, it is best not to freeze it. Freezing changes the texture of cucumbers. They become mushy when thawed. If you want to prep ahead, make the dressing and chop the cucumbers. Store them separately. Mix them just before serving for the best taste. Creamy cucumber salad is best served cold. If you have leftovers, enjoy them straight from the fridge. If the salad looks too watery, gently stir it. You can add a pinch of salt or a squeeze of lemon juice to refresh the flavor. You can keep Creamy Cucumber Salad in the fridge for about three days. Make sure to store it in an airtight container. After that, the salad might lose its crunch and flavor. Always check for any changes in smell or texture before eating. Yes, you can use sour cream instead of Greek yogurt. This swap will make the salad tangier. However, Greek yogurt adds more protein and creaminess. If you want a thicker dressing, sour cream works well too. Feel free to try both and see which you like more! You can add many veggies to your Creamy Cucumber Salad! Some tasty options include: - Cherry tomatoes - Red onion - Bell peppers - Radishes - Carrots These vegetables add color and crunch. Just chop them small so they mix well with the cucumbers. Yes, this salad is great for meal prep! You can make it ahead of time and store it in the fridge. Just keep the cucumbers and dressing separate until you are ready to eat. This way, they stay fresh and crunchy. To add some heat, try these ideas: - Add a pinch of cayenne pepper. - Mix in some chopped jalapeños. - Use a spicy yogurt or sour cream. These options will give your salad a nice kick! Experiment to find the right spice level for you. For more tasty ideas, check out the Full Recipe. In this blog post, I shared how to make a fresh and tasty Creamy Cucumber Salad. We covered the ingredients, step-by-step instructions, and tips to enhance flavor and presentation. I also shared variations and storage info to keep it fresh. This salad is easy to make and perfect for any meal. Try it with your favorite twists for a fun dish. Enjoy your cooking adventure!

Creamy Cucumber Salad Refreshing and Simple Recipe

Are you ready to beat the heat with a cool and creamy cucumber salad? This simple recipe combines crunchy cucumbers

- 4 boneless, skinless chicken breasts - 1 cup homemade or high-quality store-bought pesto - 1 cup heavy cream - 1 cup cherry tomatoes, halved - 2 tablespoons extra virgin olive oil - 1 teaspoon garlic powder - Salt and freshly ground black pepper, to taste - ½ cup freshly grated Parmesan cheese - Fresh basil leaves for garnish To make this dish, you need some key kitchen tools. A sharp knife is great for slicing the tomatoes. Use a cutting board for safe chopping. A large skillet will help sear the chicken and mix the sauce. A baking sheet is essential for roasting the tomatoes. You also need measuring cups for the cream and pesto. For storage, have some airtight containers ready. After cooking, let the dish cool before placing it in the containers. This keeps it fresh for later use. Each serving of creamy pesto chicken with roasted tomatoes has about 500 calories. It contains around 30 grams of fat, 40 grams of protein, and 10 grams of carbs. This meal is rich in flavor and nutrition, making it a great choice for any dinner. If you want to know more about the full recipe, you can check the [Full Recipe]. Start by preheating your oven to 400°F (200°C). This heat is key for roasting the tomatoes. A hot oven helps them caramelize well, adding great flavor to your dish. In a large mixing bowl, toss together the halved cherry tomatoes, olive oil, garlic powder, salt, and pepper. Make sure each tomato gets coated nicely. This adds flavor and makes them taste great. Spread the seasoned tomatoes on a parchment-lined baking sheet in a single layer. This helps them roast evenly. Next, season both sides of the chicken breasts with salt and pepper. Heat a large skillet over medium-high heat and add a splash of olive oil. When the oil shimmers, carefully place the chicken in the skillet. Sear the chicken for about 5-7 minutes on each side until golden brown. Browning adds flavor and texture, but the chicken is not fully cooked yet. After browning the chicken, lower the heat to medium-low. Pour in the heavy cream followed by the pesto. Stir gently to mix well. Timing is important here. You want the sauce to blend smoothly without boiling. Cover the skillet and let it simmer for about 10-12 minutes. This ensures the chicken cooks through. Use a meat thermometer to check that the internal temperature reaches 165°F (75°C). This step is crucial for safe eating. Once the chicken is done, take it off the heat. Plate each chicken breast and drizzle the creamy pesto sauce over them. Don’t forget to add the roasted tomatoes on the side. For a lovely touch, garnish with fresh basil leaves. Serve with crusty bread or pasta for a complete meal. Enjoy the vibrant colors and flavors of this dish! For more details, check the Full Recipe. To boost the taste of your creamy pesto chicken, try adding a pinch of red pepper flakes. This small change will give your dish a nice kick. You can also mix in fresh lemon juice for a bright, zesty touch. If you love herbs, consider adding thyme or oregano. They work well with both chicken and pesto. Feel free to experiment with these spices to create your perfect flavor. One common mistake is overcooking the chicken. It can become dry and tough. Always check the internal temperature with a meat thermometer. Aim for 165°F (75°C) to ensure it’s safe and juicy. Another mistake is under-seasoning the dish. Make sure to taste and adjust the salt and pepper before serving. This small step can make a big difference in flavor. Finding high-quality pesto can elevate your dish. Look for local markets or specialty stores that offer fresh, homemade pesto. If you prefer store-bought, choose brands that use fresh basil and olive oil. For tomatoes, visit farmers' markets for the ripest, sweetest cherry tomatoes. Fresh ingredients will give your creamy pesto chicken the best taste. You can also check your local grocery store for organic options. {{image_4}} You can easily change this dish by adding more veggies or proteins. For a colorful twist, try adding: - Baby spinach - Zucchini slices - Bell pepper strips - Mushrooms You can also swap the chicken for other proteins. Consider using shrimp, salmon, or even tofu. Each option brings a unique flavor to the creamy pesto. If you need to make this dish gluten-free, choose gluten-free pasta or serve it without pasta. For a dairy-free version, replace heavy cream with coconut milk or a dairy-free cream. Use nutritional yeast instead of Parmesan cheese for added flavor without dairy. Pair this dish with fresh sides for a well-rounded meal. Here are some ideas: - Garlic bread or a crusty baguette - A crisp green salad with lemon vinaigrette - Roasted asparagus or green beans A nice white wine, like Pinot Grigio, complements the flavors well. For a non-alcoholic option, try sparkling water with a slice of lemon. Enjoy the delightful flavors of your creamy pesto chicken with roasted tomatoes! For the complete recipe, check out [Full Recipe]. To store leftovers, let the Creamy Pesto Chicken cool to room temperature. Then, place it in an airtight container. This helps keep it fresh. In the fridge, it stays good for about three days. Make sure to label the container with the date. This way, you know when to use it. If you want to keep your dish longer, freezing is a great option. First, cool the chicken completely. Then, wrap each piece in plastic wrap. After that, put them in a freezer-safe bag. Try to remove all the air from the bag. This helps prevent freezer burn. The chicken can last about three months in the freezer. To reheat, you want to keep the chicken juicy and tasty. One way is to use the oven. Preheat it to 350°F (175°C). Place the chicken in a baking dish and cover it with foil. Heat for about 20 minutes. You can also use a microwave. Just be careful not to overcook it. Heat in short bursts of 30 seconds, checking often. Enjoy it warm with the creamy sauce and roasted tomatoes from the Full Recipe. You can use half-and-half for a lighter option. It won’t be as thick but still gives a creamy taste. Coconut milk works too, but it adds a different flavor. If you want a low-fat choice, try Greek yogurt. Just mix it with a bit of milk to make it smoother. Each choice will change the dish's richness but will still taste good. Yes, you can use grilled chicken. Just make sure it is cooked and cut into pieces. Since it’s already cooked, you can skip the searing step. Simply add the grilled chicken to the sauce after mixing in the cream and pesto. Cook it until heated through, about five minutes. To serve more people, double the chicken and sauce ingredients. Use eight chicken breasts and two cups of cream and pesto. You may need a larger pan to cook it all. Keep an eye on cooking time, too. You may need a few extra minutes to ensure everything heats well. To reheat, place the chicken in a skillet over low heat. Add a splash of cream or water to keep it moist. Cover the skillet with a lid to hold in steam. Heat for about 10 minutes or until warm. You can also use the microwave, but do it in short bursts to avoid drying it out. Yes, this recipe is kid-friendly. Kids love the creamy sauce and tasty chicken. To make it even more appealing, serve it over pasta or rice. You can also add some veggies like peas or broccoli to the dish. This adds color and nutrition without changing the flavor much. For the full recipe, check out the Creamy Pesto Chicken with Roasted Tomatoes recipe. This recipe for Creamy Pesto Chicken is simple and tasty. You learned about the ingredients, preparation steps, and helpful tips. Cooking well doesn’t have to be hard. Remember to season your chicken and use fresh ingredients. Variations allow you to personalize the dish as needed. Follow storage tips to keep leftovers fresh. Whether for family or friends, this dish is sure to impress. Enjoy making it your own and sharing it with others. You’ll be glad you tried this recipe!

Creamy Pesto Chicken with Roasted Tomatoes Delight

Are you ready to elevate your dinner game? My Creamy Pesto Chicken with Roasted Tomatoes is a simple yet luxurious

To make Coconut Chicken with Apricot Sauce, gather these ingredients: - 2 boneless, skinless chicken breasts - 1 cup unsweetened coconut flakes - 1 cup all-purpose flour - 2 large eggs, beaten - 1 teaspoon garlic powder - 1/2 teaspoon salt - 1/2 teaspoon freshly ground black pepper - 1 tablespoon olive oil - 1 cup apricot preserves - 1 tablespoon Dijon mustard - 1 tablespoon apple cider vinegar - Fresh cilantro leaves, for garnish These ingredients come together to create a dish full of flavor. You can customize this recipe to suit your taste. Here are some optional ingredients: - Chili flakes for heat - Lime zest for a citrus kick - Chopped green onions for freshness - Toasted nuts for crunch Feel free to mix and match these options to make the dish yours! If you need to make substitutions, here are some ideas: - Use coconut flour instead of all-purpose flour for a gluten-free option. - Swap apricot preserves with peach or mango preserves for a different fruit flavor. - Replace olive oil with coconut oil for an extra coconut taste. - Use maple syrup instead of Dijon mustard for sweetness. These substitutions can change the dish and keep it exciting. For more details, check the Full Recipe. Start by patting the chicken breasts dry. This helps the breading stick better. Slice each breast in half to make thinner cutlets. These will cook evenly and quickly. Next, set up your breading station. Use three shallow bowls. In the first bowl, mix flour, garlic powder, salt, and pepper. In the second bowl, add the beaten eggs. In the third bowl, put the coconut flakes. This setup makes breading simple and neat. Now it’s time to cook. Heat olive oil in a large skillet over medium heat. When the oil is hot, add the breaded chicken cutlets. Cook for about 4-5 minutes on each side. You want them golden brown and fully cooked. Adjust the heat if needed. This keeps the chicken from burning. While the chicken cooks, let’s prepare the apricot sauce. In a small saucepan, mix apricot preserves, Dijon mustard, and apple cider vinegar. Heat this over low. Stir until it’s warm and smooth. This should take about 3-4 minutes. If the sauce is too thick, add a splash of water. Once everything is ready, plate the chicken and drizzle the warm apricot sauce on top. Enjoy this tasty dish! For the full recipe, check out the details above. To make sure your chicken turns out great, follow these tips: - Use thin cutlets: This helps the chicken cook evenly. Slice the breasts in half for faster cooking. - Preheat the skillet: Heating the oil until it shimmers is key. This gives you a nice golden brown crust. - Don’t overcrowd the pan: Cook in batches if needed. This helps the chicken fry rather than steam. When serving coconut chicken, you want to create a feast for the eyes and the palate: - Serve on rice: A fluffy bed of jasmine rice is perfect. It soaks up the apricot sauce well. - Add fresh veggies: Steamed broccoli or a light salad balances the meal. The crunch adds nice texture. - Pair with a drink: A light iced tea or a fruity mocktail complements the dish well. Making your meal look good is easy with a few simple touches: - Use fresh herbs: Cilantro sprigs add color and freshness. They also give a nice aroma. - Sprinkle toasted coconut: This adds crunch and enhances the coconut flavor. It also looks beautiful. - Add lime wedges: A pop of green makes the plate vibrant. Plus, a squeeze of lime brightens the flavors. For more details, check the Full Recipe for Coconut Chicken with Apricot Sauce. {{image_4}} You can try different sauces with coconut chicken. For a spicy kick, use mango salsa. It adds a fresh burst of flavor. If you like savory, try a soy sauce mix with honey and ginger. This gives a nice Asian twist. Barbecue sauce also works well, adding a smoky touch. You can bake the chicken if you want a healthier option. Preheat your oven to 400°F. Place breaded chicken on a lined baking sheet. Bake for about 20 minutes, flipping halfway. This method keeps the chicken juicy. If you prefer frying, use medium heat. Fry until golden brown, about 4-5 minutes per side. Both methods yield delicious results! You can swap ingredients to fit your needs. For a gluten-free option, use almond flour instead of all-purpose flour. Coconut flakes are naturally gluten-free. If you want a vegan dish, replace chicken with tofu. Use unsweetened coconut yogurt for the sauce. This keeps the flavors while fitting different diets. Check the [Full Recipe] for all the details. After enjoying your coconut chicken, let it cool first. Place the leftover chicken in an airtight container. This keeps it fresh. Store it in the fridge for up to three days. Make sure to separate the apricot sauce if you want to keep it fresh longer. To reheat coconut chicken, use the oven for the best results. Preheat your oven to 350°F (175°C). Place the chicken on a baking sheet and cover it with foil. Heat it for about 15 minutes. This warms it evenly without drying it out. You can also use a microwave. Heat it in short bursts, checking often so it doesn’t get too hot. If you want to save some coconut chicken for later, freezing is a great option. Wrap each piece in plastic wrap tightly. Then, place them in a freezer-safe bag. This will prevent freezer burn. You can freeze the chicken for up to three months. Remember to label the bag with the date. When you’re ready to eat, thaw it overnight in the fridge before reheating. For the apricot sauce, store it in a small container in the fridge or freeze it in ice cube trays for easy use. To make Coconut Chicken with Apricot Sauce gluten-free, swap the all-purpose flour for gluten-free flour. Many brands offer good options. You can also use almond flour or coconut flour for a nutty flavor. Ensure all your sauces, like the apricot preserves and Dijon mustard, are gluten-free. Check labels, as some brands may contain gluten. Yes, you can use other meats. Turkey cutlets work well and have a similar texture. Pork chops are another tasty option. Just remember to adjust cooking times. For fish, try firm white fish like cod or halibut. These options will add different flavors while keeping the dish enjoyable. This dish shines with simple sides. Try steamed jasmine rice for a fluffy base. Quinoa adds a nutty flavor and extra protein. Roasted vegetables like broccoli or asparagus complement the sweetness of the sauce. A light salad with citrus dressing can also balance the meal. These sides will enhance your dining experience! For the full recipe, check out the detailed instructions above. In this blog post, we explored how to make Coconut Chicken with Apricot Sauce. We covered the ingredients, cooking steps, and helpful tips. You learned how to customize the dish and adapt it for special diets. Remember, this dish is flexible. Use your best ingredients and enjoy the process. Try different sauces or cooking methods to match your taste. With these ideas, you'll impress your family and friends. Get ready to serve up a delicious meal!

Coconut Chicken with Apricot Sauce Tasty Dinner Fix

Looking for a quick and tasty dinner that’s sure to impress? You’re in the right place! Coconut Chicken with Apricot

Creating Oreo Dirt Cake is simple and fun! Here’s what you need: - 1 package (15.25 oz) Oreo cookies - 1/2 cup (1 stick) unsalted butter, melted - 1 package (8 oz) cream cheese, softened to room temperature - 1 package (16 oz) powdered sugar - 1 tub (16 oz) Cool Whip, thawed - 1 package (3.9 oz) chocolate instant pudding mix - 2 cups cold milk - 1 cup gummy worms (optional, for playful decoration) - Fresh mint leaves (optional, for garnish) Each ingredient plays a key role in making this dessert delicious and appealing. The Oreo cookies form the base and add rich chocolate flavor. The melted butter helps bind the crust together. Cream cheese and powdered sugar create a sweet, creamy filling that pairs perfectly with the chocolate pudding. The Cool Whip adds lightness, while the gummy worms make it fun! For the best results, gather all your ingredients before you start. This way, you can work smoothly and enjoy the process. You can find the full recipe in the next section, which will guide you step by step! - First, crush the Oreo cookies. You can use a food processor for this. Pulse until they turn into fine crumbs. - Next, mix the crumbs with melted butter in a bowl. Stir well until every crumb is coated. - Now, press this mixture firmly into the bottom of a 9x13 inch baking dish. Make sure it is even and packed tight. - In a clean mixing bowl, beat the softened cream cheese with an electric mixer. Aim for a smooth texture. - Gradually add the powdered sugar while mixing. Keep beating until it is well blended and creamy. - Finally, gently fold in the thawed Cool Whip with a spatula. This makes the filling light and fluffy. - In a separate bowl, whisk the chocolate instant pudding mix with cold milk for about 2 minutes. This should thicken to a creamy consistency. - Let the pudding sit for 5 minutes to firm up before using it. - Spread the cream cheese filling evenly over the cookie crust in the baking dish. - Then, layer the chocolate pudding on top of the cream cheese. Smooth it out to make it even. - Take the reserved cup of Oreo crumbs and sprinkle it over the pudding. This gives a fun dirt look. - Cover the baking dish tightly with plastic wrap. Place it in the refrigerator. - Chill for at least 4 hours, but overnight is best. This lets the flavors mix and the cake set well. - Just before you serve, add gummy worms on top for a fun touch. - If you want, garnish with fresh mint leaves to add color and freshness. Follow these steps for a delightful Oreo Dirt Cake. For the full recipe, check out the detailed instructions provided earlier! Chilling time is key for Oreo dirt cake. It helps all the flavors blend well. I find that letting it chill for at least four hours makes a big difference. Ideally, chill it overnight for the best results. This helps the layers firm up, making each slice neat and clean. Smoothing out layers is also important. After spreading the cream cheese filling, use a spatula to make it even. When adding the pudding, gently spread it over the cream cheese. This keeps the layers distinct and beautiful. You can easily customize your Oreo dirt cake. Try different toppings like crushed nuts or sprinkles for fun textures. You can also swap out the Oreo cookies. Try using mint cookies or peanut butter cookies for unique flavors. These small changes can add a whole new twist to your cake. Portion sizes matter. You can cut the cake into squares for easy serving. If you want something fun, serve it in clear cups. This way, everyone can see the layers. Plus, it makes for a great party treat! For creative presentation, consider using a clear glass dish. This shows off the lovely layers. You can also garnish with fresh mint leaves for a nice touch. They add color and freshness to your dessert. Feel free to check out the Full Recipe for more details on making this delightful treat! {{image_4}} You can change up your Oreo dirt cake in fun ways. A vanilla version tastes great. Just swap out chocolate pudding for vanilla pudding. This gives the dessert a lighter flavor. Another fun twist is the peanut butter variation. Mix in peanut butter with the cream cheese filling. It adds a rich, nutty taste that pairs well with the cookies. Kids often love this flavor! If you need a gluten-free option, use gluten-free sandwich cookies. There are many tasty brands available. Just crush them the same way as regular Oreos. The taste stays rich and delicious, ensuring everyone can enjoy this treat. For a vegan dirt cake, you can use dairy-free cream cheese. Brands like Tofutti or Kite Hill work well. They create a creamy texture without dairy. Also, swap out Cool Whip for a non-dairy whipped topping. Look for brands like So Delicious or CocoWhip. These options keep the dessert light and fluffy while staying vegan-friendly. By exploring these variations, you can make your Oreo dirt cake perfect for everyone. Check out the Full Recipe for more details! To keep your Oreo dirt cake fresh, use an airtight container. This helps prevent the cake from drying out. Store it in the fridge for up to five days. If you notice any changes in texture or smell, it’s best to toss it. You can freeze this cake for longer storage. First, cut it into pieces. Wrap each piece tightly in plastic wrap. Then place them in a freezer-safe bag. The cake can last up to three months in the freezer. To thaw, take it out and place it in the fridge overnight. Oreo dirt cake stays its best for about five days in the fridge. Look for signs of spoilage like a sour smell or mold. If the cake feels dry or crumbly, it’s time to let it go. Keep an eye on it, and enjoy it while it’s fresh! Oreo Dirt Cake is a fun dessert that looks like dirt! It has layers of creamy goodness and crushed Oreo cookies. This dessert became popular in the 1980s. People love it for its playful look and easy prep. You can enjoy it at parties or family gatherings. The combination of flavors and textures makes it a favorite for many. You can keep Oreo Dirt Cake in the refrigerator for up to five days. Just make sure to cover it well. This helps keep it fresh and tasty. Over time, the layers may soften, but the flavor stays great. If you want the best taste, try to eat it within the first three days. Yes, you can make Oreo Dirt Cake ahead of time! This dessert is perfect for planning. You can prepare it a day before you serve it. Just follow the recipe, then chill it overnight. This gives the flavors time to blend. Plus, it saves you time on the day of your event. You can use many fun decorations for Oreo Dirt Cake! Some tasty options include chocolate sprinkles or edible flowers. You could even add mini chocolate cookies or candy rocks for a playful touch. Fresh fruit can add color, too. Choose whatever you like best to match your occasion. Absolutely! Oreo Dirt Cake is a kid-friendly dessert. Kids love the taste and the fun look. It’s simple to make, so kids can help in the kitchen. Plus, they enjoy adding their favorite toppings. This dessert is sure to make them smile! This blog post shared a simple recipe for Oreo Dirt Cake. You learned about the key ingredients, like Oreos and cream cheese, as well as step-by-step instructions to make it. Also, we covered tips to custom-make your cake and how to store leftovers. Oreo Dirt Cake is fun to make and eat. It’s a great dessert for parties or family gatherings. Enjoy creating your own versions and share them with friends.

OREO DIRT CAKE Delightful and Easy Dessert Recipe

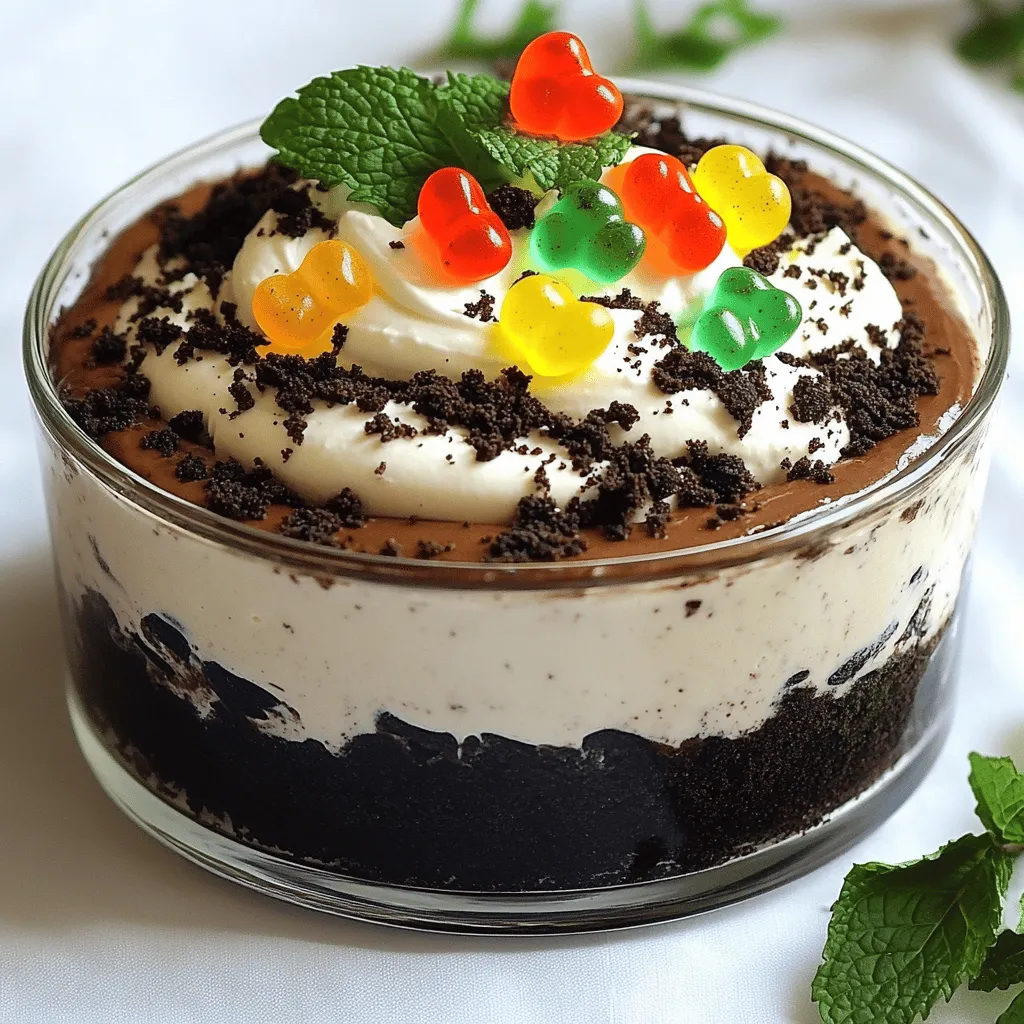
Are you ready to make dessert magic? This OREO DIRT CAKE is both fun and simple to whip up. With

- 8 oz. beef sirloin - 8 oz. fresh rice noodles - 1 bell pepper, sliced (any color) - 1 cup broccoli florets - 2 medium-sized carrots, julienned - 3 tablespoons soy sauce - 1 tablespoon oyster sauce (optional) - 1 tablespoon hoisin sauce - 2 cloves garlic, minced - 1 inch fresh ginger, grated - 1 teaspoon sesame oil - 3 green onions, chopped (separate white and green parts) - Toasted sesame seeds for garnish In this recipe, I use beef sirloin for a tender bite. Fresh rice noodles make this dish quick and tasty. You can use any color bell pepper, adding fun and color. Broccoli florets and julienned carrots give a nice crunch. The sauces bring all the flavors together. Soy sauce adds saltiness. Oyster sauce gives a rich, savory taste. Hoisin sauce adds sweetness and depth. For seasonings, garlic and ginger create a fragrant base. A hint of sesame oil adds warmth. The green onions provide fresh contrast. Toasted sesame seeds offer a crunchy finish. You can find the full recipe in another section, but these are the key ingredients you need to make a delicious beef noodle stir fry. - Thinly slice the beef - Julienne the carrots - Cut the broccoli into florets Start by slicing the beef into thin strips. This helps it cook quickly and evenly. Next, take your carrots and cut them into thin matchstick pieces, also known as julienne. It makes them cook faster and looks nice. For the broccoli, cut it into small florets. All these steps help make the cooking process quick and easy. - Boiling the noodles - Preventing sticking Fill a large pot with water and bring it to a boil. Once boiling, add the fresh rice noodles. Cook them for 2-3 minutes, following the package instructions. When they’re ready, drain them. To stop them from sticking, drizzle a bit of sesame oil over the noodles. Toss them gently to coat. Set the noodles aside for later. - Cooking the beef - Sautéing garlic and ginger - Adding and cooking the vegetables In a large wok or skillet, heat a tablespoon of vegetable oil over high heat. Once hot, add the sliced beef. Cook it for 2-3 minutes until it turns brown. Remove the beef from the pan and keep it warm. In the same pan, add another tablespoon of oil. Then, toss in minced garlic and grated ginger. Stir-fry them for about 30 seconds until fragrant. Now, it’s time for the vegetables! Add the bell pepper, broccoli, and carrots. Stir-fry them for 3-4 minutes until they are crisp but tender. - Returning beef to the pan - Mixing in sauces and noodles - Tossing everything together Now, return the cooked beef to the pan. Add the rice noodles, soy sauce, oyster sauce (if using), and hoisin sauce. Toss everything together gently for about a minute. Make sure the noodles are well-coated with the sauce. This ensures every bite is full of flavor. - Adjusting seasoning - Plating and garnishing Taste your stir-fry and adjust the seasoning with salt and pepper as needed. Just before serving, mix in the white parts of the chopped green onions for added flavor. Serve your delicious stir-fry in bowls or on a platter. Top with the green onion greens and sprinkle toasted sesame seeds for a lovely crunch. Enjoy your Beef Noodle Stir Fry! For the full recipe, check out the details included earlier. To achieve the best stir-fry, you need high heat. Start with a hot wok or skillet. This helps cook the meat and veggies quickly. It seals in flavors and keeps everything crisp. - Use thin slices of beef. This helps it cook fast and stay tender. - Prep all ingredients first. When everything is ready, you can cook quickly. For high heat cooking, use oils with high smoke points. Vegetable oil works great. It won’t burn as easily. - Heat the oil before adding food. You’ll know it’s ready when it shimmers. - Cook in small batches. This keeps the temperature steady. If you want to switch proteins, try chicken or shrimp. Both work well in stir-fry dishes. - Chicken: Use thinly sliced breast or thigh meat. - Shrimp: Shell and devein them before cooking. For vegetables, feel free to get creative. You can use snap peas, zucchini, or mushrooms. - Snap peas: Add them for a crisp bite. - Zucchini: Slice or julienne for a light texture. - Mushrooms: Add umami flavor and a meaty texture. Prepping your meals can save time later. Cook the beef and veggies ahead of time. Store them in the fridge for up to three days. - Meal prep suggestions: Prepare noodle portions in advance. Cook them when you’re ready to eat. - Freezing leftovers: If you have extra stir-fry, freeze it. Use an airtight container to keep it fresh. This way, you can enjoy it later without losing flavor. By following these tips, you’ll make cooking easier and more fun! {{image_4}} You can switch the beef for chicken. Just slice the chicken thinly like the beef. Cook it in the same way. This gives a tasty chicken stir-fry option. For a vegetarian twist, try tofu. Use firm tofu and press it to remove water. Cut it into cubes and stir-fry it until golden. This makes a great vegetarian alternative. Want more flavor? Add spices like chili flakes or black pepper. These spices can give your dish a kick. You can also try adding garlic powder or five-spice powder. Using different sauces can change everything. Try teriyaki or sweet and sour sauce instead of soy sauce. Each sauce adds a unique taste to your dish. You can mix sauces too for even more flavor. Pair your stir-fry with side dishes like steamed rice or fried rice. Both add texture and taste. You can also serve it with a simple salad for freshness. For ideal accompaniments, think of spring rolls or dumplings. They make great sides and are fun to eat with your stir-fry. Enjoy your meal together for a full experience! To keep your beef noodle stir fry fresh, store it in an airtight container. Place it in the fridge right after it cools. This way, you prevent bacteria growth. Your stir fry will last for about 3 to 4 days in the fridge. The best way to reheat stir fry is in a pan over medium heat. Add a splash of water or broth to steam the noodles and veggies. This helps keep the texture nice. Stir it often to warm everything evenly. You can also use the microwave, but this may make the noodles a bit soggy. To freeze leftover stir fry, place it in freezer-safe bags or containers. Remove as much air as possible to prevent freezer burn. Your stir fry can last up to 3 months in the freezer. When you’re ready to eat, thaw it in the fridge overnight. Reheat it in a pan for the best results. To boost flavor in your Beef Noodle Stir Fry, use fresh herbs. Cilantro or basil can add a nice touch. Add chili paste for heat. A splash of lime juice brightens the dish. You can also try using different sauces. Consider adding a dash of fish sauce for depth. Yes, you can use various noodles. Egg noodles provide a richer taste. Soba noodles add a unique flavor and are healthier. Udon noodles are thicker and chewy. For gluten-free options, try rice noodles or zucchini noodles. You can add many ingredients to make this dish your own. Try snap peas or mushrooms for extra texture. Add baby corn for a sweet crunch. For a twist, include pineapple or cashews. Feel free to adjust the vegetables based on what you have. Beef stir fry can be healthy, depending on your ingredients. Lean beef offers protein and iron. Plenty of veggies add essential vitamins and fiber. To make it healthier, use less oil and low-sodium soy sauce. You can also add more vegetables to boost nutrition. Stir-frying cooks food quickly over high heat while stirring. It uses a small amount of oil. Sautéing also cooks quickly but may use more oil. Stir-frying often involves tossing ingredients in a wok. Sautéing is done in a skillet, cooking food flat. Both methods create tasty dishes but differ in style. This blog post covers everything you need for a great Beef Noodle Stir Fry. We explored key ingredients like beef sirloin, fresh noodles, and tasty sauces. The step-by-step guide made cooking simple and clear. Plus, I shared tips for techniques and ingredient swaps to customize your dish. Remember, cooking is fun and allows you to be creative. Whether you choose beef, chicken, or veggies, the possibilities are endless. Enjoy your cooking and the delicious results that follow!

Beef Noodle Stir Fry Deliciously Quick Dinner Recipe

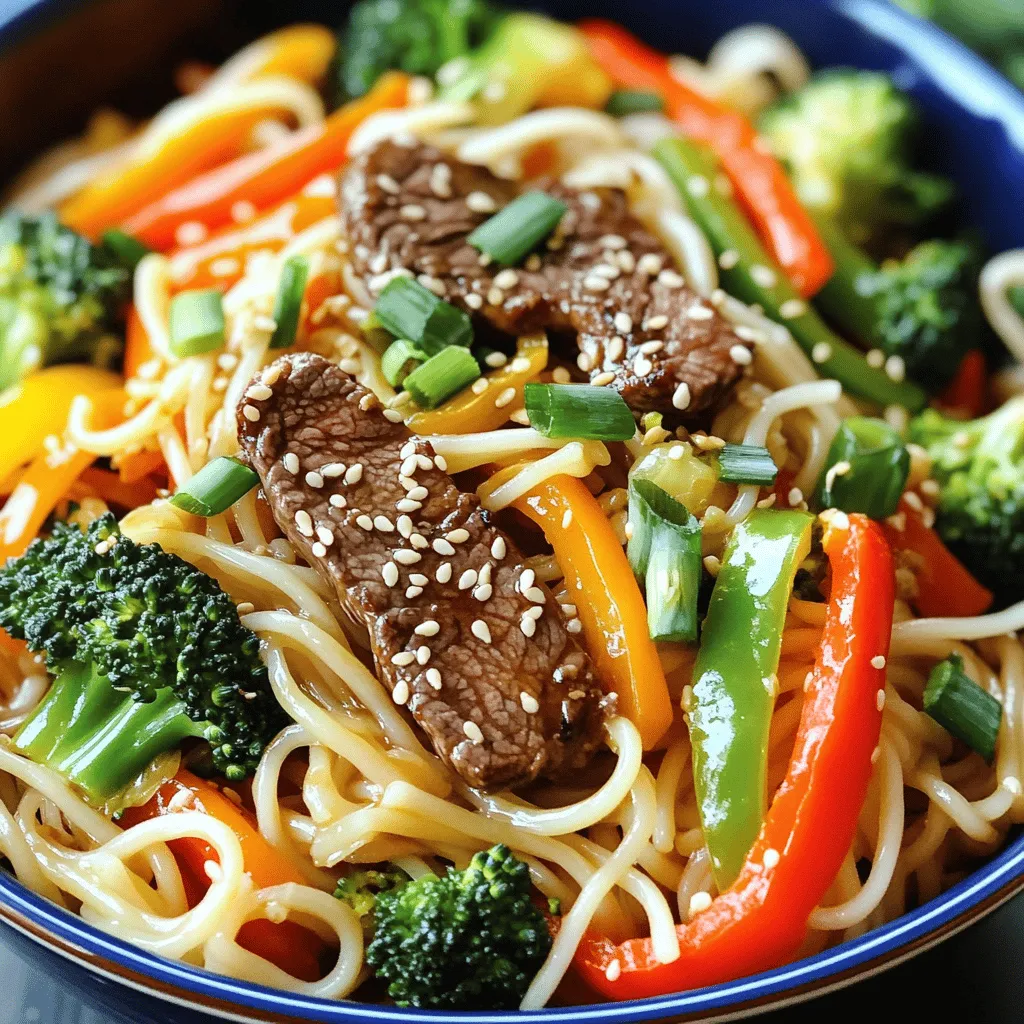
Looking for a meal that’s quick, tasty, and easy? Try my Beef Noodle Stir Fry! This dish packs fresh flavors,

- 4 boneless, skinless chicken breasts - 1 cup fresh salsa - 1 cup corn - 1 cup black beans - 1 tablespoon extra-virgin olive oil - 1 teaspoon ground cumin - 1 teaspoon chili powder - Sea salt and freshly cracked black pepper - Fresh cilantro for garnish - Lime wedges for serving When I make Salsa Fresca Chicken, I love the fresh taste of the ingredients. First, I choose good-quality chicken breasts. They should be boneless and skinless for a quick cook. Next, I add fresh salsa. You can buy it or make your own. Use ripe tomatoes, onions, and cilantro for the best flavor. Corn gives a nice crunch and sweetness to the dish. I often use frozen corn for ease. Black beans add protein and fiber, making the meal filling. I always rinse them well to remove excess salt. For the seasonings, ground cumin and chili powder bring warmth and depth. I like to use sea salt and freshly cracked black pepper for better taste. Fresh cilantro is a must for garnish. It adds color and flavor. Finally, lime wedges on the side give a bright, zesty touch. They balance the rich flavors of the chicken and salsa. If you want the full recipe, you can check it out [here](insert link). - Preheat oven to 375°F (190°C). - In a bowl, mix fresh salsa, corn, black beans, cumin, chili powder, salt, and pepper. Start by preheating your oven. A hot oven helps cook the chicken evenly. As you wait, gather your ingredients. Mixing fresh salsa, corn, black beans, and spices creates a vibrant base. This salsa mix adds flavor and color to your dish. - Heat olive oil in a skillet over medium-high heat. - Season chicken breasts with salt and pepper and sear until golden brown. Next, heat olive oil in a skillet. Searing the chicken gives it a nice crust. Season both sides with salt and pepper. When the oil is hot, add chicken breasts. Cook for about 4-5 minutes on each side. Look for a golden brown color; it means it's ready for the next step. - Pour salsa mixture over chicken and sprinkle cheese. - Bake for 20-25 minutes until cooked through. Once the chicken is seared, pour the salsa mixture over it. Make sure each piece is covered. Now, sprinkle shredded Monterey Jack cheese on top. Transfer the skillet to your preheated oven. Bake for 20-25 minutes. To check if it’s done, use a meat thermometer. The chicken should reach 165°F (74°C). After baking, let it rest for 5 minutes. This helps keep the chicken juicy. Enjoy this easy yet delicious Salsa Fresca Chicken! - Always let your chicken sit out for 15 to 30 minutes before cooking. This helps cook it evenly. Cold chicken can take longer to cook and may not brown well. - To check if your chicken is done, use a meat thermometer. Insert it into the thickest part. The chicken should reach 165°F (74°C). This ensures it’s safe to eat. - Want to kick up the flavor? Add spices like smoked paprika or garlic powder. Fresh herbs like parsley or oregano also work well. They add a nice touch. - Making homemade salsa is easy and fun. Just chop fresh tomatoes, onions, and jalapeños. Mix them with lime juice and cilantro. This salsa adds a fresh zing to the chicken. You can find the full recipe in the Full Recipe section. {{image_4}} You can easily switch some ingredients in Salsa Fresca Chicken. If you don’t have black beans, try pinto beans or chickpeas instead. They both add great texture and flavor. For corn, you can use diced bell peppers or zucchini. These swaps keep the dish fresh and exciting. When it comes to cheese, Monterey Jack is tasty, but you can use cheddar or pepper jack. Each cheese will give a different flavor. If you want a dairy-free option, try using vegan cheese. Just make sure it melts well for the best taste. Salsa Fresca Chicken pairs well with many side dishes. Serve it with fluffy rice for a filling meal. You can also use warm tortillas to scoop up the chicken and salsa mix. It's fun and tasty! To elevate the dish, add creamy avocado slices or a dollop of sour cream. Both add richness that balances the zing from the salsa. You might even sprinkle extra cilantro for a fresh touch. These additions make every bite delicious! To store leftover Salsa Fresca Chicken, let it cool first. Place it in an airtight container. It can last in the fridge for three to four days. When you're ready to eat, reheat it gently. Use a skillet over low heat for even warmth. This method keeps the chicken moist. You can also microwave it. Cover the dish with a damp paper towel to prevent drying out. If you want to freeze Salsa Fresca Chicken, ensure it is fully cooled first. Use a freezer-safe container or heavy-duty freezer bags. Remove as much air as possible. The chicken can stay good for up to three months. When you're ready to enjoy it, thaw it in the fridge overnight. For quicker thawing, place the bag in cold water. After thawing, reheat it as mentioned before for the best taste. What can I substitute for chicken breasts? You can use chicken thighs instead of breasts. Thighs stay moist and add flavor. You could also try turkey cutlets or even tofu for a plant-based option. Remember, cooking times may change with different meats. How do I ensure my chicken is juicy? To keep chicken juicy, do not overcook it. Use a meat thermometer to check for 165°F (74°C). Brining your chicken for a couple of hours before cooking can also help lock in moisture. Can I use store-bought salsa? Yes, store-bought salsa works great! It saves time and adds flavor. Just choose a salsa you enjoy, as it will affect the overall taste of your dish. How long will leftovers last in the fridge? Leftovers will last for about 3 to 4 days in the fridge. Make sure to store them in an airtight container. Reheat gently to keep the chicken moist. Is this recipe suitable for meal prep? Yes, this recipe is perfect for meal prep. You can make it ahead of time and portion it out for the week. Just reheat portions in the microwave or oven. Can I make this dish dairy-free? Absolutely! You can skip the cheese or use a dairy-free cheese alternative. This way, you can still enjoy the great flavors without the dairy. This blog post lays out a simple and tasty recipe for Salsa Fresca Chicken. We covered the main ingredients, step-by-step cooking instructions, and helpful tips for success. Variations allow you to make it your own, while storage info ensures you can enjoy leftovers. Cook this dish with confidence to impress anyone at your table. With fresh flavors and easy steps, you will make a meal everyone loves. So, grab your ingredients and get started!

Salsa Fresca Chicken Flavorful and Simple Recipe

Looking for a simple yet flavorful dish? Let me introduce you to Salsa Fresca Chicken! This recipe is packed with

Older posts
Newer posts
← Previous Page1 … Page59 Page60 Page61 … Page65 Next →

dsad

© 2025 recipesstation • Built with GeneratePress

Our Policies

  • Copyright Policy
  • Cookie Policy
  • GDPR Policy
  • Privacy Policy
  • Disclaimer
  • Terms Of Use

More Information

  • Home
  • About
  • Contact
  • Appetizers
  • Dessert
  • Dinner
  • Drinks
©2025, recipesstation About Back To Top