![- 1 cup mixed berries (strawberries, blueberries, raspberries) - 1 cup coconut milk - 2 tablespoons honey or maple syrup - 1 teaspoon pure vanilla extract - 1 tablespoon freshly squeezed lime juice - A pinch of flaky sea salt Gathering the right ingredients is key to making berry coconut popsicles. You want fresh, ripe berries for the best flavor. Strawberries, blueberries, and raspberries bring a mix of sweetness and tartness. The coconut milk makes the popsicles creamy and rich. Honey or maple syrup adds the perfect touch of sweetness. The vanilla extract enhances the overall taste. Lime juice adds a hint of tang, brightening up the flavors. A small pinch of flaky sea salt balances everything, making the berries pop. - High-speed blender - Popsicle molds - Wooden sticks - Measuring cups and spoons You’ll need a high-speed blender to make a smooth mixture. Popsicle molds are essential for shaping your treats. Wooden sticks help you easily hold and enjoy your popsicles. Use measuring cups and spoons to get all your ingredients just right. With these tools and ingredients ready, you’ll be all set to create these easy and refreshing berry coconut popsicles. Don’t forget to check the Full Recipe for more detailed steps! - Combine all ingredients in a blender. This includes your mixed berries, coconut milk, honey or maple syrup, vanilla extract, lime juice, and sea salt. - Blend until smooth and creamy. You want a nice, thick mixture without lumps. Taste it! If you want it sweeter, add more honey or syrup. - Fill molds halfway and freeze for 1-2 hours. This sets the first layer. - Add remaining mixture and freeze for an additional 4-6 hours. Make sure you pour carefully to avoid mixing the layers. - Use warm water to release the popsicles from molds. Run warm water over the outside of the molds for a few seconds. Gently pull on the popsicles to remove them. For the complete recipe, check the [Full Recipe]. You can easily change the sweetness of your berry coconut popsicles. Start with the 2 tablespoons of honey or maple syrup. After blending, taste the mixture. If you want it sweeter, add more honey or maple syrup. Blend again until mixed well. This simple step lets you control how sweet your popsicles are. Everyone has their own taste, and I encourage you to find yours. Creating beautiful layers makes your popsicles even more fun. Pour the first half of your berry mixture into the molds and freeze for 1 to 2 hours. This sets the first layer. Then, pour the rest of the mixture into a bowl. You can fold in some whole or sliced berries for texture. After the first layer is firm, add the second layer to the molds. This technique gives your popsicles a lovely look and extra flavor. Presentation can make your popsicles stand out. Serve them on a bright platter, and scatter fresh berries around. For a nice touch, sprinkle some shredded coconut on top. You can also add mint leaves for color. Wrap the base of each popsicle in parchment paper. This not only looks cute but also makes them easy to hold. {{image_4}} You can switch up the berries in this recipe. Try using mango, pineapple, or kiwi. Mixing flavors adds fun and new tastes. I love blending strawberries with peaches. Each combo brings its own flair and makes every bite exciting. If you want to boost texture, consider adding coconut flakes or yogurt. Coconut flakes add a nice crunch and a tropical vibe. You can also fold in yogurt for creaminess. This makes the popsicles richer and even more satisfying. If you want to change the sweetener, try agave syrup or stevia. Agave syrup has a mild taste and mixes well. Stevia is low-calorie, great for those watching sugar. These options keep your popsicles sweet without the extra calories. For the full recipe and more details, check the Berry Coconut Popsicles section. To keep your berry coconut popsicles creamy, freeze them properly. Use a flat, stable surface in your freezer. Make sure the popsicle molds stand straight. This stops the mixture from spilling. If you want to enjoy them later, cover the molds with plastic wrap. When you’re ready to eat, let the popsicles thaw for a few minutes at room temperature. This makes them easier to remove from the molds. These popsicles can last in the freezer for about two months. After that, they may lose flavor and texture. To keep them fresh, label your molds with the date. This way, you know when to enjoy them. If you notice any ice crystals forming, it’s time to eat them! Cleaning your popsicle molds is easy. Rinse them in warm water right after use. This helps remove any sticky residue. If needed, use a soft sponge to scrub them gently. Make sure to dry them completely before storing. You can reuse the molds many times, which is great for making different flavors. Just remember to check that they are clean and dry before filling them again. For the full recipe, refer back to the Berry Coconut Popsicles section. Yes, you can use frozen berries. Frozen berries save time and add convenience. They often blend smoother than fresh ones. However, they may create a slightly icier texture. To balance this, use a bit more coconut milk or sweetener. If you thaw them first, mix well for the best results. No popsicle molds? No problem! You can use small cups or muffin tins. Just pour the mixture into them. Place a wooden stick in each one. Freeze until solid. If you use paper cups, just peel them away after freezing. To make these popsicles vegan, swap honey for maple syrup or agave. Both are great sweeteners. Ensure your coconut milk is dairy-free, which it usually is. This keeps the recipe plant-based without losing flavor. To help popsicles release easily, run warm water over the molds. Do this for about 10 seconds. If you feel resistance, give them a little twist. This helps break the seal. They should slide out smoothly. Enjoy your Berry Coconut Popsicles! For the full recipe, check the previous sections. You now have all you need to make tasty berry popsicles. We went over the main ingredients and tools. I shared step-by-step instructions to help you blend and freeze the mixture. Don't forget the tips on sweetness and presentation! You can even try fun variations with different fruits. These popsicles are easy to make and fun to enjoy. Take them to your next gathering or treat yourself at home. Try it out and make your own delicious berry popsicles today!](https://recipesstation.com/wp-content/uploads/2025/05/3165e65a-66e5-4982-a436-dff6c35f48de-768x768.webp)
Looking for a cool treat that’s easy to make? My Berry Coconut Popsicles are perfect for you! Packed with fresh berries and creamy coconut milk, these popsicles are a savory delight. You only need a few simple ingredients and tools, and you’ll have refreshing popsicles in just hours. Let’s dive into this easy recipe that will satisfy your sweet tooth without the guilt!
Ingredients
Main Ingredients
– 1 cup mixed berries (strawberries, blueberries, raspberries)
– 1 cup coconut milk
– 2 tablespoons honey or maple syrup
– 1 teaspoon pure vanilla extract
– 1 tablespoon freshly squeezed lime juice
– A pinch of flaky sea salt
Gathering the right ingredients is key to making berry coconut popsicles. You want fresh, ripe berries for the best flavor. Strawberries, blueberries, and raspberries bring a mix of sweetness and tartness. The coconut milk makes the popsicles creamy and rich. Honey or maple syrup adds the perfect touch of sweetness.
The vanilla extract enhances the overall taste. Lime juice adds a hint of tang, brightening up the flavors. A small pinch of flaky sea salt balances everything, making the berries pop.
Tools Needed
– High-speed blender
– Popsicle molds
– Wooden sticks
– Measuring cups and spoons
You’ll need a high-speed blender to make a smooth mixture. Popsicle molds are essential for shaping your treats. Wooden sticks help you easily hold and enjoy your popsicles. Use measuring cups and spoons to get all your ingredients just right.
With these tools and ingredients ready, you’ll be all set to create these easy and refreshing berry coconut popsicles. Don’t forget to check the Full Recipe for more detailed steps!
Step-by-Step Instructions
Preparing the Berry Mixture
– Combine all ingredients in a blender.
This includes your mixed berries, coconut milk, honey or maple syrup, vanilla extract, lime juice, and sea salt.
– Blend until smooth and creamy.
You want a nice, thick mixture without lumps. Taste it! If you want it sweeter, add more honey or syrup.
Making the Popsicles
– Fill molds halfway and freeze for 1-2 hours.
This sets the first layer.
– Add remaining mixture and freeze for an additional 4-6 hours.
Make sure you pour carefully to avoid mixing the layers.
Removing the Popsicles
– Use warm water to release the popsicles from molds.
Run warm water over the outside of the molds for a few seconds. Gently pull on the popsicles to remove them.
For the complete recipe, check the [Full Recipe].
Tips & Tricks
Sweetness Adjustment
You can easily change the sweetness of your berry coconut popsicles. Start with the 2 tablespoons of honey or maple syrup. After blending, taste the mixture. If you want it sweeter, add more honey or maple syrup. Blend again until mixed well. This simple step lets you control how sweet your popsicles are. Everyone has their own taste, and I encourage you to find yours.
Layering Techniques
Creating beautiful layers makes your popsicles even more fun. Pour the first half of your berry mixture into the molds and freeze for 1 to 2 hours. This sets the first layer. Then, pour the rest of the mixture into a bowl. You can fold in some whole or sliced berries for texture. After the first layer is firm, add the second layer to the molds. This technique gives your popsicles a lovely look and extra flavor.
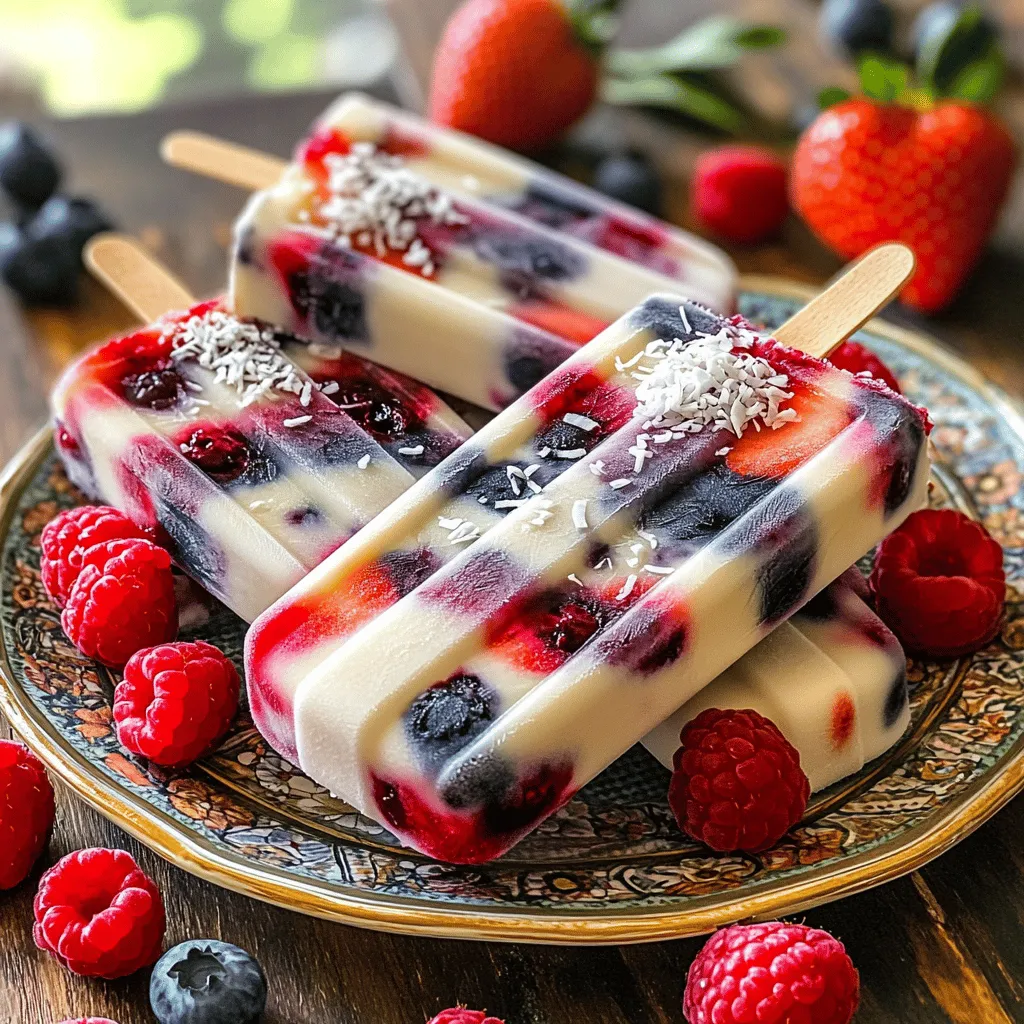
Presentation Tips
Presentation can make your popsicles stand out. Serve them on a bright platter, and scatter fresh berries around. For a nice touch, sprinkle some shredded coconut on top. You can also add mint leaves for color. Wrap the base of each popsicle in parchment paper. This not only looks cute but also makes them easy to hold.
Variations
Fruit Combinations
You can switch up the berries in this recipe. Try using mango, pineapple, or kiwi. Mixing flavors adds fun and new tastes. I love blending strawberries with peaches. Each combo brings its own flair and makes every bite exciting.
Add-ins
If you want to boost texture, consider adding coconut flakes or yogurt. Coconut flakes add a nice crunch and a tropical vibe. You can also fold in yogurt for creaminess. This makes the popsicles richer and even more satisfying.
Sweetener Substitutions
If you want to change the sweetener, try agave syrup or stevia. Agave syrup has a mild taste and mixes well. Stevia is low-calorie, great for those watching sugar. These options keep your popsicles sweet without the extra calories.
For the full recipe and more details, check the Berry Coconut Popsicles section.
Storage Info
Freezing and Thawing
To keep your berry coconut popsicles creamy, freeze them properly. Use a flat, stable surface in your freezer. Make sure the popsicle molds stand straight. This stops the mixture from spilling. If you want to enjoy them later, cover the molds with plastic wrap. When you’re ready to eat, let the popsicles thaw for a few minutes at room temperature. This makes them easier to remove from the molds.
Shelf Life
These popsicles can last in the freezer for about two months. After that, they may lose flavor and texture. To keep them fresh, label your molds with the date. This way, you know when to enjoy them. If you notice any ice crystals forming, it’s time to eat them!
Reusing Molds
Cleaning your popsicle molds is easy. Rinse them in warm water right after use. This helps remove any sticky residue. If needed, use a soft sponge to scrub them gently. Make sure to dry them completely before storing. You can reuse the molds many times, which is great for making different flavors. Just remember to check that they are clean and dry before filling them again.
For the full recipe, refer back to the Berry Coconut Popsicles section.
FAQs
Can I use frozen berries instead of fresh?
Yes, you can use frozen berries. Frozen berries save time and add convenience. They often blend smoother than fresh ones. However, they may create a slightly icier texture. To balance this, use a bit more coconut milk or sweetener. If you thaw them first, mix well for the best results.
What if I don’t have popsicle molds?
No popsicle molds? No problem! You can use small cups or muffin tins. Just pour the mixture into them. Place a wooden stick in each one. Freeze until solid. If you use paper cups, just peel them away after freezing.
How can I make these popsicles vegan?
To make these popsicles vegan, swap honey for maple syrup or agave. Both are great sweeteners. Ensure your coconut milk is dairy-free, which it usually is. This keeps the recipe plant-based without losing flavor.
What’s the best way to ensure popsicles come out easily?
To help popsicles release easily, run warm water over the molds. Do this for about 10 seconds. If you feel resistance, give them a little twist. This helps break the seal. They should slide out smoothly. Enjoy your Berry Coconut Popsicles! For the full recipe, check the previous sections.
You now have all you need to make tasty berry popsicles. We went over the main ingredients and tools. I shared step-by-step instructions to help you blend and freeze the mixture. Don’t forget the tips on sweetness and presentation! You can even try fun variations with different fruits.
These popsicles are easy to make and fun to enjoy. Take them to your next gathering or treat yourself at home. Try it out and make your own delicious berry popsicles today!
![- 1 cup mixed berries (strawberries, blueberries, raspberries) - 1 cup coconut milk - 2 tablespoons honey or maple syrup - 1 teaspoon pure vanilla extract - 1 tablespoon freshly squeezed lime juice - A pinch of flaky sea salt Gathering the right ingredients is key to making berry coconut popsicles. You want fresh, ripe berries for the best flavor. Strawberries, blueberries, and raspberries bring a mix of sweetness and tartness. The coconut milk makes the popsicles creamy and rich. Honey or maple syrup adds the perfect touch of sweetness. The vanilla extract enhances the overall taste. Lime juice adds a hint of tang, brightening up the flavors. A small pinch of flaky sea salt balances everything, making the berries pop. - High-speed blender - Popsicle molds - Wooden sticks - Measuring cups and spoons You’ll need a high-speed blender to make a smooth mixture. Popsicle molds are essential for shaping your treats. Wooden sticks help you easily hold and enjoy your popsicles. Use measuring cups and spoons to get all your ingredients just right. With these tools and ingredients ready, you’ll be all set to create these easy and refreshing berry coconut popsicles. Don’t forget to check the Full Recipe for more detailed steps! - Combine all ingredients in a blender. This includes your mixed berries, coconut milk, honey or maple syrup, vanilla extract, lime juice, and sea salt. - Blend until smooth and creamy. You want a nice, thick mixture without lumps. Taste it! If you want it sweeter, add more honey or syrup. - Fill molds halfway and freeze for 1-2 hours. This sets the first layer. - Add remaining mixture and freeze for an additional 4-6 hours. Make sure you pour carefully to avoid mixing the layers. - Use warm water to release the popsicles from molds. Run warm water over the outside of the molds for a few seconds. Gently pull on the popsicles to remove them. For the complete recipe, check the [Full Recipe]. You can easily change the sweetness of your berry coconut popsicles. Start with the 2 tablespoons of honey or maple syrup. After blending, taste the mixture. If you want it sweeter, add more honey or maple syrup. Blend again until mixed well. This simple step lets you control how sweet your popsicles are. Everyone has their own taste, and I encourage you to find yours. Creating beautiful layers makes your popsicles even more fun. Pour the first half of your berry mixture into the molds and freeze for 1 to 2 hours. This sets the first layer. Then, pour the rest of the mixture into a bowl. You can fold in some whole or sliced berries for texture. After the first layer is firm, add the second layer to the molds. This technique gives your popsicles a lovely look and extra flavor. Presentation can make your popsicles stand out. Serve them on a bright platter, and scatter fresh berries around. For a nice touch, sprinkle some shredded coconut on top. You can also add mint leaves for color. Wrap the base of each popsicle in parchment paper. This not only looks cute but also makes them easy to hold. {{image_4}} You can switch up the berries in this recipe. Try using mango, pineapple, or kiwi. Mixing flavors adds fun and new tastes. I love blending strawberries with peaches. Each combo brings its own flair and makes every bite exciting. If you want to boost texture, consider adding coconut flakes or yogurt. Coconut flakes add a nice crunch and a tropical vibe. You can also fold in yogurt for creaminess. This makes the popsicles richer and even more satisfying. If you want to change the sweetener, try agave syrup or stevia. Agave syrup has a mild taste and mixes well. Stevia is low-calorie, great for those watching sugar. These options keep your popsicles sweet without the extra calories. For the full recipe and more details, check the Berry Coconut Popsicles section. To keep your berry coconut popsicles creamy, freeze them properly. Use a flat, stable surface in your freezer. Make sure the popsicle molds stand straight. This stops the mixture from spilling. If you want to enjoy them later, cover the molds with plastic wrap. When you’re ready to eat, let the popsicles thaw for a few minutes at room temperature. This makes them easier to remove from the molds. These popsicles can last in the freezer for about two months. After that, they may lose flavor and texture. To keep them fresh, label your molds with the date. This way, you know when to enjoy them. If you notice any ice crystals forming, it’s time to eat them! Cleaning your popsicle molds is easy. Rinse them in warm water right after use. This helps remove any sticky residue. If needed, use a soft sponge to scrub them gently. Make sure to dry them completely before storing. You can reuse the molds many times, which is great for making different flavors. Just remember to check that they are clean and dry before filling them again. For the full recipe, refer back to the Berry Coconut Popsicles section. Yes, you can use frozen berries. Frozen berries save time and add convenience. They often blend smoother than fresh ones. However, they may create a slightly icier texture. To balance this, use a bit more coconut milk or sweetener. If you thaw them first, mix well for the best results. No popsicle molds? No problem! You can use small cups or muffin tins. Just pour the mixture into them. Place a wooden stick in each one. Freeze until solid. If you use paper cups, just peel them away after freezing. To make these popsicles vegan, swap honey for maple syrup or agave. Both are great sweeteners. Ensure your coconut milk is dairy-free, which it usually is. This keeps the recipe plant-based without losing flavor. To help popsicles release easily, run warm water over the molds. Do this for about 10 seconds. If you feel resistance, give them a little twist. This helps break the seal. They should slide out smoothly. Enjoy your Berry Coconut Popsicles! For the full recipe, check the previous sections. You now have all you need to make tasty berry popsicles. We went over the main ingredients and tools. I shared step-by-step instructions to help you blend and freeze the mixture. Don't forget the tips on sweetness and presentation! You can even try fun variations with different fruits. These popsicles are easy to make and fun to enjoy. Take them to your next gathering or treat yourself at home. Try it out and make your own delicious berry popsicles today!](https://recipesstation.com/wp-content/uploads/2025/05/3165e65a-66e5-4982-a436-dff6c35f48de-250x250.webp)
