Go Back
To make homemade garden pickles, you need a few key items. Here’s what you will need: - 4 cups cucumbers, sliced - 1 cup distilled white vinegar - 1 cup water - 2 tablespoons kosher salt - 1 tablespoon granulated sugar - 3 cloves garlic, peeled and sliced - 1 tablespoon dill seeds or 2 sprigs of fresh dill - 1 teaspoon mustard seeds - 1 teaspoon black peppercorns - ½ teaspoon red pepper flakes (optional) For the best crunch, use Kirby or pickling cucumbers. These types have a firm texture and fewer seeds. They hold their shape well during pickling. You can also try English cucumbers, but they may be softer. The right seasonings make your pickles stand out. Garlic adds a strong flavor. Dill gives a fresh taste. Mustard seeds and black peppercorns add depth. If you like heat, add red pepper flakes. These spices work together to create a tangy and delicious brine. You can adjust the spices to match your taste. For the full recipe, check out Crunchy Garden Pickles 🥒. Start with fresh cucumbers. Wash them well under cold water. This removes dirt and residue. For the best crunch, choose Kirby or pickling cucumbers. Slice them into your favorite shape: spears, rounds, or halves. The thickness matters. Thicker slices stay crunchy longer. Now, let’s make the brine. In a medium saucepan, mix the following: - 1 cup distilled white vinegar - 1 cup water - 2 tablespoons kosher salt - 1 tablespoon granulated sugar Heat this mixture over medium heat. Stir it gently until the salt and sugar dissolve. This takes just a few minutes. Once dissolved, take it off the heat. Let it cool for about 10-15 minutes. This cooling step is key for flavor. Grab your clean jars. If you want, you can use one large jar or multiple smaller ones. Layer the bottom with spices: - Sliced garlic - Dill seeds or fresh dill - Mustard seeds - Black peppercorns - Red pepper flakes (if you like some heat) Next, pack the sliced cucumbers tightly into the jars. Fill them snugly for the best taste and crunch. Pour the cooled brine over the cucumbers. Make sure they’re fully submerged. Leave about ½ inch of space at the top. Finally, seal the jars with lids. Let them cool to room temperature. Once cooled, store them in the fridge. Wait at least 24 hours before tasting. For the best flavor, wait a week. Enjoy your homemade garden pickles! For the full recipe, check out the details above. To make crisp pickles, start with fresh cucumbers. Use Kirby or pickling cucumbers for the best crunch. Wash them well and slice them just before pickling. This keeps them firm. Pack the cucumbers tightly in jars. Less space helps maintain their crispness. Always use cold brine. Hot brine can make pickles soft. If you want extra crunch, add a few grape leaves to each jar. The tannins in grape leaves help keep pickles firm. One common mistake is using old cucumbers. They can be soft and mushy. Another mistake is not using enough salt. Salt helps with flavor and texture. Also, avoid overcrowding the jars. If they are too packed, the brine won’t cover them fully. This leads to uneven pickling. Lastly, don’t rush the refrigeration. Let your pickles sit for at least 24 hours for the best taste. Patience is key! For a great pickling experience, you need some basic tools. First, gather glass jars with tight lids. Mason jars work well. You’ll also need a medium saucepan for the brine. A ladle helps pour the brine easily into jars. A cutting board and knife are essential for slicing cucumbers. If you have a funnel, use it to avoid spills. Lastly, a measuring cup and spoons will help keep your recipe on track. With the right tools, your pickles will shine. For the full recipe, check out the Crunchy Garden Pickles section. {{image_4}} You can spice up your pickles with fun flavors. Try adding fresh herbs like basil or cilantro. For a sweet touch, add sliced jalapeños or red onions. If you love garlic, toss in more sliced cloves. You can also add spices like coriander seeds or fennel seeds for a unique twist. Experiment with these options to find your perfect blend. While cucumbers are classic, many veggies work well for pickling. Carrots add a nice crunch and sweetness. Bell peppers bring vibrant colors and flavors. You can also pickle radishes, green beans, or even cauliflower. Each vegetable gives a new taste and texture. Don't be afraid to mix and match your favorites! There are several ways to pickle your veggies. The quick method is what I use for my garden pickles. Just mix the brine and refrigerate. For a deeper flavor, try the fermentation method. This takes longer but gives a tangy taste. You can also try hot packing, where you pour hot brine over the veggies. This ensures a nice crunch and bold taste. Each technique adds its unique flair to your pickles! Store your homemade pickles in the fridge. Use clean, airtight jars to keep them fresh. Make sure the pickles are fully submerged in the brine. This helps maintain their crunch and flavor. If you have any leftover brine, save it. You can reuse it for future pickling adventures. Homemade garden pickles can last up to two months in the fridge. After a week, the flavors become even better. The longer they sit, the tastier they get. However, for the best taste and crunch, enjoy them within this time frame. Check your pickles for any strange smells or off colors. If you see mold, toss them immediately. Look for bubbles in the jar, which can mean fermentation has occurred. If they taste sour or mushy, it's time to say goodbye. Always trust your senses when it comes to food safety. It takes about 24 hours for cucumbers to pickle. After this time, they get tangy and crisp. You can eat them right away, but they taste even better after a week. This extra time lets the flavors blend well. Yes, you can use other vinegars. Apple cider vinegar adds a fruity taste, while rice vinegar gives a milder flavor. Each type of vinegar will change the taste of your pickles. Just make sure to keep the same ratio of vinegar to water. If your pickles are too salty, try rinsing them under cold water. This helps remove some salt. You can also add fresh cucumbers to the jar. This will balance out the saltiness over time. If you follow the full recipe, this problem should not happen. Making pickles is fun and easy. We covered key ingredients, step-by-step instructions, and useful tips. You learned about suggested cucumbers and essential spices. We explored variations and storage best practices. Remember, crisp pickles need the right prep and brine. Don’t forget to check for freshness before eating. With these insights, you can enjoy delicious homemade pickles anytime. Now, get started on your pickling journey!

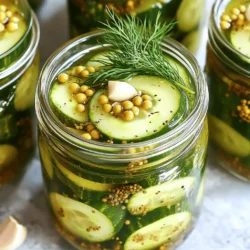
Homemade Garden Pickles

Discover the joy of making your own crunchy garden pickles with this easy recipe! Using fresh cucumbers and a tangy brine infused with garlic and dill, you'll create delicious pickles perfect for snacking or adding to sandwiches. In just 30 minutes plus 24 hours in the fridge, you can enjoy refreshing, homemade pickles bursting with flavor. Click through to explore the full recipe and discover presentation tips to impress your guests!

Ingredients
  

4 cups cucumbers, sliced (preferably Kirby or pickling cucumbers for best results)

1 cup distilled white vinegar

1 cup water

2 tablespoons kosher salt

1 tablespoon granulated sugar

3 cloves garlic, peeled and thinly sliced

1 tablespoon dill seeds or 2 sprigs of fresh dill

1 teaspoon mustard seeds

1 teaspoon black peppercorns

½ teaspoon red pepper flakes (optional, for a touch of heat)

Instructions
 

Prepare the Cucumbers: Start by thoroughly washing the cucumbers under cold running water to remove any dirt. Slice them into your preferred shape: spears, thick rounds, or halves, depending on your texture preference.

    Make the Brine: In a medium saucepan, combine the distilled white vinegar, water, kosher salt, and sugar. Heat the mixture over medium heat, stirring occasionally until the salt and sugar completely dissolve. Once dissolved, remove the saucepan from heat and let the brine cool for about 10-15 minutes.

      Add Spices to Jars: In a large glass jar or in multiple smaller jars, layer the bottom with the sliced garlic, dill seeds (or fresh dill), mustard seeds, black peppercorns, and red pepper flakes (if you prefer a spicy kick).

        Pack the Cucumbers: Tightly pack the cucumber slices into the jars, ensuring they fit snugly with minimal gaps between them. This helps in preserving the crunchiness and flavor.

          Pour on the Brine: Carefully pour the cooled vinegar brine over the packed cucumbers, ensuring they are fully submerged. Leave about ½ inch of headspace at the top of the jar to allow for expansion.

            Seal and Refrigerate: Secure the jars with their lids and let them cool to room temperature. Once cooled, transfer them to the refrigerator and allow them to sit for at least 24 hours to let the flavors meld together.

              Enjoy Your Pickles: You can enjoy your crunchy pickles after just a day, but they will develop an even richer flavor if you wait a week before indulging!

                - Prep Time: 20 minutes

                  - Total Time: 30 minutes + 24 hours refrigeration

                    - Servings: Makes about 4 cups of pickles.

                      - Presentation Tips: Serve your crunchy garden pickles in a rustic wooden bowl or alongside sandwiches for a delightful crunch. Garnish with a few fresh dill sprigs for an added pop of color!