Skip to content
DisclaimerTerms Of UseGDPR PolicyCookie Policy

recipesstation

  • Home
  • Drinks
  • Appetizers
  • Dinner
  • Dessert
  • About
  • Contact
  • Privacy Policy
DisclaimerTerms Of UseGDPR PolicyCookie Policy

Emily

- 2 medium sweet potatoes, peeled and cubed - 1 can (15 oz) chickpeas, rinsed and drained - 1 medium onion, finely chopped - 2 cloves garlic, minced - 1 tablespoon fresh ginger, minced Sweet potatoes give this curry its sweet flavor and creamy texture. Chickpeas add protein and make the dish filling. The onion, garlic, and ginger provide a great base with their strong aromas. Together, they create a rich and savory mix. - 2 tablespoons curry powder - 1 teaspoon ground cumin - 1 teaspoon ground turmeric The spices are essential. Curry powder brings warmth and depth. Ground cumin adds a nutty taste, while turmeric gives a vibrant color. These spices work together to create a lovely flavor that complements the sweet potatoes. - 1 can (14 oz) coconut milk - 1 cup vegetable broth - Fresh cilantro, for garnish - Lime wedges, for serving Coconut milk gives the curry a creamy, rich base. Vegetable broth adds more flavor and depth. Garnishing with fresh cilantro adds brightness. The lime wedges provide a zesty kick that balances the sweetness of the dish. For the full recipe, check the details provided earlier. Start by heating the olive oil in a large pot over medium heat. Once the oil is hot, add the finely chopped onion. Sauté the onion for about 5 minutes. You want it to turn soft and translucent. This step builds a great base for your curry. Next, add the minced garlic and ginger to the pot. Stir them in well. Cook for about 1-2 minutes until the garlic and ginger smell amazing. This adds depth and flavor to your dish. Now, it's time to mix in the spices. Sprinkle the curry powder, cumin, and turmeric into the pot. Stir the spices well into the onion mixture. Let them cook for about 1 minute. This step helps release their rich flavors and aromas. Your kitchen will smell incredible! Now, carefully add the cubed sweet potatoes to the pot. Mix them in well with the spiced onion base. Make sure they are well-coated with the spices. Next, pour in the coconut milk and vegetable broth. Add the drained chickpeas and stir everything together. Season with salt and pepper to taste. Bring the curry to a gentle boil. Once it starts boiling, reduce the heat to low and cover the pot. Let it simmer for 20-25 minutes. Check the sweet potatoes for tenderness. They should be soft when pierced with a fork. After simmering, taste your curry and adjust the seasoning if needed. For a creamier texture, mash a few pieces of sweet potato with a fork. Stir them back into the sauce. Remove the pot from heat and let it sit for a few minutes. This lets the flavors meld beautifully. For the full recipe, refer to the detailed instructions above. Enjoy your savory sweet potato chickpea curry! To get tender sweet potatoes, cook them for 20-25 minutes. Check them with a fork. If they pierce easily, they are ready. For a creamier sauce, mash some sweet potato pieces with a fork. Stir them back into the curry for a smooth finish. Balancing spice levels is key. Start with less curry powder, then taste and add more if needed. You can also enhance the dish with fresh garnishes. Chopped cilantro adds a bright touch. A squeeze of lime juice brings in a fresh zing. Serve your curry over fluffy basmati rice or with warm naan. This combo makes the meal hearty. For a great presentation, ladle the curry into bowls. Add a sprinkle of cilantro on top. Place lime wedges on the side for a pop of color and flavor. {{image_4}} You can swap chickpeas for other legumes. Black beans or lentils work well too. They add great texture and flavor to your curry. You can also add different vegetables. Try spinach, zucchini, or bell peppers for a fresh twist. These options keep the dish colorful and nutritious. If you like heat, add chili peppers. Sliced jalapeños or crushed red pepper flakes can spice things up. You can also experiment with different curry powders. Each blend offers unique flavors and aromas. Trying a new spice mix can change the dish entirely. To make it gluten-free, check your curry powder. Most are safe, but some may contain gluten. Adding protein options for non-vegans is easy. You can throw in cooked chicken or tofu for extra protein. These options keep the dish filling and satisfying. To keep your sweet potato chickpea curry fresh, use airtight containers. Glass or plastic containers work well. Make sure they seal tightly. This keeps out air and moisture. If you want to store the curry for longer, consider freezing it. Use freezer-safe containers or bags. Leave some space at the top for expansion. When it's time to enjoy your curry again, you have two great options: the microwave or stovetop. For the microwave, place your portion in a bowl. Cover it loosely to prevent splatters. Heat it for 1-2 minutes, stirring halfway through. For stovetop reheating, pour the curry into a pan. Heat it on low, stirring often. This helps keep the texture nice. Always check if it’s hot all the way through. In the fridge, your sweet potato chickpea curry lasts about 3-4 days. Make sure to store it properly to maintain its flavor. If you notice any off smells or changes in color, it's best to toss it. Signs of spoilage can include mold or a sour smell. Always trust your senses when it comes to food safety. For more tips on making this curry, check out the Full Recipe. Can I make this curry ahead of time? Yes, you can make this curry ahead. It tastes even better the next day! Just store it in the fridge. Reheat it on the stove or in the microwave. What can I serve with sweet potato chickpea curry? You can serve it with fluffy basmati rice or warm naan. Both pair well and soak up the sauce. Fresh lime wedges add a nice touch too! Can I use fresh chickpeas instead of canned? Yes, you can use fresh chickpeas. Soak them overnight and cook them until tender. This may take longer than canned ones, which are ready to use. What type of sweet potatoes are best for this recipe? Use orange-fleshed sweet potatoes for a sweet flavor. They cook well and add a creamy texture to the curry. How can I thicken my curry? To thicken your curry, mash a few sweet potato cubes. This adds creaminess to the sauce. You can also add a bit more coconut milk if needed. Is there a way to make this recipe spicier? Yes! You can add chili powder or fresh chili peppers. Stir in just a little at first, then taste. Adjust to your heat level! This blog outlined how to make sweet potato chickpea curry. We explored key ingredients like sweet potatoes, chickpeas, and spices. I shared step-by-step instructions to ensure great taste and texture. We also covered storage tips and answered common questions. In closing, this dish is not just nutritious; it's also versatile. You can adjust it to suit your tastes. So gather your ingredients and start cooking—this meal will delight your senses!

Savory Sweet Potato Chickpea Curry Easy and Tasty

Are you ready to savor a warm, comforting dish packed with flavor? This Savory Sweet Potato Chickpea Curry is not

- 8 slices of bread (white or whole wheat) - 4 slices of sharp cheddar cheese - 4 slices of Gruyère cheese - 1 tablespoon Dijon mustard - ¼ teaspoon garlic powder - Fresh chives for garnish - Salt and pepper to taste When making mini grilled cheese sandwiches, the ingredients play a key role in taste and texture. I love using a mix of sharp cheddar and Gruyère cheese. The cheddar adds a bold flavor, while the Gruyère brings a lovely creaminess. You can use white or whole wheat bread, depending on your preference. Dijon mustard is optional but adds a nice kick if you want to spice things up. Garlic powder can also enhance the flavor, giving your bites an extra layer of goodness. For garnishing, fresh chives not only add color but also a fresh taste. Make sure to season your cheese with salt and pepper. This small step makes a big difference in flavor. I recommend using unsalted butter for grilling. It brings a rich taste and helps achieve that perfect golden crust. For the full recipe, check out the details above. Enjoy crafting these tasty bites! Preheat your skillet or griddle over medium heat. This step is key. It ensures a perfect grill. A hot skillet helps create that crispy crust we all love. Butter one side of each slice of bread. Use softened butter for easy spreading. Next, take four slices and spread Dijon mustard on the unbuttered side. This adds a nice kick! Now, layer sharp cheddar and Gruyère cheese on top. Don’t be shy with the cheese; the more, the better! Season with garlic powder, salt, and pepper if you like. Finally, place the remaining slices of bread on top, buttered side facing out. Carefully place your sandwiches in the preheated skillet. Grill for about 3 to 4 minutes. You want a lovely golden brown color and melted cheese. Once you see that, flip the sandwiches with a spatula. Grill the other side for another 3 to 4 minutes. Remove them from the skillet and let them cool for a minute. Then, slice each sandwich into quarters. Serve your Cheesy Bliss Bites warm and enjoy! For the full recipe, check out the detailed instructions above. To get that perfect golden crust, start with softened butter. This helps you spread it easily on the bread. Make sure you cover the bread evenly. If you miss spots, some parts will burn. Also, keep your heat at medium. Too high, and the bread will burn before the cheese melts. For a truly gooey filling, mix different cheeses. Sharp cheddar gives a bold taste, while Gruyère melts beautifully. You can even add mozzarella for extra stretchiness. The right cheese blend makes your mini sandwiches amazing. These mini grilled cheese sandwiches are perfect for any snack. They are great for parties too! Serve them warm with sides like tomato soup or a fresh salad. You can even make a platter with different cheese blends for fun. {{image_4}} You can change the cheese in your mini grilled cheese sandwiches. Swap sharp cheddar for mozzarella or pepper jack. Mozzarella gives a great stretch, while pepper jack adds a spicy kick. Try mixing cheeses for a unique taste. Combining Gruyère with sharp cheddar also adds depth. Enjoy experimenting with your favorites! Want to boost flavor? Add sliced tomatoes or cooked bacon. Tomatoes bring freshness and moisture. Bacon adds a crunchy, savory bite that pairs well with cheese. You can also add avocado slices for creaminess. Each add-in transforms your sandwich into something special. Herbs and spices can elevate your sandwiches. Try mixing garlic powder or smoked paprika into the butter. Fresh herbs like basil or thyme can also add a burst of flavor. Spread these on the bread before grilling to infuse every bite. A little creativity can make a big difference! For the full recipe, check out the Cheesy Bliss Bites 🥪 section. Store your mini grilled cheese sandwiches in an airtight container for up to 3 days. This keeps them fresh and tasty. If you have leftovers, make sure the container seals well to avoid moisture loss. For the best texture, reheat the sandwiches in a skillet. Heat the skillet over medium heat. Place the sandwiches in, and cook until they are warm and crispy again. This method revives the crunchiness that makes grilled cheese delightful. You can freeze assembled sandwiches before cooking them. Wrap each sandwich tightly in plastic wrap. Then, put them in a freezer bag. This way, you can enjoy delicious mini grilled cheese sandwiches whenever you want. Just take them out, cook them straight from the freezer, and enjoy! Yes, gluten-free bread works well for this recipe. It gives you a tasty option if you avoid gluten. Many brands offer good flavors and textures. Just pick one you enjoy, and you’re all set! Opt for whole grain bread and lower-fat cheeses. Whole grain adds fiber and nutrients. Using lower-fat cheese cuts calories but keeps the taste. You can also add veggies like spinach or tomatoes for extra health. Tomato soup or a fresh salad are great accompaniments. Tomato soup complements the cheese perfectly. A fresh salad adds crunch and freshness to your meal. Both options balance flavors and textures well. Yes, bake in a preheated oven at 375°F for a crispy outcome. Simply place the sandwiches on a baking sheet. Bake until the bread is golden and the cheese melts. This method is easy and allows for larger batches. You now have all the steps to make mini grilled cheese sandwiches. With just a few ingredients, you can create a tasty snack or party treat. Keep the tips in mind for a perfect golden crust and gooey cheese. Don't hesitate to try new cheese or add-ins for unique flavors. Whether you store them in the fridge or freeze them for later, these sandwiches are always a hit. Enjoy your tasty treats any time!

Mini Grilled Cheese Sandwiches Perfect for Any Snack

Craving a snack that’s quick, tasty, and fun? Look no further than mini grilled cheese sandwiches! These bite-sized delights combine

To make the best Shrimp Creole, gather these ingredients: - 1 pound large shrimp, peeled and deveined - 2 tablespoons olive oil - 1 medium onion, diced - 1 green bell pepper, diced - 1 celery stalk, diced - 3 cloves garlic, minced - 1 can (14.5 oz) diced tomatoes (with juice) - 1 cup vegetable broth - 2 tablespoons tomato paste - 1 tablespoon Worcestershire sauce - 1 tablespoon Cajun seasoning - 1 teaspoon dried thyme - 1 teaspoon smoked paprika - Salt and pepper to taste - 3 green onions, sliced (for garnish) - 1 cup cooked white rice (for serving) You will need a few key tools to make this dish: - Large skillet - Wooden spoon or spatula - Knife and cutting board - Measuring cups and spoons - Serving bowls When choosing shrimp, look for these signs: - Clear, shiny shells - Firm texture, not mushy - Mild ocean smell, not strong - Avoid any black spots on the shells - If buying frozen, ensure they are in a solid block, not ice crystals Fresh shrimp truly makes your Shrimp Creole shine. Always pick the best! For the full recipe, check the earlier section. Start by heating two tablespoons of olive oil in a large skillet over medium heat. Once the oil is hot, add one diced onion, one diced green bell pepper, and one diced celery stalk. Sauté these veggies for about five minutes until they soften. Next, stir in three minced garlic cloves and cook for another minute. This step fills your kitchen with a lovely aroma. Now, it’s time to add flavor. Pour in one can of diced tomatoes with their juice. Then, add one cup of vegetable broth and two tablespoons of tomato paste. Mix in one tablespoon of Worcestershire sauce, one tablespoon of Cajun seasoning, one teaspoon each of dried thyme and smoked paprika. Don’t forget to taste and adjust salt and pepper to make it just right. Increase the heat to bring your sauce to a gentle simmer. Once it starts bubbling, lower the heat and let it simmer uncovered for about 10-15 minutes. This helps thicken the sauce and blend all those fantastic flavors together. Stir occasionally to prevent sticking. After the sauce has thickened, it’s shrimp time! Add one pound of peeled and deveined shrimp to the skillet. Cook for about 5-7 minutes, stirring gently until the shrimp turns pink and opaque. This shows they are cooked through and ready to eat. Once your shrimp is cooked, taste the sauce again. Adjust the seasonings if needed. Serve the Shrimp Creole over a warm bed of cooked white rice. Finish with a sprinkle of sliced green onions for color and crunch. For a fun twist, add a lime wedge for guests to squeeze over their dish. Enjoy your shrimp adventure! For the full recipe and more details, check out the [Full Recipe]. To make your sauce pop, start with fresh veggies. Use firm onions, bright peppers, and crisp celery. These add great texture and flavor. Sauté them until they are soft but not brown. This step builds a strong base for your sauce. Add garlic last to keep its flavor bright. Stir often to prevent burning. When you add the tomatoes, let them cook down. This thickens the sauce and enhances its taste. Don't rush this part; a good simmer brings everything together. Taste as you go! Start with a pinch of Cajun seasoning. You can always add more later. If you like heat, add cayenne pepper or hot sauce. For a milder dish, reduce the seasoning or skip the hot stuff. Remember, everyone's taste is different. Let your family or friends try it too. They might have ideas you hadn’t thought of! Garnishing makes your dish look amazing. Use fresh green onions for a pop of color. Chop them finely and sprinkle on top just before serving. You can also add fresh herbs like parsley or cilantro. A wedge of lime on the side adds flair and flavor. It invites people to add a splash of zest. Presentation matters, so serve your Shrimp Creole in deep bowls. This makes each serving feel cozy and special. For the full recipe, check out the detailed instructions above! {{image_4}} You can make Shrimp Creole a bit healthier. Try using quinoa instead of white rice. Quinoa adds more protein and fiber. You can also use less oil when sautéing. Consider using low-sodium vegetable broth. This swap keeps the flavor but cuts down on salt. To make a vegan version, swap shrimp for mushrooms or chickpeas. Mushrooms mimic the texture of shrimp well. Chickpeas add protein and heartiness. Use vegetable broth and keep all the spices for flavor. You won’t miss the shrimp at all! Shrimp Creole varies by region. In New Orleans, you find a rich tomato base. In other areas, they may add green peppers or okra. Some recipes use different spices too. Consider adding bay leaves or even a splash of hot sauce for heat. Each version has its charm and flavor. To keep your shrimp creole fresh, store it in an airtight container. Let it cool to room temperature first. This helps prevent condensation inside the container. Place the lid on tightly and store it in the fridge. It will last for 3 to 4 days. If you plan to eat it later, this method works well. You can freeze shrimp creole for longer storage. Use a freezer-safe container or bag. Make sure to remove as much air as possible. Label the container with the date. It will stay good in the freezer for up to 2 months. When you’re ready, thaw it overnight in the fridge. Reheat shrimp creole on the stove for best results. Place it in a skillet over medium heat. Stir it gently to heat evenly. This will take about 5 to 10 minutes. You can also microwave it in a safe dish. Heat it in short bursts, stirring in between. Ensure it’s hot all the way through before serving. For the full recipe, refer back to the main article. To peel shrimp, hold the shrimp firmly. Start at the head end and gently pull off the shell. The shell should come off easily. After peeling, look for the dark vein that runs along the back. Use a small knife to cut a shallow line along the back. Pull out the vein with your fingers. Rinse the shrimp under cold water to clean them. This method ensures your shrimp are ready for cooking. Yes, you can use frozen shrimp for this recipe. It’s often easier and just as good. Thaw the shrimp overnight in the fridge or place them in cold water for about 15 minutes. Make sure to pat them dry before cooking. Frozen shrimp may take a minute longer to cook, so keep an eye on them. Shrimp Creole pairs well with several sides. Here are some tasty options: - Cooked white rice - Crusty bread - A fresh green salad - Steamed vegetables - Cornbread These sides help balance the flavors and make your meal more filling. Shrimp Creole has a moderate spice level. The Cajun seasoning adds heat, but you can adjust it. If you like it milder, use less seasoning. If you want more heat, add a dash of hot sauce or some chopped jalapeños. Always taste as you go to find your perfect spice level. For the detailed steps and ingredients of this delicious dish, check out the Full Recipe. Enjoy the burst of flavors with every bite! In this blog post, we explored key ingredients and essential tools for making Shrimp Creole. I shared step-by-step instructions for cooking and offered tips on perfecting your sauce. We also looked at healthy ingredient swaps and storage options for leftovers. Remember, each small detail adds flavor and fun. Enjoy crafting your dish, and feel free to make it your own! The joy of cooking shines through in your unique touch. Happy cooking!

Best Shrimp Creole Flavorful Recipe to Try Today

Are you ready to spice up your dinner routine? My Best Shrimp Creole recipe is bursting with flavors that will

To make the Viral Homemade Dunkaroo Dip, you will need: - 1 cup cream cheese, softened to room temperature - 1/2 cup vanilla yogurt (Greek or regular) - 1/4 cup powdered sugar - 1 teaspoon pure vanilla extract - 1/2 teaspoon rainbow sprinkles (plus extra for a colorful garnish) - 1/4 teaspoon almond extract (optional, for enhanced flavor) - Assorted dippers: graham crackers, animal crackers, fresh fruit slices, and crunchy pretzels You can adjust the ingredients if needed. For a lighter dip, use low-fat cream cheese. Greek yogurt adds protein and creaminess. If you want a sweeter dip, add more powdered sugar. For a fun twist, swap rainbow sprinkles for chocolate chips or crushed cookies. The best part of Dunkaroo Dip is the dippers! Here are some favorites: - Graham crackers: Their crunch is perfect for dipping. - Animal crackers: These add a nostalgic touch. - Fresh fruit slices: Try apples or strawberries for a fresh taste. - Crunchy pretzels: Their saltiness complements the sweet dip. These dippers make enjoying your homemade Dunkaroo Dip even more fun! You can find the full recipe for easy reference. To make this fun dip, gather your ingredients first. The main items are cream cheese, yogurt, and powdered sugar. You will also need vanilla extract and sprinkles. Prepare a medium-sized bowl and an electric mixer. This dip comes together in just a few steps. 1. Place the softened cream cheese, yogurt, and powdered sugar in your bowl. 2. Mix these on medium speed for 2-3 minutes. You want it nice and smooth. 3. Next, add the vanilla extract and almond extract. Blend them well into the mix. 4. Finally, gently fold in the rainbow sprinkles with a spatula. This adds color and fun! Spoon the dip into a nice serving bowl. Smooth the top with a spatula for a clean look. Add extra sprinkles on top for a bright garnish. Cover it with plastic wrap and chill in the fridge for at least 30 minutes. This helps the flavors blend. Serve it with graham crackers, animal crackers, fresh fruit, or pretzels. Enjoy this sweet treat with friends and family! For the full recipe, check the provided link. To make a smooth and creamy dip, always start with softened cream cheese. Cold cream cheese will not mix well. Blend your ingredients slowly at first. This helps to avoid lumps. Use an electric mixer for the best results. Mix for about 2-3 minutes. The goal is a fluffy texture. If you want extra creaminess, add more yogurt. For added flavor, consider using almond extract. It gives a nice twist to the dip. You can also try flavored yogurt. Vanilla is great, but strawberry or peach can work too. To make it more fun, mix in some crushed cookies. Chocolate or graham crackers add a tasty crunch. Don't forget the rainbow sprinkles! They add sweetness and color. Presentation makes this dip even more fun. Use a bright serving bowl to catch the eye. After smoothing the dip, add sprinkles on top. This makes it look festive. Serve with a variety of dippers on a large plate. Arrange them in a colorful way. You can even use cookie cutters for shapes on fruit. This makes the whole dish more inviting. For the full recipe, check out the details provided earlier. {{image_4}} You can change the flavor of your Dunkaroo dip with fun twists. Try adding different extracts. A bit of orange or coconut extract adds a new taste. You can also mix in flavored yogurt. Strawberry or peach yogurt makes it fruity and fresh. For a chocolate version, add cocoa powder. Use two tablespoons for a rich twist. Each flavor brings a new joy to the dip. To make this dip healthier, swap cream cheese for low-fat or dairy-free options. You can use Greek yogurt for a protein boost. Replace powdered sugar with honey or maple syrup for natural sweetness. This change lowers sugar and keeps the taste yummy. Adding chia seeds can give extra nutrients and texture. You still enjoy a tasty treat without the guilt. Kids love fun colors and flavors. Add extra sprinkles for a bright look. You might also mix in mini chocolate chips for a sweet surprise. Try using cookie crumbs or crushed cereal on top for crunch. You can even add fruits like mashed bananas or diced strawberries. These fun additions make the dip more exciting for little ones. To store your Dunkaroo Dip, place it in an airtight container. This keeps the dip fresh and tasty. Make sure you cover the dip tightly. You can store it in the fridge for up to five days. If you want to keep it longer, consider freezing it. To freeze the dip, first, scoop it into a freezer-safe container. Leave some space at the top since it may expand when frozen. Seal the container tightly to avoid freezer burn. The dip can last up to three months in the freezer. When ready to enjoy, move it to the fridge a day before serving. When reheating, allow the dip to thaw in the fridge overnight. After thawing, mix it well to restore its creamy texture. If needed, you can add a spoonful of yogurt to make it smoother. Avoid microwaving it, as this can change the texture and taste. Enjoy your delightful dip chilled or at room temperature! The best dippers for Dunkaroo Dip are fun and tasty! You can use: - Graham crackers - Animal crackers - Fresh fruit slices like apples or strawberries - Crunchy pretzels These dippers add great flavor and texture. Experiment with your favorites to find the perfect match! Yes, you can make Dunkaroo Dip ahead of time! It tastes even better after chilling. I recommend making it a few hours before your event. Just store it in the fridge in a covered bowl. This way, the flavors blend well, and it's ready when you are! To make Dunkaroo Dip dairy-free, swap the cream cheese and yogurt. Use dairy-free cream cheese and a plant-based yogurt. Coconut yogurt works great! Make sure to check the labels for added sugars or flavors. This way, you can enjoy a tasty treat without dairy! For the full recipe, check out the complete guide! In this post, I shared how to make a delicious Dunkaroo Dip. We reviewed the complete ingredient list, helpful measurements, and tasty dippers. I provided clear steps for mixing and serving. You learned tips for a creamy texture and ways to enhance flavor. I also shared fun variations and proper storage techniques. Dunkaroo Dip is simple to make and fun to share. With these tips, you're all set to create a treat everyone will love!

Viral Homemade Dunkaroo Dip Easy Delightful Recipe

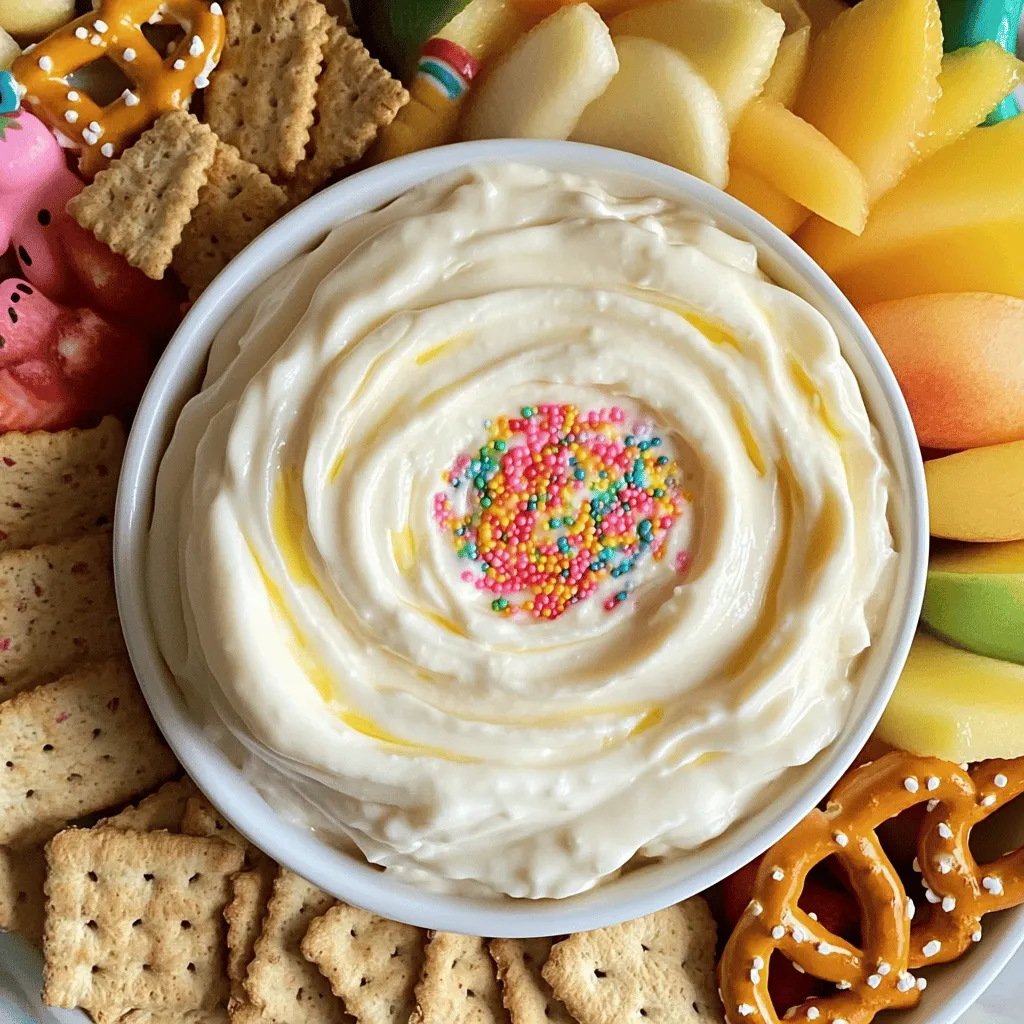
Get ready to dive into a treat that’s taking the internet by storm! This Viral Homemade Dunkaroo Dip is as

- Short-grain rice - Nori seaweed - Kimchi - Mozzarella cheese - Cucumber - Carrot - Eggs - Bamboo sushi mat - Non-stick skillet - Sharp knife Gathering the right ingredients is key to making Korean cheese kimchi kimbap. I like to use short-grain rice because it sticks better than long-grain rice. The nori seaweed adds a great flavor and texture. Kimchi brings spice and tanginess, while mozzarella cheese gives it a creamy touch. For added crunch, you can include cucumber and carrot. They not only taste great, but they also add color. If you want to include protein, beating a few eggs can make a nice omelet to add to the mix. You will need some supplies, too. A bamboo sushi mat helps you roll the kimbap tightly. A non-stick skillet works best for cooking the eggs, while a sharp knife ensures clean cuts when serving. All these ingredients and tools will help you craft this delicious dish with ease. For the full recipe, check out the provided instructions. Start by mixing the rice, sesame oil, and salt in a large bowl. I use 2 cups of cooked short-grain rice. Add 1 tablespoon of sesame oil and 1 teaspoon of salt. Make sure you mix it well. You want every grain of rice to be tasty and coated. This step is very important for the flavor. To cook the eggs, heat 1 tablespoon of vegetable oil in a non-stick skillet over medium heat. Pour in the 2 beaten eggs. Swirl the pan to spread the eggs into a thin layer. Cook until the edges set, then flip it gently. Cook for another minute and remove it from the pan. Let it cool on a plate. After it cools, slice it into thin strips. These strips add a nice texture. Lay a sheet of nori on a bamboo sushi mat or a clean cutting board. Make sure the shiny side is down. With slightly damp hands, take about 1 cup of seasoned rice. Spread it evenly over the nori, leaving 1 inch at the top. This space helps seal the kimbap later. Now, add the fun part! In the middle of the rice, layer the fillings: add chopped kimchi first, then shredded mozzarella cheese, julienned cucumber, julienned carrot, and the strips of omelet. To roll the kimbap, start from the bottom edge of the nori. Gently roll it away from you while pressing evenly. Keep rolling until you reach the exposed edge. Moisten this edge with a little water to seal it. This makes sure the roll stays together. Once you have your rolls, it’s time to slice! Use a sharp knife to cut each kimbap roll into bite-sized pieces. Apply gentle pressure to avoid squishing the filling. For presentation, arrange the sliced kimbap on a nice platter. Sprinkle sesame seeds on top for flavor. You can also add a small dish of soy sauce for dipping. Enjoy your delicious creation! How to choose fresh kimchi When selecting kimchi, look for vibrant colors. Fresh kimchi has a crisp texture and a balanced flavor. Avoid kimchi that smells overly sour or has a mushy texture. You can ask for a sample if buying from a store. This ensures you get the best quality for your kimbap. Selecting the right type of cheese Mozzarella cheese works best for this recipe. It melts well and adds a creamy texture. Choose whole milk mozzarella for a rich flavor. If you prefer a bit more zest, try pepper jack cheese. This adds a nice kick to your kimbap. Tips for even pressure while rolling While rolling, use your fingers to apply gentle, even pressure. This ensures a tight roll without squishing the filling. Start from the bottom edge and roll away from you. Keep the nori tight around the rice and filling. How to prevent the filling from spilling To avoid spills, don’t overfill your kimbap. Keep about one inch of space at the top edge of the nori. This helps seal the roll better. If you notice any filling creeping out, gently press it back in while rolling. Suggestions for additional seasonings You can add a splash of soy sauce or a sprinkle of gochugaru for more flavor. Consider adding a dash of sesame seeds to the rice for a nutty taste. Mixing in a bit of garlic powder also gives it a nice kick. Using garnishes effectively Garnishes can elevate your dish. Use sesame seeds to add crunch and visual appeal. You can also serve with pickled radish on the side for a refreshing contrast. A small dish of soy sauce is great for dipping too. For detailed steps to make this delicious dish, check out the Full Recipe. {{image_4}} You can get creative with the fillings in your kimbap. If you want a vegetarian option, try using avocado or pickled radish. Both add great flavor and texture. You can also mix in other veggies like bell peppers or spinach for color and taste. If you want protein, add beef or tofu. Cooked bulgogi beef brings a sweet and savory flavor. Tofu, on the other hand, is a great plant-based choice. Marinate it in soy sauce for extra taste. Both options give you tasty and filling kimbap. If you need gluten-free options, look for gluten-free soy sauce. This will help keep your kimbap tasty while meeting your needs. You can also use rice paper instead of nori for a different wrap. For vegan swaps, replace the cheese with a plant-based alternative. Nutritional yeast gives a cheesy flavor too. Instead of eggs, you can use scrambled tofu to mimic the texture. These changes make the kimbap suitable for everyone. Seasonal vegetables can add freshness to your kimbap. In spring, add fresh greens like asparagus. In summer, use thin slices of zucchini and bell peppers for crunch. Fall brings great options like roasted sweet potatoes or butternut squash. Different types of kimchi can spice things up too. For a milder taste, use white kimchi. If you like it hot, go for spicy kimchi. Each type can change the flavor of your kimbap, making it fun to experiment. For the full recipe, don’t forget to refer to the earlier section. Happy cooking! To keep your kimbap fresh, wrap it tight in plastic wrap. This helps keep air out. Store it in the fridge. Kimbap stays good for about three days. After that, the rice may dry out. You can reheat kimbap by using a microwave. Place the kimbap on a plate. Cover it with a damp paper towel to keep it moist. Heat for about 30 seconds. This method keeps the rice soft. You can also eat kimbap cold. It tastes great right from the fridge! If you want to freeze kimbap, it’s best to freeze it raw. Wrap each roll in plastic wrap. Then, place them in a freezer bag. They can last up to one month in the freezer. To cook, let the kimbap thaw in the fridge overnight. Cook them in a skillet for a few minutes. This way, you keep the flavors fresh and tasty! Kimbap is a Korean dish made of rice and fillings rolled in seaweed. It holds cultural significance as a popular snack or meal, often enjoyed during picnics or on the go. Kimbap is not sushi; it uses different ingredients and flavors. You can find many variations based on regional tastes. Yes, you can prepare Kimbap ahead of time. Store it in the fridge for up to a day. Wrap each roll in plastic wrap to keep it fresh. If you plan to eat it later, slice it just before serving. This helps maintain its shape and texture. For Kimbap, I recommend using napa cabbage kimchi. It has a crisp texture and a balanced flavor. You can also try radish kimchi for a different crunch. Make sure to drain it well to avoid excess moisture that can make the rice soggy. To make Korean Cheese Kimchi Kimbap at home, follow the steps in the full recipe. Start by mixing the rice with sesame oil and salt. Then, layer the kimchi, cheese, and other fillings on the rice. Roll it up gently and slice it for serving. Yes, there are gluten-free options for Kimbap. Use gluten-free soy sauce for dipping. Additionally, choose gluten-free nori. Most ingredients in Kimbap are gluten-free, so you can enjoy this dish without worry. To cut Kimbap, use a sharp knife for clean slices. Start by moistening the knife with water to prevent sticking. Slice each roll into bite-sized pieces, applying gentle pressure. Aim for even cuts to make the Kimbap look neat and appealing. Kimbap is a fun dish that combines unique flavors. We explored key ingredients, like short-grain rice and kimchi, and equipment needed for making it. I shared simple steps, from preparing rice to perfecting your roll. You can even customize fillings based on your taste! Remember to store any leftovers properly to enjoy later. Trying new variations keeps kimbap interesting. With practice, you can impress friends and family with delicious homemade kimbap. Now, it’s your turn to get creative and enjoy this delightful dish!

Korean Cheese Kimchi Kimbap Flavorful and Easy Recipe

Are you ready to try a fun twist on a classic dish? Korean Cheese Kimchi Kimbap combines rich flavors in

- Sirloin steak - Unsalted butter - Garlic - Fresh rosemary - Salt and pepper - Vegetable broth - Heavy cream - Parmesan cheese - Rigatoni pasta - Mozzarella cheese - Chives You can swap sirloin steak for flank or skirt steak if needed. For dairy-free options, use coconut cream and nutritional yeast instead of heavy cream and cheese. If you want to change the herbs, try thyme or basil for a different flavor. To make this dish, you will need: - Skillet - Pot for boiling pasta - Colander - Measuring cups and spoons Using the right tools makes cooking easier and more fun. A good skillet helps sear the steak well, while a pot with plenty of space ensures the rigatoni cooks evenly. These tools will help you create a meal that impresses everyone at the table. For the Full Recipe, you can find all the steps combined, making it easy to follow along. To make the rigatoni, start by boiling water in a big pot. Add a good amount of salt. This step is key. The salt helps flavor the pasta as it cooks. Bring the water to a rolling boil. Then, add the rigatoni pasta. Cook it for about 10 to 12 minutes. You want it to be al dente, which means it should still have a slight bite. Once done, drain the pasta in a colander and set it aside. While the pasta cooks, let’s prepare the steak. First, cut the sirloin steak into bite-sized cubes. Then, season these cubes with salt and black pepper. Make sure every piece gets coated well. This helps bring out the steak's natural flavor. Now, heat a large skillet on medium-high heat. Add 2 tablespoons of butter. Once the butter is melted and sizzling, add the steak cubes. Don't crowd the pan; cook in batches if needed. Sear each side for about 2 to 3 minutes. This creates a lovely brown crust. Next, we make the garlic butter sauce. After searing the steak, it’s time to add flavor. Stir in the minced garlic and chopped rosemary. Sauté for a minute, but keep an eye on it to avoid burning. Then, pour in 1 cup of vegetable broth and 1 cup of heavy cream. Stir well and let it simmer for 3 to 4 minutes. This allows the sauce to thicken. Now, gradually add in the grated Parmesan cheese. Stir until it melts into a creamy sauce. For a richer flavor, toss in the remaining butter. Mix until well combined. Now, you’re ready to follow the Full Recipe and bring this delicious dish to life! For perfect steak tips, aim for a cooking temperature of 130°F to 135°F for medium-rare. Use a meat thermometer to check. This ensures a tender bite without being chewy. Avoid overcooking by removing the steak from heat as soon as it reaches your desired doneness. Letting it rest also helps keep it juicy. To achieve a silky sauce, add the heavy cream slowly. Stir it in gently to avoid lumps. As you mix, the sauce will thicken nicely. When combining pasta and sauce, use tongs for even distribution. This helps every noodle get a good coating of that creamy goodness. Pair the dish with a fresh side salad or grilled vegetables for balance. For presentation, serve in wide bowls. Top with extra chives and Parmesan for a pop of color. A drizzle of olive oil can elevate the look and flavor, making your meal visually appealing and delicious. {{image_4}} You can add extra veggies to your Garlic Butter Steak Tips with Cheesy Rigatoni. Try bell peppers, zucchini, or spinach for more color and flavor. These veggies cook quickly and add nutrition. You can also use different pasta shapes. Penne, fusilli, or even macaroni can work well. Each shape holds the sauce differently, giving you a new taste experience. To spice things up, consider adding a pinch of red pepper flakes or a dash of hot sauce. This adds warmth without overpowering the dish. You can also try different cheese options or blends. Gouda, cheddar, or a mix of Italian cheeses can create unique flavors. Experiment with what you have on hand to find your favorite mix. If you need gluten-free options, use gluten-free pasta. Many brands offer great alternatives that taste good. For a low-carb version, try zucchini noodles or spaghetti squash instead of pasta. These options keep the dish light and fresh while still being delicious. You can enjoy the same great flavors without the carbs. To keep your Garlic Butter Steak Tips with Cheesy Rigatoni fresh, store leftovers properly. First, let the dish cool down to room temperature. Then, place it in an airtight container. This helps prevent any strong odors from mixing with your food. You can store the dish in the fridge for up to three days. For best taste, eat it sooner rather than later. When you reheat your leftovers, aim to keep them tasty. The best method is to use a skillet on low heat. Stir often for even warmth. You can also add a splash of cream or broth to keep it creamy. Reheating usually takes about 5 to 10 minutes. If you prefer using a microwave, do so in short bursts of 30 seconds. Stir in between bursts for even heating. Yes, you can freeze this dish! To do this, let it cool completely. Then, transfer it to a freezer-safe container. Make sure to label it with the date, so you remember when you made it. You can freeze it for up to 3 months. When you’re ready to eat, thaw it in the fridge overnight. Reheat it as mentioned above for the best results. Enjoy your meal just like it was freshly made! To marinate steak for this recipe, you want bold flavors. A simple mix of olive oil, salt, and pepper works wonders. You can also add garlic or herbs for extra taste. Let the steak sit in the marinade for at least 30 minutes, or up to a few hours. This allows the meat to absorb the flavors. If you have time, marinating overnight is best. Just remember to keep it in the fridge! Yes, you can make Garlic Butter Steak Tips ahead of time. Cook the steak and pasta, then let them cool. Store them in separate airtight containers in the fridge for up to three days. When you are ready to eat, just reheat them in a skillet. Add a splash of broth or cream to keep everything moist. The flavors will still be delicious! You can easily make a vegetarian version of this dish. Instead of steak, use hearty vegetables like mushrooms or eggplant. Sauté them in garlic and butter for great flavor. For the sauce, swap heavy cream with coconut cream or a cashew cream blend. This gives a rich texture without dairy. For pasta, stick with rigatoni or any shape you prefer. Enjoy the same yummy flavors with these veggie swaps! This article covered essential ingredients needed for creamy garlic butter steak tips and rigatoni. We explored ingredient substitutions, tools required, and step-by-step cooking instructions. I shared tips for perfect steak and creamy sauces, along with ideas for serving and variations. Remember, you can customize this dish to fit your tastes and dietary needs. Use the storage and reheating guidelines to keep your meal fresh. With these techniques, your dish will shine at any table. Enjoy each bite of your delicious creation!

Garlic Butter Steak Tips with Cheesy Rigatoni Delight

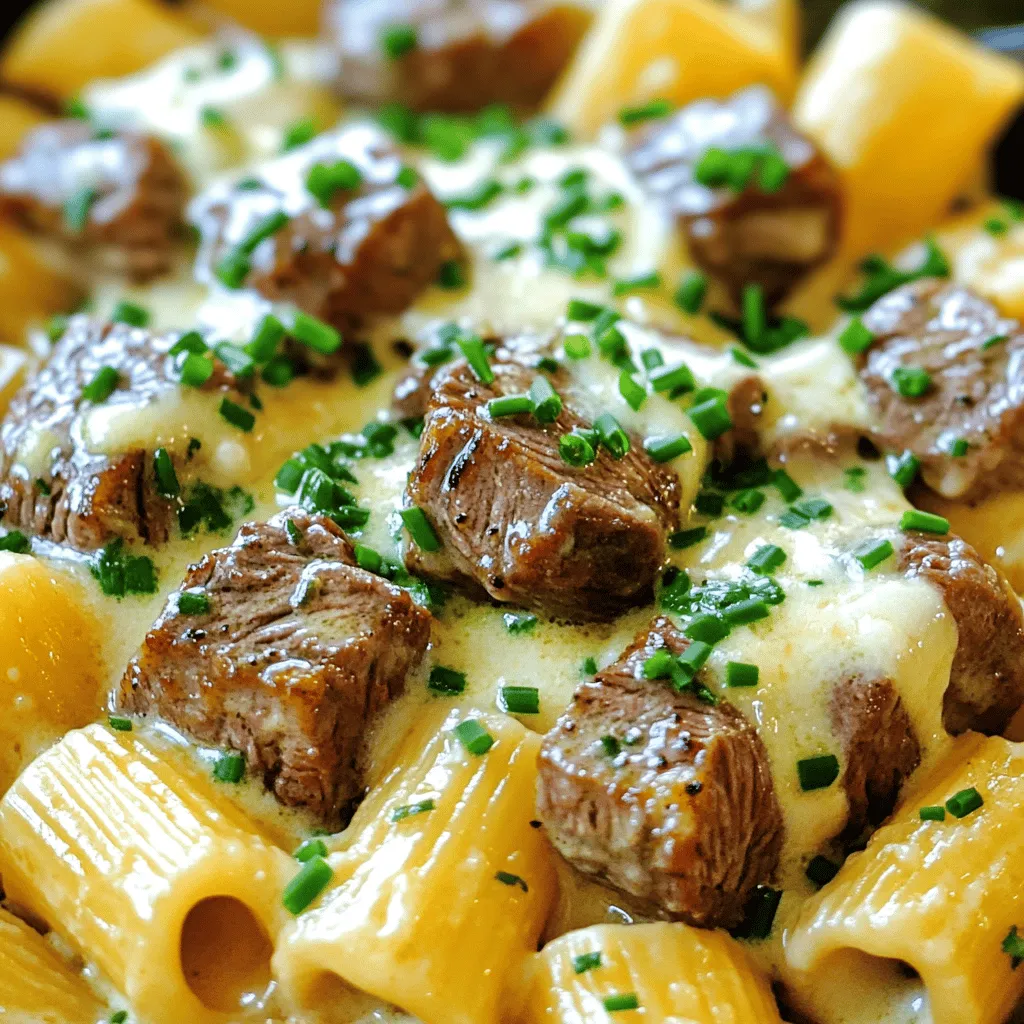
Get ready to treat your taste buds! In this blog post, I’ll guide you through making Garlic Butter Steak Tips

When making no-bake mini key lime pies, the right ingredients are key. Let’s look at what you need. - 1 cup graham cracker crumbs - 1/4 cup granulated sugar - 1/2 teaspoon ground cinnamon - 1/4 cup unsalted butter, melted - 1 (8 oz) package cream cheese, softened to room temperature - 1 can (14 oz) sweetened condensed milk - 1/2 cup freshly squeezed key lime juice - Zest of 2 key limes These ingredients create that delicious, creamy filling and a crunchy crust you crave. The graham cracker crumbs give the pies a sweet and buttery base. The sweetened condensed milk adds a rich creaminess. Fresh key lime juice brings that bright, zesty flavor. - Whipped cream - Key lime slices for garnish - Ground cinnamon While optional, these ingredients make your mini pies even better. Whipped cream adds fluffiness on top. Key lime slices and zest look pretty and add a fresh touch. A sprinkle of cinnamon can enhance the overall flavor. For the full recipe, you can refer to the detailed instructions above. Enjoy making these delightful treats! To start, gather your ingredients for the crust. In a medium bowl, combine: - 1 cup graham cracker crumbs - 1/4 cup granulated sugar - 1/2 teaspoon ground cinnamon Stir these together until they mix well. Next, pour in: - 1/4 cup unsalted butter, melted Use a fork to mix until the texture looks like wet sand. This step is key for a good crust. Now, take a muffin tin and press the crumb mixture into each cup. Make sure to pack it firmly for a solid base. Now, let’s make the filling. In a large bowl, beat: - 1 (8 oz) package cream cheese, softened to room temperature Use an electric mixer on medium speed until smooth. Slowly add: - 1 can (14 oz) sweetened condensed milk Beat this until creamy. Make sure there are no lumps! Next, mix in: - 1/2 cup freshly squeezed key lime juice - Zest of 2 key limes Keep mixing until the filling is velvety and smooth. It’s time to fill the crusts! Spoon or pipe the key lime mixture into each crust. Fill them to the top for that perfect look. Then, place the muffin tin in the refrigerator. Chill for at least 4 hours. This step is crucial for the pies to set properly. Once your mini pies have set, remove them from the muffin tin. If you used a silicone tin, they should pop out easily. If you used a metal tin, run a butter knife around the edges to help. Place the pies on a serving platter. For the finishing touch, add a dollop of whipped cream on each pie. Garnish with a slice of key lime and a sprinkle of lime zest. These little treats look fantastic and taste even better! For the full recipe, check the provided details. If you run out of graham crackers, try using crushed cookies. Vanilla wafers or digestive biscuits work well. They add a unique flavor twist. For lime juice, fresh key limes give the best taste. You can use regular lime juice, but it won’t be as tangy. Key limes are smaller and have a distinct flavor. They make your pies bright and zesty. Start with cream cheese at room temperature. This helps it blend easily. If it's cold, you'll get lumps. Use an electric mixer for best results. Beat the cream cheese first until creamy. When adding sweetened condensed milk, pour it in slowly. This keeps the filling smooth. Mix it well before adding lime juice. This method ensures a silky texture. Chill your mini pies for at least four hours. This time helps them set properly. If you want a quicker method, place them in the freezer for one hour. Then, move them to the fridge to finish chilling. Ensure they are covered to prevent drying out. This keeps the texture creamy and fresh. Enjoy your delightful mini key lime pies! For the full recipe, check out the detailed instructions above. {{image_4}} You can easily switch up the flavors of your no-bake mini key lime pies. One fun option is to make coconut key lime pies. Just add shredded coconut to the crust or filling. This gives your pies a tropical twist. Another idea is to create berry-infused versions. You can fold in fresh strawberries, blueberries, or raspberries into the filling. This adds a burst of color and flavor. You can also top the pies with berry compote for a sweet finish. If you need gluten-free options, swap the graham crackers for gluten-free crumbs. Almond flour or crushed nuts can work great too. This keeps the crust tasty and safe for everyone. For vegan adaptations, replace cream cheese with a plant-based alternative. Use coconut cream instead of sweetened condensed milk. This makes the pies creamy and dairy-free while still delicious. Toppings can take your mini pies to the next level. You can use whipped cream for a light and fluffy touch. Fresh fruit like key lime slices or berries also adds a nice visual appeal. Consider pairing these treats with side dishes like fruit salad or a light sorbet. They balance the tartness of the pies and make for a refreshing meal. For the full recipe, check out the details above. Enjoy making your no-bake mini key lime pies! To store leftover mini key lime pies, place them in an airtight container. This keeps the pies fresh and prevents them from absorbing other smells. They last up to five days in the fridge. Always ensure they are covered well to maintain their taste. You can freeze mini key lime pies for future enjoyment. To do this, wrap each pie in plastic wrap. Then, place them in a freezer-safe bag or container. They can stay frozen for up to two months. When you’re ready to enjoy them, take the pies out and let them thaw in the fridge overnight. This keeps the texture smooth. You can serve them chilled or at room temperature. For the best taste, add fresh whipped cream and a slice of lime just before serving. Want to make it a fun dessert? Consider using colorful plates for a bright presentation. No-bake mini key lime pies can last up to five days in the fridge. Store them in an airtight container. This keeps them fresh and tasty. Cover them well to prevent drying out. Yes, you can use bottled lime juice. However, fresh lime juice provides a better flavor. Fresh juice is bright and tangy. Bottled juice might taste dull. It can also change the texture slightly. For the best taste, I recommend using fresh key limes. If you don’t have a muffin tin, use small cups or ramekins. You can also shape the crust with a flat bottom glass. Press the crust mixture into these containers instead. Just ensure they are evenly packed. Key limes are smaller and have a stronger flavor. They are more aromatic and less bitter than regular limes. Key limes are often used in desserts, like key lime pie. Regular limes are larger and more common in grocery stores. Both can work in recipes, but key limes give a special taste. No-bake mini key lime pies are easy and fun to make. We covered the key ingredients like graham crackers and sweetened condensed milk. I shared steps for preparing the crust, making the filling, and assembling your pies. You learned tips for smooth filling and chilling. I also explored delicious variations and how to store your treats. These pies are perfect for any gathering. Dive into your kitchen and enjoy creating these tasty bites. They’re sure to impress your friends and family!

No-Bake Mini Key Lime Pies Delightful and Easy Treat

Ready to whip up a treat that’s both easy and delicious? These No-Bake Mini Key Lime Pies are perfect for

To make a classic Black Forest Cake, you will need these key ingredients: - 1 3/4 cups all-purpose flour - 2 cups granulated sugar - 3/4 cup unsweetened cocoa powder - 1 1/2 teaspoons baking soda - 1 1/2 teaspoons baking powder - 1 teaspoon salt - 2 large eggs - 1 cup buttermilk - 1/2 cup vegetable oil - 2 teaspoons vanilla extract - 1 cup boiling water - 1 cup heavy whipping cream - 2 tablespoons powdered sugar - 1 teaspoon vanilla extract (for the whipped cream) - 1 jar (24 oz) morello cherries, drained (reserve juice) - Dark chocolate shavings (for garnish) These ingredients combine to create a rich cake with deep chocolate flavor and sweet cherries. The whipped cream adds a lovely lightness. If you need alternatives, here are some easy swaps: - Use almond flour for a gluten-free option. - Swap buttermilk with yogurt or milk plus vinegar. - Try coconut oil instead of vegetable oil for a different flavor. - Use fresh cherries if you prefer instead of morello cherries. These substitutions can still yield a delicious cake while meeting dietary needs. Gather these tools to make your baking easier: - Two 9-inch round cake pans - Mixing bowls - Electric mixer - Whisk - Measuring cups and spoons - Rubber spatula - Wire rack for cooling Having the right tools will help you work efficiently and create a stunning Black Forest Cake. You can find the full recipe for this mouthwatering cake to guide you through the process. First, set your oven to 350°F (175°C). This step ensures even baking. While the oven heats, prepare your cake pans. Use two 9-inch round pans. Grease them with butter or shortening. After greasing, lightly dust them with flour. This step helps the cakes come out easily later. Now, grab a large mixing bowl. In it, whisk together these dry ingredients: - 1 3/4 cups all-purpose flour - 2 cups granulated sugar - 3/4 cup unsweetened cocoa powder - 1 1/2 teaspoons baking soda - 1 1/2 teaspoons baking powder - 1 teaspoon salt Make sure they blend well. Once mixed, it's time to add the wet ingredients. Add these to the bowl: - 2 large eggs - 1 cup buttermilk - 1/2 cup vegetable oil - 2 teaspoons vanilla extract Use an electric mixer on medium speed. Beat the mixture for about 2 minutes. Your batter should look smooth and creamy. Next, slowly pour in 1 cup of boiling water while mixing at low speed. Don't worry if the batter seems thin; that's normal. Now, divide the batter evenly between the prepared pans. Place the pans in the oven. Bake for 30 to 35 minutes. To check if they're done, insert a toothpick in the center. If it comes out clean, your cakes are ready. After baking, let the cakes cool in the pans for 10 minutes. Then, carefully remove them from the pans. Transfer the cakes to a wire rack to cool completely. This step is vital for a great texture. Once cool, you can slice each cake in half to create layers for your Black Forest Cake. For the full recipe, refer to the details provided earlier. To make the best whipped cream, start with cold equipment. Use a chilled bowl and beaters. This helps the cream whip faster. Use heavy whipping cream for the best texture. Add powdered sugar and vanilla extract for sweetness. Beat until you see medium peaks. This means the cream holds its shape well. Don't overmix, or it will turn into butter. If you have leftover cake, store it properly. Wrap it tightly in plastic wrap. This keeps the cake moist. You can also place it in an airtight container. If you want to keep it longer, freeze it. Just slice the cake first, so you can grab single pieces later. When ready to eat, let it thaw in the fridge. For the best flavor, use fresh cherries if possible. They add a bright taste to the cake. The cherry juice is key too. Drizzle it between layers for extra moisture. Dark chocolate shavings give a rich taste. They balance the sweetness of the whipped cream. Don’t forget to chill the cake before serving. This enhances all the flavors and makes it even more delicious. For the full recipe, check out the detailed instructions to guide you through the process. {{image_4}} You can make a vegan version of Black Forest cake easily. Replace eggs with flaxseed meal. Use 1 tablespoon of flaxseed mixed with 2.5 tablespoons of water for each egg. For buttermilk, mix plant milk with a tablespoon of vinegar. Use coconut whipping cream for the topping. This gives a light and fluffy texture. The cake will taste just as rich and tasty. For those avoiding gluten, swap the all-purpose flour with a gluten-free blend. Look for one that has xanthan gum, or add 1 teaspoon per cup of flour. This helps the cake rise and hold together. Use gluten-free cocoa powder too, as some brands may contain gluten. It’s a great way to enjoy this classic dessert without worry. Feel free to experiment with flavors. Instead of cherries, you can use raspberries or strawberries. This adds a new twist to the cake. You can also add a hint of almond extract for a unique taste. For a chocolate boost, add chocolate chips to the batter. Each of these changes can give your Black Forest cake a personal touch. If you want a lighter option, try using yogurt instead of oil. This keeps the cake moist while cutting some fat. For a full recipe, check out the details above. To keep your Black Forest Cake fresh, store it in an airtight container. This helps prevent the cake from drying out. If you don’t have a container, wrap it tightly with plastic wrap. Make sure to cover it well to keep air out. Place the wrapped cake in the fridge. The cold helps maintain its rich flavor and moist texture. Avoid putting it in the door, as that area can be warmer. You can freeze your Black Forest Cake if you want to save some for later. First, let the cake cool completely. Then, slice it into individual pieces or leave it whole. Wrap each piece or the whole cake in plastic wrap. After that, wrap it again in aluminum foil to protect it from freezer burn. Label the package with the date. You can freeze it for up to three months. When you're ready to enjoy it, thaw it in the fridge overnight. If stored properly, your Black Forest Cake can last for about four to five days in the fridge. After that, the flavor may start to fade. If you notice any changes in smell or texture, it's best to discard it. Always trust your senses when it comes to food safety. Enjoy your baking journey with this delightful cake! For the full recipe, check the earlier sections. Black Forest Cake comes from Germany. It is known as Schwarzwälder Kirschtorte in German. This cake has layers of chocolate, cherries, and cream. The name comes from the Black Forest region in Germany. This area is famous for its dark, rich cherries and Kirsch, a cherry brandy. The cake first appeared in the early 20th century. Today, it is loved worldwide for its unique taste. Yes, you can make Black Forest Cake ahead of time. You can bake the cake layers a day before serving. Just store them in an airtight container. Wait to assemble the cake until the day you serve it. This keeps the layers fresh and moist. You can also prepare the whipped cream a few hours in advance. Just keep it in the fridge until you are ready to use it. Traditional Black Forest Cake uses morello cherries. These cherries are dark and tart. They give the cake its signature flavor. You can find them in jars at most grocery stores. Be sure to drain and reserve the juice for soaking the cake. If morello cherries are hard to find, you can use other dark cherries or even frozen ones. To make a healthier Black Forest Cake, consider these tips: - Use whole wheat flour instead of all-purpose flour. - Replace granulated sugar with coconut sugar or honey. - Swap heavy cream for Greek yogurt in the whipped topping. - Use less cherry juice for soaking the layers. - Add more fresh fruit between the layers for added nutrition. These swaps can help lower calories while keeping the flavor good. This blog post covered how to make a great Black Forest Cake. We discussed traditional ingredients and offered smart substitutions. You learned useful tips for mixing, baking, and cooling the cake. We shared ways to perfect the whipped cream and store leftovers. I also shared variations, including vegan and gluten-free options. In closing, exploring this classic dessert opens doors to tasty twists. Enjoy making and sharing your cake!

Black Forest Cake Irresistible Delight to Bake

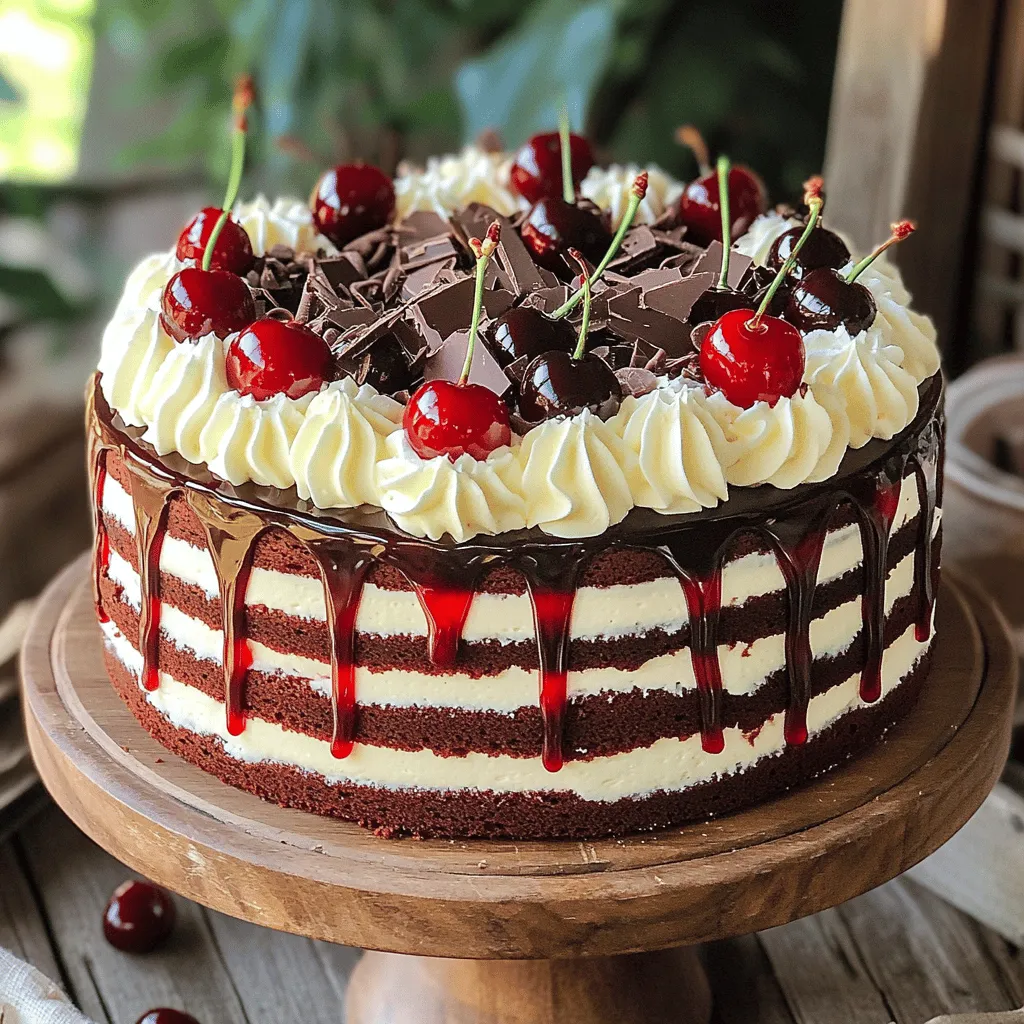
If you’re ready to take your baking skills to the next level, Black Forest Cake is your answer! This classic

- 3 cups cooked jasmine rice - 2 tablespoons vegetable oil - 1 medium onion, diced - 2 cloves garlic, minced - 1 cup mixed vegetables (e.g., peas, carrots, corn) - 2 large eggs, beaten - 2 tablespoons soy sauce - 1 tablespoon citrus zest - 2 tablespoons fresh citrus juice - Salt and pepper, to taste - Optional garnishes (e.g., cilantro, lime or orange slices) Easy fried rice is a simple dish. You need some key ingredients for great flavor. You should use jasmine rice. It adds a nice texture. Cooked rice is best if it’s a day old. This helps it fry better. You will also need oil. It helps to cook the vegetables and eggs. A medium onion and minced garlic bring in lots of flavor. Mixed vegetables add color and nutrition. You can use frozen peas, diced carrots, and corn. They cook quickly and taste great. Don’t forget the eggs! They add protein and richness to the dish. Soy sauce gives fried rice its savory taste. The citrus zest and juice add a bright, fresh flavor. You can use lime or orange, depending on your taste. Lastly, season with salt and pepper for a balanced taste. - Alternatives for cooked jasmine rice - Other vegetable options - Protein boosts such as chicken or shrimp If you don’t have jasmine rice, you can use long-grain rice or brown rice. These options work too. You can also mix in other vegetables. Bell peppers, broccoli, or snap peas can be fun choices. Looking for protein? You can add cooked chicken, shrimp, or tofu. Just chop them small and toss them in with the veggies. This makes the dish heartier. For the full recipe, check the section above. Enjoy your cooking! To make great fried rice, start with the rice. Use cooked jasmine rice that is day-old. This rice is drier and will fry better. If you use fresh rice, it may turn mushy. Next, chop your vegetables. You can use any mix you like. I often choose frozen peas, diced carrots, and corn. Dice one medium onion finely and set it aside. This will add a nice flavor to your dish. For cooking, grab a large skillet or a wok. Heat 2 tablespoons of vegetable oil over medium-high heat. When the oil is hot, add the diced onion. Cook for about 2-3 minutes until the onion is soft and clear. Now, add 2 cloves of minced garlic. Stir for about 30 seconds until you smell that wonderful aroma. Next, add your mixed vegetables. Cook them for 3-4 minutes, stirring often. You want them tender and warm. Push the veggies to one side of the pan. Pour in 2 beaten eggs into the empty space. Scramble the eggs until they are fully cooked. After that, mix the eggs in with the vegetables. Add 3 cups of cooked jasmine rice. Use a spatula to break up any clumps. Make sure the rice mixes well with the eggs and veggies. Pour in 2 tablespoons of soy sauce, 1 tablespoon of citrus zest, and 2 tablespoons of fresh citrus juice. Stir everything together to blend the flavors. Let the rice cook for another 3-5 minutes. This will help it get a nice crisp on the bottom. If you want, cover the skillet for a minute to create some steam. Before serving, taste your fried rice. Add salt and pepper to suit your taste. Just before serving, fold in some sliced green onion for a fresh touch. If you want a pop of color, add fresh cilantro on top. To achieve that crispy texture, let the rice sit in the pan a bit longer. You can also stir less frequently after adding the rice. This allows it to crisp up nicely. Enjoy your delicious fried rice with vibrant, zesty flavors! Using day-old rice is key for great fried rice. Freshly made rice is too wet. It clumps together and doesn’t fry well. Day-old rice dries out a bit in the fridge. This gives it a better texture and allows it to fry up nice and crisp. Heat management is also very important. Use high heat when cooking. This helps to add flavor and keeps the rice from getting soggy. Make sure your skillet or wok is hot before adding oil. When the oil shimmers, it is ready for the next steps. One common mistake is using wet rice. Wet rice can make your dish mushy. Always use rice that has dried a bit in the fridge. If you don’t have day-old rice, try spreading fresh rice on a plate. Let it cool for 30 minutes before using. Another mistake is overcooking vegetables or eggs. For the best taste, cook your veggies until they are just tender. If you cook them too long, they lose their crunch and color. Scramble the eggs quickly, then mix them into the rice. This keeps them fluffy and light. To add aroma and depth of flavor, use fresh herbs and spices. A bit of ginger or sesame oil can elevate your dish. Adding a splash of rice vinegar can also add zing. You can customize flavors with spices. Try adding chili flakes for heat or turmeric for color. You can even add different sauces, like teriyaki, for a twist. Experimenting with flavors makes your fried rice unique and exciting. {{image_4}} Fried rice is super fun because you can change it up! One tasty option is Sizzling Citrus Fried Rice. This style adds bright flavors with citrus zest and juice. Here’s what you’ll need for this recipe: - 3 cups cooked jasmine rice - 2 tablespoons vegetable oil - 1 medium onion, diced - 2 cloves garlic, minced - 1 cup mixed vegetables - 2 large eggs, beaten - 2 tablespoons soy sauce - 1 tablespoon citrus zest - 2 tablespoons fresh citrus juice - 1 green onion, sliced thinly - Salt and pepper, to taste - Optional: Fresh cilantro, chopped You can also try other flavor profiles. Think teriyaki fried rice with sweet soy sauce. Or, go Thai basil for a fresh twist! Just swap out the soy sauce for a different sauce to fit your taste. If you're vegetarian or vegan, you can adapt fried rice easily. Skip the eggs and use tofu for protein. Just scramble the tofu instead of the eggs. For gluten-free options, use tamari instead of soy sauce. It gives a similar taste without the gluten. Using seasonal veggies makes fried rice even better! In spring, add asparagus and peas. In summer, toss in fresh corn and bell peppers. In fall, try squash or sweet potatoes. Adding fresh herbs like basil or cilantro gives a nice pop of flavor. This keeps your fried rice fresh and exciting all year round! To keep your fried rice fresh, cool it first. Then, transfer it to a clean container. Use airtight containers to store it in the fridge. This helps keep moisture out. Store your fried rice for up to four days. For best results, label the container with the date. You can reheat fried rice safely in two main ways: the microwave or the stovetop. If you use the microwave, place the rice in a bowl. Add a splash of water to keep it moist. Cover with a microwave-safe lid. Heat for 1-2 minutes, stirring halfway through. For stovetop reheating, use a skillet on medium heat. Add a bit of oil to prevent sticking. Stir the rice frequently for even heating. This method keeps the texture better. Make sure to check that it’s heated through. To enhance flavor, add a dash of soy sauce while reheating. You can store fried rice in the fridge for about three to four days. Make sure to cool it first. Once cooled, place it in an airtight container. This keeps it fresh and safe to eat. Always check for any odd smells or changes in color before cooking it again. Yes, you can freeze fried rice. To freeze, let it cool completely. Then, place it in a freezer-safe bag or container. Press out any extra air to prevent freezer burn. It can last for about one to two months. When you want to use it, thaw it in the fridge overnight before reheating. The best rice for fried rice is day-old jasmine rice. It has a firm texture that holds up well during cooking. Freshly cooked rice can be too soft and sticky. If you don’t have jasmine rice, you can use long-grain rice. This helps keep the grains separate and fluffy. In this blog post, I shared how to make easy fried rice with simple steps and tips. I covered key ingredients and substitutions, ensuring you can customize it to your taste. Remember, using day-old rice is crucial for perfect texture. Avoid common mistakes like overcooking or using wet rice. With these guidelines, you can create delicious fried rice every time. Experiment with seasonal veggies to keep it fresh and exciting. Now, grab your ingredients and start cooking! Enjoy your tasty fried rice adventures!

Easy Fried Rice Recipe Quick and Flavorful Dish

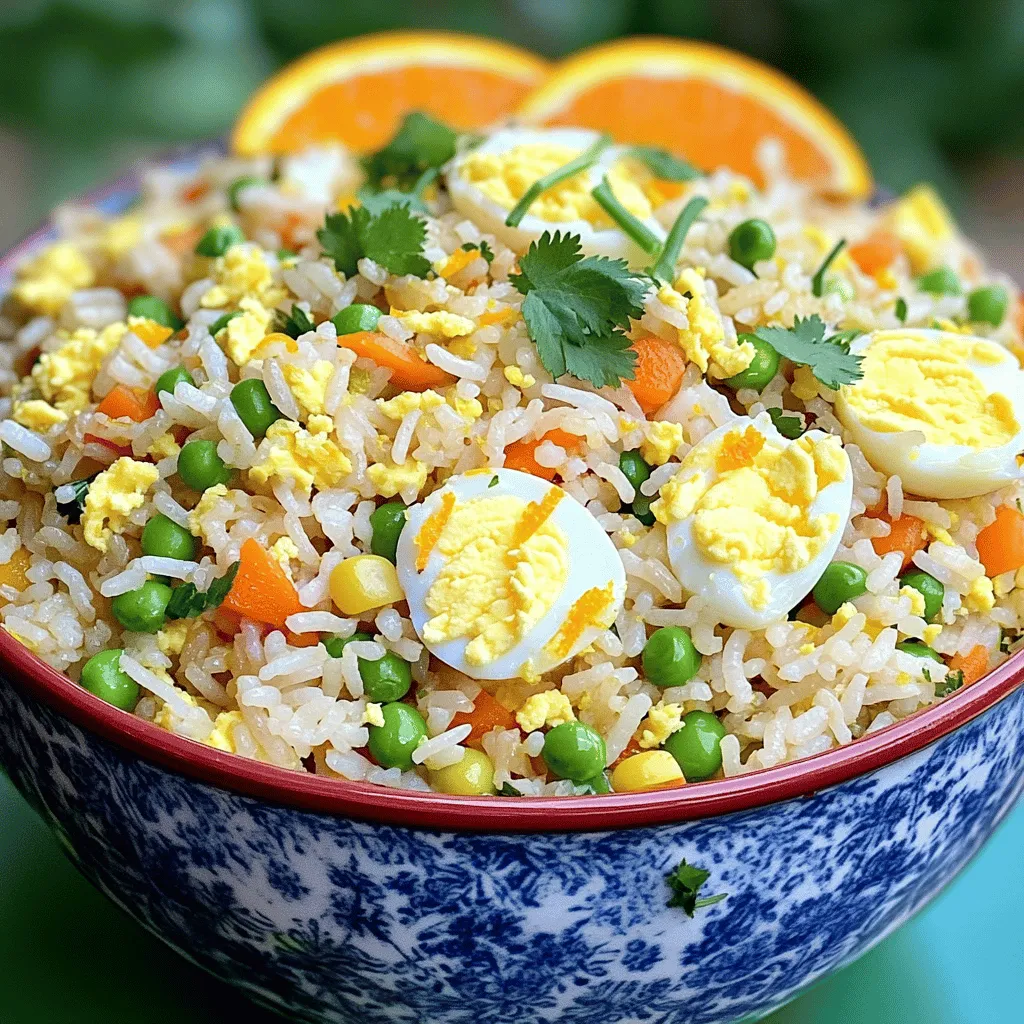
Are you ready to whip up a delicious meal in no time? This easy fried rice recipe delivers quick, flavorful

- 1 ½ cups graham cracker crumbs - ½ cup unsalted butter, melted - ¼ cup packed brown sugar - 1 teaspoon ground cinnamon - 16 oz cream cheese, softened to room temperature - 1 cup granulated sugar - 3 large eggs, at room temperature - 2 ripe bananas, mashed until smooth - 1 teaspoon pure vanilla extract - ½ cup sour cream - ¼ cup all-purpose flour - ½ teaspoon baking powder - 1 cup granulated sugar - 6 tablespoons unsalted butter, cut into pieces - ½ cup heavy cream, warmed - Pinch of fine sea salt - ½ cup chopped mixed nuts (could include walnuts, pecans, or almonds) - 1 ripe banana, sliced for garnish This Banana Caramel Nut Cheesecake uses simple ingredients for a rich flavor. The crust blends graham cracker crumbs with melted butter, brown sugar, and cinnamon for a sweet base. The filling combines cream cheese, sugar, eggs, and ripe bananas. This gives the cheesecake a creamy texture. The caramel sauce adds a golden touch. It starts with granulated sugar melted until amber. Next, you add butter and heavy cream for a smooth finish. Lastly, the topping of mixed nuts and banana slices adds crunch and flair. For the full recipe, check the detailed instructions. It’s a fun process that leads to a delicious dessert! Start by mixing the crust ingredients. In a medium bowl, combine the graham cracker crumbs, melted butter, brown sugar, and ground cinnamon. Stir until the mixture looks like wet sand. Press this mixture into the bottom of a 9-inch springform pan. Make sure it is even and compact. Bake the crust in a preheated oven at 350°F (175°C) for 10 minutes. Once done, take it out and let it cool completely while you prepare the filling. Next, make the cheesecake filling. In a large bowl, beat the softened cream cheese and granulated sugar together using an electric mixer. Mix until smooth and creamy. Add the mashed bananas and vanilla extract, and mix until combined. Now, add the eggs one at a time, mixing well after each. Finally, fold in the sour cream, flour, and baking powder. Be careful not to overmix, as this can affect the texture. Pour the cheesecake filling over the cooled crust. Spread it evenly using a spatula. Bake in the oven at 325°F (160°C) for about 50 to 60 minutes. The center should be set but still have a slight jiggle. After baking, turn off the oven but leave the door ajar. Let the cheesecake cool for about 1 hour. Once cooled, move it to the fridge to chill for at least 4 hours or overnight for best results. While the cheesecake chills, prepare the caramel sauce. In a medium saucepan, heat the sugar over medium heat. Stir it constantly until it melts and turns a golden amber color. Carefully add the butter pieces and stir until melted. Gradually whisk in the warmed heavy cream, mixing until smooth. Add a pinch of sea salt, stir, and remove from heat. Let the caramel sauce cool slightly before using. Once the cheesecake is fully chilled, it’s time to assemble. Pour a generous layer of the caramel sauce over the top. Make sure it reaches the edges. Next, sprinkle the chopped mixed nuts evenly over the caramel. This adds a nice crunch and flavor. For the final touch, decorate the cheesecake with banana slices arranged in a circle on top of the nuts. When it’s time to serve, slice the cheesecake. Drizzle any remaining caramel sauce over each slice for an extra treat. Serve each slice on a dessert plate for a lovely presentation. To make the best crust, start with the right texture for your crumbs. Use fresh graham cracker crumbs, crushed finely. You want them to feel like wet sand when mixed with butter. This helps the crust hold together well. Press the mixture firmly into your springform pan. An even layer is key for a great base. Bake it until lightly golden, then let it cool completely before adding the filling. Room temperature ingredients are crucial for a smooth filling. Take cream cheese and eggs out of the fridge ahead of time. Mix them until fluffy but avoid overmixing. This ensures a creamy texture without bubbles. Overmixing can cause cracks in your cheesecake, which we want to avoid. When making caramel, preventing crystallization is important. Stir the sugar constantly until it melts, but don’t stir too much once it starts to color. Use a clean brush dipped in water to wash down any sugar crystals on the pan's sides. For best flavor, serve the caramel warm, just a bit above room temperature. This enhances the taste and makes it easy to pour over your cheesecake. {{image_4}} You can easily change the flavor of your cheesecake. Try adding chocolate or peanut butter for a rich twist. Just mix in ½ cup of cocoa powder or ½ cup of creamy peanut butter into the filling. This adds depth and a fun flavor you will love. You can also swap nuts for different types. Instead of walnuts, try pecans or almonds. Each nut brings its own taste and texture. This choice lets you customize your cheesecake to match your taste. If you need a gluten-free crust, use almond flour or gluten-free graham crackers. Both options work well and keep the crust delicious. Just mix them with melted butter and follow the same steps. For dairy-free cheesecake, use vegan cream cheese and coconut cream. These alternatives make the cheesecake creamy without dairy. You can still enjoy the same great taste and texture. Pairing your cheesecake with ice cream or whipped cream makes it extra special. A scoop of vanilla ice cream complements the flavors perfectly. Or, top it with a dollop of whipped cream for a light touch. You can also get creative with toppings. Consider adding fresh berries, shaved chocolate, or a sprinkle of cinnamon. These additions not only look pretty but also enhance the flavor. To keep your banana caramel nut cheesecake fresh, use the right storage method. Place leftover cheesecake in an airtight container. If you don't have one, wrap it tightly in plastic wrap. This helps prevent it from drying out. Store it in the refrigerator for up to five days. If you want to keep it longer, freezing is a great option. Slice the cheesecake and wrap each piece in plastic wrap. Then, place them in a freezer-safe bag. This way, you can grab a slice any time you crave it. When frozen, the cheesecake can last for about three months. When you're ready to enjoy your cheesecake again, reheating properly is key. For best results, let it sit at room temperature for about 30 minutes. This helps to restore its creamy texture. If you prefer it warm, you can use the oven. Preheat it to 300°F. Place the cheesecake in a baking dish and add a little water to the bottom. Heat for about 10 to 15 minutes. This gentle method keeps the cheesecake soft. Serving after refrigeration or freezing is simple. Just add a drizzle of caramel sauce and some fresh banana slices on top. This way, it looks and tastes fresh. Enjoy your delicious cheesecake anytime! You can tell when the cheesecake is done by checking the center. It should be set but still slightly jiggly. This means it will firm up as it cools. I often use a toothpick to test the edges. If it comes out clean, your cheesecake is ready! Yes, you can make this cheesecake ahead of time. I recommend preparing it a day before you plan to serve it. This allows all the flavors to blend. Just store it in the fridge covered tightly with plastic wrap. If you need a substitute for cream cheese, you have options. You can use Greek yogurt for a lighter version. Silken tofu blends well and offers a creamy texture. Vegan cream cheese also works if you want a dairy-free choice. The cheesecake lasts about 5 to 7 days in the fridge. Be sure to cover it well to keep it fresh. If you want to keep it longer, consider freezing it. It can last up to 2 months in the freezer. You can find the full recipe for this banana caramel nut cheesecake at the end of the article. It includes all the detailed steps and ingredients needed to make this treat. Making a delicious cheesecake is easy with the right steps. We covered the key ingredients, from the crust to the topping. Each part plays an important role in flavor and texture. Follow the tips to perfect your cheesecake and even make variations to suit your taste. Don’t forget the best ways to store leftovers for future enjoyment. Now, it’s time to make your cheesecake masterpiece. You have all the tools needed to impress with this tasty treat. Enjoy every bite!

Banana Caramel Nut Cheesecake Delightful and Creamy

If you love creamy desserts, you’re in for a treat! This Banana Caramel Nut Cheesecake is rich, sweet, and packed

Older posts
Newer posts
← Previous Page1 … Page52 Page53 Page54 … Page67 Next →

dsad

© 2025 recipesstation • Built with GeneratePress

Our Policies

  • Copyright Policy
  • Cookie Policy
  • GDPR Policy
  • Privacy Policy
  • Disclaimer
  • Terms Of Use

More Information

  • Home
  • About
  • Contact
  • Appetizers
  • Dessert
  • Dinner
  • Drinks
©2025, recipesstation About Back To Top